Datasheet
Page 1
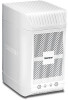
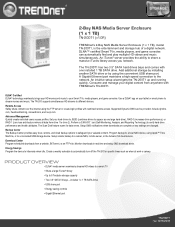
...easy local, remote, and cloud backup options to different devices. 2-Bay NAS Media Server Enclosure (1 x 1 TB) TN-200T1 (v1.0R) TRENDnet's 2-Bay NAS Media Server Enclosure (1 x 1 TB), model TN-200T1, is the entertainment and storage hub of a digital network. DLNA™ certified Smart TVs, media players, and game.... Add additional storage by installing another SATA drive or by using the FTP server or create login profiles with TRENDnet's TN-200T1. An intuitive setup wizard gets the TN-200T1 up and running quickly. Use a DLNA® app on your hard drives to JBOD (combines drives to ...
...easy local, remote, and cloud backup options to different devices. 2-Bay NAS Media Server Enclosure (1 x 1 TB) TN-200T1 (v1.0R) TRENDnet's 2-Bay NAS Media Server Enclosure (1 x 1 TB), model TN-200T1, is the entertainment and storage hub of a digital network. DLNA™ certified Smart TVs, media players, and game.... Add additional storage by installing another SATA drive or by using the FTP server or create login profiles with TRENDnet's TN-200T1. An intuitive setup wizard gets the TN-200T1 up and running quickly. Use a DLNA® app on your hard drives to JBOD (combines drives to ...

Datasheet
Page 5
...recent product information please visit http://www.trendnet.com Copyright ©TRENDnet.All Rights Reserved. Information provided in this document pertain to change at any time, without notice. 2-Bay NAS Media Server Enclosure (1 x 1 TB) TN-200T1 (v1.0R) NETWORKING SOLUTIONS PACKAGE CONTENTS TN-200T1 Multi-Language Quick Installation Guide CD-ROM ...CONTACT INFORMATION 20675 Manhattan Place,Torrance, CA 90501 USA Tel: 1-310-961-5500 Fax: 1-310-961-5511 Web: www.trendnet.com Email: sales@trendnet.com 1-888-326-6061 TRENDnet is subject to TRENDnet products and is a registered trademark.
...recent product information please visit http://www.trendnet.com Copyright ©TRENDnet.All Rights Reserved. Information provided in this document pertain to change at any time, without notice. 2-Bay NAS Media Server Enclosure (1 x 1 TB) TN-200T1 (v1.0R) NETWORKING SOLUTIONS PACKAGE CONTENTS TN-200T1 Multi-Language Quick Installation Guide CD-ROM ...CONTACT INFORMATION 20675 Manhattan Place,Torrance, CA 90501 USA Tel: 1-310-961-5500 Fax: 1-310-961-5511 Web: www.trendnet.com Email: sales@trendnet.com 1-888-326-6061 TRENDnet is subject to TRENDnet products and is a registered trademark.

Quick Installation Guide
Page 10
TN-200/TN-200T1 Technical Support If you have any questions regarding the product installation, please contact our Technical Support. USA Copyright © 2013. All Rights Reserved. Go to register your product online. TRENDnet. Toll free US/Canada: 1-866-845-3673 http://www.trendnet.com/support/ Product Warranty Registration Please take a moment to TRENDnet's website at: http://www.trendnet.com/register TRENDnet 20675 Manhattan Place, Torrance, CA 90501. TN-200/TN-200T1 (V1) / 04.24.2013
TN-200/TN-200T1 Technical Support If you have any questions regarding the product installation, please contact our Technical Support. USA Copyright © 2013. All Rights Reserved. Go to register your product online. TRENDnet. Toll free US/Canada: 1-866-845-3673 http://www.trendnet.com/support/ Product Warranty Registration Please take a moment to TRENDnet's website at: http://www.trendnet.com/register TRENDnet 20675 Manhattan Place, Torrance, CA 90501. TN-200/TN-200T1 (V1) / 04.24.2013

User's Guide
Page 4
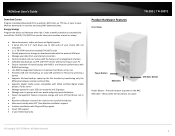
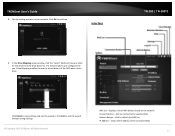
... or reseller/distributor from which the product was purchased. © Copyright 2013 TRENDnet. TN‐200 / TN‐200T1 Features TRENDnet's 2‐Bay NAS Media Server Enclosure, model TN‐200 / TN‐200T1, is the entertainment and storage hub of up and running quickly. A Gigabit ... The Backup Center provides easy local, remote, and cloud backup options to different devices. TRENDnet User's Guide Product Overview TN‐200 / TN‐200T1 Package Contents TN‐200 ‐ TN‐200 ‐ Multi‐Language Quick Installation Guide ‐ CD‐ROM (User...
... or reseller/distributor from which the product was purchased. © Copyright 2013 TRENDnet. TN‐200 / TN‐200T1 Features TRENDnet's 2‐Bay NAS Media Server Enclosure, model TN‐200 / TN‐200T1, is the entertainment and storage hub of up and running quickly. A Gigabit ... The Backup Center provides easy local, remote, and cloud backup options to different devices. TRENDnet User's Guide Product Overview TN‐200 / TN‐200T1 Package Contents TN‐200 ‐ TN‐200 ‐ Multi‐Language Quick Installation Guide ‐ CD‐ROM (User...
User's Guide
Page 5
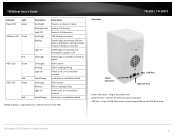
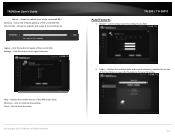
...;200 / TN‐200T1 Power Button HDD LEDs USB Sync Button Power Button - All Rights Reserved. 3 Energy Savings Program the device to peer. Blinks when the hard drives are active © Copyright 2013 TRENDnet. TRENDnet User's Guide Download Center Program scheduled downloads from ...any Internet connection Control content and user access with user quota and group quota limitations Power management feature conserves energy and turns off the TN‐200 / TN‐200T1 for ...
...;200 / TN‐200T1 Power Button HDD LEDs USB Sync Button Power Button - All Rights Reserved. 3 Energy Savings Program the device to peer. Blinks when the hard drives are active © Copyright 2013 TRENDnet. TRENDnet User's Guide Download Center Program scheduled downloads from ...any Internet connection Control content and user access with user quota and group quota limitations Power management feature conserves energy and turns off the TN‐200 / TN‐200T1 for ...
User's Guide
Page 6
.... All Rights Reserved. 4 copy data from a USB Flash drive to import/export files on , device is ready. Rear View TN‐200 / TN‐200T1 Power Connector USB Port Ethernet Port Power Connector - Connect the Ethernet cable to mount HDD is active HDD is reading/writing Power is... off, or no hard drive inserted Hard drive is installed but failed USB Sync Button - TRENDnet User's Guide Indicator Power LED ...
.... All Rights Reserved. 4 copy data from a USB Flash drive to import/export files on , device is ready. Rear View TN‐200 / TN‐200T1 Power Connector USB Port Ethernet Port Power Connector - Connect the Ethernet cable to mount HDD is active HDD is reading/writing Power is... off, or no hard drive inserted Hard drive is installed but failed USB Sync Button - TRENDnet User's Guide Indicator Power LED ...

User's Guide
Page 7
TRENDnet User's Guide Application Diagram TN‐200 / TN‐200T1 Installing Hard Drive(s) 1. All Rights Reserved. 5 Insert SATA hard drive(s) and make sure the hard drive is firmly placed into the SATA slots. © Copyright 2013 TRENDnet. Slide and hold the lock and push the top cover towards the back to open the top cover. 2.
TRENDnet User's Guide Application Diagram TN‐200 / TN‐200T1 Installing Hard Drive(s) 1. All Rights Reserved. 5 Insert SATA hard drive(s) and make sure the hard drive is firmly placed into the SATA slots. © Copyright 2013 TRENDnet. Slide and hold the lock and push the top cover towards the back to open the top cover. 2.

User's Guide
Page 8
Click Next to continue. 2. Select your preferred language from the drop‐down list 4. All Rights Reserved. 6 Click Next to store the files and proceed © Copyright 2013 TRENDnet. TRENDnet User's Guide Install NAS Setup Utility 1. Insert the CD‐ROM and click Install NAS Setup. TN‐200 / TN‐200T1 3. The NAS Setup Wizard window will now appear.
Click Next to continue. 2. Select your preferred language from the drop‐down list 4. All Rights Reserved. 6 Click Next to store the files and proceed © Copyright 2013 TRENDnet. TRENDnet User's Guide Install NAS Setup Utility 1. Insert the CD‐ROM and click Install NAS Setup. TN‐200 / TN‐200T1 3. The NAS Setup Wizard window will now appear.

User's Guide
Page 9
All Rights Reserved. 7 Click Install to complete the installation. The NAS Setup icon will now appear on your Desktop. © Copyright 2013 TRENDnet. Click Finish to install the utility 7. Select the Start Menu folder location. 6. TN‐200 / TN‐200T1 8. TRENDnet User's Guide 5.
All Rights Reserved. 7 Click Install to complete the installation. The NAS Setup icon will now appear on your Desktop. © Copyright 2013 TRENDnet. Click Finish to install the utility 7. Select the Start Menu folder location. 6. TN‐200 / TN‐200T1 8. TRENDnet User's Guide 5.

User's Guide
Page 10
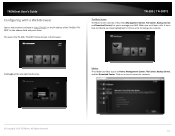
... as and space keys are not valid. © Copyright 2013 TRENDnet. The login screen will appear on the screen. 2. For first‐time setup, it's recommended that you to detect the TRENDnet TN‐200 / TN‐200T1. Password length must be 8‐16 characters; Once the NAS ...is admin / admin. TN‐200 / TN‐200T1 Configuring with the NAS Setup Utility 1. The default User Name and Password...
... as and space keys are not valid. © Copyright 2013 TRENDnet. The login screen will appear on the screen. 2. For first‐time setup, it's recommended that you to detect the TRENDnet TN‐200 / TN‐200T1. Password length must be 8‐16 characters; Once the NAS ...is admin / admin. TN‐200 / TN‐200T1 Configuring with the NAS Setup Utility 1. The default User Name and Password...

User's Guide
Page 11
...a Time Zone from the drop‐down list. Enter the IP Address, Subnet Mask, Gateway IP, DNS 1 and DNS 2. TN‐200 / TN‐200T1 5. Select either a DHCP or a Static Network. Click Next to the next step. All Rights Reserved. 9 With Static IP, ...you must enter the IP address details. 4. With DHCP, your router automatically generates an IP address for the TN‐200 / TN‐200T1. Click Next to continue. © Copyright 2013 TRENDnet. TRENDnet User's Guide 3. When selecting Static IP, click the radio button. The Wizard automatically generates a Workgroup name...
...a Time Zone from the drop‐down list. Enter the IP Address, Subnet Mask, Gateway IP, DNS 1 and DNS 2. TN‐200 / TN‐200T1 5. Select either a DHCP or a Static Network. Click Next to the next step. All Rights Reserved. 9 With Static IP, ...you must enter the IP address details. 4. With DHCP, your router automatically generates an IP address for the TN‐200 / TN‐200T1. Click Next to continue. © Copyright 2013 TRENDnet. TRENDnet User's Guide 3. When selecting Static IP, click the radio button. The Wizard automatically generates a Workgroup name...

User's Guide
Page 12
... storage but without fault tolerance. Stand‐Alone is used as an example in TN‐200 / TN‐200T1. Once you select Stand‐Alone, a warning message will begin formatting the drives. © Copyright 2013 TRENDnet. The Wizard allows four RAID options, Stand‐Alone, JBOD, RAID 0, and...before placing the hard drive(s) in the user's guide. All Rights Reserved. 10 Two drives are required for this option. TN‐200 / TN‐200T1 Stand‐Alone ‐ Creates two separate volumes from the two hard drives. JBOD RAID ‐ Makes the disks appear...
... storage but without fault tolerance. Stand‐Alone is used as an example in TN‐200 / TN‐200T1. Once you select Stand‐Alone, a warning message will begin formatting the drives. © Copyright 2013 TRENDnet. The Wizard allows four RAID options, Stand‐Alone, JBOD, RAID 0, and...before placing the hard drive(s) in the user's guide. All Rights Reserved. 10 Two drives are required for this option. TN‐200 / TN‐200T1 Stand‐Alone ‐ Creates two separate volumes from the two hard drives. JBOD RAID ‐ Makes the disks appear...
User's Guide
Page 13
Interface TN‐200 / TN‐200T1 9. Drive Mapping enables the user to exit the wizard without saving settings. © Copyright 2013 TRENDnet. NAS List - Click Finish to save settings and exit the wizard or click Exit to access data as if the NAS were a local ...Mapping setup window, click the "select" field and choose a letter for you. click to refresh the NAS List IP Address - All Rights Reserved. TRENDnet User's Guide 8. The formatting process is pre‐configured for the drive from the drop‐down list. shows the IP address of NAS devices...
Interface TN‐200 / TN‐200T1 9. Drive Mapping enables the user to exit the wizard without saving settings. © Copyright 2013 TRENDnet. NAS List - Click Finish to save settings and exit the wizard or click Exit to access data as if the NAS were a local ...Mapping setup window, click the "select" field and choose a letter for you. click to refresh the NAS List IP Address - All Rights Reserved. TRENDnet User's Guide 8. The formatting process is pre‐configured for the drive from the drop‐down list. shows the IP address of NAS devices...
User's Guide
Page 14
TRENDnet User's Guide Subnet - All Rights Reserved. Folder - shows the subnet mask of the current NAS Settings - click...network gateway of the hard drives to logout of the connected NAS Gateway - click to close the utility © Copyright 2013 TRENDnet. click to minimize the window Close - click this button to open the file explorer for easy file access. 12 shows ...usage of the NAS Setup utility Minimize - use the setup wizard to set logout intervals Help - TN‐200 / TN‐200T1 Panel Features 1. displays the current version of the hard drive (s) Logout -
TRENDnet User's Guide Subnet - All Rights Reserved. Folder - shows the subnet mask of the current NAS Settings - click...network gateway of the hard drives to logout of the connected NAS Gateway - click to close the utility © Copyright 2013 TRENDnet. click to minimize the window Close - click this button to open the file explorer for easy file access. 12 shows ...usage of the NAS Setup utility Minimize - use the setup wizard to set logout intervals Help - TN‐200 / TN‐200T1 Panel Features 1. displays the current version of the hard drive (s) Logout -

User's Guide
Page 15
All Rights Reserved. 13 Backup Center (Web browser) ‐ allows users to backup data to download files from URLs, FTP servers, and BitTorrent © Copyright 2013 TRENDnet. Management Center (Web browser)-manage users, hard drives, and system and network information here TN‐200 / TN‐200T1 5. Download Center (Web browser) ‐ allows users to local, remote, or cloud based storage 4. TRENDnet User's Guide 3.
All Rights Reserved. 13 Backup Center (Web browser) ‐ allows users to backup data to download files from URLs, FTP servers, and BitTorrent © Copyright 2013 TRENDnet. Management Center (Web browser)-manage users, hard drives, and system and network information here TN‐200 / TN‐200T1 5. Download Center (Web browser) ‐ allows users to local, remote, or cloud based storage 4. TRENDnet User's Guide 3.
User's Guide
Page 16
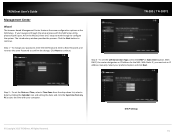
..., and the Download Center. Sidebar The sidebar provides access to manage your NAS. TN‐200 / TN‐200T1 The Main Screen The Main Screen consists of the TN‐200 / TN‐ 200T1 in the browser. TRENDnet User's Guide Configuring with a Web Browser Open a web browser and type in http...://TN‐200 or the IP address of four tiles (Management Center, File Center, Backup Center, and...
..., and the Download Center. Sidebar The sidebar provides access to manage your NAS. TN‐200 / TN‐200T1 The Main Screen The Main Screen consists of the TN‐200 / TN‐ 200T1 in the browser. TRENDnet User's Guide Configuring with a Web Browser Open a web browser and type in http...://TN‐200 or the IP address of four tiles (Management Center, File Center, Backup Center, and...
User's Guide
Page 17
...5 steps to configure the system. With Static IP, you have gone through to work through the setup process with your computer. © Copyright 2013 TRENDnet. Step 2 - select a date by clicking the Calendar icon and setting the date; and click the Sync time from the drop‐down list;...select a Time Zone from my PC to confirm the change your preferred option and click Next. Select your password, enter the Old Password; TN‐200 / TN‐200T1 Step 3 - All Rights Reserved. To change . and re‐enter the same Password to sync the time with the NAS Setup utility...
...5 steps to configure the system. With Static IP, you have gone through to work through the setup process with your computer. © Copyright 2013 TRENDnet. Step 2 - select a date by clicking the Calendar icon and setting the date; and click the Sync time from the drop‐down list;...select a Time Zone from my PC to confirm the change your preferred option and click Next. Select your password, enter the Old Password; TN‐200 / TN‐200T1 Step 3 - All Rights Reserved. To change . and re‐enter the same Password to sync the time with the NAS Setup utility...

User's Guide
Page 18
All Rights Reserved. 16 enter the User Name; Group; TRENDnet User's Guide TN‐200 / TN‐200T1 Step 5 - Wizard setup is divided into 5 sections ‐ User List, Group List, Share List, ISO Mount, and Quota. To Set Device Information, enter a ... modify, and delete a user under this section. Permissions; To delete a user, select the user from the list and click on Delete. © Copyright 2013 TRENDnet. User The User(s) Window is now complete. Click the Finish button. Static Settings Step 4 - and Quota settings. To modify a user, select the user from...
All Rights Reserved. 16 enter the User Name; Group; TRENDnet User's Guide TN‐200 / TN‐200T1 Step 5 - Wizard setup is divided into 5 sections ‐ User List, Group List, Share List, ISO Mount, and Quota. To Set Device Information, enter a ... modify, and delete a user under this section. Permissions; To delete a user, select the user from the list and click on Delete. © Copyright 2013 TRENDnet. User The User(s) Window is now complete. Click the Finish button. Static Settings Step 4 - and Quota settings. To modify a user, select the user from...

User's Guide
Page 19
... Center, and Surveillance Center. From the drop‐down list select the Group you want the account to fall under the Quota section. TRENDnet User's Guide TN‐200 / TN‐200T1 Under Share, select the Volume you want this field will only be managed if the Quota feature is a part of a Group, the...
... Center, and Surveillance Center. From the drop‐down list select the Group you want the account to fall under the Quota section. TRENDnet User's Guide TN‐200 / TN‐200T1 Under Share, select the Volume you want this field will only be managed if the Quota feature is a part of a Group, the...

User's Guide
Page 20
... be managed if the Quota feature is added and saved to the User List. © Copyright 2013 TRENDnet. Click Save to . Creating a Group List is similar to an aggregation. TN‐200 / TN‐200T1 Group List Groups are used to add one or more users to a User List. Enter a Group ...Name in the field provided. TRENDnet User's Guide Click the OK button when finished. All Rights Reserved. Group quotas...
... be managed if the Quota feature is added and saved to the User List. © Copyright 2013 TRENDnet. Click Save to . Creating a Group List is similar to an aggregation. TN‐200 / TN‐200T1 Group List Groups are used to add one or more users to a User List. Enter a Group ...Name in the field provided. TRENDnet User's Guide Click the OK button when finished. All Rights Reserved. Group quotas...

