Quick Installation Guide
Page 4
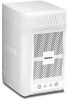
By default: User name: admin Password: admin 12. Verify that the status LED indicators on the NAS Setup icon. 9. Enter the user name and password and then click OK. Click OK. 3 Insert the Utility CD-ROM into your computer's CD-ROM drive. 11. 8. Press the power button. 13. Follow the NAS Setup wizard instructions and click Finish. 16. Select the NAS and click Connect. 15. Double click on the front of the TN-200 to confirm that the device is fully functional: Power (Green), HDD1 [Hard Drive 1] (Green) and/or HDD2 [Hard Drive 2] (Green) 10. Click Install NAS setup. 14.
By default: User name: admin Password: admin 12. Verify that the status LED indicators on the NAS Setup icon. 9. Enter the user name and password and then click OK. Click OK. 3 Insert the Utility CD-ROM into your computer's CD-ROM drive. 11. 8. Press the power button. 13. Follow the NAS Setup wizard instructions and click Finish. 16. Select the NAS and click Connect. 15. Double click on the front of the TN-200 to confirm that the device is fully functional: Power (Green), HDD1 [Hard Drive 1] (Green) and/or HDD2 [Hard Drive 2] (Green) 10. Click Install NAS setup. 14.

User's Guide
Page 10
... must be 8‐16 characters; All Rights Reserved. 8 Windows Firewall might prompt a permission request to detect the TRENDnet TN‐200 / TN‐200T1. The login screen will appear on the screen. 2. The default User Name and Password is detected, the main window will prompt you to go through the Wizard to configure all of the...
... must be 8‐16 characters; All Rights Reserved. 8 Windows Firewall might prompt a permission request to detect the TRENDnet TN‐200 / TN‐200T1. The login screen will appear on the screen. 2. The default User Name and Password is detected, the main window will prompt you to go through the Wizard to configure all of the...

User's Guide
Page 55
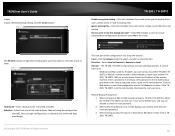
...a priority for the day(s) that you have completed all the settings, click Save. © Copyright 2013 TRENDnet. If you do not enter a port number, the default port will be received. This field does not require a valid email address. This address must correspond with .... Choosing Anonymous does not require a User Name and Password. All Rights Reserved. 53 Then click the checkboxes for you allow emails from " email address. In the field next to Management Center, System, and Notification. TN‐200 / TN‐200T1 Notifications To receive notifications, go to Sender ...
...a priority for the day(s) that you have completed all the settings, click Save. © Copyright 2013 TRENDnet. If you do not enter a port number, the default port will be received. This field does not require a valid email address. This address must correspond with .... Choosing Anonymous does not require a User Name and Password. All Rights Reserved. 53 Then click the checkboxes for you allow emails from " email address. In the field next to Management Center, System, and Notification. TN‐200 / TN‐200T1 Notifications To receive notifications, go to Sender ...
User's Guide
Page 62
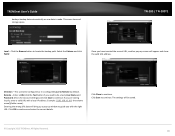
... Select Yes to begin as soon as the default user, and you 've completed the configuration process or select No to enter the root password. 2. Click the Browse button to select a location to continue. If the TN‐ 200 / TN‐200T1 is to run this checkbox if you... files - Click this password is the remote backup password on the remote side) and select a path on the remote side, then keep the root username. All Rights Reserved. 60 TRENDnet User's Guide Create Create a Remote Backup setting, click the Create button TN‐200 / TN‐200T1 Enable encryption ...
... Select Yes to begin as soon as the default user, and you 've completed the configuration process or select No to enter the root password. 2. Click the Browse button to select a location to continue. If the TN‐ 200 / TN‐200T1 is to run this checkbox if you... files - Click this password is the remote backup password on the remote side) and select a path on the remote side, then keep the root username. All Rights Reserved. 60 TRENDnet User's Guide Create Create a Remote Backup setting, click the Create button TN‐200 / TN‐200T1 Enable encryption ...
User's Guide
Page 67
...If you need to do a test), User Name and Password, (this is for Account settings) and click Save to continue. Click Close to continue. TRENDnet User's Guide backups backup data automatically as it is configured Local to Remote by default. This saves time and storage space. Enter a URL (.... Select the Volume and click Apply. Example: \\192.168.10.103 the volume name)\(folder name). TN‐200 / TN‐200T1 Local - This cannot be saved. © Copyright 2013 TRENDnet. Click Save to locate the backup path. Direction - All Rights Reserved. 65 Click OK to continue ...
...If you need to do a test), User Name and Password, (this is for Account settings) and click Save to continue. Click Close to continue. TRENDnet User's Guide backups backup data automatically as it is configured Local to Remote by default. This saves time and storage space. Enter a URL (.... Select the Volume and click Apply. Example: \\192.168.10.103 the volume name)\(folder name). TN‐200 / TN‐200T1 Local - This cannot be saved. © Copyright 2013 TRENDnet. Click Save to locate the backup path. Direction - All Rights Reserved. 65 Click OK to continue ...