Quick Installation Guide
Page 4
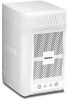
Select the NAS and click Connect. 15. Click Install NAS setup. 14. By default: User name: admin Password: admin 12. Follow the NAS Setup wizard instructions and click Finish. 16. Double click on the front of the TN-200 to confirm that the device is fully functional: Power (Green), HDD1 [Hard Drive 1] (Green) and/or HDD2 [Hard Drive 2] (Green) 10. Click OK. 3 Insert the Utility CD-ROM into your computer's CD-ROM drive. 11. Enter the user name and password and then click OK. Verify that the status LED indicators on the NAS Setup icon. 9. 8. Press the power button. 13.
Select the NAS and click Connect. 15. Click Install NAS setup. 14. By default: User name: admin Password: admin 12. Follow the NAS Setup wizard instructions and click Finish. 16. Double click on the front of the TN-200 to confirm that the device is fully functional: Power (Green), HDD1 [Hard Drive 1] (Green) and/or HDD2 [Hard Drive 2] (Green) 10. Click OK. 3 Insert the Utility CD-ROM into your computer's CD-ROM drive. 11. Enter the user name and password and then click OK. Verify that the status LED indicators on the NAS Setup icon. 9. 8. Press the power button. 13.
Quick Installation Guide
Page 5
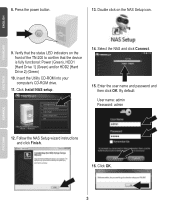
Select the desired drive letter for the hard drive. 18. Select the desired option and click Next. 23. Click OK. 4 Enter the network (computer) user name and password. 20. Follow the setup wizard instructions. 19. Click OK. 21. Click OK. 24. Insert your old password, enter a new password, confirm your new password and then click Next. 22. 17.
Select the desired drive letter for the hard drive. 18. Select the desired option and click Next. 23. Click OK. 4 Enter the network (computer) user name and password. 20. Follow the setup wizard instructions. 19. Click OK. 21. Click OK. 24. Insert your old password, enter a new password, confirm your new password and then click Next. 22. 17.

User's Guide
Page 10
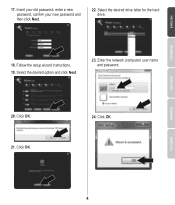
... 2. Update the password when prompted. Click the Remember Me checkbox for the TN‐200 / TN‐200T1. Password length must be 8‐16 characters; TN‐200 / TN‐200T1 Configuring with the NAS Setup Utility 1. The default User Name and Password is detected, the... 2013 TRENDnet. For first‐time setup, it's recommended that you to remember your details. All Rights Reserved. 8 TRENDnet User's Guide 9. Click Refresh to access the NAS Setup utility. Windows Firewall might prompt a permission request to detect the TRENDnet TN‐200 / TN‐...
... 2. Update the password when prompted. Click the Remember Me checkbox for the TN‐200 / TN‐200T1. Password length must be 8‐16 characters; TN‐200 / TN‐200T1 Configuring with the NAS Setup Utility 1. The default User Name and Password is detected, the... 2013 TRENDnet. For first‐time setup, it's recommended that you to remember your details. All Rights Reserved. 8 TRENDnet User's Guide 9. Click Refresh to access the NAS Setup utility. Windows Firewall might prompt a permission request to detect the TRENDnet TN‐200 / TN‐...
User's Guide
Page 17
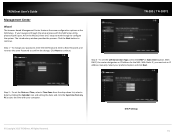
...with the NAS Setup utility, please skip this part. With Static IP, you have gone through to configure the system. Select your password, enter the Old Password; With DHCP, the router designates an IP Address for the Wizard, there are 5 steps to work through the setup process with ... time from the drop‐down list; As for the NAS. Step 1 - TRENDnet User's Guide Management Center Wizard The browser‐based Management Center features the same configuration options as the NAS Setup. TN‐200 / TN‐200T1 Step 3 - If you must set an IP Address manually. DHCP Settings...
...with the NAS Setup utility, please skip this part. With Static IP, you have gone through to configure the system. Select your password, enter the Old Password; With DHCP, the router designates an IP Address for the Wizard, there are 5 steps to work through the setup process with ... time from the drop‐down list; As for the NAS. Step 1 - TRENDnet User's Guide Management Center Wizard The browser‐based Management Center features the same configuration options as the NAS Setup. TN‐200 / TN‐200T1 Step 3 - If you must set an IP Address manually. DHCP Settings...

User's Guide
Page 18
... The User(s) Window is now complete. and Quota settings. and a Description. Click the Finish button. Static Settings Step 4 - To create a user, click Create; TRENDnet User's Guide TN‐200 / TN‐200T1 Step 5 - User List You can create, modify, and delete a user under this section. Click Next to continue. To modify a user, select the.... Permissions; Wizard setup is divided into 5 sections ‐ User List, Group List, Share List, ISO Mount, and Quota. To Set Device Information, enter a Workgroup name; Password; Confirm Password; All Rights Reserved. 16
... The User(s) Window is now complete. and Quota settings. and a Description. Click the Finish button. Static Settings Step 4 - To create a user, click Create; TRENDnet User's Guide TN‐200 / TN‐200T1 Step 5 - User List You can create, modify, and delete a user under this section. Click Next to continue. To modify a user, select the.... Permissions; Wizard setup is divided into 5 sections ‐ User List, Group List, Share List, ISO Mount, and Quota. To Set Device Information, enter a Workgroup name; Password; Confirm Password; All Rights Reserved. 16
User's Guide
Page 28
... a port forwarding rule on the router. Once you have entered all the details correctly, tap the folder that you wish to exit. © Copyright 2013 TRENDnet. TN‐200 / TN‐200T1 Deleting a Share To delete a Share, select the Volume and click the Delete button. Click Ok to confirm, click Cancel to access. the... IP is : http://routerip:publicport/webdav/SHARE_NAME/ (For example, http://172.18.73.45:801/webdav/Volume_1) Enter a User Name - All Rights Reserved. 26 Enter a Password - TRENDnet User's Guide Enter NAS name - TN‐200 / TN‐200T1 (in the example).
... a port forwarding rule on the router. Once you have entered all the details correctly, tap the folder that you wish to exit. © Copyright 2013 TRENDnet. TN‐200 / TN‐200T1 Deleting a Share To delete a Share, select the Volume and click the Delete button. Click Ok to confirm, click Cancel to access. the... IP is : http://routerip:publicport/webdav/SHARE_NAME/ (For example, http://172.18.73.45:801/webdav/Volume_1) Enter a User Name - All Rights Reserved. 26 Enter a Password - TRENDnet User's Guide Enter NAS name - TN‐200 / TN‐200T1 (in the example).

User's Guide
Page 51
...Password, and Confirmed Password for your records. All of these features handle the main operational functions of the language drop‐down menu and click Save to access your DDNS Service Provider and click Save. The NAS communicates with the DDNS Service Provider to accept the changes. © Copyright 2013 TRENDnet.... Language/Time Select a language from one of the NAS. All Rights Reserved. 49 TN‐200 / TN‐200T1 System System contains six main feature sets: Language/Time, Device...
...Password, and Confirmed Password for your records. All of these features handle the main operational functions of the language drop‐down menu and click Save to access your DDNS Service Provider and click Save. The NAS communicates with the DDNS Service Provider to accept the changes. © Copyright 2013 TRENDnet.... Language/Time Select a language from one of the NAS. All Rights Reserved. 49 TN‐200 / TN‐200T1 System System contains six main feature sets: Language/Time, Device...

User's Guide
Page 55
...SMTP Authentication if this service is filtering spam, make sure you . Select a Port number. Choosing Anonymous does not require a User Name and Password. To Test the email service, click the Test Email button. Then click the checkboxes for you allow emails from " email address. This ...;200 / TN‐200T1 Notifications To receive notifications, go to . If you have decided to use the drop‐down time menus to set the time. All Rights Reserved. 53 TRENDnet User's Guide Power On/Off Scheduling Click the checkbox to Enable this field, please contact your ...
...SMTP Authentication if this service is filtering spam, make sure you . Select a Port number. Choosing Anonymous does not require a User Name and Password. To Test the email service, click the Test Email button. Then click the checkboxes for you allow emails from " email address. This ...;200 / TN‐200T1 Notifications To receive notifications, go to . If you have decided to use the drop‐down time menus to set the time. All Rights Reserved. 53 TRENDnet User's Guide Power On/Off Scheduling Click the checkbox to Enable this field, please contact your ...
User's Guide
Page 56
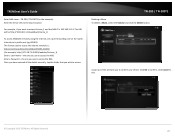
...SysLog service. Within the logs menu, you want to another TN‐200 / TN‐200T1 or SysLog Server. © Copyright 2013 TRENDnet. Once you have selected the options you can setup the TN‐200 / TN‐200T1 to receive Log Events from Power Failure. Syslog ...200 / TN‐200T1 Click the Enable checkbox to continue. Enter a Syslog Server IP address in the field provided and click Save. To back up the Log File, click the Backup button. TRENDnet User's Guide Under Event Settings, there are nine options to enable one of these settings: The Administrator password...
...SysLog service. Within the logs menu, you want to another TN‐200 / TN‐200T1 or SysLog Server. © Copyright 2013 TRENDnet. Once you have selected the options you can setup the TN‐200 / TN‐200T1 to receive Log Events from Power Failure. Syslog ...200 / TN‐200T1 Click the Enable checkbox to continue. Enter a Syslog Server IP address in the field provided and click Save. To back up the Log File, click the Backup button. TRENDnet User's Guide Under Event Settings, there are nine options to enable one of these settings: The Administrator password...

User's Guide
Page 61
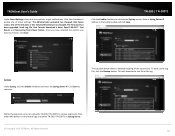
Click this button to enable Remote Backup Create - All Rights Reserved. 59 Click this button to create a new Remote Backup configuration Modify - Click this button to modify a current Remote Backup configuration Delete - TRENDnet User's Guide Remote Backup Backup data to another NAS TN‐200 / TN‐200T1 Click the checkbox next to activate The configuration will be saved. © Copyright 2013 TRENDnet. Click this button to delete a Remote Backup Enable Click the Enable button to Enable the remote backup service and then enter a service password. Enable -
Click this button to enable Remote Backup Create - All Rights Reserved. 59 Click this button to create a new Remote Backup configuration Modify - Click this button to modify a current Remote Backup configuration Delete - TRENDnet User's Guide Remote Backup Backup data to another NAS TN‐200 / TN‐200T1 Click the checkbox next to activate The configuration will be saved. © Copyright 2013 TRENDnet. Click this button to delete a Remote Backup Enable Click the Enable button to Enable the remote backup service and then enter a service password. Enable -
User's Guide
Page 62
..., the source or destination NAS doesn't have to setup the location. Select from the backup Do you want to run this password is to be a TN‐ 200 / TN‐200T1. © Copyright 2013 TRENDnet. Click this checkbox if you can back up to Windows and Mac systems. However, you wish to see if the...
..., the source or destination NAS doesn't have to setup the location. Select from the backup Do you want to run this password is to be a TN‐ 200 / TN‐200T1. © Copyright 2013 TRENDnet. Click this checkbox if you can back up to Windows and Mac systems. However, you wish to see if the...
User's Guide
Page 67
... a local IP address. This cannot be saved. © Copyright 2013 TRENDnet. Click OK to Remote by default. All Rights Reserved. 65 Once you are storing locally, enter a valid URL with the right URL. TN‐200 / TN‐200T1 Local - Select the Volume and click Apply. Remote - Direction...up window to guide you need to do a test), User Name and Password, (this is for Account settings) and click Save to continue. This saves time and storage space. Click Close to continue. TRENDnet User's Guide backups backup data automatically as it is made. Example: \\192...
... a local IP address. This cannot be saved. © Copyright 2013 TRENDnet. Click OK to Remote by default. All Rights Reserved. 65 Once you are storing locally, enter a valid URL with the right URL. TN‐200 / TN‐200T1 Local - Select the Volume and click Apply. Remote - Direction...up window to guide you need to do a test), User Name and Password, (this is for Account settings) and click Save to continue. This saves time and storage space. Click Close to continue. TRENDnet User's Guide backups backup data automatically as it is made. Example: \\192...

User's Guide
Page 68
..., and Time settings. The settings will be saved. This returns you can change to Account settings, you to Account. All Rights Reserved. 66 TRENDnet User's Guide TN‐200 / TN‐200T1 The successful configuration is now saved in the Local Backup table. Click Save to continue. In this second example, we are going...
..., and Time settings. The settings will be saved. This returns you can change to Account settings, you to Account. All Rights Reserved. 66 TRENDnet User's Guide TN‐200 / TN‐200T1 The successful configuration is now saved in the Local Backup table. Click Save to continue. In this second example, we are going...
User's Guide
Page 76
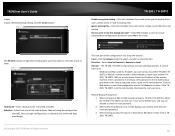
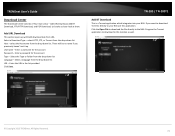
...up Username - select HTTP, FTP, or Torrent from the drop‐down list. Enter the URL in the list provided Click Save. TRENDnet User's Guide Download Center The Download Center consists of four main areas - Add URL Download, Add BT Download, FTP/HTTP Download, and ...Password - Let's take a closer look at them. All Rights Reserved. 74 Select a Download Type - There will be no name if you want to download Torrents directly to your NAS. Select the Type or Folder from the drop‐down list Language - Select a language from the drop‐down list URL - TN‐200 / TN...
...up Username - select HTTP, FTP, or Torrent from the drop‐down list. Enter the URL in the list provided Click Save. TRENDnet User's Guide Download Center The Download Center consists of four main areas - Add URL Download, Add BT Download, FTP/HTTP Download, and ...Password - Let's take a closer look at them. All Rights Reserved. 74 Select a Download Type - There will be no name if you want to download Torrents directly to your NAS. Select the Type or Folder from the drop‐down list Language - Select a language from the drop‐down list URL - TN‐200 / TN...

User's Guide
Page 78
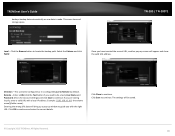
enter the FTP hostname Login Method - Re‐enter the Password Click Save. select between Account and Anonymous Username - TN‐200 / TN‐200T1 Host name - The file is saved The Host appears in the table. © Copyright 2013 TRENDnet. If you are using Account, enter a User Name Password - All Rights Reserved. 76 TRENDnet User's Guide Under FTP, click Add. These are using Account, enter a Password Confirm Password - If you are the FTP settings.
enter the FTP hostname Login Method - Re‐enter the Password Click Save. select between Account and Anonymous Username - TN‐200 / TN‐200T1 Host name - The file is saved The Host appears in the table. © Copyright 2013 TRENDnet. If you are using Account, enter a User Name Password - All Rights Reserved. 76 TRENDnet User's Guide Under FTP, click Add. These are using Account, enter a Password Confirm Password - If you are the FTP settings.
User's Guide
Page 81
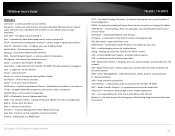
... URL - TRENDnet User's Guide Glossary Username - a name you are located in Sync - a value you enter that the network can recognize User - automatically have data copied over as soon as your identity Password - Dynamic Host Configuration Protocol - used to a RAIDED disk TN‐200 / TN‐200T1 LLTD... - the name of practice: make a storage space RAID 0 - a description for a file that is a unique address for the TN‐200 / TN‐200T1 that you can easily remember (best of the network you can automatically forward a port on a client computer to see the ...
... URL - TRENDnet User's Guide Glossary Username - a name you are located in Sync - a value you enter that the network can recognize User - automatically have data copied over as soon as your identity Password - Dynamic Host Configuration Protocol - used to a RAIDED disk TN‐200 / TN‐200T1 LLTD... - the name of practice: make a storage space RAID 0 - a description for a file that is a unique address for the TN‐200 / TN‐200T1 that you can easily remember (best of the network you can automatically forward a port on a client computer to see the ...