
Quick Installation Guide
Page 2
... position. 1 Hardware Installation 1. flash drive, external hard drive) Note: Hard Drive and USB Storage Device are not included (TN-200). Before You Start Package Contents TN-200 Multi-Language Quick Installation Guide CD-ROM (User's Guide and Utility) Network cable (1m / 3.28 ft.) Power adapter (12V...with an available network LAN port SATA I/II Hard Drive or USB 2.0 Storage Device (i.e. Note: USB Storage Device is not included (TN-200T1). NAS Setup Management Utility Supported Operating Systems Windows 8 (32/64-bit) / 7 (32/64-bit) Windows Vista (32/64-bit) Windows XP...
... position. 1 Hardware Installation 1. flash drive, external hard drive) Note: Hard Drive and USB Storage Device are not included (TN-200). Before You Start Package Contents TN-200 Multi-Language Quick Installation Guide CD-ROM (User's Guide and Utility) Network cable (1m / 3.28 ft.) Power adapter (12V...with an available network LAN port SATA I/II Hard Drive or USB 2.0 Storage Device (i.e. Note: USB Storage Device is not included (TN-200T1). NAS Setup Management Utility Supported Operating Systems Windows 8 (32/64-bit) / 7 (32/64-bit) Windows Vista (32/64-bit) Windows XP...
Quick Installation Guide
Page 4
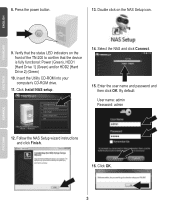
Press the power button. 13. Verify that the status LED indicators on the NAS Setup icon. 9. Select the NAS and click Connect. 15. By default: User name: admin Password: admin 12. Insert the Utility CD-ROM into your computer's CD-ROM drive. 11. Click Install NAS setup. 14. Follow the NAS Setup wizard instructions and click Finish. 16. Double click on the front of the TN-200 to confirm that the device is fully functional: Power (Green), HDD1 [Hard Drive 1] (Green) and/or HDD2 [Hard Drive 2] (Green) 10. Enter the user name and password and then click OK. Click OK. 3 8.
Press the power button. 13. Verify that the status LED indicators on the NAS Setup icon. 9. Select the NAS and click Connect. 15. By default: User name: admin Password: admin 12. Insert the Utility CD-ROM into your computer's CD-ROM drive. 11. Click Install NAS setup. 14. Follow the NAS Setup wizard instructions and click Finish. 16. Double click on the front of the TN-200 to confirm that the device is fully functional: Power (Green), HDD1 [Hard Drive 1] (Green) and/or HDD2 [Hard Drive 2] (Green) 10. Enter the user name and password and then click OK. Click OK. 3 8.

Quick Installation Guide
Page 6
If you don't see the computer icon, click on the Windows Explorer icon on the Computer/My Computer icon to access and save files to the TN-200. Click Finish. 26. Click on your taskbar. 27. NAS Media Server Enclosure installation is now complete. 5 See User's Guide for information concerning advanced user management functions. 25.
If you don't see the computer icon, click on the Windows Explorer icon on the Computer/My Computer icon to access and save files to the TN-200. Click Finish. 26. Click on your taskbar. 27. NAS Media Server Enclosure installation is now complete. 5 See User's Guide for information concerning advanced user management functions. 25.

User's Guide
Page 2
TRENDnet User's Guide Contents Product Overview 2 Package Contents ...2 Features ...2 Product Hardware Features 3 Application Diagram ...5 Installing Hard Drive(s 5 Install NAS Setup Utility 6 Configuring with the NAS Setup Utility 8 Interface ...11 Panel Features ...12 Configuring with a Web Browser 14 Management Center...15 Wizard ...15 User ...16 User List ...16 Group List...18 ...
TRENDnet User's Guide Contents Product Overview 2 Package Contents ...2 Features ...2 Product Hardware Features 3 Application Diagram ...5 Installing Hard Drive(s 5 Install NAS Setup Utility 6 Configuring with the NAS Setup Utility 8 Interface ...11 Panel Features ...12 Configuring with a Web Browser 14 Management Center...15 Wizard ...15 User ...16 User List ...16 Group List...18 ...

User's Guide
Page 4
... support simultaneous HD streams to a connected USB storage device. Program backup to a local NAS device, using the FTP server or create login profiles with TRENDnet's TN‐200 / TN‐200T1. TRENDnet User's Guide Product Overview TN‐200 / TN‐200T1 Package Contents TN‐200 ‐ TN‐200 ‐ Multi‐Language Quick Installation Guide ‐ CD‐ROM (User...
... support simultaneous HD streams to a connected USB storage device. Program backup to a local NAS device, using the FTP server or create login profiles with TRENDnet's TN‐200 / TN‐200T1. TRENDnet User's Guide Product Overview TN‐200 / TN‐200T1 Package Contents TN‐200 ‐ TN‐200 ‐ Multi‐Language Quick Installation Guide ‐ CD‐ROM (User...
User's Guide
Page 5
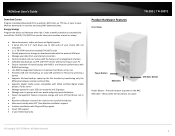
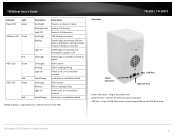
Blinks when the hard drives are active © Copyright 2013 TRENDnet. Create a weekly schedule to automatically turn off the TN‐200 / TN‐200T1 for specific times such as one Provides USB one‐click ...with Plug and Play support Smart FAN support 2‐year limited warranty Product Hardware Features Front View TN‐200 / TN‐200T1 Power Button HDD LEDs USB Sync Button Power Button - Press this button to power on your data from... downloads in use Receive notification via FTP and HTTP servers without turning on the NAS.
Blinks when the hard drives are active © Copyright 2013 TRENDnet. Create a weekly schedule to automatically turn off the TN‐200 / TN‐200T1 for specific times such as one Provides USB one‐click ...with Plug and Play support Smart FAN support 2‐year limited warranty Product Hardware Features Front View TN‐200 / TN‐200T1 Power Button HDD LEDs USB Sync Button Power Button - Press this button to power on your data from... downloads in use Receive notification via FTP and HTTP servers without turning on the NAS.
User's Guide
Page 6
... Blinking Light off Solid Orange Solid Light Blinking Light off Solid Orange Description Power is on the USB flash drive. © Copyright 2013 TRENDnet. Plug in a USB flash drive to mount HDD is active HDD is reading/writing Power is off, or no hard drive inserted Hard... import/export files on , device is installed but failed USB Sync Button - Rear View TN‐200 / TN‐200T1 Power Connector USB Port Ethernet Port Power Connector - Connect the Ethernet cable to the NAS. Plug in hibernation USB Storage connected Transfer data by pressing USB Sync Button/ USB device ...
... Blinking Light off Solid Orange Solid Light Blinking Light off Solid Orange Description Power is on the USB flash drive. © Copyright 2013 TRENDnet. Plug in a USB flash drive to mount HDD is active HDD is reading/writing Power is off, or no hard drive inserted Hard... import/export files on , device is installed but failed USB Sync Button - Rear View TN‐200 / TN‐200T1 Power Connector USB Port Ethernet Port Power Connector - Connect the Ethernet cable to the NAS. Plug in hibernation USB Storage connected Transfer data by pressing USB Sync Button/ USB device ...

User's Guide
Page 8
Select your preferred language from the drop‐down list 4. Click Next to continue. 2. Insert the CD‐ROM and click Install NAS Setup. TN‐200 / TN‐200T1 3. Click Next to store the files and proceed © Copyright 2013 TRENDnet. All Rights Reserved. 6 The NAS Setup Wizard window will now appear. TRENDnet User's Guide Install NAS Setup Utility 1.
Select your preferred language from the drop‐down list 4. Click Next to continue. 2. Insert the CD‐ROM and click Install NAS Setup. TN‐200 / TN‐200T1 3. Click Next to store the files and proceed © Copyright 2013 TRENDnet. All Rights Reserved. 6 The NAS Setup Wizard window will now appear. TRENDnet User's Guide Install NAS Setup Utility 1.

User's Guide
Page 9
All Rights Reserved. 7 The NAS Setup icon will now appear on your Desktop. © Copyright 2013 TRENDnet. TRENDnet User's Guide 5. Click Install to complete the installation. TN‐200 / TN‐200T1 8. Click Finish to install the utility 7. Select the Start Menu folder location. 6.
All Rights Reserved. 7 The NAS Setup icon will now appear on your Desktop. © Copyright 2013 TRENDnet. TRENDnet User's Guide 5. Click Install to complete the installation. TN‐200 / TN‐200T1 8. Click Finish to install the utility 7. Select the Start Menu folder location. 6.

User's Guide
Page 10
...enter a User Name and Password. Update the password when prompted. Windows Firewall might prompt a permission request to detect the TRENDnet TN‐200 / TN‐200T1. Password length must be 8‐16 characters; For first‐time setup, it's recommended that you to remember... your details. special characters such as and space keys are not valid. © Copyright 2013 TRENDnet. TN‐200 / TN‐200T1 Configuring with the NAS Setup Utility 1. TRENDnet User's Guide 9. The login screen will appear on the screen. 2. Click Refresh to access the...
...enter a User Name and Password. Update the password when prompted. Windows Firewall might prompt a permission request to detect the TRENDnet TN‐200 / TN‐200T1. Password length must be 8‐16 characters; For first‐time setup, it's recommended that you to remember... your details. special characters such as and space keys are not valid. © Copyright 2013 TRENDnet. TN‐200 / TN‐200T1 Configuring with the NAS Setup Utility 1. TRENDnet User's Guide 9. The login screen will appear on the screen. 2. Click Refresh to access the...
User's Guide
Page 13
...configured for the drive from the drop‐down list. Interface TN‐200 / TN‐200T1 9. The Volume label is now complete. NAS List - displays a list of the connected NAS 11 click to connect to access data as if the NAS were a local drive. Drive Mapping enables the user to the... Exit to refresh the NAS List IP Address - All Rights Reserved. In the Drive Mapping setup window, click the "select" field and choose a letter for you. click to exit the wizard without saving settings. © Copyright 2013 TRENDnet. shows the IP address of NAS devices found on the ...
...configured for the drive from the drop‐down list. Interface TN‐200 / TN‐200T1 9. The Volume label is now complete. NAS List - displays a list of the connected NAS 11 click to connect to access data as if the NAS were a local drive. Drive Mapping enables the user to the... Exit to refresh the NAS List IP Address - All Rights Reserved. In the Drive Mapping setup window, click the "select" field and choose a letter for you. click to exit the wizard without saving settings. © Copyright 2013 TRENDnet. shows the IP address of NAS devices found on the ...
User's Guide
Page 14
...‐click on one of the connected NAS Gateway - shows the network gateway of the NAS Setup utility Minimize - displays the current version of the connected NAS Disk Volume - TRENDnet User's Guide Subnet - use the setup... wizard to close the utility © Copyright 2013 TRENDnet. click this button to minimize the window Close - Wizard - click to configure your NAS 2. shows the capacity and usage of the current NAS Settings - All Rights Reserved. click to set logout intervals Help - TN‐200 / TN...
...‐click on one of the connected NAS Gateway - shows the network gateway of the NAS Setup utility Minimize - displays the current version of the connected NAS Disk Volume - TRENDnet User's Guide Subnet - use the setup... wizard to close the utility © Copyright 2013 TRENDnet. click this button to minimize the window Close - Wizard - click to configure your NAS 2. shows the capacity and usage of the current NAS Settings - All Rights Reserved. click to set logout intervals Help - TN‐200 / TN...
User's Guide
Page 16
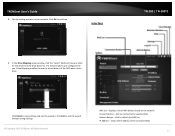
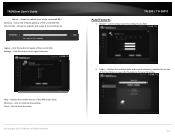
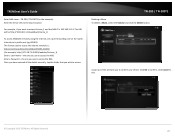
TRENDnet User's Guide Configuring with a Web Browser Open a web browser and type in http://TN‐200 or the IP address of four tiles (Management Center, File Center, Backup Center, and Download Center) for you have highlighted it turns blue to indicate ... over a tile, it . Sidebar The sidebar provides access to manage its contents. © Copyright 2013 TRENDnet. Click on an icon to manage your NAS. TN‐200 / TN‐200T1 The Main Screen The Main Screen consists of the TN‐200 / TN‐ 200T1 in the browser. All Rights Reserved. 14 Click Login at the top right...
TRENDnet User's Guide Configuring with a Web Browser Open a web browser and type in http://TN‐200 or the IP address of four tiles (Management Center, File Center, Backup Center, and Download Center) for you have highlighted it turns blue to indicate ... over a tile, it . Sidebar The sidebar provides access to manage its contents. © Copyright 2013 TRENDnet. Click on an icon to manage your NAS. TN‐200 / TN‐200T1 The Main Screen The Main Screen consists of the TN‐200 / TN‐ 200T1 in the browser. All Rights Reserved. 14 Click Login at the top right...
User's Guide
Page 17
... . TN‐200 / TN‐200T1 Step 3 - With Static IP, you have gone through to confirm the change your preferred option and click Next. Select your password, enter the Old Password; select a date by clicking the Calendar icon and setting the date; The introductory window provides the process. TRENDnet User... Next to continue. With DHCP, the router designates an IP Address for the Wizard, there are 5 steps to sync the time with the NAS Setup utility, please skip this part. To set the LAN Connection Type, select the DHCP or Static Client option. enter a New Password;...
... . TN‐200 / TN‐200T1 Step 3 - With Static IP, you have gone through to confirm the change your preferred option and click Next. Select your password, enter the Old Password; select a date by clicking the Calendar icon and setting the date; The introductory window provides the process. TRENDnet User... Next to continue. With DHCP, the router designates an IP Address for the Wizard, there are 5 steps to sync the time with the NAS Setup utility, please skip this part. To set the LAN Connection Type, select the DHCP or Static Client option. enter a New Password;...

User's Guide
Page 25
Note: A Samsung Android device is used for the example shown. Click the TN‐200 / TN‐200T1 to reveal the music files stored on the network. All Rights Reserved. 23 TRENDnet User's Guide Music Player TN‐200 / TN‐200T1 NAS Scroll through the menu bar at the top of the screen until you should find the NAS on the NAS. © Copyright 2013 TRENDnet. Devices and operating systems will vary. Select Nearby Devices and you come across Nearby Devices.
Note: A Samsung Android device is used for the example shown. Click the TN‐200 / TN‐200T1 to reveal the music files stored on the network. All Rights Reserved. 23 TRENDnet User's Guide Music Player TN‐200 / TN‐200T1 NAS Scroll through the menu bar at the top of the screen until you should find the NAS on the NAS. © Copyright 2013 TRENDnet. Devices and operating systems will vary. Select Nearby Devices and you come across Nearby Devices.
User's Guide
Page 28
... correctly, tap the folder that you to access the NAS. All Rights Reserved. 26 TN‐200 / TN‐200T1 Deleting a Share To delete a Share, select the Volume and click the Delete button. TRENDnet User's Guide Enter NAS name - Enter the Server URL to exit. © Copyright 2013 TRENDnet. the one you use to confirm your choice...
... correctly, tap the folder that you to access the NAS. All Rights Reserved. 26 TN‐200 / TN‐200T1 Deleting a Share To delete a Share, select the Volume and click the Delete button. TRENDnet User's Guide Enter NAS name - Enter the Server URL to exit. © Copyright 2013 TRENDnet. the one you use to confirm your choice...
User's Guide
Page 32
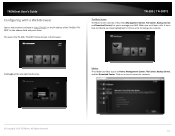
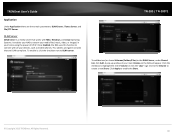
...entire Volume or click the "plus" sign next to the Volume to DLNA server. TVs; TRENDnet User's Guide Application Under Application there are DLNA compliant. All Rights Reserved. 30 TN‐200 / TN‐200T1 To add devices (or shared Volumes/Folders/Files) to enable the Share. ©... Copyright 2013 TRENDnet. DLNA Server DLNA Server is a media server that are three main parameters: DLNA Server, iTunes Server, and File/FTP Server. Once Enabled, the NAS uses this function to ...
...entire Volume or click the "plus" sign next to the Volume to DLNA server. TVs; TRENDnet User's Guide Application Under Application there are DLNA compliant. All Rights Reserved. 30 TN‐200 / TN‐200T1 To add devices (or shared Volumes/Folders/Files) to enable the Share. ©... Copyright 2013 TRENDnet. DLNA Server DLNA Server is a media server that are three main parameters: DLNA Server, iTunes Server, and File/FTP Server. Once Enabled, the NAS uses this function to ...
User's Guide
Page 34
All Rights Reserved. DLNA Server is working Accessing NAS data using a DLNA player Once the DLNA server is built © Copyright 2013 TRENDnet. Items in the Share Folder are under the same network. 32 Make sure your NAS from a DLNA compliant device and access data from it. TN‐200 / TN‐200T1 Click Refresh The Media Library is activated on your NAS, you will be able to see your phone and NAS are refreshed. TRENDnet User's Guide To Refresh the Shared List, click the Refresh button.
All Rights Reserved. DLNA Server is working Accessing NAS data using a DLNA player Once the DLNA server is built © Copyright 2013 TRENDnet. Items in the Share Folder are under the same network. 32 Make sure your NAS from a DLNA compliant device and access data from it. TN‐200 / TN‐200T1 Click Refresh The Media Library is activated on your NAS, you will be able to see your phone and NAS are refreshed. TRENDnet User's Guide To Refresh the Shared List, click the Refresh button.

User's Guide
Page 35
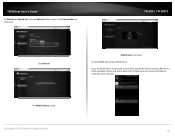
...to add your iTunes Playlist to the TN‐200 / TN‐200T1. Click Save to continue and OK to continue. This allows you to use the ROOT folder, deselect the ROOT checkbox and click Browse. Click Save to exit. © Copyright 2013 TRENDnet. Click the iTunes Server checkbox to ...use for this application and click Apply. The Volume will now appear in the Folder option list. If you wish to integrate the NAS with iTunes. TN‐200 / TN‐200T1 Select the Volume you do not ...
...to add your iTunes Playlist to the TN‐200 / TN‐200T1. Click Save to continue and OK to continue. This allows you to use the ROOT folder, deselect the ROOT checkbox and click Browse. Click Save to exit. © Copyright 2013 TRENDnet. Click the iTunes Server checkbox to ...use for this application and click Apply. The Volume will now appear in the Folder option list. If you wish to integrate the NAS with iTunes. TN‐200 / TN‐200T1 Select the Volume you do not ...

User's Guide
Page 45
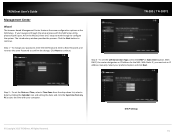
Go to test. TRENDnet User's Guide S.M.A.R.T. S.M.A.R.T. TN‐200 / TN‐200T1 Click on the disk you wish to the Management Center > Disk > S.M.A.R.T.. The Progress column shows the progress made. © Copyright 2013 TRENDnet. All Rights Reserved. 43 During the test period, you want a Quick test or an Extended test and click the Start button. allows a user to monitor the progress. Select whether you are able to test the functionality of the NAS.
Go to test. TRENDnet User's Guide S.M.A.R.T. S.M.A.R.T. TN‐200 / TN‐200T1 Click on the disk you wish to the Management Center > Disk > S.M.A.R.T.. The Progress column shows the progress made. © Copyright 2013 TRENDnet. All Rights Reserved. 43 During the test period, you want a Quick test or an Extended test and click the Start button. allows a user to monitor the progress. Select whether you are able to test the functionality of the NAS.
