
Quick Installation Guide
Page 2
Before You Start 2. Table of Contents English 1. How to Install 3. Operation Technical Specifications Troubleshooting 1 1 2 4 7 8 Version 08.14.2009
Before You Start 2. Table of Contents English 1. How to Install 3. Operation Technical Specifications Troubleshooting 1 1 2 4 7 8 Version 08.14.2009

Quick Installation Guide
Page 4
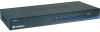
2. How to the KVM switch. 5. Use the PS/2 KVM cables to connect your PC to Install 1. Connect the included AC Power Adapter to the KVM switch and then to the KVM switch's Console Port. (TK-801R shown) FRANÇAIS 3. Connect the shared PS/2 keyboard, monitor, and PS/2 mouse to a power outlet (TK-801R /TK-1601R only). 4. PC 1, 2, 3, 4 (TK-401R) PC 1, 2, 3, 4, 5, 6, 7, 8 (TK-801R) PC 1, 2, 3, 4, 5, 6, 7, 8, 9, 10, 11, 12, 13, 14, 15, 16 (TK-1601R) 2 ESPA...
2. How to the KVM switch. 5. Use the PS/2 KVM cables to connect your PC to Install 1. Connect the included AC Power Adapter to the KVM switch and then to the KVM switch's Console Port. (TK-801R shown) FRANÇAIS 3. Connect the shared PS/2 keyboard, monitor, and PS/2 mouse to a power outlet (TK-801R /TK-1601R only). 4. PC 1, 2, 3, 4 (TK-401R) PC 1, 2, 3, 4, 5, 6, 7, 8 (TK-801R) PC 1, 2, 3, 4, 5, 6, 7, 8, 9, 10, 11, 12, 13, 14, 15, 16 (TK-1601R) 2 ESPA...
Quick Installation Guide
Page 5
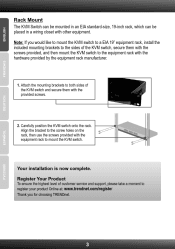
Align the bracket to the sides of the KVM switch, secure them with other equipment. Note: If you for choosing TRENDnet. 3 ESPAÑOL 2. DEUTSCH 1. Carefully position the KVM switch onto the rack. Attach the mounting brackets to both sides of customer service and support, please take a moment to mount the KVM switch. Your installation is now complete. Register Your Product To...
Align the bracket to the sides of the KVM switch, secure them with other equipment. Note: If you for choosing TRENDnet. 3 ESPAÑOL 2. DEUTSCH 1. Carefully position the KVM switch onto the rack. Attach the mounting brackets to both sides of customer service and support, please take a moment to mount the KVM switch. Your installation is now complete. Register Your Product To...
Quick Installation Guide
Page 6
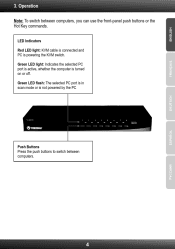
Operation Note: To switch between computers. 4 ESPAÑOL ENGLISH Green LED flash: The selected PC port is in scan mode or is turned on or off. 3. Green LED light: Indicates the selected PC port is active, whether the computer is not powered by the PC DEUTSCH FRANÇAIS Push Buttons Press the push buttons to switch between computers, you can use the front-panel push buttons or the Hot Key commands. LED Indicators Red LED light: KVM cable is connected and PC is powering the KVM switch.
Operation Note: To switch between computers. 4 ESPAÑOL ENGLISH Green LED flash: The selected PC port is in scan mode or is turned on or off. 3. Green LED light: Indicates the selected PC port is active, whether the computer is not powered by the PC DEUTSCH FRANÇAIS Push Buttons Press the push buttons to switch between computers, you can use the front-panel push buttons or the Hot Key commands. LED Indicators Red LED light: KVM cable is connected and PC is powering the KVM switch.

Quick Installation Guide
Page 7
... + 1 For TK-801R/TK-1601R ESPAÑOL Scroll Lock + Scroll Lock + Y + Z Y Z = Port number 01-08 (TK-801R) or Port number 01-16 (TK-160R) For example, to press the Scroll Lock key again. To select a specific PC port: For TK-401R DEUTSCH Y = Port number 1-4 Scroll Lock + Scroll Lock + Y For example, to Select Port 1 on the KVM Switch, you do not press a key within 2 seconds, the switch will exit hot key mode. You then...
... + 1 For TK-801R/TK-1601R ESPAÑOL Scroll Lock + Scroll Lock + Y + Z Y Z = Port number 01-08 (TK-801R) or Port number 01-16 (TK-160R) For example, to press the Scroll Lock key again. To select a specific PC port: For TK-401R DEUTSCH Y = Port number 1-4 Scroll Lock + Scroll Lock + Y For example, to Select Port 1 on the KVM Switch, you do not press a key within 2 seconds, the switch will exit hot key mode. You then...

Quick Installation Guide
Page 8
... + Scroll Lock + S + X (X)= 5~99 Seconds --- Reset KVM Scroll Lock + Scroll Lock + END --- Select the next lower PC channel Next higher channel Scroll Lock + Scroll Lock + --- Autoscan Scroll Lock + Scroll Lock + S --- Quick Reference Sheet for TK-401R/801R/1601R Command TK-401R Hot Keys Front-Panel Buttons Description Scroll Lock + Scroll Lock + Y (Y)= 1-digit port number (1-4) Select PC TK-801R/TK-1601R Press the Push Button for quick screen browsing of each...
... + Scroll Lock + S + X (X)= 5~99 Seconds --- Reset KVM Scroll Lock + Scroll Lock + END --- Select the next lower PC channel Next higher channel Scroll Lock + Scroll Lock + --- Autoscan Scroll Lock + Scroll Lock + S --- Quick Reference Sheet for TK-401R/801R/1601R Command TK-401R Hot Keys Front-Panel Buttons Description Scroll Lock + Scroll Lock + Y (Y)= 1-digit port number (1-4) Select PC TK-801R/TK-1601R Press the Push Button for quick screen browsing of each...
Quick Installation Guide
Page 9
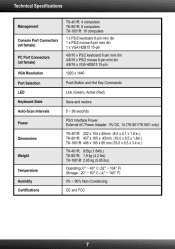
Technical Specifications TK-401R: 4 computers TK-801R: 8 computers TK-1601R: 16 computers 1 x PS/2 keyboard 6-pin mini din 1 x PS/2 mouse 6-pin mini din 1 x VGA HDB15 15-pin 4/8/16 x PS/2 keyboard 6-pin mini din 4/8/16 x PS/2 mouse 6-pin mini din 4/8/16 x VGA HDB15 15-pin 1920 x 1440 Push Button and Hot Key Commands Link (Green), Active (Red) Save and restore 5 ~ 99 seconds PS/2 Interface Power External AC Power Adapter : 9V DC, 1A (TK-801/TK1601...
Technical Specifications TK-401R: 4 computers TK-801R: 8 computers TK-1601R: 16 computers 1 x PS/2 keyboard 6-pin mini din 1 x PS/2 mouse 6-pin mini din 1 x VGA HDB15 15-pin 4/8/16 x PS/2 keyboard 6-pin mini din 4/8/16 x PS/2 mouse 6-pin mini din 4/8/16 x VGA HDB15 15-pin 1920 x 1440 Push Button and Hot Key Commands Link (Green), Active (Red) Save and restore 5 ~ 99 seconds PS/2 Interface Power External AC Power Adapter : 9V DC, 1A (TK-801/TK1601...
Quick Installation Guide
Page 10
... TK-801R/ TK-1601R KVM switch. Will the KVM switch restore the keyboard settings between computers. (i.e.: Cap Lock, Num key, etc.) How do I switch from one computer to Section 3 Operation for more information. Yes, you use the included external AC adapter? You can connect or disconnect the KVM cables while the computers are turned on the KVM switch or using the Hot Key commands.. Once you still encounter problems...
... TK-801R/ TK-1601R KVM switch. Will the KVM switch restore the keyboard settings between computers. (i.e.: Cap Lock, Num key, etc.) How do I switch from one computer to Section 3 Operation for more information. Yes, you use the included external AC adapter? You can connect or disconnect the KVM cables while the computers are turned on the KVM switch or using the Hot Key commands.. Once you still encounter problems...
Quick Installation Guide
Page 11
.... Upon proper submission of the purchase. An RMA number is voided if (i) the product has been modified or repaired by any unauthorized service center, (ii) the product was subject to the customer. Customers shipping from outside of TRENDnet. TK-401R/TK-801R/TK-1601R - 2 Years Limited Warranty AC/DC Power Adapter, Cooling Fan and Power Supply carry a 1 year limited warranty If a product does...
.... Upon proper submission of the purchase. An RMA number is voided if (i) the product has been modified or repaired by any unauthorized service center, (ii) the product was subject to the customer. Customers shipping from outside of TRENDnet. TK-401R/TK-801R/TK-1601R - 2 Years Limited Warranty AC/DC Power Adapter, Cooling Fan and Power Supply carry a 1 year limited warranty If a product does...
Quick Installation Guide
Page 12
... OR ANY THIRD PERSON'S MISUSE, NEGLECT, IMPROPER INSTALLATION OR TESTING, UNAUTHORIZED ATTEMPTS TO REPAIR OR MODIFY, OR ANY OTHER CAUSE BEYOND THE RANGE OF THE INTENDED USE, OR BY ACCIDENT, FIRE, LIGHTNING, OR OTHER HAZARD. Some TRENDnet products include software code written by the laws of the state of each ....gnu.org/licenses/lgpl.txt for specific terms of California. Please go to http://www.trendnet.com/gpl or http://www.trendnet.com Download section and look for these codes. LIMITATION OF LIABILITY: TO THE FULL EXTENT ALLOWED BY LAW TRENDNET ALSO EXCLUDES FOR ITSELF AND ITS ...
... OR ANY THIRD PERSON'S MISUSE, NEGLECT, IMPROPER INSTALLATION OR TESTING, UNAUTHORIZED ATTEMPTS TO REPAIR OR MODIFY, OR ANY OTHER CAUSE BEYOND THE RANGE OF THE INTENDED USE, OR BY ACCIDENT, FIRE, LIGHTNING, OR OTHER HAZARD. Some TRENDnet products include software code written by the laws of the state of each ....gnu.org/licenses/lgpl.txt for specific terms of California. Please go to http://www.trendnet.com/gpl or http://www.trendnet.com Download section and look for these codes. LIMITATION OF LIABILITY: TO THE FULL EXTENT ALLOWED BY LAW TRENDNET ALSO EXCLUDES FOR ITSELF AND ITS ...

Quick Installation Guide
Page 13
...ANY RADIO OR TV INTERFERENCE CAUSED BY UNAUTHORIZED MODIFICATIONS TO THIS EQUIPMENT. Certifications This equipment has been tested and found to the following two conditions: (1) This device may cause undesired operation. Please recycle where facilities exist. ADVERTENCIA En todos nuestros equipos se mencionan... any interference received. Check with you Local Authority or Retailer for recycling advice. El uso de un adaptador distinto al mencionado puede producir daños fisicos y/o daños al equipo conectado. SUCH MODIFICATIONS COULD VOID THE USER'S AUTHORITY TO OPERATE ...
...ANY RADIO OR TV INTERFERENCE CAUSED BY UNAUTHORIZED MODIFICATIONS TO THIS EQUIPMENT. Certifications This equipment has been tested and found to the following two conditions: (1) This device may cause undesired operation. Please recycle where facilities exist. ADVERTENCIA En todos nuestros equipos se mencionan... any interference received. Check with you Local Authority or Retailer for recycling advice. El uso de un adaptador distinto al mencionado puede producir daños fisicos y/o daños al equipo conectado. SUCH MODIFICATIONS COULD VOID THE USER'S AUTHORITY TO OPERATE ...

Quick Installation Guide
Page 14
Go to register your product online. Product Warranty Registration Please take a moment to TRENDnet's website at http://www.trendnet.com/register Copyright ©2009. All Rights Reserved. TRENDnet.
Go to register your product online. Product Warranty Registration Please take a moment to TRENDnet's website at http://www.trendnet.com/register Copyright ©2009. All Rights Reserved. TRENDnet.


