User Guide
Page 3
This equipment generates, uses, and can radiate radio frequency energy and, if not installed and used in accordance with the limits for a Class A digital device, pursuant to Part 15 of the FCC Rules. These limits are designed to provide ...
This equipment generates, uses, and can radiate radio frequency energy and, if not installed and used in accordance with the limits for a Class A digital device, pursuant to Part 15 of the FCC Rules. These limits are designed to provide ...
User Guide
Page 4
... of circuits might have on over current protection and supply wiring. Therefore, consideration should be used when addressing this concern. Installation of the equipment in a rack should be greater than direct connections to the branch circuit (e.g., use of power strips).... Particular attention should be given to installing the equipment in an environment compatible with the manufacturer's maximum rated ambient temperature (Tmra). UL Warning a) Elevated Operating Ambient Temperature-If installed in a closed or multi-unit rack assembly, the operating...
... of circuits might have on over current protection and supply wiring. Therefore, consideration should be used when addressing this concern. Installation of the equipment in a rack should be greater than direct connections to the branch circuit (e.g., use of power strips).... Particular attention should be given to installing the equipment in an environment compatible with the manufacturer's maximum rated ambient temperature (Tmra). UL Warning a) Elevated Operating Ambient Temperature-If installed in a closed or multi-unit rack assembly, the operating...
User Guide
Page 5
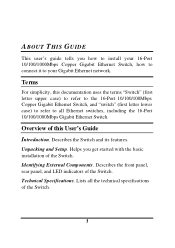
TABLE OF CONTENTS ABOUT THIS GUIDE 1 TERMS 1 OVERVIEW OF THIS USER'S GUIDE 1 INTRODUCTION 3 GIGABIT ETHERNET TECHNOLOGY 3 SWITCHING TECHNOLOGY 4 FEATURES 5 UNPACKING AND SETUP 6 UNPACKING 6 SETUP 6 DESKTOP INSTALLATION 7 RACK INSTALLATION 8 IDENTIFYING EXTERNAL COMPONENTS ....9 FRONT PANEL 9 REAR PANEL 10 LED INDICATORS 11 TECHNICAL SPECIFICATIONS 12
TABLE OF CONTENTS ABOUT THIS GUIDE 1 TERMS 1 OVERVIEW OF THIS USER'S GUIDE 1 INTRODUCTION 3 GIGABIT ETHERNET TECHNOLOGY 3 SWITCHING TECHNOLOGY 4 FEATURES 5 UNPACKING AND SETUP 6 UNPACKING 6 SETUP 6 DESKTOP INSTALLATION 7 RACK INSTALLATION 8 IDENTIFYING EXTERNAL COMPONENTS ....9 FRONT PANEL 9 REAR PANEL 10 LED INDICATORS 11 TECHNICAL SPECIFICATIONS 12
User Guide
Page 7
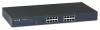
.../100/100Mbps Copper Gigabit Ethernet Switch, and "switch" (first letter lower case) to refer to your Gigabit Ethernet network. Lists all Ethernet switches, including the 16-Port 10/100/1000Mbps Gigabit Ethernet Switch. Technical Specifications. Terms For simplicity, this User's Guide Introduction. Unpacking and Setup. Describes the Switch and its features. Helps you how to install your 16-Port...
.../100/100Mbps Copper Gigabit Ethernet Switch, and "switch" (first letter lower case) to refer to your Gigabit Ethernet network. Lists all Ethernet switches, including the 16-Port 10/100/1000Mbps Gigabit Ethernet Switch. Technical Specifications. Terms For simplicity, this User's Guide Introduction. Unpacking and Setup. Describes the Switch and its features. Helps you how to install your 16-Port...
User Guide
Page 11
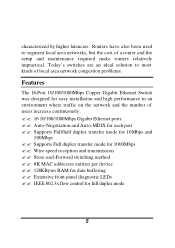
...addresses entities per device ?? 128KBytes RAM for 1000Mbps ?? Today's switches are an ideal solution to segment local area networks, but the... ?? Routers have also been used to most kinds of users increase continuously. ?? 16 10/100/1000Mbps Gigabit Ethernet ports ?? Extensive front-panel diagnostic LEDs ?? Wire speed reception and transmission ?? Auto-Negotiation and Auto... mode for each port ?? characterized by higher latencies. IEEE 802.3x flow control for easy installation and high performance in an environment where traffic on the network and the number of local area...
...addresses entities per device ?? 128KBytes RAM for 1000Mbps ?? Today's switches are an ideal solution to segment local area networks, but the... ?? Routers have also been used to most kinds of users increase continuously. ?? 16 10/100/1000Mbps Gigabit Ethernet ports ?? Extensive front-panel diagnostic LEDs ?? Wire speed reception and transmission ?? Auto-Negotiation and Auto... mode for each port ?? characterized by higher latencies. IEEE 802.3x flow control for easy installation and high performance in an environment where traffic on the network and the number of local area...
User Guide
Page 13
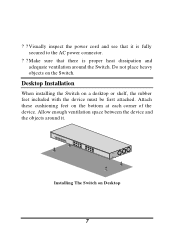
Desktop Installation When installing the Switch on Desktop 7 Allow enough ventilation space between the device and the objects around the Switch. Visually inspect the power cord and see that there is proper heat dissipation and adequate ventilation around it is fully secured to the AC power connector. ? ? Installing The Switch on a desktop or shelf, the rubber feet included with the device must be first attached. Attach these cushioning feet on the Switch. Do not place heavy objects on the bottom at each corner of the device. Make sure that it . ? ?
Desktop Installation When installing the Switch on Desktop 7 Allow enough ventilation space between the device and the objects around the Switch. Visually inspect the power cord and see that there is proper heat dissipation and adequate ventilation around it is fully secured to the AC power connector. ? ? Installing The Switch on a desktop or shelf, the rubber feet included with the device must be first attached. Attach these cushioning feet on the Switch. Do not place heavy objects on the bottom at each corner of the device. Make sure that it . ? ?
User Guide
Page 14
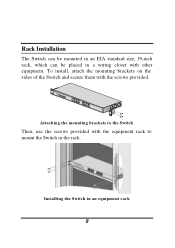
Installing the Switch in the rack. Attaching the mounting brackets to the Switch Then, use the screws provided with the equipment rack to mount the Switch in an equipment rack 8 Rack Installation The Switch can be mounted in an EIA standard size, 19-inch rack, which can be placed in a wiring closet with the screws provided. To install, attach the mounting brackets on the sides of the Switch and secure them with other equipment.
Installing the Switch in the rack. Attaching the mounting brackets to the Switch Then, use the screws provided with the equipment rack to mount the Switch in an equipment rack 8 Rack Installation The Switch can be mounted in an EIA standard size, 19-inch rack, which can be placed in a wiring closet with the screws provided. To install, attach the mounting brackets on the sides of the Switch and secure them with other equipment.