User Guide
Page 6
Discovery List 18 Monitor List 19 Device Setting 21 Toolbar 23 Configuring the Switch 24 Login 24 Setup Menu 27 Configuring Setup Setting 27 Port Settings 27 VLAN Settings (Virtual Local Area Network 29 Trunk Setting 30 Mirror Setting 31 Device Status 31 Statistic 32 System Setting 33 Trap Setting 33 Set Password 34 Backup Setting 35 Reset Setting 35 Logout 36 Technical Specifications 37 ii
Discovery List 18 Monitor List 19 Device Setting 21 Toolbar 23 Configuring the Switch 24 Login 24 Setup Menu 27 Configuring Setup Setting 27 Port Settings 27 VLAN Settings (Virtual Local Area Network 29 Trunk Setting 30 Mirror Setting 31 Device Status 31 Statistic 32 System Setting 33 Trap Setting 33 Set Password 34 Backup Setting 35 Reset Setting 35 Logout 36 Technical Specifications 37 ii
User Guide
Page 23
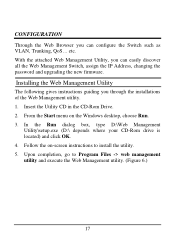
... is located) and click OK. 4. CONFIGURATION Through the Web Browser you can easily discover all the Web Management Switch, assign the IP Address, changing the password and upgrading the new firmware. etc. Installing the Web Management Utility The following gives instructions guiding you can configure the Switch such as VLAN, Trunking...
... is located) and click OK. 4. CONFIGURATION Through the Web Browser you can easily discover all the Web Management Switch, assign the IP Address, changing the password and upgrading the new firmware. etc. Installing the Web Management Utility The following gives instructions guiding you can configure the Switch such as VLAN, Trunking...

User Guide
Page 27
Figure 9. Configuration Setting: In this button, then the Configuration Setting window will pop out as Figure 9, after filling up the data that you want to change, you can set the IP Address, Subnet Mask, Gateway, Set Trap to process the data changed immediately. Configuration Setting 21 Select the device in the Device Setting Dialog box. Device Setting You can set the device by using the function key in the Discovery list or Monitor List and press this Configuration Setting, you must fill up the password and press the "Set" to (Trap IP Address), System name and Location.
Figure 9. Configuration Setting: In this button, then the Configuration Setting window will pop out as Figure 9, after filling up the data that you want to change, you can set the IP Address, Subnet Mask, Gateway, Set Trap to process the data changed immediately. Configuration Setting 21 Select the device in the Device Setting Dialog box. Device Setting You can set the device by using the function key in the Discovery list or Monitor List and press this Configuration Setting, you must fill up the password and press the "Set" to (Trap IP Address), System name and Location.

User Guide
Page 28
Password Change: You can use this function to update. Figure 11. Web Access: Double click the device in the Monitor List or select a device in Web browser. 22 Password Change Firmware Upgrade: When the device has a new function, there will be a new firmware to update the device, use this "Web Access" button to proceed the password change the password, fill in the password needed in the dialog box and press "Set" button to access the device in the Monitor List and press this Password Change when you need to change immediately. Figure 10.
Password Change: You can use this function to update. Figure 11. Web Access: Double click the device in the Monitor List or select a device in Web browser. 22 Password Change Firmware Upgrade: When the device has a new function, there will be a new firmware to update the device, use this "Web Access" button to proceed the password change the password, fill in the password needed in the dialog box and press "Set" button to access the device in the Monitor List and press this Password Change when you need to change immediately. Figure 10.

User Guide
Page 31
Or through the Web Management Utility, you do not need to remember the IP Address, select the device shown in the Monitor List of the Web Management Utility to enter the main configuration window. When the following dialog page appears, remain enter the default password "admin" and press Login to settle the device on the Web Browser. Figure 13. 25
Or through the Web Management Utility, you do not need to remember the IP Address, select the device shown in the Monitor List of the Web Management Utility to enter the main configuration window. When the following dialog page appears, remain enter the default password "admin" and press Login to settle the device on the Web Browser. Figure 13. 25

User Guide
Page 32
After entering the password, the main page comes up, the screen will display the device status. Figure 14. Device Status 26
After entering the password, the main page comes up, the screen will display the device status. Figure 14. Device Status 26
User Guide
Page 33
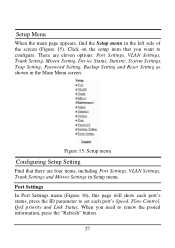
... Click on the setup item that there are eleven options: Port Settings, VLAN Settings, Trunk Setting, Mirror Setting, Device Status, Statistic, System Settings, Trap Setting, Password Setting, Backup Setting and Reset Setting as shown in Setup menu. Setup Menu When the main page appears, find the Setup menu in the left...
... Click on the setup item that there are eleven options: Port Settings, VLAN Settings, Trunk Setting, Mirror Setting, Device Status, Statistic, System Settings, Trap Setting, Password Setting, Backup Setting and Reset Setting as shown in Setup menu. Setup Menu When the main page appears, find the Setup menu in the left...

User Guide
Page 40
... the IP to be lost and the Switch will be login. etc. Device Bootup: a trap when booting up the system. If you forget the password, press the "Reset" button in copper port. Abnormal* Transmit Error: a trap when there are receive data error in copper port. Abnormal*: 50... error packet count within 10 seconds. Trap Setting System Events: Monitoring the system's trap. will restore to change the password. Illegal Login: a trap when there is the invaluable tool for the manager to secure Web Management Switch, use this function to the default setting...
... the IP to be lost and the Switch will be login. etc. Device Bootup: a trap when booting up the system. If you forget the password, press the "Reset" button in copper port. Abnormal* Transmit Error: a trap when there are receive data error in copper port. Abnormal*: 50... error packet count within 10 seconds. Trap Setting System Events: Monitoring the system's trap. will restore to change the password. Illegal Login: a trap when there is the invaluable tool for the manager to secure Web Management Switch, use this function to the default setting...

User Guide
Page 41
Backup Setting Note: when restoring a recorded file, the current password will not be set to default setting 192.168.0.1. 35 To restore a current setting file to the device, you to reset the device back to ... helps you must specify the backup file and press "Restore" button to the default setting from the factory. Once you to save the setting. Set Password Backup Setting The backup tools help you need to backup the setting, press the "Backup" button to backup the current setting of the device will...
Backup Setting Note: when restoring a recorded file, the current password will not be set to default setting 192.168.0.1. 35 To restore a current setting file to the device, you to reset the device back to ... helps you must specify the backup file and press "Restore" button to the default setting from the factory. Once you to save the setting. Set Password Backup Setting The backup tools help you need to backup the setting, press the "Backup" button to backup the current setting of the device will...

Quick Installation Guide
Page 4
... a CAT-5 RJ-45 network cable from the computer to a power outlet. 2. Connect the Power Cord to the rear of the TEG-160WS/ TEG-240WS and then to an available Ethernet port of the TEG-160WS/TEG-240WS. 2 English 2. Hardware Installation Note: After hardware installation is complete, use the Web-based Smart Utility to the same network...
... a CAT-5 RJ-45 network cable from the computer to a power outlet. 2. Connect the Power Cord to the rear of the TEG-160WS/ TEG-240WS and then to an available Ethernet port of the TEG-160WS/TEG-240WS. 2 English 2. Hardware Installation Note: After hardware installation is complete, use the Web-based Smart Utility to the same network...

Quick Installation Guide
Page 5
For Windows User 1. Follow the steps below. Follow the Installation Wizard instructions. Click OK. 3. Insert the Utility & User's Guide CD-ROM into your computer's CD-ROM Drive and then click Install Utility. 2. Click Start > Programs > web_management_utility, and then click web_management_utility. 3 English Web Management Utility ote: If you would like to easily discover all the Web Management Switches on the network, assign IP Address, change the password, and upgrade to new firmware, then install the Web Management Utility. 3.
For Windows User 1. Follow the steps below. Follow the Installation Wizard instructions. Click OK. 3. Insert the Utility & User's Guide CD-ROM into your computer's CD-ROM Drive and then click Install Utility. 2. Click Start > Programs > web_management_utility, and then click web_management_utility. 3 English Web Management Utility ote: If you would like to easily discover all the Web Management Switches on the network, assign IP Address, change the password, and upgrade to new firmware, then install the Web Management Utility. 3.
Quick Installation Guide
Page 6
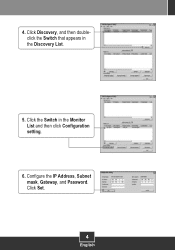
Click the Switch in the Discovery List. 5. 4. Configure the IP Address, Subnet mask, Gateway, and Password. Click Set. 4 English Click Discovery, and then doubleclick the Switch that appears in the Monitor List and then click Configuration setting. 6.
Click the Switch in the Discovery List. 5. 4. Configure the IP Address, Subnet mask, Gateway, and Password. Click Set. 4 English Click Discovery, and then doubleclick the Switch that appears in the Monitor List and then click Configuration setting. 6.

Quick Installation Guide
Page 7
For more information regarding the Web-based Smart Utility configuration and advanced settings, please refer to the User's Guide included on the Utility CDROM or TRENDnet's website at www.trendnet.com 5 English 7. Click Web access. 9. Type in your Password and then click Login. Click OK. 8.
For more information regarding the Web-based Smart Utility configuration and advanced settings, please refer to the User's Guide included on the Utility CDROM or TRENDnet's website at www.trendnet.com 5 English 7. Click Web access. 9. Type in your Password and then click Login. Click OK. 8.
Quick Installation Guide
Page 8
... Switch is 192.168.0.1 and the default password is powered on the same network segment as the TEG-160WS/TEG-240WS. Q5: When I reset my TEG-160WS/TEG-240WS? If you still get a screen that the TEG-160WS/TEG-240WS is admin. Operation is subject to the ...TEG-160WS/TEG-240WS. Q3: When I access the TEG-160WS/TEG-240WS using a pen or paperclip for recycling advice. Check with FCC and CE Rules. How do ? Also make sure to power on the Utility CD-ROM or contact TRENDnet's Technical Support Department. What should I forgot the administration password. The default password...
... Switch is 192.168.0.1 and the default password is powered on the same network segment as the TEG-160WS/TEG-240WS. Q5: When I reset my TEG-160WS/TEG-240WS? If you still get a screen that the TEG-160WS/TEG-240WS is admin. Operation is subject to the ...TEG-160WS/TEG-240WS. Q3: When I access the TEG-160WS/TEG-240WS using a pen or paperclip for recycling advice. Check with FCC and CE Rules. How do ? Also make sure to power on the Utility CD-ROM or contact TRENDnet's Technical Support Department. What should I forgot the administration password. The default password...