
User Guide
Page 5
TABLE OF CONTENT About This Guide 1 Purpose 1 Terms/Usage 1 Introduction 3 Gigabit Ethernet Technology 3 Fast Ethernet Technology 4 Switching Technology 5 VLAN (Virtual Local Area Network 6 Features 6 Unpacking and Installation 9 Unpacking 9 Installation 9 Rack Mounting 10 Connecting Network Cable 11 AC Power 11 Identifying External Components 13 Front Panel 13 Rear Panel 14 Understanding LED Indicators 15 Power and System LEDs 15 Ports 1~16 Status LEDs 16 Configuration 17 Installing the Web Management Utility 17 i
TABLE OF CONTENT About This Guide 1 Purpose 1 Terms/Usage 1 Introduction 3 Gigabit Ethernet Technology 3 Fast Ethernet Technology 4 Switching Technology 5 VLAN (Virtual Local Area Network 6 Features 6 Unpacking and Installation 9 Unpacking 9 Installation 9 Rack Mounting 10 Connecting Network Cable 11 AC Power 11 Identifying External Components 13 Front Panel 13 Rear Panel 14 Understanding LED Indicators 15 Power and System LEDs 15 Ports 1~16 Status LEDs 16 Configuration 17 Installing the Web Management Utility 17 i

User Guide
Page 6
Discovery List 18 Monitor List 19 Device Setting 21 Toolbar 23 Configuring the Switch 24 Login 24 Setup Menu 26 Configuring Setup Setting 26 Port Settings 26 VLAN Settings (Virtual Local Area Network 28 Trunk Setting 29 Mirror Setting 30 Device Status 30 Statistic 31 System Setting 31 Trap Setting 32 Set Password 33 Backup Setting 34 Reset Setting 34 Logout 35 Technical Specifications 37 ii
Discovery List 18 Monitor List 19 Device Setting 21 Toolbar 23 Configuring the Switch 24 Login 24 Setup Menu 26 Configuring Setup Setting 26 Port Settings 26 VLAN Settings (Virtual Local Area Network 28 Trunk Setting 29 Mirror Setting 30 Device Status 30 Statistic 31 System Setting 31 Trap Setting 32 Set Password 33 Backup Setting 34 Reset Setting 34 Logout 35 Technical Specifications 37 ii

User Guide
Page 7
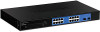
Purpose This guide discusses how to install your 16-Port 10/100/1000Mbps Gigabit Ethernet Web Smart Switch, and "switch" (first letter lower case) refers to your 16-Port 10/100/1000Mbps Gigabit Ethernet Web Smart Switch. Terms/Usage In this guide, the term "Switch" (first letter upper case) refers to other Ethernet switches. 1 ABOUT THIS GUIDE Congratulations on your purchase of the 16-Port 10/100/1000Mbps Gigabit Ethernet Web Smart Switch. This device integrates 1000Mbps Gigabit Ethernet, 100Mbps Fast Ethernet and 10Mbps Ethernet network capabilities in a highly flexible package.
Purpose This guide discusses how to install your 16-Port 10/100/1000Mbps Gigabit Ethernet Web Smart Switch, and "switch" (first letter lower case) refers to your 16-Port 10/100/1000Mbps Gigabit Ethernet Web Smart Switch. Terms/Usage In this guide, the term "Switch" (first letter upper case) refers to other Ethernet switches. 1 ABOUT THIS GUIDE Congratulations on your purchase of the 16-Port 10/100/1000Mbps Gigabit Ethernet Web Smart Switch. This device integrates 1000Mbps Gigabit Ethernet, 100Mbps Fast Ethernet and 10Mbps Ethernet network capabilities in a highly flexible package.
User Guide
Page 9
..., software, and trained personnel. Since it is an extension of the 16-Port 10/100/1000Mbps Gigabit Ethernet Web Smart Switch and some background information about Ethernet/Fast Ethernet/Gigabit Ethernet switching technology. Upgrading key components, such as computers and their busses get faster and more users use applications that frequently develop...
..., software, and trained personnel. Since it is an extension of the 16-Port 10/100/1000Mbps Gigabit Ethernet Web Smart Switch and some background information about Ethernet/Fast Ethernet/Gigabit Ethernet switching technology. Upgrading key components, such as computers and their busses get faster and more users use applications that frequently develop...

User Guide
Page 10
It is compatible with all other 10Mbps Ethernet environments, it provides a straightforward upgrade and takes advantage of today and tomorrow's rapidly improving switching and routing internetworking technologies. A number of high-speed LAN technologies have been proposed to take advantage of the existing investment in silicon technology and digital ...
It is compatible with all other 10Mbps Ethernet environments, it provides a straightforward upgrade and takes advantage of today and tomorrow's rapidly improving switching and routing internetworking technologies. A number of high-speed LAN technologies have been proposed to take advantage of the existing investment in silicon technology and digital ...

User Guide
Page 11
... development of a router, the setup and maintenance required make routers relatively impractical. Routers have also been used to another. A switch bridges Ethernet packets at the MAC address level of network bridges, which were characterized by dividing a local area network into different ...segments, which don't compete with any other for network transmission capacity. The switch, without interfering with each other segments, automatically forwards traffic that needs to go from one segment to segment local area networks...
... development of a router, the setup and maintenance required make routers relatively impractical. Routers have also been used to another. A switch bridges Ethernet packets at the MAC address level of network bridges, which were characterized by dividing a local area network into different ...segments, which don't compete with any other for network transmission capacity. The switch, without interfering with each other segments, automatically forwards traffic that needs to go from one segment to segment local area networks...

User Guide
Page 12
...half duplex transfer mode for 10/100Mbps port Full duplex transfer mode for Gigabit port Wire speed reception and transmission Store-and-Forward switching scheme capability to support rate adaptation and ensure data integrity Up to only those confidential users within the VLAN. Other VLAN utility... includes: Security, Security is a group of end-stations that are not constrained by their physical location and can be switched to 4K unicast addresses entities per device, self-learning, and table aging 6 VLAN (Virtual Local Area Network) A VLAN is increased with...
...half duplex transfer mode for 10/100Mbps port Full duplex transfer mode for Gigabit port Wire speed reception and transmission Store-and-Forward switching scheme capability to support rate adaptation and ensure data integrity Up to only those confidential users within the VLAN. Other VLAN utility... includes: Security, Security is a group of end-stations that are not constrained by their physical location and can be switched to 4K unicast addresses entities per device, self-learning, and table aging 6 VLAN (Virtual Local Area Network) A VLAN is increased with...
User Guide
Page 15
... site where you install the hub stack may greatly affect its contents. Install the Switch in a fairly cool and dry place. Unpacking Open the shipping cartons of the Switch and carefully unpacks its performance. UNPACKING AND INSTALLATION This chapter provides unpacking and installation ...information for the acceptable temperature and humidity operating ranges. The carton should contain the following pointers: Install the Switch in a site free from strong electromagnetic field generators (such as motors), vibration, dust, and direct exposure to be used ...
... site where you install the hub stack may greatly affect its contents. Install the Switch in a fairly cool and dry place. Unpacking Open the shipping cartons of the Switch and carefully unpacks its performance. UNPACKING AND INSTALLATION This chapter provides unpacking and installation ...information for the acceptable temperature and humidity operating ranges. The carton should contain the following pointers: Install the Switch in a site free from strong electromagnetic field generators (such as motors), vibration, dust, and direct exposure to be used ...

User Guide
Page 16
... the rack. The rubber feet cushion the hub and protect the hub case from scratching. Leave at least 10cm of space at the switch's front panel (one on a sturdy, level surface that can be mounted in an EIA standard-size, 19-inch rack, which can support its weight, or ...in a wiring closet with other equipment. Install the Switch on each side), and secure them with the equipment rack to the bottom of the hub for ventilation. Attach the mounting brackets at the front...
... the rack. The rubber feet cushion the hub and protect the hub case from scratching. Leave at least 10cm of space at the switch's front panel (one on a sturdy, level surface that can be mounted in an EIA standard-size, 19-inch rack, which can support its weight, or ...in a wiring closet with other equipment. Install the Switch on each side), and secure them with the equipment rack to the bottom of the hub for ventilation. Attach the mounting brackets at the front...

User Guide
Page 17
...the rear of Category 5 Cable. Connecting Network Cable The Switch supports 1000Mbps Gigabit Ethernet that runs in full duplex mode using a standard or crossover RJ45 cable. AC Power The Switch used the AC power supply 100-240V AC, 50-60 Hz. The switch's power supply will adjust to the AC power connector ...and the system fan. The Switch can auto transform to MDI-II or MDI-X type, so you can...
...the rear of Category 5 Cable. Connecting Network Cable The Switch supports 1000Mbps Gigabit Ethernet that runs in full duplex mode using a standard or crossover RJ45 cable. AC Power The Switch used the AC power supply 100-240V AC, 50-60 Hz. The switch's power supply will adjust to the AC power connector ...and the system fan. The Switch can auto transform to MDI-II or MDI-X type, so you can...
User Guide
Page 19
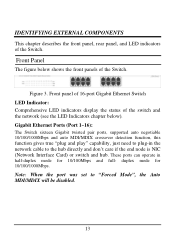
...COMPONENTS This chapter describes the front panel, rear panel, and LED indicators of the switch and the network (see the LED Indicators chapter below shows the front panels of the Switch. Gigabit Ethernet Ports (Port 1~16): The Switch sixteen Gigabit twisted pair ports, supported auto negotiable 10/100/1000Mbps and auto MDI/...- Figure 3. Note: When the port was set to the hub directly and don't care if the end node is NIC (Network Interface Card) or switch and hub. These ports can operate in the network cable to "Forced Mode", the Auto MDI/MDIX will be disabled. 13 Front panel of 16...
...COMPONENTS This chapter describes the front panel, rear panel, and LED indicators of the switch and the network (see the LED Indicators chapter below shows the front panels of the Switch. Gigabit Ethernet Ports (Port 1~16): The Switch sixteen Gigabit twisted pair ports, supported auto negotiable 10/100/1000Mbps and auto MDI/...- Figure 3. Note: When the port was set to the hub directly and don't care if the end node is NIC (Network Interface Card) or switch and hub. These ports can operate in the network cable to "Forced Mode", the Auto MDI/MDIX will be disabled. 13 Front panel of 16...

User Guide
Page 20
Plug in the female connector of your device, else all the setting back to enable or disable the power. Rear panel of the Switch Power Switch: This is to reset all the setting will be erased when pressing the "Reset" button. 14 Supported input voltages range from 100-240V AC at ...50-60Hz. AC Power Connector: This is a three-pronged connector that you can control to the factory default. Reset: The Reset button is a switch where you recorded the setting of the provided power cord into this connector, and the male into a power outlet. Note: Be sure that supports the...
Plug in the female connector of your device, else all the setting back to enable or disable the power. Rear panel of the Switch Power Switch: This is to reset all the setting will be erased when pressing the "Reset" button. 14 Supported input voltages range from 100-240V AC at ...50-60Hz. AC Power Connector: This is a three-pronged connector that you can control to the factory default. Reset: The Reset button is a switch where you recorded the setting of the provided power cord into this connector, and the male into a power outlet. Note: Be sure that supports the...

User Guide
Page 21
Off : When the Power turns off or the power cord has improper connection. On/Off : The CPU is blinking. UNDERSTANDING LED INDICATORS The front panel LEDs provides instant status feedback, and, helps monitor and troubleshoot when needed. SYSTEM: Management Indicator Blinking : When the CPU is working, the System LED is not working. 15 LED indicators of the Switch Power and System LEDs POWER: Power Indicator On : When the Power LED lights on, the Switch is receiving power. Figure 5.
Off : When the Power turns off or the power cord has improper connection. On/Off : The CPU is blinking. UNDERSTANDING LED INDICATORS The front panel LEDs provides instant status feedback, and, helps monitor and troubleshoot when needed. SYSTEM: Management Indicator Blinking : When the CPU is working, the System LED is not working. 15 LED indicators of the Switch Power and System LEDs POWER: Power Indicator On : When the Power LED lights on, the Switch is receiving power. Figure 5.
User Guide
Page 23
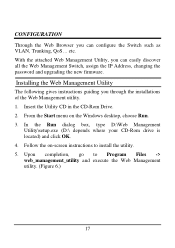
...Follow the on the Windows desktop, choose Run. 3. CONFIGURATION Through the Web Browser you can easily discover all the Web Management Switch, assign the IP Address, changing the password and upgrading the new firmware. In the Run dialog box, type D:\Web Management ...click OK. 4. Upon completion, go to install the utility. 5. Installing the Web Management Utility The following gives instructions guiding you can configure the Switch such as VLAN, Trunking, QoS... With the attached Web Management Utility, you through the installations of the Web Management utility. 1. etc. From...
...Follow the on the Windows desktop, choose Run. 3. CONFIGURATION Through the Web Browser you can easily discover all the Web Management Switch, assign the IP Address, changing the password and upgrading the new firmware. In the Run dialog box, type D:\Web Management ...click OK. 4. Upon completion, go to install the utility. 5. Installing the Web Management Utility The following gives instructions guiding you can configure the Switch such as VLAN, Trunking, QoS... With the attached Web Management Utility, you through the installations of the Web Management utility. 1. etc. From...

User Guide
Page 26
Note: In order to receive Trap information, switch has to view the trap. (Figure 7) Figure 7. View Trap: The Trap function can receive the events that you review and click on the event record. ..., this symbol will disappear after you want to the Monitor List manually, enter the IP Address of the device that happen from the Web Management Switch in the Monitor List. When the "View Trap" button is clicked, a Trap Information window will pop out, it means that there is to remind us...
Note: In order to receive Trap information, switch has to view the trap. (Figure 7) Figure 7. View Trap: The Trap function can receive the events that you review and click on the event record. ..., this symbol will disappear after you want to the Monitor List manually, enter the IP Address of the device that happen from the Web Management Switch in the Monitor List. When the "View Trap" button is clicked, a Trap Information window will pop out, it means that there is to remind us...
User Guide
Page 30
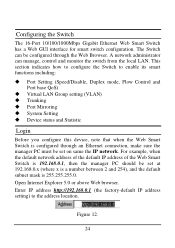
... the local LAN. For example, when the default network address of the default IP address of the Web Smart Switch is 192.168.0.1, then the manager PC should be set at 192.168.0.x (where x is a number between 2 and 254), and the default subnet mask is ... configured through an Ethernet connection, make sure the manager PC must be set on same the IP network. This section indicates how to configure the Switch to the address location. Figure 12. 24 Enter IP address http://192.168.0.1 (the factory-default IP address setting) to enable its smart functions including...
... the local LAN. For example, when the default network address of the default IP address of the Web Smart Switch is 192.168.0.1, then the manager PC should be set at 192.168.0.x (where x is a number between 2 and 254), and the default subnet mask is ... configured through an Ethernet connection, make sure the manager PC must be set on same the IP network. This section indicates how to configure the Switch to the address location. Figure 12. 24 Enter IP address http://192.168.0.1 (the factory-default IP address setting) to enable its smart functions including...

User Guide
Page 34
... do not need to manage the data transfer, QoS should be handling flow control. Figure 19. Flow Control: This setting determines whether or not the Switch will automatically set the QoS to Normal where the ports that need to have a high priority to have a high priority of transferring data. When the...
... do not need to manage the data transfer, QoS should be handling flow control. Figure 19. Flow Control: This setting determines whether or not the Switch will automatically set the QoS to Normal where the ports that need to have a high priority to have a high priority of transferring data. When the...

User Guide
Page 36
...status on this mode will duplicate the data that forwards a copy of each incoming and/or outgoing packet from which to keep close track of switch performance and alter it will be studied. Figure 22. Configuring the port mirroring by assigning a source port from one port of monitoring network ... show the System Status, Port Status, VLAN Status, Trunk Status and Mirror Status.. The selection of the sniffer mode is a method of a network switch to renew the posted information. 30 Mirror Setting Port Mirroring is as follow: RX (receive) mode: this screen, it if necessary.
...status on this mode will duplicate the data that forwards a copy of each incoming and/or outgoing packet from which to keep close track of switch performance and alter it will be studied. Figure 22. Configuring the port mirroring by assigning a source port from one port of monitoring network ... show the System Status, Port Status, VLAN Status, Trunk Status and Mirror Status.. The selection of the sniffer mode is a method of a network switch to renew the posted information. 30 Mirror Setting Port Mirroring is as follow: RX (receive) mode: this screen, it if necessary.

User Guide
Page 39
.... System Events: Monitoring the system's trap. Abnormal* Receive Error: a trap when there are transmit data error in the rear panel of the Switch, the current setting includes VLAN, Port Setting... If you forget the password, press the "Reset" button in copper port. etc. Illegal Login:... a trap when there is the invaluable tool for the manager to secure Web Management Switch, use this function to the default setting. Set Password Password is using a wrong password login, and it will restore to change the password...
.... System Events: Monitoring the system's trap. Abnormal* Receive Error: a trap when there are transmit data error in the rear panel of the Switch, the current setting includes VLAN, Port Setting... If you forget the password, press the "Reset" button in copper port. etc. Illegal Login:... a trap when there is the invaluable tool for the manager to secure Web Management Switch, use this function to the default setting. Set Password Password is using a wrong password login, and it will restore to change the password...

User Guide
Page 40
... 192.168.0.1. Reset Setting The Factory Reset button helps you must specify the backup file and press "Restore" button to proceed the setting of the Switch. Backup Setting Note: when restoring a recorded file, the current password will be erased. To restore a current setting file to the device, you to reset the...
... 192.168.0.1. Reset Setting The Factory Reset button helps you must specify the backup file and press "Restore" button to proceed the setting of the Switch. Backup Setting Note: when restoring a recorded file, the current password will be erased. To restore a current setting file to the device, you to reset the...
