
User Guide
Page 5
TABLE OF CONTENT About This Guide 1 Purpose 1 Terms/Usage 1 Introduction 3 Gigabit Ethernet Technology 3 Fast Ethernet Technology 4 Switching Technology 5 VLAN (Virtual Local Area Network 6 Features 6 Unpacking and Installation 9 Unpacking 9 Installation 9 Rack Mounting 10 Connecting Network Cable 11 AC Power 11 Identifying External Components 13 Front Panel 13 Rear Panel 14 Understanding LED Indicators 15 Power and System LEDs 15 Ports 1~16 Status LEDs 16 Configuration 17 Installing the Web Management Utility 17 i
TABLE OF CONTENT About This Guide 1 Purpose 1 Terms/Usage 1 Introduction 3 Gigabit Ethernet Technology 3 Fast Ethernet Technology 4 Switching Technology 5 VLAN (Virtual Local Area Network 6 Features 6 Unpacking and Installation 9 Unpacking 9 Installation 9 Rack Mounting 10 Connecting Network Cable 11 AC Power 11 Identifying External Components 13 Front Panel 13 Rear Panel 14 Understanding LED Indicators 15 Power and System LEDs 15 Ports 1~16 Status LEDs 16 Configuration 17 Installing the Web Management Utility 17 i

User Guide
Page 6
Discovery List 18 Monitor List 19 Device Setting 21 Toolbar 23 Configuring the Switch 24 Login 24 Setup Menu 26 Configuring Setup Setting 26 Port Settings 26 VLAN Settings (Virtual Local Area Network 28 Trunk Setting 29 Mirror Setting 30 Device Status 30 Statistic 31 System Setting 31 Trap Setting 32 Set Password 33 Backup Setting 34 Reset Setting 34 Logout 35 Technical Specifications 37 ii
Discovery List 18 Monitor List 19 Device Setting 21 Toolbar 23 Configuring the Switch 24 Login 24 Setup Menu 26 Configuring Setup Setting 26 Port Settings 26 VLAN Settings (Virtual Local Area Network 28 Trunk Setting 29 Mirror Setting 30 Device Status 30 Statistic 31 System Setting 31 Trap Setting 32 Set Password 33 Backup Setting 34 Reset Setting 34 Logout 35 Technical Specifications 37 ii
User Guide
Page 9
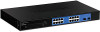
... duplex, flow control, and management objects, but with all 10-Mbps and 100-Mbps Ethernet environments, Gigabit Ethernet provides a straightforward upgrade without wasting a company's existing investment in hardware, software, and trained personnel. Likewise, since data transfers occur 10 times faster than Fast Ethernet, servers outfitted with the network bottlenecks that frequently develop as computers and their busses get faster and more users use applications that generate more traffic. Gigabit Ethernet enables fast optical fiber connections...
... duplex, flow control, and management objects, but with all 10-Mbps and 100-Mbps Ethernet environments, Gigabit Ethernet provides a straightforward upgrade without wasting a company's existing investment in hardware, software, and trained personnel. Likewise, since data transfers occur 10 times faster than Fast Ethernet, servers outfitted with the network bottlenecks that frequently develop as computers and their busses get faster and more users use applications that generate more traffic. Gigabit Ethernet enables fast optical fiber connections...

User Guide
Page 11
... between the individual segments. Routers have also been used to another. A switch bridges Ethernet packets at the MAC address level of increasing the total network capacity available to users on a local area network. The switch, without interfering with each other segments, automatically forwards traffic that needs to go from one segment to segment local area networks, but the cost of switching technology. By doing this...
... between the individual segments. Routers have also been used to another. A switch bridges Ethernet packets at the MAC address level of increasing the total network capacity available to users on a local area network. The switch, without interfering with each other segments, automatically forwards traffic that needs to go from one segment to segment local area networks, but the cost of switching technology. By doing this...

User Guide
Page 12
.../100/1000Mbps Auto-negotiation Gigabit Ethernet ports All RJ45 ports support auto MDI/MDIX, so there is no need for Gigabit port Wire speed reception and transmission Store-and-Forward switching scheme capability to support rate adaptation and ensure data integrity Up to 4K unicast addresses entities per device, self-learning, and table aging 6 Cost Reduction, VLANs can communicate as if a common broadcast domain, a LAN. VLAN (Virtual Local Area Network) A VLAN is...
.../100/1000Mbps Auto-negotiation Gigabit Ethernet ports All RJ45 ports support auto MDI/MDIX, so there is no need for Gigabit port Wire speed reception and transmission Store-and-Forward switching scheme capability to support rate adaptation and ensure data integrity Up to 4K unicast addresses entities per device, self-learning, and table aging 6 Cost Reduction, VLANs can communicate as if a common broadcast domain, a LAN. VLAN (Virtual Local Area Network) A VLAN is...
User Guide
Page 15
... cartons of the Switch and carefully unpacks its performance. Installation The site where you install the hub stack may greatly affect its contents. See Technical Specifications for the Switch. When installing, consider the following items: One 16-Port 10/100/1000Mbps Gigabit Ethernet Web Smart Switch One AC power cord, suitable for replacement. The carton should contain the following pointers: Install the Switch in a site free from strong electromagnetic...
... cartons of the Switch and carefully unpacks its performance. Installation The site where you install the hub stack may greatly affect its contents. See Technical Specifications for the Switch. When installing, consider the following items: One 16-Port 10/100/1000Mbps Gigabit Ethernet Web Smart Switch One AC power cord, suitable for replacement. The carton should contain the following pointers: Install the Switch in a site free from strong electromagnetic...

User Guide
Page 17
... adjacent to the local power source automatically and may be turned on without worrying if you can auto transform to MDI-II or MDI-X type, so you are Auto-MDI type port. The power switch is located at the rear of Category 5 Cable. Connecting Network Cable The Switch supports 1000Mbps Gigabit Ethernet that runs in full duplex mode using a standard or crossover RJ45 cable. AC Power The Switch used the AC power supply 100-240V AC...
... adjacent to the local power source automatically and may be turned on without worrying if you can auto transform to MDI-II or MDI-X type, so you are Auto-MDI type port. The power switch is located at the rear of Category 5 Cable. Connecting Network Cable The Switch supports 1000Mbps Gigabit Ethernet that runs in full duplex mode using a standard or crossover RJ45 cable. AC Power The Switch used the AC power supply 100-240V AC...
User Guide
Page 19
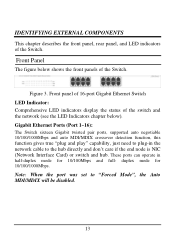
Figure 3. Note: When the port was set to plug-in half-duplex mode for 10/100/1000Mbps. duplex mode for 10/100Mbps and full- These ports can operate in the network cable to the hub directly and don't care if the end node is NIC (Network Interface Card) or switch and hub. Gigabit Ethernet Ports (Port 1~16): The Switch sixteen Gigabit twisted pair ports, supported auto negotiable 10/100/1000Mbps and auto MDI/MDIX crossover...
Figure 3. Note: When the port was set to plug-in half-duplex mode for 10/100/1000Mbps. duplex mode for 10/100Mbps and full- These ports can operate in the network cable to the hub directly and don't care if the end node is NIC (Network Interface Card) or switch and hub. Gigabit Ethernet Ports (Port 1~16): The Switch sixteen Gigabit twisted pair ports, supported auto negotiable 10/100/1000Mbps and auto MDI/MDIX crossover...

User Guide
Page 21
Off : When the Power turns off or the power cord has improper connection. LED indicators of the Switch Power and System LEDs POWER: Power Indicator On : When the Power LED lights on, the Switch is blinking. Figure 5. UNDERSTANDING LED INDICATORS The front panel LEDs provides instant status feedback, and, helps monitor and troubleshoot when needed. SYSTEM: Management Indicator Blinking : When the CPU is working . 15 On/Off : The CPU is not working , the System LED is receiving power.
Off : When the Power turns off or the power cord has improper connection. LED indicators of the Switch Power and System LEDs POWER: Power Indicator On : When the Power LED lights on, the Switch is blinking. Figure 5. UNDERSTANDING LED INDICATORS The front panel LEDs provides instant status feedback, and, helps monitor and troubleshoot when needed. SYSTEM: Management Indicator Blinking : When the CPU is working . 15 On/Off : The CPU is not working , the System LED is receiving power.
User Guide
Page 23
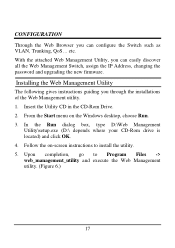
... the Web Browser you can easily discover all the Web Management Switch, assign the IP Address, changing the password and upgrading the new firmware. From the Start menu on -screen instructions to Program Files -> web_management_utility and execute the Web Management utility. (Figure 6.) 17 With the attached Web Management Utility, you through the installations of the Web Management utility. 1. Installing the Web Management Utility The following gives instructions guiding you can configure the Switch such as VLAN, Trunking, QoS...
... the Web Browser you can easily discover all the Web Management Switch, assign the IP Address, changing the password and upgrading the new firmware. From the Start menu on -screen instructions to Program Files -> web_management_utility and execute the Web Management utility. (Figure 6.) 17 With the attached Web Management Utility, you through the installations of the Web Management utility. 1. Installing the Web Management Utility The following gives instructions guiding you can configure the Switch such as VLAN, Trunking, QoS...

User Guide
Page 25
... current IP address of the Utility protocol. Monitor List All the Web Smart Device in the Discovery List: MAC Address: Shows the device MAC Address. Protocol version: Shows the version of the device. you can be monitored; MAC Address: Shows the device MAC Address. Location: Shows where the device is located. Subnet Mask: Shows the Subnet Mask set of the device. Gateway: Shows the Gateway set of the device. IP Address: Shows...
... current IP address of the Utility protocol. Monitor List All the Web Smart Device in the Discovery List: MAC Address: Shows the device MAC Address. Protocol version: Shows the version of the device. you can be monitored; MAC Address: Shows the device MAC Address. Location: Shows where the device is located. Subnet Mask: Shows the Subnet Mask set of the device. Gateway: Shows the Gateway set of the device. IP Address: Shows...

User Guide
Page 26
... Setting Menu (see Page 45 for detail). Add Item: To add a device to the Monitor List manually, enter the IP Address of the device that you review and click on the event record. Note: In order to receive Trap information, switch has to monitor. View Trap: The Trap function can receive the events that happen from the Web Management Switch in the Monitor List. 20 Figure 8. Delete...
... Setting Menu (see Page 45 for detail). Add Item: To add a device to the Monitor List manually, enter the IP Address of the device that you review and click on the event record. Note: In order to receive Trap information, switch has to monitor. View Trap: The Trap function can receive the events that happen from the Web Management Switch in the Monitor List. 20 Figure 8. Delete...

User Guide
Page 27
Configuration Setting: In this Configuration Setting, you must fill up the password and press the "Set" to (Trap IP Address), System name and Location. Configuration Setting 21 Figure 9. Select the device in the Device Setting Dialog box. Device Setting You can set the device by using the function key in the Discovery list or Monitor List and press this button, then the Configuration Setting window will pop out as Figure 9, after filling up the data that you want to change, you can set the IP Address, Subnet Mask, Gateway, Set Trap to process the data changed immediately.
Configuration Setting: In this Configuration Setting, you must fill up the password and press the "Set" to (Trap IP Address), System name and Location. Configuration Setting 21 Figure 9. Select the device in the Device Setting Dialog box. Device Setting You can set the device by using the function key in the Discovery list or Monitor List and press this button, then the Configuration Setting window will pop out as Figure 9, after filling up the data that you want to change, you can set the IP Address, Subnet Mask, Gateway, Set Trap to process the data changed immediately.
User Guide
Page 30
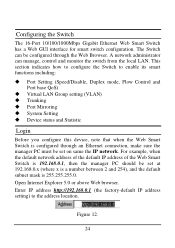
... set on same the IP network. Configuring the Switch The 16-Port 10/100/1000Mbps Gigabit Ethernet Web Smart Switch has a Web GUI interface for smart switch configuration. Open Internet Explorer 5.0 or above Web browser. Enter IP address http://192.168.0.1 (the factory-default IP address setting) to enable its smart functions including: Port Setting (Speed/Disable, Duplex mode, Flow Control and Port base QoS) Virtual LAN Group setting (VLAN) Trunking Port Mirroring System Setting Device status and Statistic Login Before you configure this device, note that when the Web Smart Switch...
... set on same the IP network. Configuring the Switch The 16-Port 10/100/1000Mbps Gigabit Ethernet Web Smart Switch has a Web GUI interface for smart switch configuration. Open Internet Explorer 5.0 or above Web browser. Enter IP address http://192.168.0.1 (the factory-default IP address setting) to enable its smart functions including: Port Setting (Speed/Disable, Duplex mode, Flow Control and Port base QoS) Virtual LAN Group setting (VLAN) Trunking Port Mirroring System Setting Device status and Statistic Login Before you configure this device, note that when the Web Smart Switch...

User Guide
Page 34
... flow control or other ports. The default setting of all port QoS is high, set to Disable. VLAN Settings (Virtual Local Area Network) Group individual ports into a small "Virtual" network of the other hardware/software management. there is set to forced mode, then the flow control will automatically set the QoS to Normal where the ports that need to have a high priority to manage the data transfer, QoS should be independent of their own to be change. VLAN Group Settings...
... flow control or other ports. The default setting of all port QoS is high, set to Disable. VLAN Settings (Virtual Local Area Network) Group individual ports into a small "Virtual" network of the other hardware/software management. there is set to forced mode, then the flow control will automatically set the QoS to Normal where the ports that need to have a high priority to manage the data transfer, QoS should be independent of their own to be change. VLAN Group Settings...

User Guide
Page 36
... of monitoring network traffic that send to the source and forward to renew the posted information. 30 Configuring the port mirroring by assigning a source port from one port of a network switch to copy all packets and a sniffer port where those packets will show the System Status, Port Status, VLAN Status, Trunk Status and Mirror Status.. Mirror Setting Port Mirroring is as follow: RX (receive) mode: this screen, it if necessary. It enables the manager to present the device status on the "Status...
... of monitoring network traffic that send to the source and forward to renew the posted information. 30 Configuring the port mirroring by assigning a source port from one port of a network switch to copy all packets and a sniffer port where those packets will show the System Status, Port Status, VLAN Status, Trunk Status and Mirror Status.. Mirror Setting Port Mirroring is as follow: RX (receive) mode: this screen, it if necessary. It enables the manager to present the device status on the "Status...

User Guide
Page 39
Twisted Pair Port Events: Monitoring the copper port status. Set Password Password is using a wrong password login, and it will record from where the IP to change the password. will restore to the default setting. System Events: Monitoring the system's trap. etc. Set Password 33 Abnormal*: 50 error packet count within 10 seconds. Abnormal* Receive Error: a trap when there are transmit data error in copper port. If you forget the password, press the "Reset" button in copper port. Figure...
Twisted Pair Port Events: Monitoring the copper port status. Set Password Password is using a wrong password login, and it will record from where the IP to change the password. will restore to the default setting. System Events: Monitoring the system's trap. etc. Set Password 33 Abnormal*: 50 error packet count within 10 seconds. Abnormal* Receive Error: a trap when there are transmit data error in copper port. If you forget the password, press the "Reset" button in copper port. Figure...

User Guide
Page 40
.... To restore a current setting file to the device, you need to backup the setting, press the "Backup" button to save the setting. Backup Setting Note: when restoring a recorded file, the current password will be erased. Reset Setting 34 Reset Setting The Factory Reset button helps you to backup the current setting of the device will not be set to default setting 192.168.0.1. Be aware that the entire configuration will be reset, the IP address of the Switch. Backup Setting The backup tools...
.... To restore a current setting file to the device, you need to backup the setting, press the "Backup" button to save the setting. Backup Setting Note: when restoring a recorded file, the current password will be erased. Reset Setting 34 Reset Setting The Factory Reset button helps you to backup the current setting of the device will not be set to default setting 192.168.0.1. Be aware that the entire configuration will be reset, the IP address of the Switch. Backup Setting The backup tools...
Quick Installation Guide
Page 3
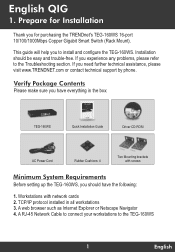
... AC Power Cord Rubber Cushions: 4 Two Mounting brackets with network cards 2. Workstations with screws Minimum System Requirements Before setting up the TEG-160WS, you need further technical assistance, please visit www.TRENDNET.com or contact technical support by phone. A web browser such as Internet Explorer or Netscape Navigator 4. Installation should have everything in the box: TEG-160WS TEG-160WS 16-port 10/100/1000Mbps Copper Gigabit Smart Switch (Rack Mount) Quick Installation Guide Guide d'installation rapide...
... AC Power Cord Rubber Cushions: 4 Two Mounting brackets with network cards 2. Workstations with screws Minimum System Requirements Before setting up the TEG-160WS, you need further technical assistance, please visit www.TRENDNET.com or contact technical support by phone. A web browser such as Internet Explorer or Netscape Navigator 4. Installation should have everything in the box: TEG-160WS TEG-160WS 16-port 10/100/1000Mbps Copper Gigabit Smart Switch (Rack Mount) Quick Installation Guide Guide d'installation rapide...
Quick Installation Guide
Page 12
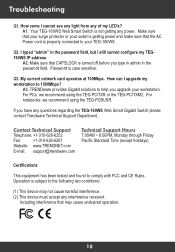
.... Your TEG-160WS Web Smart Switch is subject to 1000Mbps? Password is case sensitive. How can I cannot see any light from any questions regarding the TEG-160WS Web Smart Gigabit Switch please contact Trendware Technical Support Department.. For PCs, we recommend using the TEG-PCITXR or the TEG-PCITXM2. Including interference that the AC Power cord is turned off before you have any of my LED's? Troubleshooting Q1. I still cannot configure my...
.... Your TEG-160WS Web Smart Switch is subject to 1000Mbps? Password is case sensitive. How can I cannot see any light from any questions regarding the TEG-160WS Web Smart Gigabit Switch please contact Trendware Technical Support Department.. For PCs, we recommend using the TEG-PCITXR or the TEG-PCITXM2. Including interference that the AC Power cord is turned off before you have any of my LED's? Troubleshooting Q1. I still cannot configure my...


