
Datasheet
Page 1
... virtually any stand-alone multi-function USB printer into a shared resource on your network. FEATURES • Compliant with USB 2.0 high speed printing • Supports most operating systems, simply connect a multi-function device to this product for easy firmware upgrade • 5 year limited warranty TE100-MP1U rev:11.06.2008 print server 1-Port 10/100Mbps Multi-Function USB 2.0 Print Server TE100-MP1U The 1-Port 10/100Mbps Multi-Function USB 2.0 Print Server (TE100-MP1U) is designed to...
... virtually any stand-alone multi-function USB printer into a shared resource on your network. FEATURES • Compliant with USB 2.0 high speed printing • Supports most operating systems, simply connect a multi-function device to this product for easy firmware upgrade • 5 year limited warranty TE100-MP1U rev:11.06.2008 print server 1-Port 10/100Mbps Multi-Function USB 2.0 Print Server TE100-MP1U The 1-Port 10/100Mbps Multi-Function USB 2.0 Print Server (TE100-MP1U) is designed to...
Datasheet
Page 2
... Multi-Function USB 2.0 Print Server TEW-MP2U 54Mbps 802.11g Wireless 2-Port Multi-Function USB 2.0 Print Server Multi-Functional USB 2.0 Printer Workstations with Fast Ethernet Adapter (TE100-PCIWN) ORDERING INFORMATION 20675 Manhattan Place,Torrance, CA 90501 USA Tel: 1-310-961-5500 Fax: 1-310-961-5511 Web: www.trendnet.com Email: sales@trendnet.com To Order Please Call: 1-888-326-6061 TRENDnet is a registered trademark. 1-Port 10/100Mbps Multi-Function USB 2.0 Print Server TE100-MP1U...
... Multi-Function USB 2.0 Print Server TEW-MP2U 54Mbps 802.11g Wireless 2-Port Multi-Function USB 2.0 Print Server Multi-Functional USB 2.0 Printer Workstations with Fast Ethernet Adapter (TE100-PCIWN) ORDERING INFORMATION 20675 Manhattan Place,Torrance, CA 90501 USA Tel: 1-310-961-5500 Fax: 1-310-961-5511 Web: www.trendnet.com Email: sales@trendnet.com To Order Please Call: 1-888-326-6061 TRENDnet is a registered trademark. 1-Port 10/100Mbps Multi-Function USB 2.0 Print Server TE100-MP1U...
Quick Installation Guide
Page 4
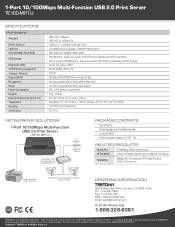
... Multi-Function USB 2.0 Print Server (TEW-MP2U) Multi-Functional External USB 2.0 USB 2.0 Printer Storage Drive Notebook with Wireless PC Card (TEW-421PC) 54Mbps 802.11g Wireless Firewall Router (TEW-432BRP) Workstation with Wireless PCI Adapter (TEW-423PI) Internet Cable/DSL Modem 1 or 2 Port 10/100Mbps Multi-Function USB 2.0 Print Server (TE100-MP1U/TE100-MP2U) Internet Cable/DSL Modem Cable/DSL 4-Port Broadband Router (TW100-S4W1CA) Multi-Functional USB 2.0 Printer External USB...
... Multi-Function USB 2.0 Print Server (TEW-MP2U) Multi-Functional External USB 2.0 USB 2.0 Printer Storage Drive Notebook with Wireless PC Card (TEW-421PC) 54Mbps 802.11g Wireless Firewall Router (TEW-432BRP) Workstation with Wireless PCI Adapter (TEW-423PI) Internet Cable/DSL Modem 1 or 2 Port 10/100Mbps Multi-Function USB 2.0 Print Server (TE100-MP1U/TE100-MP2U) Internet Cable/DSL Modem Cable/DSL 4-Port Broadband Router (TW100-S4W1CA) Multi-Functional USB 2.0 Printer External USB...
Quick Installation Guide
Page 5
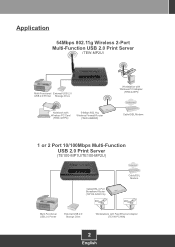
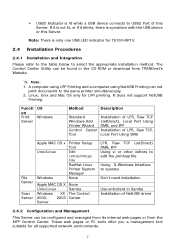
Install the printer drivers to the LAN port of the Print Server. 5. Then shutdown the printer and disconnect the printer from a Switch/Router to your printer's manual for printer installation instructions. 2. How to the USB port of the Print Server. 4. Note: Please refer to a power outlet. 3. Verify the Power, Link and USB1 or USB2 LEDs are lit on the Print Server. 3 English Power ON printer. 6. Connect a RJ-45 network cable from your computer. Connect the USB Printer to Connect 1. 2. Connect the Power Adapter to the Print Server and then to your computer.
Install the printer drivers to the LAN port of the Print Server. 5. Then shutdown the printer and disconnect the printer from a Switch/Router to your printer's manual for printer installation instructions. 2. How to the USB port of the Print Server. 4. Note: Please refer to a power outlet. 3. Verify the Power, Link and USB1 or USB2 LEDs are lit on the Print Server. 3 English Power ON printer. 6. Connect a RJ-45 network cable from your computer. Connect the USB Printer to Connect 1. 2. Connect the Power Adapter to the Print Server and then to your computer.
Quick Installation Guide
Page 10
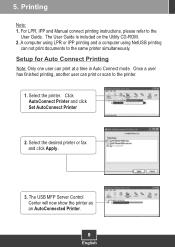
... on the Utility CD-ROM. 2. Once a user has finished printing, another user can print or scan to the User Guide. For LPR, IPP and Manual connect printing instructions, please refer to the printer. 1. 5. Click AutoConnect Printer and click Set AutoConnect Printer 2. The USB MFP Server Control Center will now show the printer as an AutoConnected...
... on the Utility CD-ROM. 2. Once a user has finished printing, another user can print or scan to the User Guide. For LPR, IPP and Manual connect printing instructions, please refer to the printer. 1. 5. Click AutoConnect Printer and click Set AutoConnect Printer 2. The USB MFP Server Control Center will now show the printer as an AutoConnected...

Quick Installation Guide
Page 14
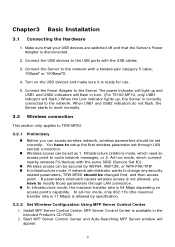
Click Supported Protocols, select Server Mode or NetUSB Mode and then click apply. 3. Select the Print Server and click Configure Server. 2. Click Yes to restart the Print Server. Storage Selecting Mode 1. Server Mode 1. Click Network Storage. 2. Right click the USB storage icon and select Map Network Drive. 12 English 8.
Click Supported Protocols, select Server Mode or NetUSB Mode and then click apply. 3. Select the Print Server and click Configure Server. 2. Click Yes to restart the Print Server. Storage Selecting Mode 1. Server Mode 1. Click Network Storage. 2. Right click the USB storage icon and select Map Network Drive. 12 English 8.

Quick Installation Guide
Page 16
... Print Server, wait 15 seconds, then plug the print server back in. I do ? A5. The Multi-Function Print (MFP) Server Control Center does not detect the Print Server and/or printer/storage device. Fourth, go through the installation process again. Q2. Once the user has finished printing or scanner, you will not work properly. You must wait until the other USB port (TE100...
... Print Server, wait 15 seconds, then plug the print server back in. I do ? A5. The Multi-Function Print (MFP) Server Control Center does not detect the Print Server and/or printer/storage device. Fourth, go through the installation process again. Q2. Once the user has finished printing or scanner, you will not work properly. You must wait until the other USB port (TE100...
Quick Installation Guide
Page 17
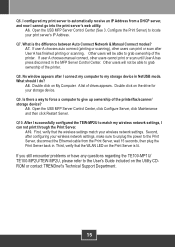
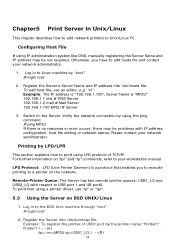
... the USB MFP Server Control Center, click Configure Server, click Maintenance and then click Restart Server. First, verify that the WLAN LED on the Utility CDROM or contact TRENDnet's Technical Support Department. 15 If user A chooses manual connect, other users can not print through the Print Server. Q8.... Double click on My Computer. If you still encounter problems or have any questions regarding the TE100-MP1U/ TE100-MP2U/TEW-MP2U, please refer to grab ownership of drives appears. A7. I configured my print server to match my wireless network settings, I cannot go into the...
... the USB MFP Server Control Center, click Configure Server, click Maintenance and then click Restart Server. First, verify that the WLAN LED on the Utility CDROM or contact TRENDnet's Technical Support Department. 15 If user A chooses manual connect, other users can not print through the Print Server. Q8.... Double click on My Computer. If you still encounter problems or have any questions regarding the TE100-MP1U/ TE100-MP2U/TEW-MP2U, please refer to grab ownership of drives appears. A7. I configured my print server to match my wireless network settings, I cannot go into the...
User's Guide
Page 2
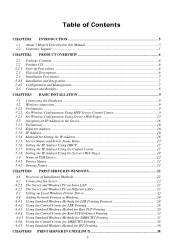
... Center 17 Setting the IP Address Using the Server's Web Pages 19 Name of USB Device ...21 Printer Names...21 Storage Names ...21 CHAPTER4 PRINT SERVER IN WINDOWS 22 4.1 Overview of Installation Methods 22 4.2 Connecting the Server...22 4.2.1 The Server and Windows PC on Same LAN 23 4.2.2 The Server and Windows PC on Different LANs 23 4.3 Setting...
... Center 17 Setting the IP Address Using the Server's Web Pages 19 Name of USB Device ...21 Printer Names...21 Storage Names ...21 CHAPTER4 PRINT SERVER IN WINDOWS 22 4.1 Overview of Installation Methods 22 4.2 Connecting the Server...22 4.2.1 The Server and Windows PC on Same LAN 23 4.2.2 The Server and Windows PC on Different LANs 23 4.3 Setting...

User's Guide
Page 3
...Printing by LPD/LPR ...38 5.3 Using the Server on BSD UNIX/Linux 38 5.4 Using the Server on RedHat Linux (Fedora Core 39 CHAPTER6 FILE SERVER ...46 6.1 6.2 6.3 6.4 6.5 6.5.1 6.5.2 6.5.3 6.5.4 Preliminary ...46 Storage Names ...46 Connecting USB Mass Storage to the Server 46 Supported Codepages ...47 Adding Your USB... ...55 Connect & Disconnect...55 How to Use ...56 Remote Installation ...56 NetUSB Printing ...58 NetUSB Scanning...60 NetUSB Scanning using Network Scan 62 Accessing USB Storage using NetUSB Technology 63 Limitations ...64 CHAPTER8 THE CONTROL CENTER 65 8.1 8.2 ...
...Printing by LPD/LPR ...38 5.3 Using the Server on BSD UNIX/Linux 38 5.4 Using the Server on RedHat Linux (Fedora Core 39 CHAPTER6 FILE SERVER ...46 6.1 6.2 6.3 6.4 6.5 6.5.1 6.5.2 6.5.3 6.5.4 Preliminary ...46 Storage Names ...46 Connecting USB Mass Storage to the Server 46 Supported Codepages ...47 Adding Your USB... ...55 Connect & Disconnect...55 How to Use ...56 Remote Installation ...56 NetUSB Printing ...58 NetUSB Scanning...60 NetUSB Scanning using Network Scan 62 Accessing USB Storage using NetUSB Technology 63 Limitations ...64 CHAPTER8 THE CONTROL CENTER 65 8.1 8.2 ...
User's Guide
Page 5
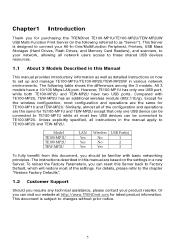
... in this manual are based on how to Factory Default, which will restore most of the configuration and operations are the same for purchasing the TRENDnet TE100-MP1U/TE100-MP2U/TEW-MP2UW USB Multi-Function Print Server (in a new Server. Compared with basic networking principles. Chapter1 Introduction Thank you for TE100-MP1U and TEW-MP2U. The following referred to...
... in this manual are based on how to Factory Default, which will restore most of the configuration and operations are the same for purchasing the TRENDnet TE100-MP1U/TE100-MP2U/TEW-MP2UW USB Multi-Function Print Server (in a new Server. Compared with basic networking principles. Chapter1 Introduction Thank you for TE100-MP1U and TEW-MP2U. The following referred to...
User's Guide
Page 6
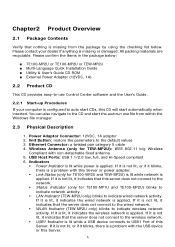
... to indicate wireless network activity. If it indicates that this server does not connect to the network. ƒ Status Indicator...the items in the package below: „ TE100-MP2U or TE100-MP2U or TEW-MP2U „ Multi-Language Quick Installation Guide „ Utility & ...USB Host Ports: USB 1.1/2.0 low, full, and Hi-Speed compliant 6. If it is lit, it blinks, there is missing from within the Windows file manager. 2.3 Physical Description 1. Ethernet Connector: a twisted pair category 5 cable 4. Please contact your computer is applied. Wireless Antenna (only for TE100-MP1U and TE100...
... to indicate wireless network activity. If it indicates that this server does not connect to the network. ƒ Status Indicator...the items in the package below: „ TE100-MP2U or TE100-MP2U or TEW-MP2U „ Multi-Language Quick Installation Guide „ Utility & ...USB Host Ports: USB 1.1/2.0 low, full, and Hi-Speed compliant 6. If it is lit, it blinks, there is missing from within the Windows file manager. 2.3 Physical Description 1. Ethernet Connector: a twisted pair category 5 cable 4. Please contact your computer is applied. Wireless Antenna (only for TE100-MP1U and TE100...
User's Guide
Page 7
... using LRP Printing and a computer using NetUSB Printing can not print documents to USB2 Port of NetUSB driver 2.4.2 Configuration and Management This Server can be configured and managed from its internal web pages or from TRENDnet's Website. # Note: 1. If it is not lit, or if it blinks, there is only one USB LED indicator for TE100-MP1U. 2.4 Installation...
... using LRP Printing and a computer using NetUSB Printing can not print documents to USB2 Port of NetUSB driver 2.4.2 Configuration and Management This Server can be configured and managed from its internal web pages or from TRENDnet's Website. # Note: 1. If it is not lit, or if it blinks, there is only one USB LED indicator for TE100-MP1U. 2.4 Installation...

User's Guide
Page 8
...USB devices. 6. Future Proof: The firmware stored in a reliable and easy fashion. 4. Easy to Install: The Server installs, operates, and is managed in the Server's Flash memory can assign administrator name and password to quickly update and enhance its operational features when new Server... Server provides the following features and benefits: 1. Monitoring: The Server's web pages and user software allow you to restrict login. 5. Reliability: The Server provides high performance and reliability combined with low power consumption. 2. Flexibility: The Server supports print/File...
...USB devices. 6. Future Proof: The firmware stored in a reliable and easy fashion. 4. Easy to Install: The Server installs, operates, and is managed in the Server's Flash memory can assign administrator name and password to quickly update and enhance its operational features when new Server... Server provides the following features and benefits: 1. Monitoring: The Server's web pages and user software allow you to restrict login. 5. Reliability: The Server provides high performance and reliability combined with low power consumption. 2. Flexibility: The Server supports print/File...
User's Guide
Page 9
...; Preliminary Before you have to the network. Connect the Power Adapter to the USB ports with the USB cables. 3. MFP Server Control Center is available in turn. (For TE100-MP1U, only USB1 indicator will flash.) When the Link indicator lights up, the Server is disconnected. 2. Ad-hoc mode, which need an access point to change any...
...; Preliminary Before you have to the network. Connect the Power Adapter to the USB ports with the USB cables. 3. MFP Server Control Center is available in turn. (For TE100-MP1U, only USB1 indicator will flash.) When the Link indicator lights up, the Server is disconnected. 2. Ad-hoc mode, which need an access point to change any...

User's Guide
Page 21
... name. The system will set as : USB1_Printer and USB2_Printer with respect to USB1 port and USB2 port. 3.4.2 Storage Names The local drives of USB Device 3.4.1 Printer Names 1. You have to define Subnet Mask and Default Gateway. 7. For example, the printer model name is "LaserJet 3030 PCL 6" and ...procedure of setting the IP address. 3.4 Name of the two storages in USB1 port and USB2 port are set as "LaserJet 303". 2. And the Server will be set the printer model names as USBx_DyPz, where USBx represents the USBx port, Dy represents the y-th Disk (in multiple cards) and Pz...
... name. The system will set as : USB1_Printer and USB2_Printer with respect to USB1 port and USB2 port. 3.4.2 Storage Names The local drives of USB Device 3.4.1 Printer Names 1. You have to define Subnet Mask and Default Gateway. 7. For example, the printer model name is "LaserJet 3030 PCL 6" and ...procedure of setting the IP address. 3.4 Name of the two storages in USB1 port and USB2 port are set as "LaserJet 303". 2. And the Server will be set the printer model names as USBx_DyPz, where USBx represents the USBx port, Dy represents the y-th Disk (in multiple cards) and Pz...

User's Guide
Page 30
Number values are 9100, 9101 for USB port 1 and USB port 2, respectively. Refer to the Server's web pages or the Control Center, you can get exact values. Click OK. 9. Click Finish. 30
Number values are 9100, 9101 for USB port 1 and USB port 2, respectively. Refer to the Server's web pages or the Control Center, you can get exact values. Click OK. 9. Click Finish. 30
User's Guide
Page 38
... USB1 port by using IP administration system like DNS, manually registering the Server Name and IP address may be not required. Printer1:\ ---(A) :lp=:rm=MP2U:rp=USB1_LQ:\ ---(B) 38 Otherwise, you to execute printing to print using a printer driver, use an editor, e.g. "vi". Verify the...address configuration, host file editing or network status. Printing by "root". # login root 2. Example: The IP address is "192.168.1.100", Server Name is a protocol that enables you have to USB port 1 and UB port2. Chapter5 Print Server in Unix/Linux This chapter describes how to ...
... USB1 port by using IP administration system like DNS, manually registering the Server Name and IP address may be not required. Printer1:\ ---(A) :lp=:rm=MP2U:rp=USB1_LQ:\ ---(B) 38 Otherwise, you to execute printing to print using a printer driver, use an editor, e.g. "vi". Verify the...address configuration, host file editing or network status. Printing by "root". # login root 2. Example: The IP address is "192.168.1.100", Server Name is a protocol that enables you have to USB port 1 and UB port2. Chapter5 Print Server in Unix/Linux This chapter describes how to ...

User's Guide
Page 46
... FAT12/16/32 and NTFS. This product allows shared two USB storage devices over TCP/IP and FTP protocol. 6.1 Preliminary 1. Chapter6 File Server This chapter describes the file server function of the Server which allows USB storage devices to be set up. 4. Please refer to the Server 46 TRENDnet is not responsible for the leak, manipulation, loss, or...
... FAT12/16/32 and NTFS. This product allows shared two USB storage devices over TCP/IP and FTP protocol. 6.1 Preliminary 1. Chapter6 File Server This chapter describes the file server function of the Server which allows USB storage devices to be set up. 4. Please refer to the Server 46 TRENDnet is not responsible for the leak, manipulation, loss, or...

User's Guide
Page 49
4. Double click the highlight list and enter the Server's administrator (default: admin) and password (default: admin). 4. After you have logged in your USB Mass Storages with Security You can use the following protocols to share your local area network, then you... Server's web pages. 6.5.1 Setting up File Server Using the Control Center 1. Start the Control Center and Auto-searching Server window will appear. 2. If the tool finds multiple Servers in successfully, click Supported Protocols. 49 Select your codepage form File Server Codepage box and click Apply. 6.5 Adding Your USB ...
4. Double click the highlight list and enter the Server's administrator (default: admin) and password (default: admin). 4. After you have logged in your USB Mass Storages with Security You can use the following protocols to share your local area network, then you... Server's web pages. 6.5.1 Setting up File Server Using the Control Center 1. Start the Control Center and Auto-searching Server window will appear. 2. If the tool finds multiple Servers in successfully, click Supported Protocols. 49 Select your codepage form File Server Codepage box and click Apply. 6.5 Adding Your USB ...