Quick Installation Guide
Page 5
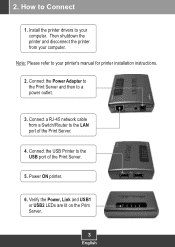
Note: Please refer to the LAN port of the Print Server. 5. Connect a RJ-45 network cable from your computer. Then shutdown the printer and disconnect the printer from a Switch/Router to your printer's manual for printer installation instructions. 2. How to a power outlet. 3. Connect the Power Adapter to the Print Server and then to Connect 1. Verify the Power, Link and USB1 or USB2 LEDs are lit on the Print Server. 3 English 2. Connect the USB Printer to your computer. Power ON printer. 6. Install the printer drivers to the USB port of the Print Server. 4.
Note: Please refer to the LAN port of the Print Server. 5. Connect a RJ-45 network cable from your computer. Then shutdown the printer and disconnect the printer from a Switch/Router to your printer's manual for printer installation instructions. 2. How to a power outlet. 3. Connect the Power Adapter to the Print Server and then to Connect 1. Verify the Power, Link and USB1 or USB2 LEDs are lit on the Print Server. 3 English 2. Connect the USB Printer to your computer. Power ON printer. 6. Install the printer drivers to the USB port of the Print Server. 4.
Quick Installation Guide
Page 10
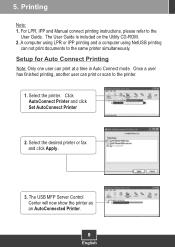
... The USB MFP Server Control Center will now show the printer as an AutoConnected Printer. 8 English 5. A computer using LPR or IPP printing and a computer using NetUSB printing can not print documents to the printer. 1. Once a user has finished printing, another user can print at a time...click Apply. 3. Printing Note: 1. Setup for Auto Connect Printing Note: Only one user can print or scan to the same printer simultaneously. Select the printer. Click AutoConnect Printer and click Set AutoConnect Printer 2. For LPR, IPP and Manual connect printing instructions, please refer ...
... The USB MFP Server Control Center will now show the printer as an AutoConnected Printer. 8 English 5. A computer using LPR or IPP printing and a computer using NetUSB printing can not print documents to the printer. 1. Once a user has finished printing, another user can print at a time...click Apply. 3. Printing Note: 1. Setup for Auto Connect Printing Note: Only one user can print or scan to the same printer simultaneously. Select the printer. Click AutoConnect Printer and click Set AutoConnect Printer 2. For LPR, IPP and Manual connect printing instructions, please refer ...
Quick Installation Guide
Page 17
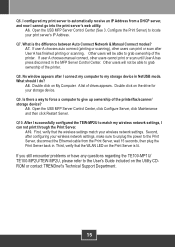
...CDROM or contact TRENDnet's Technical Support Department. 15 Double click on the Print Server is the difference between Auto Connect Network & Manual Connect modes? Q9. A9. Open the USB MFP Server Control Center, click Configure Server, click Maintenance and then click Restart Server. First, verify ... encounter problems or have any questions regarding the TE100-MP1U/ TE100-MP2U/TEW-MP2U, please refer to match my wireless network settings, I cannot go into the print server's web utility. A list of the printer. I configured my print server to grab ownership of drives appears. Q7. ...
...CDROM or contact TRENDnet's Technical Support Department. 15 Double click on the Print Server is the difference between Auto Connect Network & Manual Connect modes? Q9. A9. Open the USB MFP Server Control Center, click Configure Server, click Maintenance and then click Restart Server. First, verify ... encounter problems or have any questions regarding the TE100-MP1U/ TE100-MP2U/TEW-MP2U, please refer to match my wireless network settings, I cannot go into the print server's web utility. A list of the printer. I configured my print server to grab ownership of drives appears. Q7. ...
User's Guide
Page 2
... Pages 19 Name of USB Device ...21 Printer Names...21 Storage Names ...21 CHAPTER4 PRINT SERVER IN WINDOWS 22 4.1 Overview of Installation Methods 22 4.2 Connecting the Server...22 4.2.1 The Server and Windows PC on Same LAN 23 4.2.2 The Server and Windows PC on Different LANs 23 4.3 Setting up Local Windows Printer Driver 23 4.4 Adding Network...
... Pages 19 Name of USB Device ...21 Printer Names...21 Storage Names ...21 CHAPTER4 PRINT SERVER IN WINDOWS 22 4.1 Overview of Installation Methods 22 4.2 Connecting the Server...22 4.2.1 The Server and Windows PC on Same LAN 23 4.2.2 The Server and Windows PC on Different LANs 23 4.3 Setting up Local Windows Printer Driver 23 4.4 Adding Network...
User's Guide
Page 5
... explicitly specified, all of the settings. The instructions described in this Manual This manual provides introductory information as well as "Server"). All 3 models have two USB ports. Model TE100-MP1U TE100-MP2U TEW-MP2U LAN Yes Yes Yes Wireless No No Yes USB Port...configuration and operations are the same for TE100-MP1U and TEW-MP2U. Similarly, almost all instructions in various network environments. Chapter1 Introduction Thank you for purchasing the TRENDnet TE100-MP1U/TE100-MP2U/TEW-MP2UW USB Multi-Function Print Server (in a new Server. For details, please refer to ...
... explicitly specified, all of the settings. The instructions described in this Manual This manual provides introductory information as well as "Server"). All 3 models have two USB ports. Model TE100-MP1U TE100-MP2U TEW-MP2U LAN Yes Yes Yes Wireless No No Yes USB Port...configuration and operations are the same for TE100-MP1U and TEW-MP2U. Similarly, almost all instructions in various network environments. Chapter1 Introduction Thank you for purchasing the TRENDnet TE100-MP1U/TE100-MP2U/TEW-MP2UW USB Multi-Function Print Server (in a new Server. For details, please refer to ...
User's Guide
Page 16
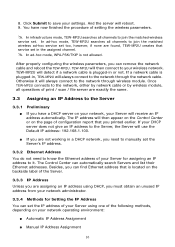
... network, your network operating environment: „ Automatic IP Address Assignment „ Manual IP Address Assignment 16 If a network cable is not allowed. You have a DHCP server on the page of print / scan / file server are assigning an IP address using one of the Server. 3.3.3 IP Address Unless you are exactly the same. 3.3 Assigning an IP...
... network, your network operating environment: „ Automatic IP Address Assignment „ Manual IP Address Assignment 16 If a network cable is not allowed. You have a DHCP server on the page of print / scan / file server are assigning an IP address using one of the Server. 3.3.3 IP Address Unless you are exactly the same. 3.3 Assigning an IP...
User's Guide
Page 17
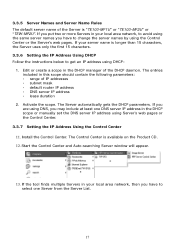
... using the same server names you have to select one DNS server IP address in the DHCP scope or manually set the DNS server IP address using the Control Center or the Server's web pages. The Server automatically gets the DHCP parameters. If the tool finds multiple Servers in the DHCP ... 11. Activate the scope. If you may include at least one Server from the Server List. 17 Install the Control Center. The Control Center is "TE100-MP1U" or "TE100-MP2U" or "TEW-MP2U". 3.3.5 Server Names and Server Name Rules The default server name of the Server is available on the Product CD. 12.
... using the same server names you have to select one DNS server IP address in the DHCP scope or manually set the DNS server IP address using the Control Center or the Server's web pages. The Server automatically gets the DHCP parameters. If the tool finds multiple Servers in the DHCP ... 11. Activate the scope. If you may include at least one Server from the Server List. 17 Install the Control Center. The Control Center is "TE100-MP1U" or "TE100-MP2U" or "TEW-MP2U". 3.3.5 Server Names and Server Name Rules The default server name of the Server is available on the Product CD. 12.

User's Guide
Page 19
If you choose Automatically get IP by DHCP, you also have to define Subnet Mask and Default Gateway. Open IE Browser and enter the Server's IP address or click the Home Icon of you have now finished the procedure of Set the IP Address Using the Control Center. 2. Go ... IP address. 3.3.8 Setting the IP Address Using the Server's Web Pages 1. You can use desired DNS by clicking the Manual DNS button and manually assigning a DNS. 17. 16. If you don't know the current IP of you Server, you Server in the Server List. And the Server will reboot. 18. You have to save your choice...
If you choose Automatically get IP by DHCP, you also have to define Subnet Mask and Default Gateway. Open IE Browser and enter the Server's IP address or click the Home Icon of you have now finished the procedure of Set the IP Address Using the Control Center. 2. Go ... IP address. 3.3.8 Setting the IP Address Using the Server's Web Pages 1. You can use desired DNS by clicking the Manual DNS button and manually assigning a DNS. 17. 16. If you don't know the current IP of you Server, you Server in the Server List. And the Server will reboot. 18. You have to save your choice...
User's Guide
Page 38
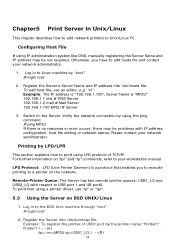
... contact your network administrator. 1. Please contact your workstation manual. "vi". For further information on BSD UNIX/Linux 1. To print files using LPD protocol of USB1 port by the printer name "Printer1". Switch on the network. Printing by using IP administration system like DNS, manually registering the Server Name and IP address may be not required...
... contact your network administrator. 1. Please contact your workstation manual. "vi". For further information on BSD UNIX/Linux 1. To print files using LPD protocol of USB1 port by the printer name "Printer1". Switch on the network. Printing by using IP administration system like DNS, manually registering the Server Name and IP address may be not required...
User's Guide
Page 57
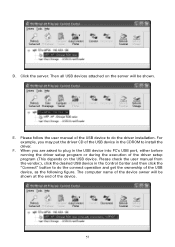
... computer name of the device owner will be shown at the end of the driver setup program (This depends on the server will be shown. For example, you are asked to plug in the CDROM to install the driver. When you may put the driver CD of ... the driver setup program or during the execution of the device. 57 F. Then all USB devices attached on the USB device. E. Please check the user manual from the vendor.), click the desired USB device in the Control Center and then click the "Connect" button to do the connect operation and get...
... computer name of the device owner will be shown at the end of the driver setup program (This depends on the server will be shown. For example, you are asked to plug in the CDROM to install the driver. When you may put the driver CD of ... the driver setup program or during the execution of the device. 57 F. Then all USB devices attached on the USB device. E. Please check the user manual from the vendor.), click the desired USB device in the Control Center and then click the "Connect" button to do the connect operation and get...
User's Guide
Page 58
... user manual of the USB device to do the rest jobs of Windows Task Bar, you can see a newly created printer in the Control Panel's "Printers and Faxes". If the USB device is a MFP, you can see a new printer and a new scanner from the "Control Panel". 7.3.2 NetUSB Printing After... detect the plug-in the previous section, you can see the information of the USB device. A. B. Follow the steps below to do a NetUSB printing. Click the desired printer (or MFP). G. On the right side of installation, until the driver installation finished. After the installation, you can see ...
... user manual of the USB device to do the rest jobs of Windows Task Bar, you can see a newly created printer in the Control Panel's "Printers and Faxes". If the USB device is a MFP, you can see a new printer and a new scanner from the "Control Panel". 7.3.2 NetUSB Printing After... detect the plug-in the previous section, you can see the information of the USB device. A. B. Follow the steps below to do a NetUSB printing. Click the desired printer (or MFP). G. On the right side of installation, until the driver installation finished. After the installation, you can see ...

User's Guide
Page 60
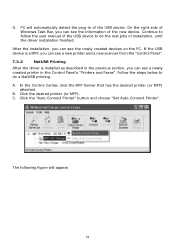
... I. In the Control Center, click the MFP Server that printer. You will see a newly created scanner in the Control Panel's "Scanners and Cameras", and choose "Get picture using manual "connect" and "disconnect" rather than "Auto Connect Print". G. Even you already properly setup an auto-connected...means you'd better run automatically after you can make the Control Center be running while a print job is installed as described in 7.3.1, you login Windows. In order to do this manual operation, you login Windows. Right-click the scanner icon in the Control Panel's "Scanners...
... I. In the Control Center, click the MFP Server that printer. You will see a newly created scanner in the Control Panel's "Scanners and Cameras", and choose "Get picture using manual "connect" and "disconnect" rather than "Auto Connect Print". G. Even you already properly setup an auto-connected...means you'd better run automatically after you can make the Control Center be running while a print job is installed as described in 7.3.1, you login Windows. In order to do this manual operation, you login Windows. Right-click the scanner icon in the Control Panel's "Scanners...

User's Guide
Page 61
Then the "Scanner Wizard" will run. After the scanning finished, click the "Disconnect" button in the Control Center to release the ownership of the scanner (or MFP). The steps described above require manual "connect" and "disconnect" operations 61 E. F. Then submit the scan job. Set the options as your need.
Then the "Scanner Wizard" will run. After the scanning finished, click the "Disconnect" button in the Control Center to release the ownership of the scanner (or MFP). The steps described above require manual "connect" and "disconnect" operations 61 E. F. Then submit the scan job. Set the options as your need.
User's Guide
Page 64
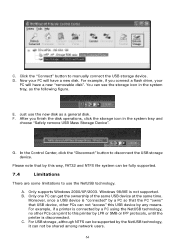
...you finish the disk operations, click the storage icon in the system tray, as a general disk. F. Please note that USB device, other PCs can print to use the new disk as the following figure. Click the "Connect" button to disconnect the USB storage device. A. For USB storage, although NTFS can...see the storage icon in the system tray and choose "Safely remove USB Mass Storage Device". In the Control Center, click the "Disconnect" button to manually connect the USB storage device. Only supports Windows 2000/XP/2003. Windows 98/ME is "connected" by a PC so that the PC "owns" ...
...you finish the disk operations, click the storage icon in the system tray, as a general disk. F. Please note that USB device, other PCs can print to use the new disk as the following figure. Click the "Connect" button to disconnect the USB storage device. A. For USB storage, although NTFS can...see the storage icon in the system tray and choose "Safely remove USB Mass Storage Device". In the Control Center, click the "Disconnect" button to manually connect the USB storage device. Only supports Windows 2000/XP/2003. Windows 98/ME is "connected" by a PC so that the PC "owns" ...

User's Guide
Page 84
... Community: public z Trap Address: 0.0.0.0 z SysContact: sales@trendnet.com z SysName: TRENDnet TE100-MP1U (or TE100-MP2U or TEW-MP2U) USB MFP Server z SysLocation: www.trendnet.com z EnableAuthenTrap: 2 (disable) z SNMPv3: Disabled - User Security Name: None - Manual DNS: None (Disabled). z Static IP: Disabled - DNS Server: none Supported Protocols z LPR Printing: Enabled z IPP Printing: Enabled z Raw TCP/JetDirect Printing: Enabled - TCP Port (USB2): 9101 z SMB/CIFS...
... Community: public z Trap Address: 0.0.0.0 z SysContact: sales@trendnet.com z SysName: TRENDnet TE100-MP1U (or TE100-MP2U or TEW-MP2U) USB MFP Server z SysLocation: www.trendnet.com z EnableAuthenTrap: 2 (disable) z SNMPv3: Disabled - User Security Name: None - Manual DNS: None (Disabled). z Static IP: Disabled - DNS Server: none Supported Protocols z LPR Printing: Enabled z IPP Printing: Enabled z Raw TCP/JetDirect Printing: Enabled - TCP Port (USB2): 9101 z SMB/CIFS...
User's Guide
Page 90
... manual. THE FOREGOING WARRANTIES AND REMEDIES ARE EXCLUSIVE AND ARE IN LIEU OF ALL OTHER WARRANTIES, EXPRESSED OR IMPLIED, EITHER IN FACT OR BY OPERATION OF LAW, STATUTORY OR OTHERWISE, INCLUDING WARRANTIES OF MERCHANTABILITY AND FITNESS FOR A PARTICULAR PURPOSE. TE100-MP1U/TE100-MP2U...- 5 Years Warranty TEW-MP2U - 3 Years Warranty If a product does not operate as warranted above during the applicable warranty period, TRENDnet shall, at its products against defects in material and workmanship...
... manual. THE FOREGOING WARRANTIES AND REMEDIES ARE EXCLUSIVE AND ARE IN LIEU OF ALL OTHER WARRANTIES, EXPRESSED OR IMPLIED, EITHER IN FACT OR BY OPERATION OF LAW, STATUTORY OR OTHERWISE, INCLUDING WARRANTIES OF MERCHANTABILITY AND FITNESS FOR A PARTICULAR PURPOSE. TE100-MP1U/TE100-MP2U...- 5 Years Warranty TEW-MP2U - 3 Years Warranty If a product does not operate as warranted above during the applicable warranty period, TRENDnet shall, at its products against defects in material and workmanship...