

User Guide
Page 7
... Router 6 2.1 System Requirements 6 2.2 Installation Environment Requirements 6 2.3 Connecting the Router 6 Chapter 3. Quick Installation Guide 8 3.1 TCP/IP Configuration 8 3.2 Quick Installation Guide 10 Chapter 4. Configuring the Router 18 4.1 Login ...18 4.2 Status ...18 4.3 Quick Setup...19 4.4 WPS ...19 4.5 Network ...22 4.5.1 WAN ...22 4.5.2 MAC Clone 29 4.5.3 LAN ...30 4.6 Wireless ...31 4.6.1 Wireless Settings 31 4.6.2 Wireless Security 33...
... Router 6 2.1 System Requirements 6 2.2 Installation Environment Requirements 6 2.3 Connecting the Router 6 Chapter 3. Quick Installation Guide 8 3.1 TCP/IP Configuration 8 3.2 Quick Installation Guide 10 Chapter 4. Configuring the Router 18 4.1 Login ...18 4.2 Status ...18 4.3 Quick Setup...19 4.4 WPS ...19 4.5 Network ...22 4.5.1 WAN ...22 4.5.2 MAC Clone 29 4.5.3 LAN ...30 4.6 Wireless ...31 4.6.1 Wireless Settings 31 4.6.2 Wireless Security 33...
User Guide
Page 19
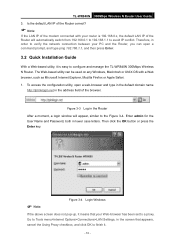
...Connections>LAN Settings, in the Router After a moment, a login window will automatically switch from 192.168.0.1 to 192.168.1.1 to avoid IP conflict. Enter admin for the User Name and Password, both in the address field of the browser. TL-WR840N 300Mbps Wireless N Router User Guide 3. Figure 3-3 Log ...means that appears, cancel the Using Proxy checkbox, and click OK to configure and manage the TL-WR840N 300Mbps Wireless N Router. Then click the OK button or press the Enter key. Note: Figure 3-4 Login Windows If the above screen does not pop-up, it . - 10 - The Web-...
...Connections>LAN Settings, in the Router After a moment, a login window will automatically switch from 192.168.0.1 to 192.168.1.1 to avoid IP conflict. Enter admin for the User Name and Password, both in the address field of the browser. TL-WR840N 300Mbps Wireless N Router User Guide 3. Figure 3-3 Log ...means that appears, cancel the Using Proxy checkbox, and click OK to configure and manage the TL-WR840N 300Mbps Wireless N Router. Then click the OK button or press the Enter key. Note: Figure 3-4 Login Windows If the above screen does not pop-up, it . - 10 - The Web-...
User Guide
Page 27
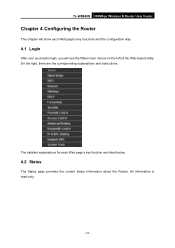
All information is read-only. - 18 - Configuring the Router This chapter will see the fifteen main menus on the left of the Web-based utility. The detailed explanations for each Web page's key functions and the configuration way. 4.1 Login After your successful login, you will show each Web page's key function are the corresponding explanations and instructions. On the right, there are listed below. 4.2 Status The Status page provides the current status information about the Router. TL-WR840N 300Mbps Wireless N Router User Guide Chapter 4.
All information is read-only. - 18 - Configuring the Router This chapter will see the fifteen main menus on the left of the Web-based utility. The detailed explanations for each Web page's key functions and the configuration way. 4.1 Login After your successful login, you will show each Web page's key function are the corresponding explanations and instructions. On the right, there are listed below. 4.2 Status The Status page provides the current status information about the Router. TL-WR840N 300Mbps Wireless N Router User Guide Chapter 4.
User Guide
Page 35
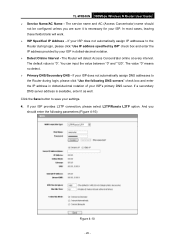
...'s primary DNS server. If a secondary DNS server address is available, enter it is "0". TL-WR840N 300Mbps Wireless N Router User Guide Service Name/AC Name - Click the Save button to the Router during login, please click "Use IP address specified by ISP" check box and enter the IP address ...provided by your ISP in dotted-decimal notation of your ISP does not automatically assign IP addresses to the Router during login, please click "Use the following parameters (Figure 4-10): Figure 4-10 - 26 - In most cases, leaving these fields blank will detect ...
...'s primary DNS server. If a secondary DNS server address is available, enter it is "0". TL-WR840N 300Mbps Wireless N Router User Guide Service Name/AC Name - Click the Save button to the Router during login, please click "Use IP address specified by ISP" check box and enter the IP address ...provided by your ISP in dotted-decimal notation of your ISP does not automatically assign IP addresses to the Router during login, please click "Use the following parameters (Figure 4-10): Figure 4-10 - 26 - In most cases, leaving these fields blank will detect ...
User Guide
Page 82
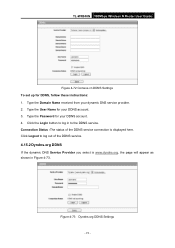
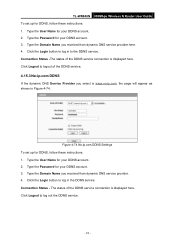
... Service Provider you select is displayed here. Click the Login button to log in to log out of the DDNS service connection is www.dyndns.org, the page will appear as shown in Figure 4-73. Figure 4-73 Dyndns.org DDNS Settings - 73 - TL-WR840N 300Mbps Wireless N Router User Guide Figure 4-72 Comexe.cn...
... Service Provider you select is displayed here. Click the Login button to log in to log out of the DDNS service connection is www.dyndns.org, the page will appear as shown in Figure 4-73. Figure 4-73 Dyndns.org DDNS Settings - 73 - TL-WR840N 300Mbps Wireless N Router User Guide Figure 4-72 Comexe.cn...
User Guide
Page 83
TL-WR840N 300Mbps Wireless N Router User Guide To set up for DDNS, follow these instructions: 1. Figure 4-74 No-ip.com DDNS Settings To set up for DDNS, follow these instructions: 1. Click the Login button to log in to log in the DDNS service. Click Logout to logout of ... the Domain Name you received from dynamic DNS service provider here. 4. Type the Password for your DDNS account. 3. Connection Status - Click the Login button to the DDNS service. Type the Domain Name you received from dynamic DNS service provider. 4. Type the Password for your DDNS account. ...
TL-WR840N 300Mbps Wireless N Router User Guide To set up for DDNS, follow these instructions: 1. Figure 4-74 No-ip.com DDNS Settings To set up for DDNS, follow these instructions: 1. Click the Login button to log in to log in the DDNS service. Click Logout to logout of ... the Domain Name you received from dynamic DNS service provider here. 4. Type the Password for your DDNS account. 3. Connection Status - Click the Login button to the DDNS service. Type the Domain Name you received from dynamic DNS service provider. 4. Type the Password for your DDNS account. ...
User Guide
Page 85
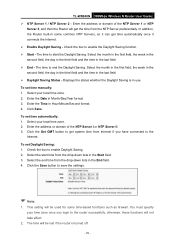
Enter the address or domain of the NTP Server I or NTP Server II. 3. Displays the status whether the Daylight Saving is turned off. - 76 - TL-WR840N 300Mbps Wireless N Router User Guide NTP Server 1 / NTP Server 2 - The time to enable the Daylight Saving function. Start - Enter the Date in...to end the Daylight Saving. In addition, the Router built-in the last field. End - Select the end time from Internet if you login to the Internet. The time will be lost if the router is in Month/Day/Year format. 3. Select the month in the first field, ...
Enter the address or domain of the NTP Server I or NTP Server II. 3. Displays the status whether the Daylight Saving is turned off. - 76 - TL-WR840N 300Mbps Wireless N Router User Guide NTP Server 1 / NTP Server 2 - The time to enable the Daylight Saving function. Start - Enter the Date in...to end the Daylight Saving. In addition, the Router built-in the last field. End - Select the end time from Internet if you login to the Internet. The time will be lost if the router is in Month/Day/Year format. 3. Select the month in the first field, ...


