Quick Installation Guide
Page 3
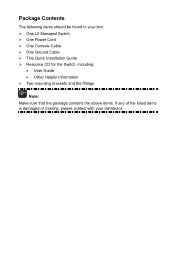
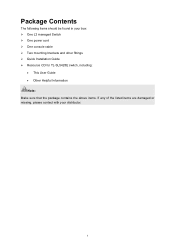
Package Contents The following items should be found in your box: ¾ One L2 Managed Switch ¾ One Power Cord ¾ One Console Cable ¾ One Ground Cable ¾ This Quick Installation Guide ¾ Resource CD for the Switch, including: • User Guide • Other Helpful Information ¾ Two mounting brackets and the fittings Note: Make sure that the package contains the above items. If any of the listed items is damaged or missing, please contact with your distributor.
Package Contents The following items should be found in your box: ¾ One L2 Managed Switch ¾ One Power Cord ¾ One Console Cable ¾ One Ground Cable ¾ This Quick Installation Guide ¾ Resource CD for the Switch, including: • User Guide • Other Helpful Information ¾ Two mounting brackets and the fittings Note: Make sure that the package contains the above items. If any of the listed items is damaged or missing, please contact with your distributor.
Quick Installation Guide
Page 5
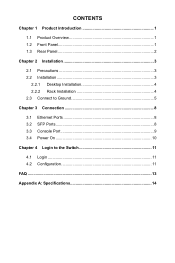
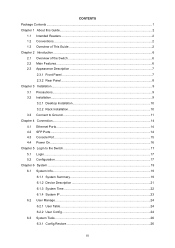
CONTENTS Chapter 1 Product Introduction 1 1.1 Product Overview 1 1.2 Front Panel 1 1.3 Rear Panel 2 Chapter 2 Installation 3 2.1 Precautions 3 2.2 Installation 3 2.2.1 Desktop Installation 4 2.2.2 Rack Installation 4 2.3 Connect to Ground 5 Chapter 3 Connection 8 3.1 Ethernet Ports 8 3.2 SFP Ports 8 3.3 Console Port 9 3.4 Power On 10 Chapter 4 Login to the Switch 11 4.1 Login 11 4.2 Configuration 11 FAQ ...13 Appendix A: Specifications 14
CONTENTS Chapter 1 Product Introduction 1 1.1 Product Overview 1 1.2 Front Panel 1 1.3 Rear Panel 2 Chapter 2 Installation 3 2.1 Precautions 3 2.2 Installation 3 2.2.1 Desktop Installation 4 2.2.2 Rack Installation 4 2.3 Connect to Ground 5 Chapter 3 Connection 8 3.1 Ethernet Ports 8 3.2 SFP Ports 8 3.3 Console Port 9 3.4 Power On 10 Chapter 4 Login to the Switch 11 4.1 Login 11 4.2 Configuration 11 FAQ ...13 Appendix A: Specifications 14

Quick Installation Guide
Page 6
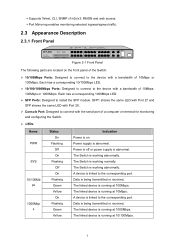
... TP-LINK L2 Managed Switch provides both Web and Command Line management interface. The SFP1 (SFP2) port and Port 27 (Port 28) are located on the front panel of the Switch: ¾ 10/100Mbps Ports: Designed to connect to the device with the serial port of 10M or 100M. The TL-SL5428E ... solutions for monitoring and configuring the Switch. 1 SFP1 shares the same LED with Port 27 and SFP shares the same LED with Port 28. ¾ Console Port: Designed to as "combo" ports, which means they cannot be used simultaneously. Each has a corresponding 10/100M LED. ¾ 10/100/1000Mbps Ports...
... TP-LINK L2 Managed Switch provides both Web and Command Line management interface. The SFP1 (SFP2) port and Port 27 (Port 28) are located on the front panel of the Switch: ¾ 10/100Mbps Ports: Designed to connect to the device with the serial port of 10M or 100M. The TL-SL5428E ... solutions for monitoring and configuring the Switch. 1 SFP1 shares the same LED with Port 27 and SFP shares the same LED with Port 28. ¾ Console Port: Designed to as "combo" ports, which means they cannot be used simultaneously. Each has a corresponding 10/100M LED. ¾ 10/100/1000Mbps Ports...

Quick Installation Guide
Page 14
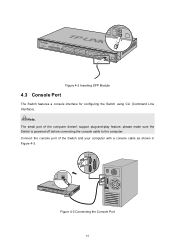
Figure 3-2 Inserting SFP Module 3.3 Console Port The Switch features a console interface for configuring the Switch using CLI (Command Line Interface). Figure 3-3 Connecting the Console Port 9 Connect the console port of the computer doesn't support plug-and-play feature, please make sure the Switch is powered off before connecting the console cable to the computer. Caution: The serial port of the Switch and your computer with a console cable as shown in Figure 3-3.
Figure 3-2 Inserting SFP Module 3.3 Console Port The Switch features a console interface for configuring the Switch using CLI (Command Line Interface). Figure 3-3 Connecting the Console Port 9 Connect the console port of the computer doesn't support plug-and-play feature, please make sure the Switch is powered off before connecting the console cable to the computer. Caution: The serial port of the Switch and your computer with a console cable as shown in Figure 3-3.
User Guide
Page 3
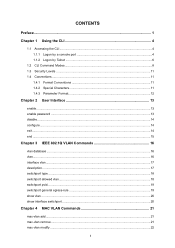
CONTENTS Preface...1 Chapter 1 Using the CLI 4 1.1 Accessing the CLI ...4 1.1.1 Logon by a console port 4 1.1.2 Logon by Telnet ...6 1.2 CLI Command Modes ...8 1.3 Security Levels ...11 1.4 Conventions ...11 1.4.1 Format Conventions 11 1.4.2 Special Characters 11 1.4.3 Parameter Format 12 Chapter 2 User Interface 13 ...
CONTENTS Preface...1 Chapter 1 Using the CLI 4 1.1 Accessing the CLI ...4 1.1.1 Logon by a console port 4 1.1.2 Logon by Telnet ...6 1.2 CLI Command Modes ...8 1.3 Security Levels ...11 1.4 Conventions ...11 1.4.1 Format Conventions 11 1.4.2 Special Characters 11 1.4.3 Parameter Format 12 Chapter 2 User Interface 13 ...

User Guide
Page 16
TL-SL5428E 24-port 10/100Mbps + 4-port Gigabit L2 Managed Switch CLI Guide Chapter 1... Click Start → All Programs → Accessories→ Communications → Hyper Terminal to the switch by a RS-232 serial console port on the switch by a provided cable. 2. Figure 1-1 Open Hyper Terminal 3. Enter a name into the Name field and click... to the switch remotely by a Telnet or SSH connection through an Ethernet port. 1.1.1 Logon by a RS-232 serial console port on the switch, please take the following two methods: 1. The Connection Description Window will prompt as the figure 1-1...
TL-SL5428E 24-port 10/100Mbps + 4-port Gigabit L2 Managed Switch CLI Guide Chapter 1... Click Start → All Programs → Accessories→ Communications → Hyper Terminal to the switch by a RS-232 serial console port on the switch by a provided cable. 2. Figure 1-1 Open Hyper Terminal 3. Enter a name into the Name field and click... to the switch remotely by a Telnet or SSH connection through an Ethernet port. 1.1.1 Logon by a RS-232 serial console port on the switch, please take the following two methods: 1. The Connection Description Window will prompt as the figure 1-1...
User Guide
Page 21
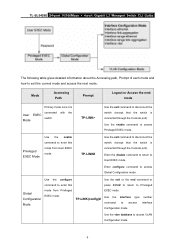
... EXEC Mode Use the enable command to enter this press Ctrl+Z to return to enter this mode from Privileged EXEC mode. TP-LINK(config)# EXEC mode. Use the vlan database to access Global Configuration mode. Use the configure Use the exit or the end...the switch (except that the switch is connected through the Console port). Use the enable command to access interface Configuration mode. TP-LINK# Use the exit command to disconnect the switch (except that the switch is connected through the Console port). TL-SL5428E 24-port 10/100Mbps + 4-port Gigabit L2 Managed Switch...
... EXEC Mode Use the enable command to enter this press Ctrl+Z to return to enter this mode from Privileged EXEC mode. TP-LINK(config)# EXEC mode. Use the vlan database to access Global Configuration mode. Use the configure Use the exit or the end...the switch (except that the switch is connected through the Console port). Use the enable command to access interface Configuration mode. TP-LINK# Use the exit command to disconnect the switch (except that the switch is connected through the Console port). TL-SL5428E 24-port 10/100Mbps + 4-port Gigabit L2 Managed Switch...
User Guide
Page 22
... )# to return to Privileged EXEC mode. TP-LINK(configvlan)# Use the end command or press Ctrl+Z to return to Privileged EXEC mode. b). TL-SL5428E 24-port 10/100Mbps + 4-port Gigabit L2 Managed Switch CLI Guide Use the interface type Use the end command... broadcast storm. VLAN Configuration Mode Use the vlan database command to enter this mode from Global Configuration mode. The user is established by a console port or by a telnet connection. 2. Interface range Ethernet: The commands contained are global, that of specific commands. Interface vlan: Configure parameters...
... )# to return to Privileged EXEC mode. TP-LINK(configvlan)# Use the end command or press Ctrl+Z to return to Privileged EXEC mode. b). TL-SL5428E 24-port 10/100Mbps + 4-port Gigabit L2 Managed Switch CLI Guide Use the interface type Use the end command... broadcast storm. VLAN Configuration Mode Use the vlan database command to enter this mode from Global Configuration mode. The user is established by a console port or by a telnet connection. 2. Interface range Ethernet: The commands contained are global, that of specific commands. Interface vlan: Configure parameters...
User Guide
Page 23
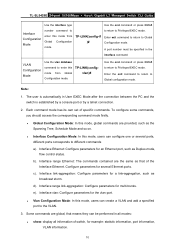
User level only allows users to the User level once connecting console port with the switch or logging in User EXEC Mode; Users get the privilege to do some simple operations in by using the enable command. ... aging-time aging-time 1.4.2 Special Characters You should pay attentions to monitor, configure and manage the switch in braces and separated by enable password command. TL-SL5428E 24-port 10/100Mbps + 4-port Gigabit L2 Managed Switch CLI Guide z history: Display the commands history. 1.3 Security Levels This switch's security is needed. Admin level...
User level only allows users to the User level once connecting console port with the switch or logging in User EXEC Mode; Users get the privilege to do some simple operations in by using the enable command. ... aging-time aging-time 1.4.2 Special Characters You should pay attentions to monitor, configure and manage the switch in braces and separated by enable password command. TL-SL5428E 24-port 10/100Mbps + 4-port Gigabit L2 Managed Switch CLI Guide z history: Display the commands history. 1.3 Security Levels This switch's security is needed. Admin level...
User Guide
Page 3
... ...7 2.3.2 Rear Panel ...8 Chapter 3 Installation ...9 3.1 Precautions...9 3.2 Installation...9 3.2.1 Desktop Installation 10 3.2.2 Rack Installation 10 3.3 Connect to Ground ...11 Chapter 4 Connection ...14 4.1 Ethernet Ports...14 4.2 SFP Ports ...14 4.3 Console Port ...15 4.4 Power On...16 Chapter 5 Login to the Switch...17 5.1 Login...17 5.2 Configuration ...17 Chapter 6 System ...19 6.1 System Info...19 6.1.1 System Summary 19 6.1.2 Device...
... ...7 2.3.2 Rear Panel ...8 Chapter 3 Installation ...9 3.1 Precautions...9 3.2 Installation...9 3.2.1 Desktop Installation 10 3.2.2 Rack Installation 10 3.3 Connect to Ground ...11 Chapter 4 Connection ...14 4.1 Ethernet Ports...14 4.2 SFP Ports ...14 4.3 Console Port ...15 4.4 Power On...16 Chapter 5 Login to the Switch...17 5.1 Login...17 5.2 Configuration ...17 Chapter 6 System ...19 6.1 System Info...19 6.1.1 System Summary 19 6.1.2 Device...
User Guide
Page 9
Package Contents The following items should be found in your box: ¾ One L2 managed Switch ¾ One power cord ¾ One console cable ¾ Two mounting brackets and other fittings ¾ Quick Installation Guide ¾ Resource CD for TL-SL5428E switch, including: • This User Guide • Other Helpful Information Note: Make sure that the package contains the above items. If any of the listed items are damaged or missing, please contact with your distributor. 1
Package Contents The following items should be found in your box: ¾ One L2 managed Switch ¾ One power cord ¾ One console cable ¾ Two mounting brackets and other fittings ¾ Quick Installation Guide ¾ Resource CD for TL-SL5428E switch, including: • This User Guide • Other Helpful Information Note: Make sure that the package contains the above items. If any of the listed items are damaged or missing, please contact with your distributor. 1
User Guide
Page 15
... the corresponding port. A device is working normally. The linked device is being transmitted or received. SFP1 shares the same LED with Port 27 and SFP shares the same LED with Port 28. ¾ Console Port: Designed to install the SFP module. Data is running at 10/100Mbps. 7 ... to connect to the device with a bandwidth of 10Mbps, 100Mbps or 1000Mbps. The Switch is being transmitted or received. The linked device is running at 1000Mbps. The linked device is running at 10Mbps. + Supports Telnet, CLI, SNMP v1/v2c/v3, RMON and web access. + Port Mirroring ...
... the corresponding port. A device is working normally. The linked device is being transmitted or received. SFP1 shares the same LED with Port 27 and SFP shares the same LED with Port 28. ¾ Console Port: Designed to install the SFP module. Data is running at 10/100Mbps. 7 ... to connect to the device with a bandwidth of 10Mbps, 100Mbps or 1000Mbps. The Switch is being transmitted or received. The linked device is running at 1000Mbps. The linked device is running at 10Mbps. + Supports Telnet, CLI, SNMP v1/v2c/v3, RMON and web access. + Port Mirroring ...
User Guide
Page 23
Connect the console port of the computer doesn't support plug-and-play feature, please make sure the Switch is powered off before connecting the console cable to the computer. Figure 4-3 Connecting the Console Port 15 Figure 4-2 Inserting SFP Module 4.3 Console Port The Switch features a console interface for configuring the Switch using CLI (Command Line Interface). Note: The serial port of the Switch and your computer with a console cable as shown in Figure 4-3.
Connect the console port of the computer doesn't support plug-and-play feature, please make sure the Switch is powered off before connecting the console cable to the computer. Figure 4-3 Connecting the Console Port 15 Figure 4-2 Inserting SFP Module 4.3 Console Port The Switch features a console interface for configuring the Switch using CLI (Command Line Interface). Note: The serial port of the Switch and your computer with a console cable as shown in Figure 4-3.
User Guide
Page 230
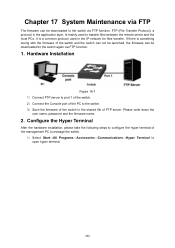
Hardware Installation Figure 16-1 1) Connect FTP server to port 1 of the switch. 2) Connect the Console port of the switch in the IP network for files transfer. If there is something wrong with the firmware of the switch and the switch ...
Hardware Installation Figure 16-1 1) Connect FTP server to port 1 of the switch. 2) Connect the Console port of the switch in the IP network for files transfer. If there is something wrong with the firmware of the switch and the switch ...
User Guide
Page 232
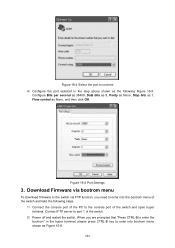
... via FTP function, you are prompted that "Press CTRL-B to enter the bootrom" in the step above shown as the following steps. 1) Connect the console port of the switch and open hyper terminal. Connect FTP server to connect 4) Configure the port selected in the hyper terminal, please press CTRL...-B key to enter into the bootrom menu of the switch and take the following Figure 16-5. Figure 16-5 Port Settings 3. When you need to the console port of the PC to enter into bootrom menu shown as None, and then click OK. Configure Bits per second as 38400, Data bits as...
... via FTP function, you are prompted that "Press CTRL-B to enter the bootrom" in the step above shown as the following steps. 1) Connect the console port of the switch and open hyper terminal. Connect FTP server to connect 4) Configure the port selected in the hyper terminal, please press CTRL...-B key to enter into the bootrom menu of the switch and take the following Figure 16-5. Figure 16-5 Port Settings 3. When you need to the console port of the PC to enter into bootrom menu shown as None, and then click OK. Configure Bits per second as 38400, Data bits as...