User Guide
Page 4
CONTENTS Package Contents...1 Chapter 1 Product Introduction 2 1.1 Product Overview 2 1.2 Features ...2 Chapter 2 Identifying External Components 3 2.1 Front Panel...3 2.2 Rear Panel ...3 Chapter 3 Installation ...4 3.1 Precautions ...4 3.2 Installation ...4 3.2.1 Desktop Installation 5 3.2.2 Rack Installation 5 3.3 Connect to Ground 7 3.4 Power on ...8 Appendix A: Specifications 9 Appendix B: Troubleshooting 11 Appendix C: Contact Information 11 III
CONTENTS Package Contents...1 Chapter 1 Product Introduction 2 1.1 Product Overview 2 1.2 Features ...2 Chapter 2 Identifying External Components 3 2.1 Front Panel...3 2.2 Rear Panel ...3 Chapter 3 Installation ...4 3.1 Precautions ...4 3.2 Installation ...4 3.2.1 Desktop Installation 5 3.2.2 Rack Installation 5 3.3 Connect to Ground 7 3.4 Power on ...8 Appendix A: Specifications 9 Appendix B: Troubleshooting 11 Appendix C: Contact Information 11 III
User Guide
Page 6
... and auto-aging ¾ LED indicators for monitoring power, link, speed and activity ¾ Desktop and rack-mountable steel case ¾ Internal power supply 2 Transfer graphics, CGI, CAD, or multimedia files and other applications that have to 1000Mbps. The TL-SG1008/TL-SG1016D/TL-SG1024D Switch is plug-and-play and no configuration is standard...
... and auto-aging ¾ LED indicators for monitoring power, link, speed and activity ¾ Desktop and rack-mountable steel case ¾ Internal power supply 2 Transfer graphics, CGI, CAD, or multimedia files and other applications that have to 1000Mbps. The TL-SG1008/TL-SG1016D/TL-SG1024D Switch is plug-and-play and no configuration is standard...
User Guide
Page 8
... AC cord or with all fittings. • Locate the Switch far from water and moisture sources, be either installed on the standard 19-inch mountable rack or located on a flat and stable surface that the cables can be easily connected. • Position the Switch away from strong electromagnetic field generators (such...
... AC cord or with all fittings. • Locate the Switch far from water and moisture sources, be either installed on the standard 19-inch mountable rack or located on a flat and stable surface that the cables can be easily connected. • Position the Switch away from strong electromagnetic field generators (such...

User Guide
Page 9
Caution: Please avoid any heavy thing placed on the Switch. 3.2.2 Rack Installation To install the Switch in an EIA standard-sized, 19-inch rack, follow the steps: 1) Set the Switch on a flat surface strong enough to the recessed areas on the desktop, please follow the instructions described below: 5 Figure 3-1 ...
Caution: Please avoid any heavy thing placed on the Switch. 3.2.2 Rack Installation To install the Switch in an EIA standard-sized, 19-inch rack, follow the steps: 1) Set the Switch on a flat surface strong enough to the recessed areas on the desktop, please follow the instructions described below: 5 Figure 3-1 ...
User Guide
Page 10
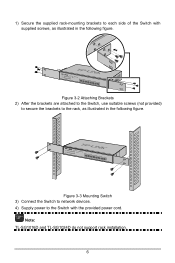
Note: TL-SG1016D and TL-SG1024D do not support rack installation. 6 Figure 3-3 Mounting Switch 3) Connect the Switch to network devices. 4) Supply power to each side of the Switch with the provided power cord. 1) Secure the supplied rack-mounting brackets to the Switch with supplied screws, as illustrated in the following figure. Figure 3-2 Attaching Brackets 2) After the brackets are attached to the Switch, use suitable screws (not provided) to secure the brackets to the rack, as illustrated in the following figure.
Note: TL-SG1016D and TL-SG1024D do not support rack installation. 6 Figure 3-3 Mounting Switch 3) Connect the Switch to network devices. 4) Supply power to each side of the Switch with the provided power cord. 1) Secure the supplied rack-mounting brackets to the Switch with supplied screws, as illustrated in the following figure. Figure 3-2 Attaching Brackets 2) After the brackets are attached to the Switch, use suitable screws (not provided) to secure the brackets to the rack, as illustrated in the following figure.