User Guide
Page 6
TL-SG1008/TL-SG1016/TL-SG1024/TL-SG1048 Gigabit Ethernet Switch User Guide Package Contents The following contents should be found in your box: ¾ One Gigabit Ethernet Switch ¾ One power cord ¾ This User's Guide ¾ Rubber footpads for Desk-mount ¾ Rack-mount kit for installing the switch in a 19-inch rack Note: If any of the above contents is damaged or missing, please contact the retailer from whom you purchased the Gigabit Ethernet Switch for assistance. 1
TL-SG1008/TL-SG1016/TL-SG1024/TL-SG1048 Gigabit Ethernet Switch User Guide Package Contents The following contents should be found in your box: ¾ One Gigabit Ethernet Switch ¾ One power cord ¾ This User's Guide ¾ Rubber footpads for Desk-mount ¾ Rack-mount kit for installing the switch in a 19-inch rack Note: If any of the above contents is damaged or missing, please contact the retailer from whom you purchased the Gigabit Ethernet Switch for assistance. 1
User Guide
Page 7
...into a server, a hub, a router or a switch, using the straight cable or crossover cable. Diagnostic LEDs which display link status and activity, allowing you to quickly detect and correct problems on all 10,100, and 1000Mbps Ethernet devices because it is...190; Complies with IEEE802.3, IEEE802.3u, IEEE802.3ab standards 2 The Gigabit Ethernet Switch features a non-blocking switching architecture that have to move large, bandwidth-intensive files faster. TL-SG1008/TL-SG1016/TL-SG1024/TL-SG1048 Gigabit Ethernet Switch User Guide Chapter 1 Introduction of the Product This chapter ...
...into a server, a hub, a router or a switch, using the straight cable or crossover cable. Diagnostic LEDs which display link status and activity, allowing you to quickly detect and correct problems on all 10,100, and 1000Mbps Ethernet devices because it is...190; Complies with IEEE802.3, IEEE802.3u, IEEE802.3ab standards 2 The Gigabit Ethernet Switch features a non-blocking switching architecture that have to move large, bandwidth-intensive files faster. TL-SG1008/TL-SG1016/TL-SG1024/TL-SG1048 Gigabit Ethernet Switch User Guide Chapter 1 Introduction of the Product This chapter ...
User Guide
Page 8
MDI/MDIX ¾ All ports Support full/half-duplex mode for monitoring power, link, speed and activity ¾ Store-and-Forward switching method 3 mode for 1000Mbps ¾ Supports IEEE802.3x flow control for full-duplex mode and backpressure for ... maximum throughput ¾ 4K entry MAC address table of the TL-SG1008 and 8K entry MAC address table of the TL-SG1016, TL-SG1024 and TL-SG1048 with auto-learning and auto-aging ¾ LED indicators for 10/100Mbps and full duplex- TL-SG1008/TL-SG1016/TL-SG1024/TL-SG1048 Gigabit Ethernet Switch User Guide ¾ 8/16/24/48 10/100...
MDI/MDIX ¾ All ports Support full/half-duplex mode for monitoring power, link, speed and activity ¾ Store-and-Forward switching method 3 mode for 1000Mbps ¾ Supports IEEE802.3x flow control for full-duplex mode and backpressure for ... maximum throughput ¾ 4K entry MAC address table of the TL-SG1008 and 8K entry MAC address table of the TL-SG1016, TL-SG1024 and TL-SG1048 with auto-learning and auto-aging ¾ LED indicators for 10/100Mbps and full duplex- TL-SG1008/TL-SG1016/TL-SG1024/TL-SG1048 Gigabit Ethernet Switch User Guide ¾ 8/16/24/48 10/100...

User Guide
Page 9
All figures are different in the number of TL-SG1008 in this user's guide. TL-SG1008, TL-SG1016, TL-SG1024 and TL-SG1048 are of LED indicators and RJ45 ports. TL-SG1008/TL-SG1016/TL-SG1024/TL-SG1048 Gigabit Ethernet Switch User Guide Chapter 2 Installation 2.1 Mounting the Switch on a Desk Before placing the Switch on a desk, attach four rubber footpads to the flutes...
All figures are different in the number of TL-SG1008 in this user's guide. TL-SG1008, TL-SG1016, TL-SG1024 and TL-SG1048 are of LED indicators and RJ45 ports. TL-SG1008/TL-SG1016/TL-SG1024/TL-SG1048 Gigabit Ethernet Switch User Guide Chapter 2 Installation 2.1 Mounting the Switch on a Desk Before placing the Switch on a desk, attach four rubber footpads to the flutes...
User Guide
Page 10
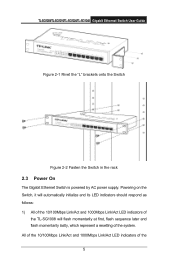
... LED indicators should respond as follows: 1) All of the 10/100Mbps Link/Act and 1000Mbps Link/Act LED indicators of the TL-SG1008 will flash momentarily at first, flash sequence later and flash momentarily lastly, which represent a resetting of the 5 TL-SG1008/TL-SG1016/TL-SG1024/TL-SG1048 Gigabit Ethernet Switch User Guide Figure 2-1 Rivet the "L" brackets onto the...
... LED indicators should respond as follows: 1) All of the 10/100Mbps Link/Act and 1000Mbps Link/Act LED indicators of the TL-SG1008 will flash momentarily at first, flash sequence later and flash momentarily lastly, which represent a resetting of the 5 TL-SG1008/TL-SG1016/TL-SG1024/TL-SG1048 Gigabit Ethernet Switch User Guide Figure 2-1 Rivet the "L" brackets onto the...
User Guide
Page 11
If the LED indicators don't respond as described above, please check the power supply and connection. 6 TL-SG1008/TL-SG1016/TL-SG1024/TL-SG1048 Gigabit Ethernet Switch User Guide TL-SG1016/TL-SG1024 /TL-SG1048 will flash momentarily for one second, which represent a resetting of the system. 2) The Power indicator will light up all the time.
If the LED indicators don't respond as described above, please check the power supply and connection. 6 TL-SG1008/TL-SG1016/TL-SG1024/TL-SG1048 Gigabit Ethernet Switch User Guide TL-SG1016/TL-SG1024 /TL-SG1048 will flash momentarily for one second, which represent a resetting of the system. 2) The Power indicator will light up all the time.

User Guide
Page 12
...LED Indicators The LED indicators include Power, 1000Mbps Link/Act and 10/100Mbps Link/Act LED indicators, which is an AC power receptacle. Figure 3-1 TL-SG1008 Switch Front Panel sketch 3.1 Rear Panel The rear panel of the TL-SG1008 only features a power receptacle, which are... section shows the LED indicators for monitoring and pretroubleshooting of the Switch. Connect the female of each indicator. 7 TL-SG1008/TL-SG1016/TL-SG1024/TL-SG1048 Gigabit Ethernet Switch User Guide Chapter 3 Identifying External Components This Chapter describes the front panel, rear panel and LED indicators...
...LED Indicators The LED indicators include Power, 1000Mbps Link/Act and 10/100Mbps Link/Act LED indicators, which is an AC power receptacle. Figure 3-1 TL-SG1008 Switch Front Panel sketch 3.1 Rear Panel The rear panel of the TL-SG1008 only features a power receptacle, which are... section shows the LED indicators for monitoring and pretroubleshooting of the Switch. Connect the female of each indicator. 7 TL-SG1008/TL-SG1016/TL-SG1024/TL-SG1048 Gigabit Ethernet Switch User Guide Chapter 3 Identifying External Components This Chapter describes the front panel, rear panel and LED indicators...
User Guide
Page 13
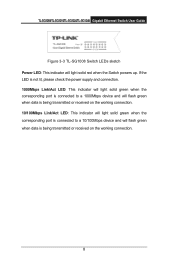
TL-SG1008/TL-SG1016/TL-SG1024/TL-SG1048 Gigabit Ethernet Switch User Guide Figure 3-3 TL-SG1008 Switch LEDs sketch Power LED: This indicator will flash green when data is connected to a 1000Mbps device and will flash green when data is being transmitted or received on the working connection. 10/100Mbps Link/Act LED: ...being transmitted or received on the working connection. 8 If the LED is not lit, please check the power supply and connection. 1000Mbps Link/Act LED: This indicator will light solid green when the corresponding port is connected to a 10/100Mbps device and will light solid red...
TL-SG1008/TL-SG1016/TL-SG1024/TL-SG1048 Gigabit Ethernet Switch User Guide Figure 3-3 TL-SG1008 Switch LEDs sketch Power LED: This indicator will flash green when data is connected to a 1000Mbps device and will flash green when data is being transmitted or received on the working connection. 10/100Mbps Link/Act LED: ...being transmitted or received on the working connection. 8 If the LED is not lit, please check the power supply and connection. 1000Mbps Link/Act LED: This indicator will light solid green when the corresponding port is connected to a 10/100Mbps device and will light solid red...
User Guide
Page 14
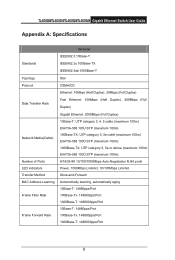
TL-SG1008/TL-SG1016/TL-SG1024/TL-SG1048 Gigabit Ethernet Switch User Guide Appendix A: Specifications Standards...Star CSMA/CD Ethernet: 10Mbps (Half Duplex), 20Mbps (Full Duplex) Fast Ethernet: 100Mbps (Half Duplex), 200Mbps (Full Duplex) Gigabit Ethernet: 2000Mbps (Full Duplex) 10Base-T: UTP category 3, 4, 5 cable (maximum 100m) EIA/TIA-568 100Ù STP (... STP (maximum 100m) 8/16/24/48 10/100/1000Mbps Auto-Negotiation RJ45 ports Power, 1000Mbps Link/Act, 10/100Mbps Link/Act Store-and-Forward Automatically learning, automatically aging 10Base-T: 14880pps/Port 100Base-Tx: 148800pps/Port 1000Base...
TL-SG1008/TL-SG1016/TL-SG1024/TL-SG1048 Gigabit Ethernet Switch User Guide Appendix A: Specifications Standards...Star CSMA/CD Ethernet: 10Mbps (Half Duplex), 20Mbps (Full Duplex) Fast Ethernet: 100Mbps (Half Duplex), 200Mbps (Full Duplex) Gigabit Ethernet: 2000Mbps (Full Duplex) 10Base-T: UTP category 3, 4, 5 cable (maximum 100m) EIA/TIA-568 100Ù STP (... STP (maximum 100m) 8/16/24/48 10/100/1000Mbps Auto-Negotiation RJ45 ports Power, 1000Mbps Link/Act, 10/100Mbps Link/Act Store-and-Forward Automatically learning, automatically aging 10Base-T: 14880pps/Port 100Base-Tx: 148800pps/Port 1000Base...
User Guide
Page 15
The Power LED is not lit ¾ Make sure the AC power cord connected the Switch with power source properly. ¾ Make sure the power source is turned on and working well. ¾ The cable must be less than 100 meters long(328 feet). 10 TL-SG1008/TL-SG1016/TL-SG1024/TL-SG1048 Gigabit Ethernet Switch User Guide Appendix B: Troubleshooting 1. The Link/Act LED is not lit when a device is connected to the corresponding port ¾ Make sure that the cable connectors are firmly plugged into the Switch and the device. ¾ Make sure the connected device is ON. 2.
The Power LED is not lit ¾ Make sure the AC power cord connected the Switch with power source properly. ¾ Make sure the power source is turned on and working well. ¾ The cable must be less than 100 meters long(328 feet). 10 TL-SG1008/TL-SG1016/TL-SG1024/TL-SG1048 Gigabit Ethernet Switch User Guide Appendix B: Troubleshooting 1. The Link/Act LED is not lit when a device is connected to the corresponding port ¾ Make sure that the cable connectors are firmly plugged into the Switch and the device. ¾ Make sure the connected device is ON. 2.