
Quick Installation Guide
Page 1
... /O reset Internet Power Cable Router Ethernet Cable 1 23 WAN LAN TL-SC4171G Camera Mounting Bracket Power Adapter Quick Installation Guide Wireless Pan/Tilt Surveillance Camera Ethernet Cable MODEL NO. The direction of the camera's installation can be restored to the operation instructions included with your router...8226; Solid: The electrical power is on. • Off: There is no electrical power. • Solid: The Ethernet port is linked, but there is no Ethernet connection. • Step 1: Re-power on by default.) For detailed information, please refer to factory defaults...
... /O reset Internet Power Cable Router Ethernet Cable 1 23 WAN LAN TL-SC4171G Camera Mounting Bracket Power Adapter Quick Installation Guide Wireless Pan/Tilt Surveillance Camera Ethernet Cable MODEL NO. The direction of the camera's installation can be restored to the operation instructions included with your router...8226; Solid: The electrical power is on. • Off: There is no electrical power. • Solid: The Ethernet port is linked, but there is no Ethernet connection. • Step 1: Re-power on by default.) For detailed information, please refer to factory defaults...

Quick Installation Guide
Page 2
... Support Website. Choose the language you become familiar with the camera immediately. Click "Next" to continue.2 the 1 set up some typical applications step by using the following details: Global Australia & New Zealand Service Language: English Tel: +86 755 26504400 E-mail : support@tp-link.com Service time:24hrs, 7days a week Singapore Tel: AU 1300...
... Support Website. Choose the language you become familiar with the camera immediately. Click "Next" to continue.2 the 1 set up some typical applications step by using the following details: Global Australia & New Zealand Service Language: English Tel: +86 755 26504400 E-mail : support@tp-link.com Service time:24hrs, 7days a week Singapore Tel: AU 1300...
User Guide
Page 2
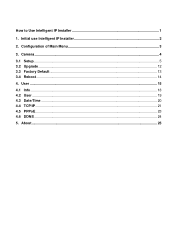
Configuration of Main Menu 3 3. Camera ...4 3.1 Setup...5 3.2 Upgrade ...12 3.3 Factory Default ...13 3.4 Reboot ...14 4. How to Use Intelligent IP Installer 1 1. User ...15 4.1 Info ...18 4.2 User ...19 4.3 Date/Time ...20 4.4 TCP/IP ...21 4.5 PPPoE...23 4.6 DDNS ...24 5. Initial use Intelligent IP Installer 2 2. About...25
Configuration of Main Menu 3 3. Camera ...4 3.1 Setup...5 3.2 Upgrade ...12 3.3 Factory Default ...13 3.4 Reboot ...14 4. How to Use Intelligent IP Installer 1 1. User ...15 4.1 Info ...18 4.2 User ...19 4.3 Date/Time ...20 4.4 TCP/IP ...21 4.5 PPPoE...23 4.6 DDNS ...24 5. Initial use Intelligent IP Installer 2 2. About...25

User Guide
Page 3
If you to Intelligent IP Installer. How to Use Intelligent IP Installer This chapter introduces how to use IP cameras with Microsoft web browsers and Intelligent IP Installer in Windows operating systems. This document focuses on introducing you want to know how to monitor the image from the camera using Intelligent IP Installer. The IP cameras can be used with Microsoft web browsers, please check the camera user manuals. 1
If you to Intelligent IP Installer. How to Use Intelligent IP Installer This chapter introduces how to use IP cameras with Microsoft web browsers and Intelligent IP Installer in Windows operating systems. This document focuses on introducing you want to know how to monitor the image from the camera using Intelligent IP Installer. The IP cameras can be used with Microsoft web browsers, please check the camera user manuals. 1

User Guide
Page 5
...includes Info, User, Date Time, TCP/IP, PPPoE and DDNS. ) Note: Only the administrator has access to get into common information of all Network Cameras in network. User Click this button to get live video and to get and set basic values. You can connect the specific Network... Cameras to get into user basic setting information of all Network Cameras in local network. About Click this button to get the information of Intelligent IP Installer. 3 Configuration of Main ...
...includes Info, User, Date Time, TCP/IP, PPPoE and DDNS. ) Note: Only the administrator has access to get into common information of all Network Cameras in network. User Click this button to get live video and to get and set basic values. You can connect the specific Network... Cameras to get into user basic setting information of all Network Cameras in local network. About Click this button to get the information of Intelligent IP Installer. 3 Configuration of Main ...

User Guide
Page 6
..., IP Address, MAC, Mod. ID. If any of finding IP address is seeking from the DHCP server. ID. ) Note: ¾ If the camera is not in local network. ¾ The IP addresses shown in the network with product factory information, including product Name, IP Address, MAC Address, Mod.... Name and Mod. Name and Mod. 3. Camera The Camera page provides you all Network Cameras in the "IP Address" field reflect those on the LAN status). They may be 255.255.255.0. 4
..., IP Address, MAC, Mod. ID. If any of finding IP address is seeking from the DHCP server. ID. ) Note: ¾ If the camera is not in local network. ¾ The IP addresses shown in the network with product factory information, including product Name, IP Address, MAC Address, Mod.... Name and Mod. Name and Mod. 3. Camera The Camera page provides you all Network Cameras in the "IP Address" field reflect those on the LAN status). They may be 255.255.255.0. 4

User Guide
Page 7
... to go back, Cancel to go to key in the username and password of these cameras. System Information: The system information is displayed. The following screen will display: ) Note: For IP cameras not in local network area (which appears in red in the search screen), you can...use IP cameras with Microsoft web browses. 3.1 Setup Choose a network camera, click on Setup to change the configurations of the administrator to enter the setup page. Link to IE:After searching Network Cameras in network, you can click to specific Network Cameras in search area and press Link to IE...
... to go back, Cancel to go to key in the username and password of these cameras. System Information: The system information is displayed. The following screen will display: ) Note: For IP cameras not in local network area (which appears in red in the search screen), you can...use IP cameras with Microsoft web browses. 3.1 Setup Choose a network camera, click on Setup to change the configurations of the administrator to enter the setup page. Link to IE:After searching Network Cameras in network, you can click to specific Network Cameras in search area and press Link to IE...

User Guide
Page 9
See "Hint" for details. Press Next to continue, Previous to go back, Cancel to go to the main page. 7 Date/Time settings: You can set the date/time of the network camera here.
See "Hint" for details. Press Next to continue, Previous to go back, Cancel to go to the main page. 7 Date/Time settings: You can set the date/time of the network camera here.

User Guide
Page 10
Press Next to continue, Previous to go back, Cancel to go to the main page. 8 See "Hint" for details. Network settings: You can change the network settings of the network camera here.
Press Next to continue, Previous to go back, Cancel to go to the main page. 8 See "Hint" for details. Network settings: You can change the network settings of the network camera here.

User Guide
Page 14
You have to key in the username and password of the administrator to start. The device will display: Choose the firmware image file you want to upgrade and press Upgrade to enter the upgrade page. The following screen will automatically reboot after upgrade. 12 3.2 Upgrade Choose a network camera, click on Upgrade to upgrade the firmware.
You have to key in the username and password of the administrator to start. The device will display: Choose the firmware image file you want to upgrade and press Upgrade to enter the upgrade page. The following screen will automatically reboot after upgrade. 12 3.2 Upgrade Choose a network camera, click on Upgrade to upgrade the firmware.
User Guide
Page 15
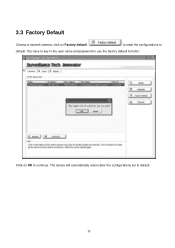
Click on Factory default to reset the configurations to use the factory default function. The device will automatically reboot after the configurations set to continue. 3.3 Factory Default Choose a network camera, click on OK to default. 13 You have to key in the user name and password to default.
Click on Factory default to reset the configurations to use the factory default function. The device will automatically reboot after the configurations set to continue. 3.3 Factory Default Choose a network camera, click on OK to default. 13 You have to key in the user name and password to default.

User Guide
Page 16
You have to key Click on Reboot in the user name and password to use the reboot function. 3.4 Reboot Choose a network camera, click on OK to continue. The device will automatically reboot. 14 to reboot the device.
You have to key Click on Reboot in the user name and password to use the reboot function. 3.4 Reboot Choose a network camera, click on OK to continue. The device will automatically reboot. 14 to reboot the device.
User Guide
Page 17
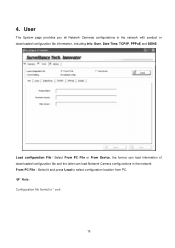
User The System page provides you all Network Cameras configurations in the network. From PC File:Select it and press Load to select configuration location from PC. ) Note: Configuration file format is * conf. 15 Load configuration File:Select From PC File or From Device, the former can load information of downloaded configuration file and the latter can load Network Camera configurations in the network with product or downloaded configuration file information, including Info, User, Date Time, TCP/IP, PPPoE and DDNS. 4.
User The System page provides you all Network Cameras configurations in the network. From PC File:Select it and press Load to select configuration location from PC. ) Note: Configuration file format is * conf. 15 Load configuration File:Select From PC File or From Device, the former can load information of downloaded configuration file and the latter can load Network Camera configurations in the network with product or downloaded configuration file information, including Info, User, Date Time, TCP/IP, PPPoE and DDNS. 4.

User Guide
Page 21
Intelligent IP Installer provides to assign a password if the Network Camera is "admin/admin". 4.2 User The Network Camera default account and password setting is intended to be accessed by others. Use this menu to set the username and password of Administrator and up ...
Intelligent IP Installer provides to assign a password if the Network Camera is "admin/admin". 4.2 User The Network Camera default account and password setting is intended to be accessed by others. Use this menu to set the username and password of Administrator and up ...

User Guide
Page 22
.... ¾ Keep current setting:Select this mode to keep the current date and time of the camera. ¾ Synchronize with PC:Select this mode to make the date and time of the camera the same as the monitoring PC. ¾ Manual setting:Select this mode to manually adjust the...; Synchronize with NTP:Specify the NTP server name and the Refresh Interval to synchronize the date and time of the camera with those of the time server, known as the NTP (Network Time Protocol) server. ) Note: The NTP server (Network Time Protocol) is the time ...
.... ¾ Keep current setting:Select this mode to keep the current date and time of the camera. ¾ Synchronize with PC:Select this mode to make the date and time of the camera the same as the monitoring PC. ¾ Manual setting:Select this mode to manually adjust the...; Synchronize with NTP:Specify the NTP server name and the Refresh Interval to synchronize the date and time of the camera with those of the time server, known as the NTP (Network Time Protocol) server. ) Note: The NTP server (Network Time Protocol) is the time ...

User Guide
Page 23
... to a number other than 80 on the Network setting page or in the Setup Program, access the camera by typing the IP address of the camera on the web browser as follows: Example: when HTTP port number is set to 64 characters. ¾...; Time zone:Select the time zone and time difference from Greenwich Mean Time in the area where the camera is installed from the pulldown box. 4.4 TCP/IP ¾ HTTP Port: Select port 80 in a network of computers. ¾... in general situations. top of TCP/IP) that assures accurate synchronization to the millisecond of the camera. 21
... to a number other than 80 on the Network setting page or in the Setup Program, access the camera by typing the IP address of the camera on the web browser as follows: Example: when HTTP port number is set to 64 characters. ¾...; Time zone:Select the time zone and time difference from Greenwich Mean Time in the area where the camera is installed from the pulldown box. 4.4 TCP/IP ¾ HTTP Port: Select port 80 in a network of computers. ¾... in general situations. top of TCP/IP) that assures accurate synchronization to the millisecond of the camera. 21

User Guide
Page 24
... this when you set . z IP Address:Enter the IP address of the primary DNS server. z Primary DNS:Enter the IP address of the camera. IP Address: ¾ Obtain IP automatically (DHCP): If a DHCP server is installed on the network. ¾ Use the following IP:Select this when a fixed...
... this when you set . z IP Address:Enter the IP address of the primary DNS server. z Primary DNS:Enter the IP address of the camera. IP Address: ¾ Obtain IP automatically (DHCP): If a DHCP server is installed on the network. ¾ Use the following IP:Select this when a fixed...

User Guide
Page 25
... PPPoE connecting with network. ¾ User ID:Enter the user ID for authentication necessary for PPPoE connections. 4.5 PPPoE Use this when you connect the camera through PPPoE (Point -to-
... PPPoE connecting with network. ¾ User ID:Enter the user ID for authentication necessary for PPPoE connections. 4.5 PPPoE Use this when you connect the camera through PPPoE (Point -to-

User Guide
Page 2
Show Camera: ...15 2.4.4. General Setting 19 3.6.2. Filter Setting...19 3.7 Save Video ...19 3.8 Save Image ...20 3.9 Print ...20 3.10 Backup ...20 3.11 Log Viewer...22 3.11.1. Zoom:...13 2.3.3. ... Control 18 3.3 Screen Division:...18 3.4 Browse Mode: ...18 3.5 Open Record: ...18 3.6 Enhancement ...19 3.6.1. CONTENTS 1.1 System Requirement 1 1.2 Installation ...1 1.3 Quick Start...5 2.1 Start ...11 2.2 Information Window 13 2.3 PTZ Camera Control 13 2.3.1. Focus: ...13 2.3.4. Preset/ Go:...13 2.3.2. Enable Talk:...14 2.4.2. Snapshot:...15 2.4.5.
Show Camera: ...15 2.4.4. General Setting 19 3.6.2. Filter Setting...19 3.7 Save Video ...19 3.8 Save Image ...20 3.9 Print ...20 3.10 Backup ...20 3.11 Log Viewer...22 3.11.1. Zoom:...13 2.3.3. ... Control 18 3.3 Screen Division:...18 3.4 Browse Mode: ...18 3.5 Open Record: ...18 3.6 Enhancement ...19 3.6.1. CONTENTS 1.1 System Requirement 1 1.2 Installation ...1 1.3 Quick Start...5 2.1 Start ...11 2.2 Information Window 13 2.3 PTZ Camera Control 13 2.3.1. Focus: ...13 2.3.4. Preset/ Go:...13 2.3.2. Enable Talk:...14 2.4.2. Snapshot:...15 2.4.5.

User Guide
Page 3
...28 4.7.2. Pre-record/ Post-record Time 28 5.1 Event ...29 5.1.1. General Motion 31 5.2 Action ...33 5.2.1. Startup ...35 6.1.2. IP Camera / Video Server Setting Panel 40 6.3 Setting - System Log 45 Automatically Popup Event Report 35 6.1.3. Action Type 33 6.1 Setting - I/O... - Custom: ...27 4.6 Adjust the Scheduled Setting 27 4.7 Encoding Option Panel 28 4.7.1. Assign a Camera Event 30 5.1.2. Holiday:...27 4.5.3. User Account 42 6.6 Setting - Add Camera...37 6.2.2. Monitor Display 42 6.7 Save/ Load Configuration 43 6.8 Log Viewer...44 6.8.1. 4.2 Load Preset...
...28 4.7.2. Pre-record/ Post-record Time 28 5.1 Event ...29 5.1.1. General Motion 31 5.2 Action ...33 5.2.1. Startup ...35 6.1.2. IP Camera / Video Server Setting Panel 40 6.3 Setting - System Log 45 Automatically Popup Event Report 35 6.1.3. Action Type 33 6.1 Setting - I/O... - Custom: ...27 4.6 Adjust the Scheduled Setting 27 4.7 Encoding Option Panel 28 4.7.1. Assign a Camera Event 30 5.1.2. Holiday:...27 4.5.3. User Account 42 6.6 Setting - Add Camera...37 6.2.2. Monitor Display 42 6.7 Save/ Load Configuration 43 6.8 Log Viewer...44 6.8.1. 4.2 Load Preset...


