
Surveillance Manager User Guide
Page 2
......14 Chapter 4 Main-console 17 4.1 System status...17 4.2 Screen Division ...19 4.3 Operation with sub-screen 20 4.3.1 Define display camera(s) sequence 20 4.3.2 Digital Zoom at sub-screen 20 4.3.3 Switch to Full screen ...20 4.3.4 Snapshot of sub-screen 21 4.3.5 Restore... division default 21 4.4 System setup ...21 4.4.1 System setup...22 4.4.2 Camera...24 4.4.3 User ...27 4.4.4 Address Book ...28 4.4.5 Notification...29 4.4.6 Muti-Monitor...31 4.4.7 Joystick...32 4.5 Alarm Setting...34 4.6 Server Setup ...39...
......14 Chapter 4 Main-console 17 4.1 System status...17 4.2 Screen Division ...19 4.3 Operation with sub-screen 20 4.3.1 Define display camera(s) sequence 20 4.3.2 Digital Zoom at sub-screen 20 4.3.3 Switch to Full screen ...20 4.3.4 Snapshot of sub-screen 21 4.3.5 Restore... division default 21 4.4 System setup ...21 4.4.1 System setup...22 4.4.2 Camera...24 4.4.3 User ...27 4.4.4 Address Book ...28 4.4.5 Notification...29 4.4.6 Muti-Monitor...31 4.4.7 Joystick...32 4.5 Alarm Setting...34 4.6 Server Setup ...39...

Surveillance Manager User Guide
Page 3
4.10 Start & Stop Monitor ...49 4.11 E-Map...50 4.12 Two way Audio ...51 Chapter 5 Playback 53 5.1 Search history recorded file(s 54 5.2 Playback control button(s 56 5.3 Convert to AVI file...57 5.4 Switch audio play mode 59 5.5 Playback setting ...59 5.6 Snapshot dialog ...59 5.7 Backup history file(s) ...61 5.8 Playback status ...62 5.9 Operation with sub-screen 62 5.9.1 Define display camera(s) sequence 62 5.9.2 Digital Zoom at sub-screen 63 5.9.3 Switch to Full screen ...63 5.9.4 Snapshot of sub-screen 63 5.9.5 Motion Search ...64 5.9.6 Sequential Search ...65
4.10 Start & Stop Monitor ...49 4.11 E-Map...50 4.12 Two way Audio ...51 Chapter 5 Playback 53 5.1 Search history recorded file(s 54 5.2 Playback control button(s 56 5.3 Convert to AVI file...57 5.4 Switch audio play mode 59 5.5 Playback setting ...59 5.6 Snapshot dialog ...59 5.7 Backup history file(s) ...61 5.8 Playback status ...62 5.9 Operation with sub-screen 62 5.9.1 Define display camera(s) sequence 62 5.9.2 Digital Zoom at sub-screen 63 5.9.3 Switch to Full screen ...63 5.9.4 Snapshot of sub-screen 63 5.9.5 Motion Search ...64 5.9.6 Sequential Search ...65

Surveillance Manager User Guide
Page 8
... the manufacturer. Step2: Check the network between the IP camera(s) and the system. Step3: Add the IP camera(s) to remember the account user name and password you enter this time. Step2: Enter the user name and password to login Surveillance Manager (Both ...name and password are admin) Check the Remember User to the system by following the instruction manual provided by following the steps below. 3.2 Add IP Camera(s) Step1: Click Start → All Programs → Surveillancee_Manager →Surveillancee_Manager. Step3: Click the system setup icon and select System setup. 5
... the manufacturer. Step2: Check the network between the IP camera(s) and the system. Step3: Add the IP camera(s) to remember the account user name and password you enter this time. Step2: Enter the user name and password to login Surveillance Manager (Both ...name and password are admin) Check the Remember User to the system by following the instruction manual provided by following the steps below. 3.2 Add IP Camera(s) Step1: Click Start → All Programs → Surveillancee_Manager →Surveillancee_Manager. Step3: Click the system setup icon and select System setup. 5

Surveillance Manager User Guide
Page 9
Step4: Select "Camera", enter the camera's configuration, and then click Add. ¾ Auto Detect: Click Auto Detect button to the camera, or may cause malfunction. 6 Please confirm the Vendor and Model setting is matched to detect camera and the system will check and set model automatically.
Step4: Select "Camera", enter the camera's configuration, and then click Add. ¾ Auto Detect: Click Auto Detect button to the camera, or may cause malfunction. 6 Please confirm the Vendor and Model setting is matched to detect camera and the system will check and set model automatically.

Surveillance Manager User Guide
Page 10
z Select the Video codec, protocol, and RSTP port for searching complete, select the cameras as your need, and then click OK to search the camera(s) installed in LAN, wait for the current connection. ¾ Camera parameter: If you need to receive audio streaming. z Check Enable Audio if you must check both Enable Audio and Enable Audio Record. ¾ Search: Click the Search button to finish this job. 7 If you need to record audio into file, you need to change the camera parameters, click button.
z Select the Video codec, protocol, and RSTP port for searching complete, select the cameras as your need, and then click OK to search the camera(s) installed in LAN, wait for the current connection. ¾ Camera parameter: If you need to receive audio streaming. z Check Enable Audio if you must check both Enable Audio and Enable Audio Record. ¾ Search: Click the Search button to finish this job. 7 If you need to record audio into file, you need to change the camera parameters, click button.

Surveillance Manager User Guide
Page 11
Step6: Click OK button. Step7: Now you can preview live stream at main page. 8 Step5: Confirm all added camera's setting parameters.
Step6: Click OK button. Step7: Now you can preview live stream at main page. 8 Step5: Confirm all added camera's setting parameters.

Surveillance Manager User Guide
Page 13
... time period bar, or skip this step. 10 ¾ Daily mode: configure each camera's recording time and type on every day. ¾ Weekly mode: configure each camera's recording time and type in each weekday. ¾ Special day mode: configure each camera's recording time and type on specified day. ) Note: If the Special day...
... time period bar, or skip this step. 10 ¾ Daily mode: configure each camera's recording time and type on every day. ¾ Weekly mode: configure each camera's recording time and type in each weekday. ¾ Special day mode: configure each camera's recording time and type on specified day. ) Note: If the Special day...

Surveillance Manager User Guide
Page 18
Select the camera(s) to select playback time period. Step4: System will display recorded file(s) status in control list below. ¾ Blue: Round the clock recorded file. ¾ Green: Motion detection recorded file. ¾ Red: DI triggered recorded file. Choose Record mode(s) that you need (Round the clock, Motion detection, DI detection, Alarm) and click Search. System allows maximum 16 cameras playback at once. 15 Step5: Drag mouse cursor on the date that you want to search recorded files. Step3: Click on the list control to playback recorded file(s).
Select the camera(s) to select playback time period. Step4: System will display recorded file(s) status in control list below. ¾ Blue: Round the clock recorded file. ¾ Green: Motion detection recorded file. ¾ Red: DI triggered recorded file. Choose Record mode(s) that you need (Round the clock, Motion detection, DI detection, Alarm) and click Search. System allows maximum 16 cameras playback at once. 15 Step5: Drag mouse cursor on the date that you want to search recorded files. Step3: Click on the list control to playback recorded file(s).

Surveillance Manager User Guide
Page 22
¾ Red: system can't found available free space any more. 4.2 Screen Division Assign the preview screen to NxN Screen(s) Start Rotate sub-screen(s) 19 Divide to 1 Screen Divide to 6 Screen(s) Divide to 16 Screen(s) Divide to 64 Screen(s) Switch to Full screen mode Stop Rotate sub-screen(s) Divide to 4 Screen(s) Divide to 9 Screen(s) Divide to 32 Screen(s) Divide to preferred layout division by clicking these buttons. To switch to restore previous screen division layout. Double click on the screen again to single camera display, just double click on a particular sub-screen.
¾ Red: system can't found available free space any more. 4.2 Screen Division Assign the preview screen to NxN Screen(s) Start Rotate sub-screen(s) 19 Divide to 1 Screen Divide to 6 Screen(s) Divide to 16 Screen(s) Divide to 64 Screen(s) Switch to Full screen mode Stop Rotate sub-screen(s) Divide to 4 Screen(s) Divide to 9 Screen(s) Divide to 32 Screen(s) Divide to preferred layout division by clicking these buttons. To switch to restore previous screen division layout. Double click on the screen again to single camera display, just double click on a particular sub-screen.
Surveillance Manager User Guide
Page 23
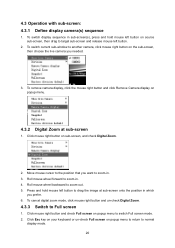
...the position in sub-screen(s), press and hold mouse left button. 2. 4.3 Operation with sub-screen: 4.3.1 Define display camera(s) sequence 1. To remove camera display, click the mouse right button and click Remove Camera display on popup menu to zoom-in . 4. Roll mouse wheel backward to Full screen 1. Click Esc key on your... keyboard or un-check Full screen on the sub-screen, then choose the live camera you needed. 3. To switch display sequence in which you want to switch Full screen mode. 2. To switch current sub-window to another...
...the position in sub-screen(s), press and hold mouse left button. 2. 4.3 Operation with sub-screen: 4.3.1 Define display camera(s) sequence 1. To remove camera display, click the mouse right button and click Remove Camera display on popup menu to zoom-in . 4. Roll mouse wheel backward to Full screen 1. Click Esc key on your... keyboard or un-check Full screen on the sub-screen, then choose the live camera you needed. 3. To switch display sequence in which you want to switch Full screen mode. 2. To switch current sub-window to another...

Surveillance Manager User Guide
Page 25
4.4.1 System setup ¾ Start up config: z Auto start: Auto start main console while system boots up . z Minimized at started: Auto minimize main console when system boots up . z Auto login: Auto login main console when system boots up . It must configure "Auto login" information. 22 z Auto monitor all: Auto monitors all cameras when main console starts up z Auto Full Screen: Auto configure as full screen when main console starts up .
4.4.1 System setup ¾ Start up config: z Auto start: Auto start main console while system boots up . z Minimized at started: Auto minimize main console when system boots up . z Auto login: Auto login main console when system boots up . It must configure "Auto login" information. 22 z Auto monitor all: Auto monitors all cameras when main console starts up z Auto Full Screen: Auto configure as full screen when main console starts up .

Surveillance Manager User Guide
Page 27
...enable them. If the selected Vender is listed by clicking checkbox. ¾ Clone Camera setting: 1. 4.4.2 Camera ¾ Camera list: List all cameras setting with the copied setting. ¾ OSD Config: System could show some of these camera(s), please un-check them . 3. z Show Date: Displays system date. The... information. If you need to disable some information on pop-up menu. 2. z Show Time: Displays system time. Select one camera and click Copy, or click mouse right button and select Copy on the preview screen at system. Click Apply all button will ...
...enable them. If the selected Vender is listed by clicking checkbox. ¾ Clone Camera setting: 1. 4.4.2 Camera ¾ Camera list: List all cameras setting with the copied setting. ¾ OSD Config: System could show some of these camera(s), please un-check them . 3. z Show Date: Displays system date. The... information. If you need to disable some information on pop-up menu. 2. z Show Time: Displays system time. Select one camera and click Copy, or click mouse right button and select Copy on the preview screen at system. Click Apply all button will ...

Surveillance Manager User Guide
Page 28
... to login specified camera. z Camera parameter button: Click Camera parameter to system. z IP: Set this camera's HTTP port. z Port: Set this camera's IP. Click OK to cancel all cameras in system. z Model: Select Model name of the selected camera. z Password: Set the Password for this camera. NVR: For ... selected Model is not identical to identify this camera in the list. Click Cancel to confirm all field for search completed and check the cameras which you need. z Camera name: Set this channel's camera name to the camera, this channel may not work correctly. z ...
... to login specified camera. z Camera parameter button: Click Camera parameter to system. z IP: Set this camera's HTTP port. z Port: Set this camera's IP. Click OK to cancel all cameras in system. z Model: Select Model name of the selected camera. z Password: Set the Password for this camera. NVR: For ... selected Model is not identical to identify this camera in the list. Click Cancel to confirm all field for search completed and check the cameras which you need. z Camera name: Set this channel's camera name to the camera, this channel may not work correctly. z ...

Surveillance Manager User Guide
Page 29
...: Select the protocol via which channel for connecting to the previous page. If you need to listen live audio, this page and return to camera. z Channel parameter Page(NVR): Channel: Select which the system connects to listen live audio, this function must Enabled with "Enable Audio" value... both. If you need to the camera. Enable Audio: Set Audio enabled to receive audio streaming form NVR. Click Cancel to save audio data into recorded file. ) Note: The Audio...
...: Select the protocol via which channel for connecting to the previous page. If you need to listen live audio, this page and return to camera. z Channel parameter Page(NVR): Channel: Select which the system connects to listen live audio, this function must Enabled with "Enable Audio" value... both. If you need to the camera. Enable Audio: Set Audio enabled to receive audio streaming form NVR. Click Cancel to save audio data into recorded file. ) Note: The Audio...

Surveillance Manager User Guide
Page 30
...privilege of the user can change division of these privileges at least or the user can not do anything with camera. The user can use E-Map function. z EMap: The privilege of the user can preview the live streaming.... Tilt, and Zoom functions of the user can preview live streaming of check cameras. ¾ Account list: Display all users' information of the user can access system setup page. z ...System Setup: The privilege of camera. When you want to define user's privilege of each function of the system. z Schedule...
...privilege of the user can change division of these privileges at least or the user can not do anything with camera. The user can use E-Map function. z EMap: The privilege of the user can preview the live streaming.... Tilt, and Zoom functions of the user can preview live streaming of check cameras. ¾ Account list: Display all users' information of the user can access system setup page. z ...System Setup: The privilege of camera. When you want to define user's privilege of each function of the system. z Schedule...

Surveillance Manager User Guide
Page 34
... auto-detect monitor connect status, If you can't find out extra-monitor, please check monitor connect status and re-open setup page. 31 z Show Live Camera: Displays extra live preview window on selected monitor. z Port: The FTP server's port. z Playback: Execute Playback on selected monitor. z Alarm-Report: Displays Alarm status report...
... auto-detect monitor connect status, If you can't find out extra-monitor, please check monitor connect status and re-open setup page. 31 z Show Live Camera: Displays extra live preview window on selected monitor. z Port: The FTP server's port. z Playback: Execute Playback on selected monitor. z Alarm-Report: Displays Alarm status report...

Surveillance Manager User Guide
Page 35
...Down/Left/Right/Up-Left/Up-Right/Down-Left/Down-Right/Home: Move Pan-Tilt camera direction. 3. Auto Focus: Trigger focus camera auto focus function. 7. Zoom in / Zoom out Trigger focus camera zoom-in or zoom-out. 8. Surveillance Manager support all kinds of joystick by ...please confirm install joystick driver first. Switch to next division / Switch to previous division / Switch to previous window Change focus camera window. 5. Auto IRIS: Trigger focus camera auto-IRIS function. 32 Button's function list: 1. Switch to next window / Switch to One division: Change sub-screen division...
...Down/Left/Right/Up-Left/Up-Right/Down-Left/Down-Right/Home: Move Pan-Tilt camera direction. 3. Auto Focus: Trigger focus camera auto focus function. 7. Zoom in / Zoom out Trigger focus camera zoom-in or zoom-out. 8. Surveillance Manager support all kinds of joystick by ...please confirm install joystick driver first. Switch to next division / Switch to previous division / Switch to previous window Change focus camera window. 5. Auto IRIS: Trigger focus camera auto-IRIS function. 32 Button's function list: 1. Switch to next window / Switch to One division: Change sub-screen division...

Surveillance Manager User Guide
Page 36
Preset 1~16 Change focus camera direction to preset position. ) Note: How many buttons will auto-detect joystick connect status, If you can define one function in the list above. System will display on setting page depends on joystick driver, each button can 't find out your joystick, please check the joystick connect status and re-open setup page. 33 9.
Preset 1~16 Change focus camera direction to preset position. ) Note: How many buttons will auto-detect joystick connect status, If you can define one function in the list above. System will display on setting page depends on joystick driver, each button can 't find out your joystick, please check the joystick connect status and re-open setup page. 33 9.

Surveillance Manager User Guide
Page 37
Select the camera which you want to approach Alarm setup dialog. ¾ Event Setting / Add Event: 1. 4.5 Alarm Setting Click system setup button and select Alarm Setup to add event. 34
Select the camera which you want to approach Alarm setup dialog. ¾ Event Setting / Add Event: 1. 4.5 Alarm Setting Click system setup button and select Alarm Setup to add event. 34

Surveillance Manager User Guide
Page 38
The selected Event will be added into the specified camera. ¾ Event Setting / Delete Event: Select an event which you want to delete, and then click Delete to add it. 4. Select the Event which was ...
The selected Event will be added into the specified camera. ¾ Event Setting / Delete Event: Select an event which you want to delete, and then click Delete to add it. 4. Select the Event which was ...


