User Guide
Page 4
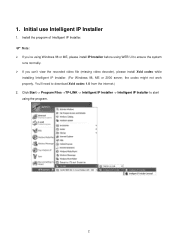
... the system runs normally. ¾ If you can't view the recorded video file (missing video decoder), please install Xvid codec while installing Intelligent IP Installer. (For Windows 98, ME or 2000 server, the codec might not work properly. Click Start -> Program Files ->TP-LINK -> Intelligent IP Installer -> Intelligent IP Installer to start using...
... the system runs normally. ¾ If you can't view the recorded video file (missing video decoder), please install Xvid codec while installing Intelligent IP Installer. (For Windows 98, ME or 2000 server, the codec might not work properly. Click Start -> Program Files ->TP-LINK -> Intelligent IP Installer -> Intelligent IP Installer to start using...

User Guide
Page 2
... 2.3 PTZ Camera Control 13 2.3.1. Show Camera: ...15 2.4.4. Toggle Full Screen 15 3.1 Information Window 18 3.2 Audio Volume Control 18 3.3 Screen Division:...18 3.4 Browse Mode: ...18 3.5 Open Record: ...18 3.6 Enhancement ...19 3.6.1. System Log:...23 4.1 Day Mode ...24 Enable Talk:...14 2.4.2. Patrol:...13 2.4 On Screen Menu...14 2.4.1. Unusual Event 22 3.11.2. Manual...
... 2.3 PTZ Camera Control 13 2.3.1. Show Camera: ...15 2.4.4. Toggle Full Screen 15 3.1 Information Window 18 3.2 Audio Volume Control 18 3.3 Screen Division:...18 3.4 Browse Mode: ...18 3.5 Open Record: ...18 3.6 Enhancement ...19 3.6.1. System Log:...23 4.1 Day Mode ...24 Enable Talk:...14 2.4.2. Patrol:...13 2.4 On Screen Menu...14 2.4.1. Unusual Event 22 3.11.2. Manual...

User Guide
Page 3
Always Record 28 4.7.2. Event - General Motion 31 5.2 Action ...33 5.2.1. Automatically Popup Event Report 35 6.1.3. Add Camera...37 6.2.2. IP Camera / Video Server Setting Panel 40 6.3 Setting - Monitor Display... 45 Camera ...37 6.2.1. User Account 42 6.6 Setting - Custom: ...27 4.6 Adjust the Scheduled Setting 27 4.7 Encoding Option Panel 28 4.7.1. Assign a Camera Event 30 5.1.2. Holiday:...27 4.5.3. Pre-record/ Post-record Time 28 5.1 Event ...29 5.1.1. Action Type 33 6.1 Setting - Log Viewer - Log Viewer - I/O Device 40 6.4 Setting - Action - Default: ...27...
Always Record 28 4.7.2. Event - General Motion 31 5.2 Action ...33 5.2.1. Automatically Popup Event Report 35 6.1.3. Add Camera...37 6.2.2. IP Camera / Video Server Setting Panel 40 6.3 Setting - Monitor Display... 45 Camera ...37 6.2.1. User Account 42 6.6 Setting - Custom: ...27 4.6 Adjust the Scheduled Setting 27 4.7 Encoding Option Panel 28 4.7.1. Assign a Camera Event 30 5.1.2. Holiday:...27 4.5.3. Pre-record/ Post-record Time 28 5.1 Event ...29 5.1.1. Action Type 33 6.1 Setting - Log Viewer - Log Viewer - I/O Device 40 6.4 Setting - Action - Default: ...27...

User Guide
Page 4
6.9 Backup ...46 6.9.1. Server and Camera List 57 7.2.3. Information Display Window 58 8.1 Server IP...59 8.2 Remote Live Viewer 59 8.3 Remote Playback ...60 Backup...46 6.9.2. PTZ Camera Control 57 7.2.4. Digital Zoom:...58 7.2.5. Setup Panel-Server 56 7.2 Show Camera(s) On the Display Screen 56 7.2.1. Play/ Stop/Drop 58 7.2.6. Delete Recorded Information from the System 48 6.10 Network Service ...50 6.10.1. Live Streaming Server 50 6.11 About Main Console 53 7.1 Setup Panel...55 7.1.1. Log In/ Log Out 57 7.2.2.
6.9 Backup ...46 6.9.1. Server and Camera List 57 7.2.3. Information Display Window 58 8.1 Server IP...59 8.2 Remote Live Viewer 59 8.3 Remote Playback ...60 Backup...46 6.9.2. PTZ Camera Control 57 7.2.4. Digital Zoom:...58 7.2.5. Setup Panel-Server 56 7.2 Show Camera(s) On the Display Screen 56 7.2.1. Play/ Stop/Drop 58 7.2.6. Delete Recorded Information from the System 48 6.10 Network Service ...50 6.10.1. Live Streaming Server 50 6.11 About Main Console 53 7.1 Setup Panel...55 7.1.1. Log In/ Log Out 57 7.2.2.
User Guide
Page 11
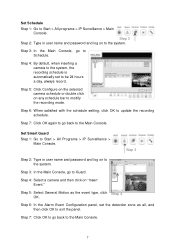
... the detection zone as the event type, click Step 4 OK. Step 5: Select General Motion as all, and then click OK to modify the recording mode. Step 5: Click Configure on the selected camera schedule or double click on "Insert Event." Step 6: When satisfied with the schedule setting, click... OK to Start > All programs > IP Surveillance > Main Console. Set Schedule Step 1: Go to update the recording schedule. Step 3 Step 2: Type in user name and password and log on to the Main Console. 7 Step 7: Click OK to go to Start > All...
... the detection zone as the event type, click Step 4 OK. Step 5: Select General Motion as all, and then click OK to modify the recording mode. Step 5: Click Configure on the selected camera schedule or double click on "Insert Event." Step 6: When satisfied with the schedule setting, click... OK to Start > All programs > IP Surveillance > Main Console. Set Schedule Step 1: Go to update the recording schedule. Step 3 Step 2: Type in user name and password and log on to the Main Console. 7 Step 7: Click OK to go to Start > All...

User Guide
Page 12
Step 3 Step 4: Click on "Start Recording Schedule" and "Start Smart Guard System" to Start > All programs > IP Surveillance > Main Console. Step 4 Playback Step 1: Go to initiate the two functions. Highlight any ... Console, go to Playback. Step 3 Step 4: In the Playback window, click on the Open Record Icon. Step 5: In the time table, recorded files are displayed in user name and password and log on to the system. Step 5 Start Recording & Smart Guard Step 6 Step 1: Go to Start > All Programs > IP Surveillance > Main Console Step...
Step 3 Step 4: Click on "Start Recording Schedule" and "Start Smart Guard System" to Start > All programs > IP Surveillance > Main Console. Step 4 Playback Step 1: Go to initiate the two functions. Highlight any ... Console, go to Playback. Step 3 Step 4: In the Playback window, click on the Open Record Icon. Step 5: In the time table, recorded files are displayed in user name and password and log on to the system. Step 5 Start Recording & Smart Guard Step 6 Step 1: Go to Start > All Programs > IP Surveillance > Main Console Step...

User Guide
Page 13
Step 6: The recorded files are ready to Playback Console. Click OK to return to view now. 9 bars to select playback section.
Step 6: The recorded files are ready to Playback Console. Click OK to return to view now. 9 bars to select playback section.
User Guide
Page 14
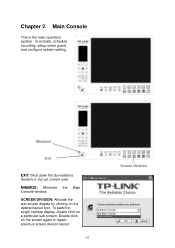
Main Console This is the main operation system - MINIMIZE: Minimize the Main Console window. To switch to single camera display, double click on the screen again to activate, schedule recording, setup smart guard and configure system setting. Minimize Exit EXIT: Shut down the Surveillance System or log out current user. Double click on a particular sub-screen. to regain previous screen division layout. 10 Screen Division SCREEN DIVISION: Allocate the sub-screen display by clicking on the desired layout icon. Chapter 2.
Main Console This is the main operation system - MINIMIZE: Minimize the Main Console window. To switch to single camera display, double click on the screen again to activate, schedule recording, setup smart guard and configure system setting. Minimize Exit EXIT: Shut down the Surveillance System or log out current user. Double click on a particular sub-screen. to regain previous screen division layout. 10 Screen Division SCREEN DIVISION: Allocate the sub-screen display by clicking on the desired layout icon. Chapter 2.

User Guide
Page 15
... into N screen(s) Rotate all the functions at the moment you want to, for example, detect Missing Object, be sure the object needed to activate/ deactivate: (a) Recording Schedule System, (b) Smart Guard System, or (c) Counting Application. Select Start/Stop Monitor All to activate/ deactivate all screens Start START: Click on the Start icon...
... into N screen(s) Rotate all the functions at the moment you want to, for example, detect Missing Object, be sure the object needed to activate/ deactivate: (a) Recording Schedule System, (b) Smart Guard System, or (c) Counting Application. Select Start/Stop Monitor All to activate/ deactivate all screens Start START: Click on the Start icon...

User Guide
Page 16
...access log viewer and backup files, or setup network services. See Schedule on page 42 for detail. You can watch recorded video, search recorded video, adjust image of events that you want to modify general setting, save video/ pictures, print images, check log information and... event records, and set up recording function configuration. Guard Schedule Playback Config PLAYBACK: Click on the icon to events. setup reaction(s) responding to get Playback Console....
...access log viewer and backup files, or setup network services. See Schedule on page 42 for detail. You can watch recorded video, search recorded video, adjust image of events that you want to modify general setting, save video/ pictures, print images, check log information and... event records, and set up recording function configuration. Guard Schedule Playback Config PLAYBACK: Click on the icon to events. setup reaction(s) responding to get Playback Console....

User Guide
Page 19
Toggle Full Screen: To view a specific channel with full screen. 15 You have the options to copy the image to the clipboard or to be displayed from the Show Camera Menu. 2.4.4. 2.4.3. Manual Record: Start recording video by selecting manual record. 2.4.6. Show Camera: Select the camera to save it. 2.4.5. Snapshot: Select the snapshot function to capture a specific video image immediately.
Toggle Full Screen: To view a specific channel with full screen. 15 You have the options to copy the image to the clipboard or to be displayed from the Show Camera Menu. 2.4.4. 2.4.3. Manual Record: Start recording video by selecting manual record. 2.4.6. Show Camera: Select the camera to save it. 2.4.5. Snapshot: Select the snapshot function to capture a specific video image immediately.

User Guide
Page 20
Chapter 3. EXIT: Shut down the Playback console. Minimize Exit Scroll Bar Control Speed Zoom Cue MINIMIZE: Minimize the Playback console. drag it to where you want to review. 16 SCROLL BAR: Indicate the status of the playing video; Playback Watch the recorded video, view and/or search for unusual events and recorded system information.
Chapter 3. EXIT: Shut down the Playback console. Minimize Exit Scroll Bar Control Speed Zoom Cue MINIMIZE: Minimize the Playback console. drag it to where you want to review. 16 SCROLL BAR: Indicate the status of the playing video; Playback Watch the recorded video, view and/or search for unusual events and recorded system information.

User Guide
Page 21
ZOOM: Zoom in and zoom out. Click + to set . Get a close up and - CONTROL: Play, pause and stop the video. Open Record Search Mode Screen Division Information Window Step FWD/REV: Forward/reverse frame by dragging the screen. SPEED: Control the speed of a saved video clip. The ... the playing video. CUE: When playing video, click on the Cue In/ Cue Out icon at where you want to speed up view of the recorded video; to view by frame. move to the spot you want to speed down.
ZOOM: Zoom in and zoom out. Click + to set . Get a close up and - CONTROL: Play, pause and stop the video. Open Record Search Mode Screen Division Information Window Step FWD/REV: Forward/reverse frame by dragging the screen. SPEED: Control the speed of a saved video clip. The ... the playing video. CUE: When playing video, click on the Cue In/ Cue Out icon at where you want to speed up view of the recorded video; to view by frame. move to the spot you want to speed down.
User Guide
Page 22
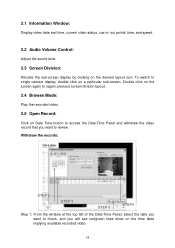
...date you will see red/green lines show on the time table implying available recorded video. 18 Double click on the screen again to regain previous screen division layout. 3.4 Browse Mode: Play the recorded video. 3.5 Open Record: Click on Date Time button to access the Date-Time Panel and withdraw ...the video record that you want to check, and you want to single camera display, double click on ...
...date you will see red/green lines show on the time table implying available recorded video. 18 Double click on the screen again to regain previous screen division layout. 3.4 Browse Mode: Play the recorded video. 3.5 Open Record: Click on Date Time button to access the Date-Time Panel and withdraw ...the video record that you want to check, and you want to single camera display, double click on ...

User Guide
Page 23
... you want to save as a video clip. Step 4: Choose the compression format and then save ) the record with the settings. 3.6 Enhancement 3.6.1. You can select the day.If the day has record files,that would show the record in grey scale mode so the image displays in black and white. 3.7 Save Video Step 1: Click...
... you want to save as a video clip. Step 4: Choose the compression format and then save ) the record with the settings. 3.6 Enhancement 3.6.1. You can select the day.If the day has record files,that would show the record in grey scale mode so the image displays in black and white. 3.7 Save Video Step 1: Click...

User Guide
Page 25
Step 4: You can adjust the Cameras you want to backup. Step 1: Press the "Open Record" to start backing up. Step 2 Step 3 Step 4 Step 5 Step 6 Step 7 21 Step 3: You can calculate the size of the backup data. Step 5: Select the directory you want to backup. Step 6: Check the log you want to save the backup data. Step 7: Press the "Backup" to select data and press "Backup". Step 2: You can adjust the Start Time and End Time you want to backup.
Step 4: You can adjust the Cameras you want to backup. Step 1: Press the "Open Record" to start backing up. Step 2 Step 3 Step 4 Step 5 Step 6 Step 7 21 Step 3: You can calculate the size of the backup data. Step 5: Select the directory you want to backup. Step 6: Check the log you want to save the backup data. Step 7: Press the "Backup" to select data and press "Backup". Step 2: You can adjust the Start Time and End Time you want to backup.
User Guide
Page 26
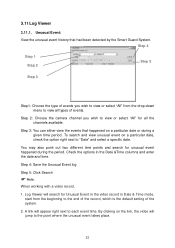
...view or select "All" from the beginning to view or select "All" for Unusual Event in the video record in the Date &Time columns and enter the date and time. Check the options in Date & Time mode,... during the period. Step 4: Save the Unusual Event log Step 5: Click Search Note: When working with a video record, 1. 3.11Log Viewer 3.11.1. Step 3: You can either view the events that had been detected by the Smart Guard System.... Unusual Event: View the unusual event history that happened on the link, the video will appear right next to "Date" and select a specific date...
...view or select "All" from the beginning to view or select "All" for Unusual Event in the video record in the Date &Time columns and enter the date and time. Check the options in Date & Time mode,... during the period. Step 4: Save the Unusual Event log Step 5: Click Search Note: When working with a video record, 1. 3.11Log Viewer 3.11.1. Step 3: You can either view the events that had been detected by the Smart Guard System.... Unusual Event: View the unusual event history that happened on the link, the video will appear right next to "Date" and select a specific date...

User Guide
Page 28
... day according to 10 pm (10:00 - 22:00) with 30 FPS, Normal video quality, and Normal resolution. Chapter 4. Office Mode: Video recording from 10 am to turn the recorder on the Load icon for each camera, you may 1. To setup the time schedule for the drop-down menu. Schedule Load Camera... / Channel Day Mode Click on the Schedule icon on the Main Console and set up the time duration for video recording on the schedule configuration panel. 4.1 Day Mode Schedule the cameras to 8 pm (08:00 - 20:00, shown on the red bar in the Schedule Configuration...
... day according to 10 pm (10:00 - 22:00) with 30 FPS, Normal video quality, and Normal resolution. Chapter 4. Office Mode: Video recording from 10 am to turn the recorder on the Load icon for each camera, you may 1. To setup the time schedule for the drop-down menu. Schedule Load Camera... / Channel Day Mode Click on the Schedule icon on the Main Console and set up the time duration for video recording on the schedule configuration panel. 4.1 Day Mode Schedule the cameras to 8 pm (08:00 - 20:00, shown on the red bar in the Schedule Configuration...

User Guide
Page 29
... motion detection in the Schedule Configuration. You can adjust the sensitivity, interval, and area of 30 FPS, Normal quality, and Normal resolution. to record video during the time period you want to the time table. Step 4: Click OK. 25 highest video quality, and High resolution. The scheduled ...time will start recording only when a motion is detected on the screen, 24 hours a day (shown on the green bar in the Schedule Configuration panel), with the...
... motion detection in the Schedule Configuration. You can adjust the sensitivity, interval, and area of 30 FPS, Normal quality, and Normal resolution. to record video during the time period you want to the time table. Step 4: Click OK. 25 highest video quality, and High resolution. The scheduled ...time will start recording only when a motion is detected on the screen, 24 hours a day (shown on the green bar in the Schedule Configuration panel), with the...
User Guide
Page 32
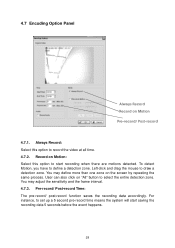
... may adjust the sensitivity and the frame interval. 4.7.3. Pre-record/ Post-record Time: The pre-record/ post-record function saves the recording data accordingly. User can also click on Motion Pre-record/ Post-record 4.7.1. For instance, to set up a 5 second pre-record time means the system will start recording when there are motions detected. To detect Motion, you have...
... may adjust the sensitivity and the frame interval. 4.7.3. Pre-record/ Post-record Time: The pre-record/ post-record function saves the recording data accordingly. User can also click on Motion Pre-record/ Post-record 4.7.1. For instance, to set up a 5 second pre-record time means the system will start recording when there are motions detected. To detect Motion, you have...

