
User Guide
Page 3
How to Use Intelligent IP Installer This chapter introduces how to use IP cameras with Microsoft web browsers and Intelligent IP Installer in Windows operating systems. This document focuses on introducing you want to know how to monitor the image from the camera using Intelligent IP Installer. If you to Intelligent IP Installer. The IP cameras can be used with Microsoft web browsers, please check the camera user manuals. 1
How to Use Intelligent IP Installer This chapter introduces how to use IP cameras with Microsoft web browsers and Intelligent IP Installer in Windows operating systems. This document focuses on introducing you want to know how to monitor the image from the camera using Intelligent IP Installer. If you to Intelligent IP Installer. The IP cameras can be used with Microsoft web browsers, please check the camera user manuals. 1

User Guide
Page 22
... with PC:Select this mode to make the date and time of the camera the same as the monitoring PC. ¾ Manual setting:Select this mode to manually adjust the date & time of the camera. ¾ Synchronize with NTP:Specify the NTP server name and the Refresh Interval to...
... with PC:Select this mode to make the date and time of the camera the same as the monitoring PC. ¾ Manual setting:Select this mode to manually adjust the date & time of the camera. ¾ Synchronize with NTP:Specify the NTP server name and the Refresh Interval to...

User Guide
Page 1
IP Surveillance System User's manual
IP Surveillance System User's manual

User Guide
Page 2
... 3.11.1. System Log:...23 4.1 Day Mode ...24 CONTENTS 1.1 System Requirement 1 1.2 Installation ...1 1.3 Quick Start...5 2.1 Start ...11 2.2 Information Window 13 2.3 PTZ Camera Control 13 2.3.1. Preset/ Go:...13 2.3.2. Manual Record 15 2.4.6.
... 3.11.1. System Log:...23 4.1 Day Mode ...24 CONTENTS 1.1 System Requirement 1 1.2 Installation ...1 1.3 Quick Start...5 2.1 Start ...11 2.2 Information Window 13 2.3 PTZ Camera Control 13 2.3.1. Preset/ Go:...13 2.3.2. Manual Record 15 2.4.6.

User Guide
Page 3
... the Scheduled Setting 27 4.7 Encoding Option Panel 28 4.7.1. Assign a Camera Event 30 5.1.2. General ...35 6.1.1. Status Display...37 6.2 Setting - 4.2 Load Preset Modes 24 4.3 Insert a New Schedule Manually 25 4.4 Copy Schedule ...26 4.5 Week Mode ...26 4.5.1. Default: ...27 4.5.2. Signal Lost 30 5.1.3. Action - Camera ...37 6.2.1. Add Camera...37 6.2.2. IP Camera / Video Server Setting Panel 40...
... the Scheduled Setting 27 4.7 Encoding Option Panel 28 4.7.1. Assign a Camera Event 30 5.1.2. General ...35 6.1.1. Status Display...37 6.2 Setting - 4.2 Load Preset Modes 24 4.3 Insert a New Schedule Manually 25 4.4 Copy Schedule ...26 4.5 Week Mode ...26 4.5.1. Default: ...27 4.5.2. Signal Lost 30 5.1.3. Action - Camera ...37 6.2.1. Add Camera...37 6.2.2. IP Camera / Video Server Setting Panel 40...

User Guide
Page 9
... network between the IP camera(s) and the system. Step 2: Type in user name and password and log on to the system following by the instruction manual provided by the manufacturer.
... network between the IP camera(s) and the system. Step 2: Type in user name and password and log on to the system following by the instruction manual provided by the manufacturer.

User Guide
Page 19
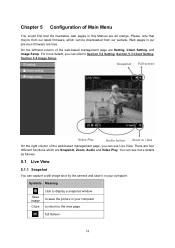
You have the options to copy the image to the clipboard or to capture a specific video image immediately. Snapshot: Select the snapshot function to save it. 2.4.5. 2.4.3. Manual Record: Start recording video by selecting manual record. 2.4.6. Toggle Full Screen: To view a specific channel with full screen. 15 Show Camera: Select the camera to be displayed from the Show Camera Menu. 2.4.4.
You have the options to copy the image to the clipboard or to capture a specific video image immediately. Snapshot: Select the snapshot function to save it. 2.4.5. 2.4.3. Manual Record: Start recording video by selecting manual record. 2.4.6. Toggle Full Screen: To view a specific channel with full screen. 15 Show Camera: Select the camera to be displayed from the Show Camera Menu. 2.4.4.

User Guide
Page 28
Insert a new schedule manually 4.2 Load Preset Modes Click on the Load icon for each camera, you may 1. Shop Mode: Video recording from 8 am to 8 pm (08:00 - 20:00, ...
Insert a new schedule manually 4.2 Load Preset Modes Click on the Load icon for each camera, you may 1. Shop Mode: Video recording from 8 am to 8 pm (08:00 - 20:00, ...

User Guide
Page 29
...: The system will show as a grey bar. You can adjust the sensitivity, interval, and area of motion detection in the Schedule Configuration. 4.3 Insert a New Schedule Manually Step 1: Left-click and draw the bar you set with the setting of motion detection in the Schedule Configuration. The scheduled time will start recording...
...: The system will show as a grey bar. You can adjust the sensitivity, interval, and area of motion detection in the Schedule Configuration. 4.3 Insert a New Schedule Manually Step 1: Left-click and draw the bar you set with the setting of motion detection in the Schedule Configuration. The scheduled time will start recording...

User Guide
Page 31
Holiday: You may assign holidays where the system will work according to the setting of schedule. Custom: You can manually change the setting at any time after you insert or load a period of Sunday. 4.5.3. 4.5.1. Default: Follow the same process to obtain the Encoding Option panel. ...
Holiday: You may assign holidays where the system will work according to the setting of schedule. Custom: You can manually change the setting at any time after you insert or load a period of Sunday. 4.5.3. 4.5.1. Default: Follow the same process to obtain the Encoding Option panel. ...

User Guide
Page 34
... Event Step 1: Select a channel from the camera list and click the insert event icon. . Step 3: Configure the setting of events: Signal Lost and General Motion. Manually cancel event or event continues triggered: The alarm/action will be off once the abnormality is fixed or ends. Step 2 Step 3 Step 2: There are two...
... Event Step 1: Select a channel from the camera list and click the insert event icon. . Step 3: Configure the setting of events: Signal Lost and General Motion. Manually cancel event or event continues triggered: The alarm/action will be off once the abnormality is fixed or ends. Step 2 Step 3 Step 2: There are two...

User Guide
Page 35
... from the Main Console (Start>Open Event Report>Cancel All Events). Activated Period: You can set up the system to react during a certain time period; Manually cancel event or event continues triggered: The alarm/action will be notified by the alarm. General Motion 31 The user currently not at the seat...
... from the Main Console (Start>Open Event Report>Cancel All Events). Activated Period: You can set up the system to react during a certain time period; Manually cancel event or event continues triggered: The alarm/action will be notified by the alarm. General Motion 31 The user currently not at the seat...

User Guide
Page 47
Load Configuration: To load a specific setting, go to Config > Save/ Load Configuration > Save. Please re-start MainConsole manually. 43 For instance, you may save up a primary channel that you will be able to rotate the channels/ cameras on primary/ secondary ...function allows system users to save any specific setting as a cfg file. modify the cameras shown on the display screen. Please re-start Main Console manually. Note: MainConsole will always be automatically shutdown after loading a new configuration. With auto scan function, you saved the cfg files at any...
Load Configuration: To load a specific setting, go to Config > Save/ Load Configuration > Save. Please re-start MainConsole manually. 43 For instance, you may save up a primary channel that you will be able to rotate the channels/ cameras on primary/ secondary ...function allows system users to save any specific setting as a cfg file. modify the cameras shown on the display screen. Please re-start Main Console manually. Note: MainConsole will always be automatically shutdown after loading a new configuration. With auto scan function, you saved the cfg files at any...
User Guide
Page 19
... that they're from our website. There are four different functions which can refer to the view page full Screen 14 Web pages in this Manual are blue. Please note that the illustrative web pages in our previous firmware are all orange.
... that they're from our website. There are four different functions which can refer to the view page full Screen 14 Web pages in this Manual are blue. Please note that the illustrative web pages in our previous firmware are all orange.

User Guide
Page 26
... formats. ¾ Adjust: You can select one of this IP Camera. z Synchronize with NTP: Specify the NTP server name and the Refresh Interval to adjust manually the date and time of those four adjusting modes for your IP Camera. 6.1.2 Date/Time The Date/Time page displays all options of time setting... monitoring PC clock. ¾ Date/time format: You can click the drop-down list to keep the current date and time of this IP Camera. z Manual setting: Select this mode to 21
... formats. ¾ Adjust: You can select one of this IP Camera. z Synchronize with NTP: Specify the NTP server name and the Refresh Interval to adjust manually the date and time of those four adjusting modes for your IP Camera. 6.1.2 Date/Time The Date/Time page displays all options of time setting... monitoring PC clock. ¾ Date/time format: You can click the drop-down list to keep the current date and time of this IP Camera. z Manual setting: Select this mode to 21

User Guide
Page 89
... using the web browser that you 're allowed to the Java script installation, please visit the official website here: http://www.java.com/en/download/manual/jsp Q3.If the image is , please install the ActiveX and Java script. Why can I view the image from our web site, or run the...
... using the web browser that you 're allowed to the Java script installation, please visit the official website here: http://www.java.com/en/download/manual/jsp Q3.If the image is , please install the ActiveX and Java script. Why can I view the image from our web site, or run the...