
User Guide
Page 5
... basic values. About Click this button to optimize video setting. You can connect the specific Network Cameras to get into common information of all Network Cameras in local network. User Click this button to get the information of all Network Cameras in network. 2. This section includes Info, User, Date Time, TCP/IP, PPPoE and DDNS. ) Note: Only the...
... basic values. About Click this button to optimize video setting. You can connect the specific Network Cameras to get into common information of all Network Cameras in local network. User Click this button to get the information of all Network Cameras in network. 2. This section includes Info, User, Date Time, TCP/IP, PPPoE and DDNS. ) Note: Only the...

User Guide
Page 6
...reflect those on the LAN status). If any of finding IP address is not located in the network, it displays Network Cameras information including Name, IP Address, MAC, Mod. If there is free, the Network Video server will try to find a free IP address (this IP address, and its subnet... mask would be from 192.168.1.2, to search Network Cameras in local network, it to 192.168.1.254. 3. Name and Mod. Name and Mod. Search:Click it will appear in the network with product factory information, including product Name, IP Address, MAC Address, Mod...
...reflect those on the LAN status). If any of finding IP address is not located in the network, it displays Network Cameras information including Name, IP Address, MAC, Mod. If there is free, the Network Video server will try to find a free IP address (this IP address, and its subnet... mask would be from 192.168.1.2, to search Network Cameras in local network, it to 192.168.1.254. 3. Name and Mod. Name and Mod. Search:Click it will appear in the network with product factory information, including product Name, IP Address, MAC Address, Mod...

User Guide
Page 7
... Next to continue, Previous to go back, Cancel to go to key in the username and password of these cameras. Link to IE:After searching Network Cameras in network, you can click to specific Network Cameras in search area and press Link to IE to use setup to change the configurations. You have to the main page. 5
... Next to continue, Previous to go back, Cancel to go to key in the username and password of these cameras. Link to IE:After searching Network Cameras in network, you can click to specific Network Cameras in search area and press Link to IE to use setup to change the configurations. You have to the main page. 5

User Guide
Page 9
Press Next to continue, Previous to go back, Cancel to go to the main page. 7 Date/Time settings: You can set the date/time of the network camera here. See "Hint" for details.
Press Next to continue, Previous to go back, Cancel to go to the main page. 7 Date/Time settings: You can set the date/time of the network camera here. See "Hint" for details.

User Guide
Page 10
See "Hint" for details. Press Next to continue, Previous to go back, Cancel to go to the main page. 8 Network settings: You can change the network settings of the network camera here.
See "Hint" for details. Press Next to continue, Previous to go back, Cancel to go to the main page. 8 Network settings: You can change the network settings of the network camera here.

User Guide
Page 14
The following screen will automatically reboot after upgrade. 12 You have to key in the username and password of the administrator to start. 3.2 Upgrade Choose a network camera, click on Upgrade to upgrade the firmware. The device will display: Choose the firmware image file you want to upgrade and press Upgrade to enter the upgrade page.
The following screen will automatically reboot after upgrade. 12 You have to key in the username and password of the administrator to start. 3.2 Upgrade Choose a network camera, click on Upgrade to upgrade the firmware. The device will display: Choose the firmware image file you want to upgrade and press Upgrade to enter the upgrade page.
User Guide
Page 15
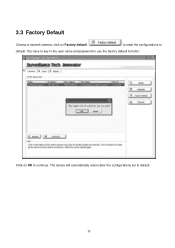
Click on Factory default to reset the configurations to continue. 3.3 Factory Default Choose a network camera, click on OK to default. You have to key in the user name and password to default. 13 The device will automatically reboot after the configurations set to use the factory default function.
Click on Factory default to reset the configurations to continue. 3.3 Factory Default Choose a network camera, click on OK to default. You have to key in the user name and password to default. 13 The device will automatically reboot after the configurations set to use the factory default function.

User Guide
Page 16
The device will automatically reboot. 14 3.4 Reboot Choose a network camera, click on OK to continue. to use the reboot function. You have to key Click on Reboot in the user name and password to reboot the device.
The device will automatically reboot. 14 3.4 Reboot Choose a network camera, click on OK to continue. to use the reboot function. You have to key Click on Reboot in the user name and password to reboot the device.
User Guide
Page 17
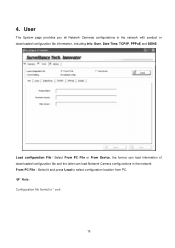
Load configuration File:Select From PC File or From Device, the former can load information of downloaded configuration file and the latter can load Network Camera configurations in the network with product or downloaded configuration file information, including Info, User, Date Time, TCP/IP, PPPoE and DDNS. User The System page provides you all Network Cameras configurations in the network. 4. From PC File:Select it and press Load to select configuration location from PC. ) Note: Configuration file format is * conf. 15
Load configuration File:Select From PC File or From Device, the former can load information of downloaded configuration file and the latter can load Network Camera configurations in the network with product or downloaded configuration file information, including Info, User, Date Time, TCP/IP, PPPoE and DDNS. User The System page provides you all Network Cameras configurations in the network. 4. From PC File:Select it and press Load to select configuration location from PC. ) Note: Configuration file format is * conf. 15

User Guide
Page 21
Intelligent IP Installer provides to assign a password if the Network Camera is "admin/admin". Use this menu to set the username and password of Administrator and up to 9 different users (User 1 to User 9), and the authentication ...:Set a user to Admin, Operator or Viewer mode. ¾ Viewer authentication:Allows any viewer direct access to be accessed by others. 4.2 User The Network Camera default account and password setting is intended to Live View. 19
Intelligent IP Installer provides to assign a password if the Network Camera is "admin/admin". Use this menu to set the username and password of Administrator and up to 9 different users (User 1 to User 9), and the authentication ...:Set a user to Admin, Operator or Viewer mode. ¾ Viewer authentication:Allows any viewer direct access to be accessed by others. 4.2 User The Network Camera default account and password setting is intended to Live View. 19

User Guide
Page 22
... mode to manually adjust the date & time of the camera. ¾ Synchronize with NTP:Specify the NTP server name and the Refresh Interval to synchronize the date and time of the camera with those of the time server, known as the NTP (Network Time Protocol) server. ) Note: The NTP server... (Network Time Protocol) is the time server which is an Internet standard protocol (built on 20
... mode to manually adjust the date & time of the camera. ¾ Synchronize with NTP:Specify the NTP server name and the Refresh Interval to synchronize the date and time of the camera with those of the time server, known as the NTP (Network Time Protocol) server. ) Note: The NTP server... (Network Time Protocol) is the time server which is an Internet standard protocol (built on 20

User Guide
Page 23
...; When you have set the HTTP port number to a number other than 80 on the Network setting page or in general situations. top of TCP/IP) that assures accurate synchronization to the millisecond of computer... clock times in a network of computers. ¾ NTP server name:Type the host name or IP address of the NTP... to 2000 Æ http://192.168.0.100:2000/ ¾ MAC Address: Display the MAC address of the camera on the web browser as follows: Example: when HTTP port number is set to 64 characters. ¾ Time...
...; When you have set the HTTP port number to a number other than 80 on the Network setting page or in general situations. top of TCP/IP) that assures accurate synchronization to the millisecond of computer... clock times in a network of computers. ¾ NTP server name:Type the host name or IP address of the NTP... to 2000 Æ http://192.168.0.100:2000/ ¾ MAC Address: Display the MAC address of the camera on the web browser as follows: Example: when HTTP port number is set to 64 characters. ¾ Time...

User Guide
Page 24
...mask. DNS Setting ¾ Obtain DNS server automatically:If a DHCP server is installed on the network. ¾ Use the following DNS server:Select this while the IP address is assigned by the ... server. IP Address: ¾ Obtain IP automatically (DHCP): If a DHCP server is installed on the network, to select this while the DNS server is assigned by the DHCP server. ¾ Use the following... IP:Select this when a fixed IP address is working on the network, to select this when you set Obtain IP automatically (DHCP), make sure that the DHCP server...
...mask. DNS Setting ¾ Obtain DNS server automatically:If a DHCP server is installed on the network. ¾ Use the following DNS server:Select this while the IP address is assigned by the ... server. IP Address: ¾ Obtain IP automatically (DHCP): If a DHCP server is installed on the network, to select this while the DNS server is assigned by the DHCP server. ¾ Use the following... IP:Select this when a fixed IP address is working on the network, to select this when you set Obtain IP automatically (DHCP), make sure that the DHCP server...

User Guide
Page 25
4.5 PPPoE Use this when you connect the camera through PPPoE (Point -to- PPPoE connection is the protocol that is widely used in xDSL (digital affiliate line such as ADSL, VDSL or SDSL) as ... when you set the fixed address as the authentication and connection system. ¾ IP Address:The IP address obtained at the PPPoE connecting with network. ¾ User ID:Enter the user ID for authentication necessary for PPPoE connections. Point Protocol over Ethernet). Type it up to obtain the address...
4.5 PPPoE Use this when you connect the camera through PPPoE (Point -to- PPPoE connection is the protocol that is widely used in xDSL (digital affiliate line such as ADSL, VDSL or SDSL) as ... when you set the fixed address as the authentication and connection system. ¾ IP Address:The IP address obtained at the PPPoE connecting with network. ¾ User ID:Enter the user ID for authentication necessary for PPPoE connections. Point Protocol over Ethernet). Type it up to obtain the address...

User Guide
Page 4
Server and Camera List 57 7.2.3. 6.9 Backup ...46 6.9.1. PTZ Camera Control 57 7.2.4. Play/ Stop/Drop 58 7.2.6. Digital Zoom:...58 7.2.5. Backup...46 6.9.2. Log In/ Log Out 57 7.2.2. Information Display Window 58 8.1 Server IP...59 8.2 Remote Live Viewer 59 8.3 Remote Playback ...60 Setup Panel-Server 56 7.2 Show Camera(s) On the Display Screen 56 7.2.1. Delete Recorded Information from the System 48 6.10 Network Service ...50 6.10.1. Live Streaming Server 50 6.11 About Main Console 53 7.1 Setup Panel...55 7.1.1.
Server and Camera List 57 7.2.3. 6.9 Backup ...46 6.9.1. PTZ Camera Control 57 7.2.4. Play/ Stop/Drop 58 7.2.6. Digital Zoom:...58 7.2.5. Backup...46 6.9.2. Log In/ Log Out 57 7.2.2. Information Display Window 58 8.1 Server IP...59 8.2 Remote Live Viewer 59 8.3 Remote Playback ...60 Setup Panel-Server 56 7.2 Show Camera(s) On the Display Screen 56 7.2.1. Delete Recorded Information from the System 48 6.10 Network Service ...50 6.10.1. Live Streaming Server 50 6.11 About Main Console 53 7.1 Setup Panel...55 7.1.1.

User Guide
Page 9
... provided by the manufacturer. Step 3 5 Step 3: Add the IP camera(s) to Start > All Programs > IP Surveillance > Main Console. Step 2: Check the network between the IP camera(s) and the system. Now enjoy our Intelligent Surveillance Solution. 1.3 Quick Start Install IP camera(s) Step 1: Setup the IP camera(s) following below steps. Step 3: In Main Console, go to Config...
... provided by the manufacturer. Step 3 5 Step 3: Add the IP camera(s) to Start > All Programs > IP Surveillance > Main Console. Step 2: Check the network between the IP camera(s) and the system. Now enjoy our Intelligent Surveillance Solution. 1.3 Quick Start Install IP camera(s) Step 1: Setup the IP camera(s) following below steps. Step 3: In Main Console, go to Config...

User Guide
Page 16
... for detail. GUARD: Add/edit type(s) of the stored data, save / load configuration settings, start counting application, access log viewer and backup files, or setup network services. You can watch recorded video, search recorded video, adjust image of events that you want to events. See Guard on page 20 for detail...
... for detail. GUARD: Add/edit type(s) of the stored data, save / load configuration settings, start counting application, access log viewer and backup files, or setup network services. You can watch recorded video, search recorded video, adjust image of events that you want to events. See Guard on page 20 for detail...

User Guide
Page 44
6.2.4. Check "Use DNS" to the instruction provided by the camera manufacturer. I/O Device Device Setting Module Setting List of IP address. IP Camera / Video Server Setting Panel Network Device Description Network: Fill up the Network field (including Name, IP Address, Http Port, User Name, Password and Protocol) referring to use domain name instead of devices Input Monitor...
6.2.4. Check "Use DNS" to the instruction provided by the camera manufacturer. I/O Device Device Setting Module Setting List of IP address. IP Camera / Video Server Setting Panel Network Device Description Network: Fill up the Network field (including Name, IP Address, Http Port, User Name, Password and Protocol) referring to use domain name instead of devices Input Monitor...

User Guide
Page 27
..., 256, 384, 512, 768, 1024, 1280, 1536, and 2048 kbps. ¾ MPEG4 view port (if RTSP mode is Off, please check "Setting →Basic → Camera → General") z Unicast Streaming Video / Audio Port Number: Specify the transmission port number of the video data, which is 8090). to 65534. You can select... default value is an even number from 1024 to the frame rate. You can pass through. ¾ Image Size: Specify the image size when the network camera transmits.
..., 256, 384, 512, 768, 1024, 1280, 1536, and 2048 kbps. ¾ MPEG4 view port (if RTSP mode is Off, please check "Setting →Basic → Camera → General") z Unicast Streaming Video / Audio Port Number: Specify the transmission port number of the video data, which is 8090). to 65534. You can select... default value is an even number from 1024 to the frame rate. You can pass through. ¾ Image Size: Specify the image size when the network camera transmits.

User Guide
Page 29
... Rate: Set the frame rate of the MJPEG image. If you change automatically. ¾ Image Size: Specify the image size when the network camera transmits. z Fixed Quality: You can specify an even number from 5, 10, 15 fps. You can choose among Medium, Standard, Good, Delicate and ...Excellent. 6.3 Network Click Network to 65534. The unit "fps" stands for "frames per second". ¾ Quality: z Auto: The quality will change the setting of Video / ...
... Rate: Set the frame rate of the MJPEG image. If you change automatically. ¾ Image Size: Specify the image size when the network camera transmits. z Fixed Quality: You can specify an even number from 5, 10, 15 fps. You can choose among Medium, Standard, Good, Delicate and ...Excellent. 6.3 Network Click Network to 65534. The unit "fps" stands for "frames per second". ¾ Quality: z Auto: The quality will change the setting of Video / ...


