
User Guide
Page 9
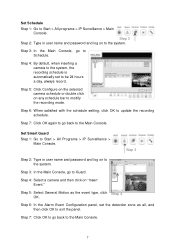
... in user name and password and log on to Start > All Programs > IP Surveillance > Main Console. Step 3 5 Step 2: Check the network between the IP camera(s) and the system. Add IP camera(s) Step 1: Go to the system. Step 3: Add the IP camera(s) to obtain the Setting panel. Execute the Main Console Enter the password you...
... in user name and password and log on to Start > All Programs > IP Surveillance > Main Console. Step 3 5 Step 2: Check the network between the IP camera(s) and the system. Add IP camera(s) Step 1: Go to the system. Step 3: Add the IP camera(s) to obtain the Setting panel. Execute the Main Console Enter the password you...
User Guide
Page 11
... the event type, click Step 4 OK. Step 7: Click OK again to go back to the Main Console. Step 4: Select a camera and then click on to Start > All programs > IP Surveillance > Main Console. Step 3: In the Main Console, go to Schedule. Step 3: In the Main Console, go to Guard. Step... 6: In the Alarm Event Configuration panel, set to Start > All Programs > IP Surveillance > Main Console. Set Smart Guard Step 1: Go to be 24 hours a day, always record. Step 3 Step 2: Type in user name and password and...
... the event type, click Step 4 OK. Step 7: Click OK again to go back to the Main Console. Step 4: Select a camera and then click on to Start > All programs > IP Surveillance > Main Console. Step 3: In the Main Console, go to Schedule. Step 3: In the Main Console, go to Guard. Step... 6: In the Alarm Event Configuration panel, set to Start > All Programs > IP Surveillance > Main Console. Set Smart Guard Step 1: Go to be 24 hours a day, always record. Step 3 Step 2: Type in user name and password and...
User Guide
Page 14
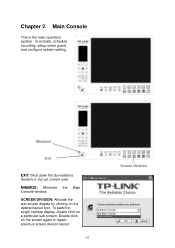
Main Console This is the main operation system - Double click on the desired layout icon. SCREEN DIVISION: Allocate the sub-screen display by clicking on the screen again to regain previous screen division layout. 10 Screen Division Minimize Exit EXIT: Shut down the Surveillance System or log out current user. Chapter 2. MINIMIZE: Minimize the Main Console window. To switch to activate, schedule recording, setup smart guard and configure system setting. to single camera display, double click on a particular sub-screen.
Main Console This is the main operation system - Double click on the desired layout icon. SCREEN DIVISION: Allocate the sub-screen display by clicking on the screen again to regain previous screen division layout. 10 Screen Division Minimize Exit EXIT: Shut down the Surveillance System or log out current user. Chapter 2. MINIMIZE: Minimize the Main Console window. To switch to activate, schedule recording, setup smart guard and configure system setting. to single camera display, double click on a particular sub-screen.

User Guide
Page 41
Status Display 6.2 Setting - Camera 6.2.1. Add Camera Four function buttons will be included in the Main Console. Volume: Adjust the volume with the "volume bar." 6.1.3. Status Display Check the boxes of the information that you wish to see in the information display window in the Setting/Camera panel if you have our Hybrid Surveillance System license for IP camera. 37
Status Display 6.2 Setting - Camera 6.2.1. Add Camera Four function buttons will be included in the Main Console. Volume: Adjust the volume with the "volume bar." 6.1.3. Status Display Check the boxes of the information that you wish to see in the information display window in the Setting/Camera panel if you have our Hybrid Surveillance System license for IP camera. 37

User Guide
Page 57
Performance Total bit rate Individual Camera bit rate Live Streaming Server log information 6.11About Main Console Go to About Main Console to view the version of your surveillance system and the hardware information. 53
Performance Total bit rate Individual Camera bit rate Live Streaming Server log information 6.11About Main Console Go to About Main Console to view the version of your surveillance system and the hardware information. 53

Quick Installation Guide
Page 1
...; Off. Warning Before Installation • Do not keep the Camera exposed to direct sunlight O • Do not place the Camera in high humidity • environments such as • a kitchen Quick Installation Guide TL-SC3130 2-Way Audio Surveillance Camera TL-SC3130G Wireless 2-Way Audio Surveillance Camera 7106503244 (The antenna is for TL-SC3130G only) System Requirement The following operating system are supported...
...; Off. Warning Before Installation • Do not keep the Camera exposed to direct sunlight O • Do not place the Camera in high humidity • environments such as • a kitchen Quick Installation Guide TL-SC3130 2-Way Audio Surveillance Camera TL-SC3130G Wireless 2-Way Audio Surveillance Camera 7106503244 (The antenna is for TL-SC3130G only) System Requirement The following operating system are supported...

Quick Installation Guide
Page 2
...Surveillance Camera Your surveillance Camera Installation is completed. Find the item "Download signed ActiveX controls" and make sure it is admin / admin) Wireless IP Camera User name: Password: VV... Select the relevant camera from the list and click "Link...tp-link.com Service time: Monday to Friday 9:00 AM to www.tp-link.com/support/download.asp • For all active TP-LINK camera devices. TP-LINK' a cre. For more troubleshooting help, go to www.tp-link...9642; Psable Enable Reset custom settings Reset to the TL-SC3130G's manual on the computer's Desktop. Note: To ...
...Surveillance Camera Your surveillance Camera Installation is completed. Find the item "Download signed ActiveX controls" and make sure it is admin / admin) Wireless IP Camera User name: Password: VV... Select the relevant camera from the list and click "Link...tp-link.com Service time: Monday to Friday 9:00 AM to www.tp-link.com/support/download.asp • For all active TP-LINK camera devices. TP-LINK' a cre. For more troubleshooting help, go to www.tp-link...9642; Psable Enable Reset custom settings Reset to the TL-SC3130G's manual on the computer's Desktop. Note: To ...
User Guide
Page 6
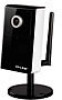
Package Contents The follow items should be found in your package: ¾ TL-SC3130G Wireless 2-Way Audio Surveillance Camera ¾ Power Adapter ¾ Mounting Bracket with three screws, a Lock Ring, a Brace and a Base Plate ¾ RJ45 Cable ¾ Quick Installation Guide ¾ Resource CD, including: z This User Guide z Application Guide z Other helpful information ) Note: Make sure that the package contains the above items. If any of the listed items are damaged or missing, please contact your distributor. 1
Package Contents The follow items should be found in your package: ¾ TL-SC3130G Wireless 2-Way Audio Surveillance Camera ¾ Power Adapter ¾ Mounting Bracket with three screws, a Lock Ring, a Brace and a Base Plate ¾ RJ45 Cable ¾ Quick Installation Guide ¾ Resource CD, including: z This User Guide z Application Guide z Other helpful information ) Note: Make sure that the package contains the above items. If any of the listed items are damaged or missing, please contact your distributor. 1


