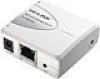

Quick Installation Guide
Page 9
Technical Support „ For more troubleshooting help, go to: www.tp-link.com/support/faq.asp „ To download the latest Firmware, Driver, Utility and User Guide, go to: www.tp-link.com/support/download.asp „ For all other technical support, please contact us by using the following details:... Global Tel: +86 755 26504400 E-mail: support@tp-link.com Service time: 24hrs, 7days ...
Technical Support „ For more troubleshooting help, go to: www.tp-link.com/support/faq.asp „ To download the latest Firmware, Driver, Utility and User Guide, go to: www.tp-link.com/support/download.asp „ For all other technical support, please contact us by using the following details:... Global Tel: +86 755 26504400 E-mail: support@tp-link.com Service time: 24hrs, 7days ...

User Guide
Page 20
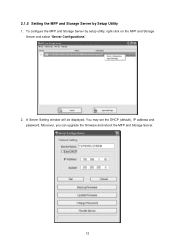
You may set the DHCP(default), IP address and password. Moreover, you can upgrade the firmware and reboot the MFP and Storage Server. 17 b) A Server Setting window will be displayed.
You may set the DHCP(default), IP address and password. Moreover, you can upgrade the firmware and reboot the MFP and Storage Server. 17 b) A Server Setting window will be displayed.

User Guide
Page 29
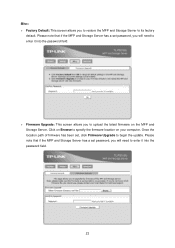
Click on "Browse" to specify the firmware location on the MFP and Storage Server. Once the location path of firmware has been set password, you will allow you to restore the MFP and Storage Server back to factory default. Misc: Allow you to upload the latest firmware on your computer. And, the firmware link will need to enter it into the password field box. Please note that if the MFP and Storage Server has a set , click "Firmware Upgrade" to begin the update. 25
Click on "Browse" to specify the firmware location on the MFP and Storage Server. Once the location path of firmware has been set password, you will allow you to restore the MFP and Storage Server back to factory default. Misc: Allow you to upload the latest firmware on your computer. And, the firmware link will need to enter it into the password field box. Please note that if the MFP and Storage Server has a set , click "Firmware Upgrade" to begin the update. 25
Instruction Manual
Page 16
You may set the DHCP (default), IP address and password. 2.1.5 Setting the MFP and Storage Server by setup utility, right-click on the MFP and Storage Server and select "Server Configurations". 2. To configure the MFP and Storage Server by Setup Utility 1. A Server Setting window will be displayed. Moreover, you can upgrade the firmware and reboot the MFP and Storage Server. 12
You may set the DHCP (default), IP address and password. 2.1.5 Setting the MFP and Storage Server by setup utility, right-click on the MFP and Storage Server and select "Server Configurations". 2. To configure the MFP and Storage Server by Setup Utility 1. A Server Setting window will be displayed. Moreover, you can upgrade the firmware and reboot the MFP and Storage Server. 12
Instruction Manual
Page 27
Please note that if the MFP and Storage Server has a set , click Firmware Upgrade to begin the update. Once the location path of firmware has been set password, you will need to enter it into the password field. 23 Misc: ¾ Factory Default: This screen allows you will need... to enter it into the password field. ¾ Firmware Upgrade: This screen allows you to upload the latest firmware on your computer. Please note that if the MFP and Storage Server has a set password, you to restore the MFP and...
Please note that if the MFP and Storage Server has a set , click Firmware Upgrade to begin the update. Once the location path of firmware has been set password, you will need to enter it into the password field. 23 Misc: ¾ Factory Default: This screen allows you will need... to enter it into the password field. ¾ Firmware Upgrade: This screen allows you to upload the latest firmware on your computer. Please note that if the MFP and Storage Server has a set password, you to restore the MFP and...