
Quick Installation Guide
Page 1
... Installation 1. Connect your USB device to the TL-PS310U. Before you start, you should prepare the following items ¾ Windows 2000/XP/Vista/7 computer with print server setup CD ¾ One USB device with a default password. 1 Connect the TL-PS310U to the network. When the Link LED lights up, the TL-PS310U is correctly connected to the router or...
... Installation 1. Connect your USB device to the TL-PS310U. Before you start, you should prepare the following items ¾ Windows 2000/XP/Vista/7 computer with print server setup CD ¾ One USB device with a default password. 1 Connect the TL-PS310U to the network. When the Link LED lights up, the TL-PS310U is correctly connected to the router or...
User Guide
Page 2
...for compliance could void the user's authority to operate the equipment. This device complies with the instructions, may cause undesired operation. Copyright © 2008 TP-LINK TECHNOLOGIES CO., LTD. However, there is subject to the following measures: • Reorient or relocate the receiving antenna. • Increase the separation between... expressly approved by any means or used in a residential installation. This equipment generates, uses and can be reproduced in a particular installation. Windows 2000/XP/Vista are registered trademarks of their respective holders.
...for compliance could void the user's authority to operate the equipment. This device complies with the instructions, may cause undesired operation. Copyright © 2008 TP-LINK TECHNOLOGIES CO., LTD. However, there is subject to the following measures: • Reorient or relocate the receiving antenna. • Increase the separation between... expressly approved by any means or used in a residential installation. This equipment generates, uses and can be reproduced in a particular installation. Windows 2000/XP/Vista are registered trademarks of their respective holders.
User Guide
Page 3
......1 1.1 Product Overview...1 1.2 Network Management 1 1.3 Components and Features 1 1.4 Hardware Installation 1 2 THE SOFTWARE INSTALLATION 2 2.1 For Windows 2000/XP Users 2 2.1.1 Connecting to an USB Device 5 2.1.2 Connecting to an USB Printer or Multi-functional Printer 8 2.1.3 Connecting to ...2.1.7 Setting the MFP and Storage Server by Setup Utility 16 2.2 For Windows Vista Users 18 2.2.1 Connecting to an USB Device 21 2.2.2 Connecting to an USB HUB 21 3 WEB MANAGEMENT INTERFACE 22 3.1 For Windows 2000/XP/Vista Users 22 3.2 WEB Page Description 22 4 TROUBLESHOOTING 28 ...
......1 1.1 Product Overview...1 1.2 Network Management 1 1.3 Components and Features 1 1.4 Hardware Installation 1 2 THE SOFTWARE INSTALLATION 2 2.1 For Windows 2000/XP Users 2 2.1.1 Connecting to an USB Device 5 2.1.2 Connecting to an USB Printer or Multi-functional Printer 8 2.1.3 Connecting to ...2.1.7 Setting the MFP and Storage Server by Setup Utility 16 2.2 For Windows Vista Users 18 2.2.1 Connecting to an USB Device 21 2.2.2 Connecting to an USB HUB 21 3 WEB MANAGEMENT INTERFACE 22 3.1 For Windows 2000/XP/Vista Users 22 3.2 WEB Page Description 22 4 TROUBLESHOOTING 28 ...
User Guide
Page 4
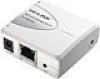
... remote management and a warning. 1 Introduction 1.1 Product Overview MFP and Storage Server enhance capability by letting you should prepare: ¾ One Windows 2000/XP/Vista computer with CD-ROM drive ¾ One USB devices with USB port 1.4 Hardware Installation Make sure that your USB devices are switched...speed) y Fast Ethernet network port: RJ-45 for 10Base-T or 100Base-TX y LINK LED to indicate network connection,100M LED to indicate 100M connection, USB LED to indicate USB status y One Setup CD for Windows 2000/XP/Vista, User's Guide y One power adapter y Built-in Reset Button Before ...
... remote management and a warning. 1 Introduction 1.1 Product Overview MFP and Storage Server enhance capability by letting you should prepare: ¾ One Windows 2000/XP/Vista computer with CD-ROM drive ¾ One USB devices with USB port 1.4 Hardware Installation Make sure that your USB devices are switched...speed) y Fast Ethernet network port: RJ-45 for 10Base-T or 100Base-TX y LINK LED to indicate network connection,100M LED to indicate 100M connection, USB LED to indicate USB status y One Setup CD for Windows 2000/XP/Vista, User's Guide y One power adapter y Built-in Reset Button Before ...
User Guide
Page 5
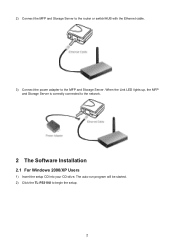
When the Link LED lights up, the MFP and Storage Server is correctly connected to begin the setup. 2 The auto-run program will be started. 2) Click the TL-PS310U to the network. 2 The Software Installation 2.1 For Windows 2000/XP Users 1) Insert the setup CD into your CD-drive. 2) Connect the MFP and Storage Server to the router or switch/HUB with the Ethernet cable. 3) Connect the power adapter to the MFP and Storage Server.
When the Link LED lights up, the MFP and Storage Server is correctly connected to begin the setup. 2 The auto-run program will be started. 2) Click the TL-PS310U to the network. 2 The Software Installation 2.1 For Windows 2000/XP Users 1) Insert the setup CD into your CD-drive. 2) Connect the MFP and Storage Server to the router or switch/HUB with the Ethernet cable. 3) Connect the power adapter to the MFP and Storage Server.
User Guide
Page 26
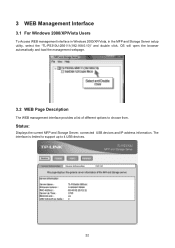
Status: Displays the current MFP and Storage Server, connected USB devices and IP address information. The interface is limited to support up to choose from. 3 WEB Management Interface 3.1 For Windows 2000/XP/Vista Users To Access WEB management interface in Windows 2000/XP/Vista, in the MFP and Storage Server setup utility, select the "TL-PS310U-2B5111(192.168.0.10)" and double click, OS will open the browser automatically and load the management webpage. 3.2 WEB Page Description The WEB management interface provides a list of different options to 4 USB devices. 22
Status: Displays the current MFP and Storage Server, connected USB devices and IP address information. The interface is limited to support up to choose from. 3 WEB Management Interface 3.1 For Windows 2000/XP/Vista Users To Access WEB management interface in Windows 2000/XP/Vista, in the MFP and Storage Server setup utility, select the "TL-PS310U-2B5111(192.168.0.10)" and double click, OS will open the browser automatically and load the management webpage. 3.2 WEB Page Description The WEB management interface provides a list of different options to 4 USB devices. 22
User Guide
Page 32
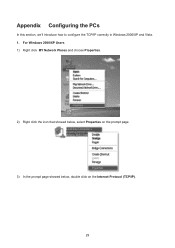
For Windows 2000/XP Users 1) Right click MY Network Places and choose Properties. 2) Right click the icon that showed below, select Properties on the prompt page. 3) In the prompt page showed below, double click on the Internet Protocol (TCP/IP). 29 Appendix Configuring the PCs In this section, we'll introduce how to configure the TCP/IP correctly in Windows 2000/XP and Vista. 1.
For Windows 2000/XP Users 1) Right click MY Network Places and choose Properties. 2) Right click the icon that showed below, select Properties on the prompt page. 3) In the prompt page showed below, double click on the Internet Protocol (TCP/IP). 29 Appendix Configuring the PCs In this section, we'll introduce how to configure the TCP/IP correctly in Windows 2000/XP and Vista. 1.
Compatibility List
Page 20
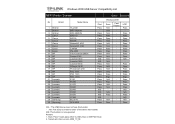
Windows 2000 USB Server Compatibility List MFP / Printer / Scanner No Brand 1 Brother 2 Brother 3 Brother 4 Canon 5 Canon 6 Canon 7 Canon 8 Canon 9 Epson 10 Epson 11 HP 12 HP 13 ... Pass Pass Pass N/S Pass Pass Pass Pass Pass Pass Pass Pass Pass Pass N/S N/S Pass N/S N/S Pass Tested with driver version 2009_10_06 Update:12/02/2010 Windows 2000 Scan N/A N/A N/A Pass Pass N/A N/A N/A Pass Pass N/A N/A N/A N/A N/A N/S N/S N/S Pass Pass N/A Pass N/A N/A N/S Pass N/A Pass Card Reader - Pass Pass Pass Pass Pass Pass Pass Pass Pass Pass N/S N/S Pass Pass Pass...
Windows 2000 USB Server Compatibility List MFP / Printer / Scanner No Brand 1 Brother 2 Brother 3 Brother 4 Canon 5 Canon 6 Canon 7 Canon 8 Canon 9 Epson 10 Epson 11 HP 12 HP 13 ... Pass Pass Pass N/S Pass Pass Pass Pass Pass Pass Pass Pass Pass Pass N/S N/S Pass N/S N/S Pass Tested with driver version 2009_10_06 Update:12/02/2010 Windows 2000 Scan N/A N/A N/A Pass Pass N/A N/A N/A Pass Pass N/A N/A N/A N/A N/A N/S N/S N/S Pass Pass N/A Pass N/A N/A N/S Pass N/A Pass Card Reader - Pass Pass Pass Pass Pass Pass Pass Pass Pass Pass N/S N/S Pass Pass Pass...
Instruction Manual
Page 2
Contents Chapter 1 Introduction 1 1.1 Product Overview ...1 1.2 Network Management ...1 1.3 Components and Features 1 1.4 Hardware Installation...1 Chapter 2 Software Installation 3 2.1 For Windows 2000/XP Users 3 2.2 For Windows 7 Users 13 Chapter 3 WEB Management Interface 18 3.1 For Windows 2000/XP and Windows 7 Users 18 3.2 WEB Page Description 19 Chapter 4 Troubleshooting 25 4.1 Frequently Asked Questions 25
Contents Chapter 1 Introduction 1 1.1 Product Overview ...1 1.2 Network Management ...1 1.3 Components and Features 1 1.4 Hardware Installation...1 Chapter 2 Software Installation 3 2.1 For Windows 2000/XP Users 3 2.2 For Windows 7 Users 13 Chapter 3 WEB Management Interface 18 3.1 For Windows 2000/XP and Windows 7 Users 18 3.2 WEB Page Description 19 Chapter 4 Troubleshooting 25 4.1 Frequently Asked Questions 25
Instruction Manual
Page 5
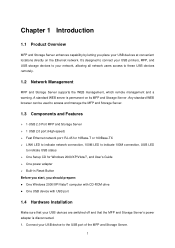
...190; Fast Ethernet network port: RJ-45 for 10Base-T or 100Base-TX ¾ LINK LED to indicate network connection, 100M LED to indicate 100M connection, USB LED to indicate USB status ¾ One Setup CD for Windows 2000/XP/Vista/7, and User's Guide ¾ One power adapter ¾ Built-in... on its MFP and Storage Server. Chapter 1 Introduction 1.1 Product Overview MFP and Storage Server enhances capability by letting you should prepare: z One Windows 2000/XP/Vista/7 computer with CD-ROM drive z One USB device with USB port 1.4 Hardware Installation Make sure that the MFP and Storage Server's ...
...190; Fast Ethernet network port: RJ-45 for 10Base-T or 100Base-TX ¾ LINK LED to indicate network connection, 100M LED to indicate 100M connection, USB LED to indicate USB status ¾ One Setup CD for Windows 2000/XP/Vista/7, and User's Guide ¾ One power adapter ¾ Built-in... on its MFP and Storage Server. Chapter 1 Introduction 1.1 Product Overview MFP and Storage Server enhances capability by letting you should prepare: z One Windows 2000/XP/Vista/7 computer with CD-ROM drive z One USB device with USB port 1.4 Hardware Installation Make sure that the MFP and Storage Server's ...
Instruction Manual
Page 7
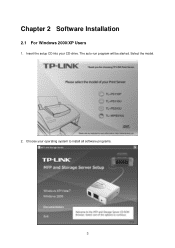
Select the model. 2. Insert the setup CD into your operating system to install all software programs. 3 Choose your CD-drive. The auto-run program will be started. Chapter 2 Software Installation 2.1 For Windows 2000/XP Users 1.
Select the model. 2. Insert the setup CD into your operating system to install all software programs. 3 Choose your CD-drive. The auto-run program will be started. Chapter 2 Software Installation 2.1 For Windows 2000/XP Users 1.
Instruction Manual
Page 22
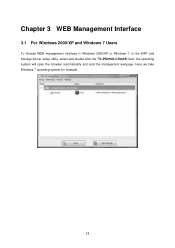
Chapter 3 WEB Management Interface 3.1 For Windows 2000/XP and Windows 7 Users To Access WEB management interface in Windows 2000/XP or Windows 7, in the MFP and Storage Server setup utility, select and double-click the "TL-PS310U-C7641B" item, the operating system will open the browser automatically and load the management webpage. Here we take Windows 7 operating system for example. 18
Chapter 3 WEB Management Interface 3.1 For Windows 2000/XP and Windows 7 Users To Access WEB management interface in Windows 2000/XP or Windows 7, in the MFP and Storage Server setup utility, select and double-click the "TL-PS310U-C7641B" item, the operating system will open the browser automatically and load the management webpage. Here we take Windows 7 operating system for example. 18


