User Guide
Page 2
... and receiver. • Connect the equipment into an outlet on a circuit different from TP-LINK TECHNOLOGIES CO., LTD. Copyright © 2010 TP-LINK TECHNOLOGIES CO., LTD. If this equipment. http://www.tp-link.com FCC STATEMENT This equipment has been tested and found to comply with part 15 of... TP-LINK TECHNOLOGIES CO., LTD. This device complies with the limits for any form or by one or more of their respective holders. I COPYRIGHT & TRADEMARKS Specifications are subject to change without permission from that to which can radiate radio frequency energy and, if not installed...
... and receiver. • Connect the equipment into an outlet on a circuit different from TP-LINK TECHNOLOGIES CO., LTD. Copyright © 2010 TP-LINK TECHNOLOGIES CO., LTD. If this equipment. http://www.tp-link.com FCC STATEMENT This equipment has been tested and found to comply with part 15 of... TP-LINK TECHNOLOGIES CO., LTD. This device complies with the limits for any form or by one or more of their respective holders. I COPYRIGHT & TRADEMARKS Specifications are subject to change without permission from that to which can radiate radio frequency energy and, if not installed...

User Guide
Page 3
..., general authorization is intended for home and office use the product outdoors in conjunction with FCC RF exposure compliance requirements, this transmitter must not be installed to allow current 2454-2483.5 MHz relaxed regulation. CE Mark Warning This is applicable to take adequate measures. Refarming of at least 20 cm from...
..., general authorization is intended for home and office use the product outdoors in conjunction with FCC RF exposure compliance requirements, this transmitter must not be installed to allow current 2454-2483.5 MHz relaxed regulation. CE Mark Warning This is applicable to take adequate measures. Refarming of at least 20 cm from...
User Guide
Page 5
......2 1.3 Main Features ...3 1.4 Panel Layout ...3 1.4.1 The Front Panel 3 1.4.2 The Rear Panel 4 Chapter 2. CONTENTS Package Contents ...1 Chapter 1. Quick Installation Guide 8 3.1 TCP/IP Configuration 8 3.2 Quick Installation Guide 10 Chapter 4. Configuring the Router 17 4.1 Login ...17 4.2 Status ...17 4.3 Quick Setup...19 4.4 QSS...19 4.5 Network ...25 4.5.1 Internet Access... 4.6.4 Wireless Advanced 54 4.6.5 Wireless Statistics 55 4.7 DHCP ...56 I Connecting the Router 6 2.1 System Requirements 6 2.2 Installation Environment Requirements 6 2.3 Connecting the Router 6 Chapter 3.
......2 1.3 Main Features ...3 1.4 Panel Layout ...3 1.4.1 The Front Panel 3 1.4.2 The Rear Panel 4 Chapter 2. CONTENTS Package Contents ...1 Chapter 1. Quick Installation Guide 8 3.1 TCP/IP Configuration 8 3.2 Quick Installation Guide 10 Chapter 4. Configuring the Router 17 4.1 Login ...17 4.2 Status ...17 4.3 Quick Setup...19 4.4 QSS...19 4.5 Network ...25 4.5.1 Internet Access... 4.6.4 Wireless Advanced 54 4.6.5 Wireless Statistics 55 4.7 DHCP ...56 I Connecting the Router 6 2.1 System Requirements 6 2.2 Installation Environment Requirements 6 2.3 Connecting the Router 6 Chapter 3.

User Guide
Page 8
TL-MR3420 3G/3.75G Wireless N Router Package Contents The following items should be found in your package: ¾ TL-MR3420 3G/3.75G Wireless N Router ¾ DC Power Adapter for TL-MR3420 3G/3.75G Wireless N Router ¾ Quick Installation Guide ¾ Resource CD for TL-MR3420 3G/3.75G Wireless N Router, including: • This Guide • Other Helpful Information ) Note: Make sure that the package contains the above items. If any of the listed items are damaged or missing, please contact with your distributor. -1-
TL-MR3420 3G/3.75G Wireless N Router Package Contents The following items should be found in your package: ¾ TL-MR3420 3G/3.75G Wireless N Router ¾ DC Power Adapter for TL-MR3420 3G/3.75G Wireless N Router ¾ Quick Installation Guide ¾ Resource CD for TL-MR3420 3G/3.75G Wireless N Router, including: • This Guide • Other Helpful Information ) Note: Make sure that the package contains the above items. If any of the listed items are damaged or missing, please contact with your distributor. -1-
User Guide
Page 13
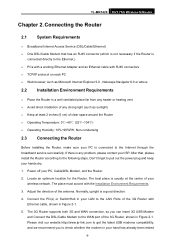
...connectors ¾ TCP/IP protocol on each PC ¾ Web browser, such as Microsoft Internet Explorer 5.0 , Netscape Navigator 6.0 or above 2.2 Installation Environment Requirements ¾ Place the Router in a well ventilated place far from any heater or heating vent ¾ Avoid direct irradiation of any ...Router. Please visit our website http://www.tp-link.com to get the latest USB modems compatibility, and we recommend you can insert 3G USB Modem and Connect the DSL/Cable Modem to the Internet through the broadband service successfully. TL-MR3420 3G/3.75G Wireless N Router Chapter 2. ...
...connectors ¾ TCP/IP protocol on each PC ¾ Web browser, such as Microsoft Internet Explorer 5.0 , Netscape Navigator 6.0 or above 2.2 Installation Environment Requirements ¾ Place the Router in a well ventilated place far from any heater or heating vent ¾ Avoid direct irradiation of any ...Router. Please visit our website http://www.tp-link.com to get the latest USB modems compatibility, and we recommend you can insert 3G USB Modem and Connect the DSL/Cable Modem to the Internet through the broadband service successfully. TL-MR3420 3G/3.75G Wireless N Router Chapter 2. ...
User Guide
Page 14
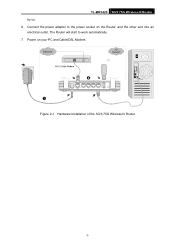
Figure 2-1 Hardware Installation of the 3G/3.75G Wireless N Router -7- Power on the Router, and the other end into an electrical outlet. Connect the power adapter to work automatically. 7. TL-MR3420 3G/3.75G Wireless N Router by us. 6. The Router will start to the power socket on your PC and Cable/DSL Modem.
Figure 2-1 Hardware Installation of the 3G/3.75G Wireless N Router -7- Power on the Router, and the other end into an electrical outlet. Connect the power adapter to work automatically. 7. TL-MR3420 3G/3.75G Wireless N Router by us. 6. The Router will start to the power socket on your PC and Cable/DSL Modem.
User Guide
Page 15
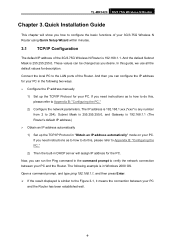
... PC and the Router. The following two ways. ¾ Configure the IP address manually 1) Set up the TCP/IP Protocol in Windows 2000 OS. TL-MR3420 3G/3.75G Wireless N Router Chapter 3. And the default Subnet Mask is 192.168.1.1. Connect the local PC to Appendix B: "Configuring the PC." 2) ...your 3G/3.75G Wireless N Router using Quick Setup Wizard within minutes. 3.1 TCP/IP Configuration The default IP address of the Router. Quick Installation Guide This chapter will assign IP address for the PC. These values can run the Ping command in DHCP server will show you can ...
... PC and the Router. The following two ways. ¾ Configure the IP address manually 1) Set up the TCP/IP Protocol in Windows 2000 OS. TL-MR3420 3G/3.75G Wireless N Router Chapter 3. And the default Subnet Mask is 192.168.1.1. Connect the local PC to Appendix B: "Configuring the PC." 2) ...your 3G/3.75G Wireless N Router using Quick Setup Wizard within minutes. 3.1 TCP/IP Configuration The default IP address of the Router. Quick Installation Guide This chapter will assign IP address for the PC. These values can run the Ping command in DHCP server will show you can ...
User Guide
Page 17
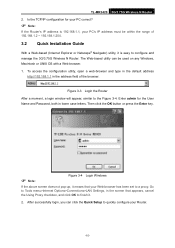
... case letters. Is the TCP/IP configuration for the User Name and Password, both in the address field of 192.168.1.2 ~ 192.168.1.254. 3.2 Quick Installation Guide With a Web-based (Internet Explorer or Netscape® Navigator) utility, it is easy to finish it means that appears, cancel the Using Proxy checkbox... successfully login, you can be within the range of the browser. Figure 3-3 Login the Router After a moment, a login window will appear, similar to the Figure 3-4. TL-MR3420 3G/3.75G Wireless N Router 2.
... case letters. Is the TCP/IP configuration for the User Name and Password, both in the address field of 192.168.1.2 ~ 192.168.1.254. 3.2 Quick Installation Guide With a Web-based (Internet Explorer or Netscape® Navigator) utility, it is easy to finish it means that appears, cancel the Using Proxy checkbox... successfully login, you can be within the range of the browser. Figure 3-3 Login the Router After a moment, a login window will appear, similar to the Figure 3-4. TL-MR3420 3G/3.75G Wireless N Router 2.
User Guide
Page 26
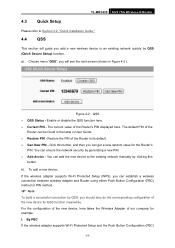
... QSS function here. ¾ Current PIN - Figure 4-2 QSS ¾ QSS Status - The default PIN of our company for example. I. a). TL-MR3420 3G/3.75G Wireless N Router 4.3 Quick Setup Please refer to Section 3.2: "Quick Installation Guide." 4.4 QSS This section will guide you will see the next screen (shown in the label or User Guide. ¾...
... QSS function here. ¾ Current PIN - Figure 4-2 QSS ¾ QSS Status - The default PIN of our company for example. I. a). TL-MR3420 3G/3.75G Wireless N Router 4.3 Quick Setup Please refer to Section 3.2: "Quick Installation Guide." 4.4 QSS This section will guide you will see the next screen (shown in the label or User Guide. ¾...
User Guide
Page 110
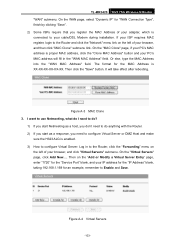
... "WAN MAC Address" field. The format for the "Service Port" blank, and your browser, and then click "MAC Clone" submenu link. Then click the "Save" button. Figure A-4 Virtual Servers -103- Figure A-3 MAC Clone 3. On the WAN page, select "Dynamic...register the MAC Address of your browser, and click "Virtual Servers" submenu. On the "Virtual Servers" page, click Add New.... TL-MR3420 3G/3.75G Wireless N Router "WAN" submenu. On the "MAC Clone" page, if your PC's MAC address is XX-XX-... MAC address, click the "Clone MAC Address" button and your cable/DSL Modem during installation.
... "WAN MAC Address" field. The format for the "Service Port" blank, and your browser, and then click "MAC Clone" submenu link. Then click the "Save" button. Figure A-4 Virtual Servers -103- Figure A-3 MAC Clone 3. On the WAN page, select "Dynamic...register the MAC Address of your browser, and click "Virtual Servers" submenu. On the "Virtual Servers" page, click Add New.... TL-MR3420 3G/3.75G Wireless N Router "WAN" submenu. On the "MAC Clone" page, if your PC's MAC address is XX-XX-... MAC address, click the "Clone MAC Address" button and your cable/DSL Modem during installation.
User Guide
Page 114
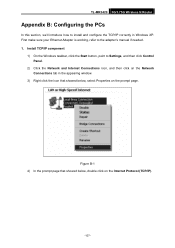
...below , select Properties on the prompt page. TL-MR3420 3G/3.75G Wireless N Router Appendix B: Configuring the PCs In this section, we'll introduce how to the adapter's manual if needed. 1. First make sure your Ethernet Adapter is working, refer to install and configure the TCP/IP correctly in the ...appearing window. 3) Right click the icon that showed below , double click on the Network Connections tab in Windows XP. Install TCP/IP component 1) On the Windows taskbar, click the Start button, point to Settings, and then click Control Panel. 2) Click the Network ...
...below , select Properties on the prompt page. TL-MR3420 3G/3.75G Wireless N Router Appendix B: Configuring the PCs In this section, we'll introduce how to the adapter's manual if needed. 1. First make sure your Ethernet Adapter is working, refer to install and configure the TCP/IP correctly in the ...appearing window. 3) Right click the icon that showed below , double click on the Network Connections tab in Windows XP. Install TCP/IP component 1) On the Windows taskbar, click the Start button, point to Settings, and then click Control Panel. 2) Click the Network ...


