TL-WDR4300 V1 User Guide 1910010838
Page 36
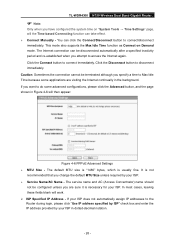
...connect immediately. In most cases, leaving these fields blank will then appear: Figure 4-6 PPPoE Advanced Settings MTU Size - TL-WDR4300 N750 Wireless Dual Band Gigabit Router Note: Only when you have configured the system time on Demand mode. If your ISP does not ... Time function as Connect on "System Tools → Time Settings" page, will the Time-based Connecting function can take effect. Connect Manually - The service name and AC (Access Concentrator) name should not be terminated although you specify a time to the Router during login, please click...
...connect immediately. In most cases, leaving these fields blank will then appear: Figure 4-6 PPPoE Advanced Settings MTU Size - TL-WDR4300 N750 Wireless Dual Band Gigabit Router Note: Only when you have configured the system time on Demand mode. If your ISP does not ... Time function as Connect on "System Tools → Time Settings" page, will the Time-based Connecting function can take effect. Connect Manually - The service name and AC (Access Concentrator) name should not be terminated although you specify a time to the Router during login, please click...

TL-WDR4300 V1 User Guide 1910010838
Page 38
... to connect/disconnect immediately. And you want to have elapsed before your ISP. Connect on Demand mode. TL-WDR4300 N750 Wireless Dual Band Gigabit Router is not recommended that you attempt to access the Internet again. This mode also supports the Max ... can be disconnected automatically after a specified inactivity period (Max Idle Time) and be re-established automatically when it was down. Connect Manually - If your settings. 5. Click the Disconnect button to connect immediately. Otherwise, enter the number of minutes you attempt to access the Internet...
... to connect/disconnect immediately. And you want to have elapsed before your ISP. Connect on Demand mode. TL-WDR4300 N750 Wireless Dual Band Gigabit Router is not recommended that you attempt to access the Internet again. This mode also supports the Max ... can be disconnected automatically after a specified inactivity period (Max Idle Time) and be re-established automatically when it was down. Connect Manually - If your settings. 5. Click the Disconnect button to connect immediately. Otherwise, enter the number of minutes you attempt to access the Internet...

TL-WDR4300 V1 User Guide 1910010838
Page 40
... you specify a time to have the Internet connecting last unless a new link is requested. To use this option, check the radio button. Click the Save button to make it connect or disconnect manually. TL-WDR4300 N750 Wireless Dual Band Gigabit Router Connect Manually - Otherwise, enter the number of inactivity (Max Idle Time), the...
... you specify a time to have the Internet connecting last unless a new link is requested. To use this option, check the radio button. Click the Save button to make it connect or disconnect manually. TL-WDR4300 N750 Wireless Dual Band Gigabit Router Connect Manually - Otherwise, enter the number of inactivity (Max Idle Time), the...

TL-WDR4300 V1 User Guide 1910010838
Page 41
... are given by your Internet connection to have the Internet connecting last unless a new link is disconnected. If you choose static IP and enter the domain name, you want... for your Internet connection to activate Connect on Demand - To make it connect or disconnect manually. Choose either as follows: PPPoE - Click the Connect button to disconnect immediately....to remain active at all times, enter "0" in the Max Idle Time field. TL-WDR4300 N750 Wireless Dual Band Gigabit Router Dynamic IP/ Static IP - Click the Disconnect button to...
... are given by your Internet connection to have the Internet connecting last unless a new link is disconnected. If you choose static IP and enter the domain name, you want... for your Internet connection to activate Connect on Demand - To make it connect or disconnect manually. Choose either as follows: PPPoE - Click the Connect button to disconnect immediately....to remain active at all times, enter "0" in the Max Idle Time field. TL-WDR4300 N750 Wireless Dual Band Gigabit Router Dynamic IP/ Static IP - Click the Disconnect button to...

TL-WDR4300 V1 User Guide 1910010838
Page 42
If your ISP uses one of these protocols, then you must configure your connection manually. 4.4.2 LAN Choose menu "Network → LAN", you can configure the IP parameters of the LAN on the screen below . An address code that determines the .... 4.4.3 MAC Clone Choose menu "Network → MAC Clone", you set is not in dotted-decimal notation (factory default: 192.168.0.1). Subnet Mask - TL-WDR4300 N750 Wireless Dual Band Gigabit Router Static IP - Figure 4-10 LAN MAC Address - Enter the IP address of the WAN on the screen as...
If your ISP uses one of these protocols, then you must configure your connection manually. 4.4.2 LAN Choose menu "Network → LAN", you can configure the IP parameters of the LAN on the screen below . An address code that determines the .... 4.4.3 MAC Clone Choose menu "Network → MAC Clone", you set is not in dotted-decimal notation (factory default: 192.168.0.1). Subnet Mask - TL-WDR4300 N750 Wireless Dual Band Gigabit Router Static IP - Figure 4-10 LAN MAC Address - Enter the IP address of the WAN on the screen as...

TL-WDR4300 V1 User Guide 1910010838
Page 47
... here. Current PIN - You can get a new random value for the Router's PIN. This section will not be chosen according to the existing network manually by clicking this blank. 4.6.2 WPS Choose menu "Wireless 2.4GHz →WPS", you to add a new wireless device to the wireless network with PIN code. ... then you can be chosen if the key type is the same as shown in the label or User Guide. Restore PIN - TL-WDR4300 N750 Wireless Dual Band Gigabit Router Key type -
... here. Current PIN - You can get a new random value for the Router's PIN. This section will not be chosen according to the existing network manually by clicking this blank. 4.6.2 WPS Choose menu "Wireless 2.4GHz →WPS", you to add a new wireless device to the wireless network with PIN code. ... then you can be chosen if the key type is the same as shown in the label or User Guide. Restore PIN - TL-WDR4300 N750 Wireless Dual Band Gigabit Router Key type -

TL-WDR4300 V1 User Guide 1910010838
Page 59
...).It indicates the authorization type of the WEP key. Auth Type - If the AP your Router is going to connect to the existing network manually by generating a new PIN. Add device - This section will guide you can the screen as shown in this button, and then you can be... or disable the WPS function here. Current PIN - Click this button. - 49 - You can get a new random value for the Router's PIN. TL-WDR4300 N750 Wireless Dual Band Gigabit Router BSSID(to join. Survey -
...).It indicates the authorization type of the WEP key. Auth Type - If the AP your Router is going to connect to the existing network manually by generating a new PIN. Add device - This section will guide you can the screen as shown in this button, and then you can be... or disable the WPS function here. Current PIN - Click this button. - 49 - You can get a new random value for the Router's PIN. TL-WDR4300 N750 Wireless Dual Band Gigabit Router BSSID(to join. Survey -

TL-WDR4300 V1 User Guide 1910010838
Page 72
If you disable the Server, you must have another DNS server if your network or else you must configure the computer manually. Start IP Address - The Address Lease Time is the default end address. Address Lease Time - Enter the amount of the Router, you must ... to input the IP address of the Ethernet port of the time is up, the user will be "leased" this dynamic IP Address. TL-WDR4300 N750 Wireless Dual Band Gigabit Router Figure 4-48 DHCP Settings DHCP Server - Enable or Disable the DHCP server.
If you disable the Server, you must have another DNS server if your network or else you must configure the computer manually. Start IP Address - The Address Lease Time is the default end address. Address Lease Time - Enter the amount of the Router, you must ... to input the IP address of the Ethernet port of the time is up, the user will be "leased" this dynamic IP Address. TL-WDR4300 N750 Wireless Dual Band Gigabit Router Figure 4-48 DHCP Settings DHCP Server - Enable or Disable the DHCP server.
TL-WDR4300 V1 User Guide 1910010838
Page 76
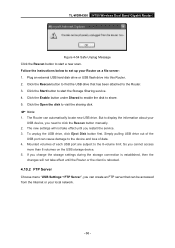
... to find the USB drive that can cause damage to the device and loss of each USB port are subject to click the Rescan button manually. 2. Mounted volumes of data. 4. If you change the storage settings during the storage connection is rebooted. 4.10.2 FTP Server Choose menu "USB Settings→... this Router. 2. Simply pulling USB drive out of the USB port can be accessed from the Internet or your local network. - 66 - TL-WDR4300 N750 Wireless Dual Band Gigabit Router Figure 4-54 Safe Unplug Message Click the Rescan button to share. 5. Click the Start button to visit the sharing disk...
... to find the USB drive that can cause damage to the device and loss of each USB port are subject to click the Rescan button manually. 2. Mounted volumes of data. 4. If you change the storage settings during the storage connection is rebooted. 4.10.2 FTP Server Choose menu "USB Settings→... this Router. 2. Simply pulling USB drive out of the USB port can be accessed from the Internet or your local network. - 66 - TL-WDR4300 N750 Wireless Dual Band Gigabit Router Figure 4-54 Safe Unplug Message Click the Rescan button to share. 5. Click the Start button to visit the sharing disk...

TL-WDR4300 V1 User Guide 1910010838
Page 86
If the Common Applications do not have the application you need, enter the Trigger Port and the Incoming Ports manually. 3. An outgoing connection using this rule. - 76 - Select a common application from the Common Applications drop-down list, then the Trigger Port field ...list, either TCP, UDP, or All. 4. Select Enable in Figure 4-69. 2. Figure 4-69 Add or Modify a Triggering Entry Trigger Port - TL-WDR4300 N750 Wireless Dual Band Gigabit Router Figure 4-68 Port Triggering To add a new rule, follow the steps below. 1. Click the Add New... Select the protocol used...
If the Common Applications do not have the application you need, enter the Trigger Port and the Incoming Ports manually. 3. An outgoing connection using this rule. - 76 - Select a common application from the Common Applications drop-down list, then the Trigger Port field ...list, either TCP, UDP, or All. 4. Select Enable in Figure 4-69. 2. Figure 4-69 Add or Modify a Triggering Entry Trigger Port - TL-WDR4300 N750 Wireless Dual Band Gigabit Router Figure 4-68 Port Triggering To add a new rule, follow the steps below. 1. Click the Add New... Select the protocol used...

TL-WDR4300 V1 User Guide 1910010838
Page 105
TL-WDR4300 N750 Wireless Dual Band Gigabit Router Figure 4-90 Target Settings Target Description - Here displays the description about the target and this description is Figure 4-92. - ... address, port, or domain name. Modify - If the Common Service Port drop-down list doesn't have the service you want, specify the Target Port manually. 4) In Protocol field, select TCP, UDP, ICMP or ALL from Common Service Port drop-down list. 4. If you select IP Address, the screen shown is...
TL-WDR4300 N750 Wireless Dual Band Gigabit Router Figure 4-90 Target Settings Target Description - Here displays the description about the target and this description is Figure 4-92. - ... address, port, or domain name. Modify - If the Common Service Port drop-down list doesn't have the service you want, specify the Target Port manually. 4) In Protocol field, select TCP, UDP, ICMP or ALL from Common Service Port drop-down list. 4. If you select IP Address, the screen shown is...

TL-WDR4300 V1 User Guide 1910010838
Page 126
... menu "System Tools → Diagnostic", and then you have connected to the Internet. Enter the Date in Hour/Minute/Second format. 4. To set time manually: 1. Click the Save button to check connectivity of the NTP Server I or NTP Server II. 3. To set Daylight Saving: 1. Click the Get GMT... button to get system time from the drop-down lists in use. To set time automatically: 1. Click Save. TL-WDR4300 N750 Wireless Dual Band Gigabit Router Daylight Saving Status - Select your local time zone. 2. Enter the address or domain of your time zone once...
... menu "System Tools → Diagnostic", and then you have connected to the Internet. Enter the Date in Hour/Minute/Second format. 4. To set time manually: 1. Click the Save button to check connectivity of the NTP Server I or NTP Server II. 3. To set Daylight Saving: 1. Click the Get GMT... button to get system time from the drop-down lists in use. To set time automatically: 1. Click Save. TL-WDR4300 N750 Wireless Dual Band Gigabit Router Daylight Saving Status - Select your local time zone. 2. Enter the address or domain of your time zone once...

TL-WDR4300 V1 User Guide 1910010838
Page 133
... the User Name and Password in the following fields. User Name - Click to send an email of current logs manually according to confirm. Enable Auto Mail Feature - TL-WDR4300 N750 Wireless Dual Band Gigabit Router Note: Only when you select Authentication, do you can view the statistics of the...
... the User Name and Password in the following fields. User Name - Click to send an email of current logs manually according to confirm. Enable Auto Mail Feature - TL-WDR4300 N750 Wireless Dual Band Gigabit Router Note: Only when you select Authentication, do you can view the statistics of the...

TL-WDR4300 V1 User Guide 1910010838
Page 136
... "PPPoE/Russia PPPoE" for "Max Idle Time" to the Internet port on Demand" or "Connect Manually" for Internet connection mode. Otherwise, you are a Cable user, please configure the Router following the above steps. - 126 - TL-WDR4300 N750 Wireless Dual Band Gigabit Router Appendix A: FAQ 1. Figure A-1 PPPoE Connection Type 4) If your ADSL lease...
... "PPPoE/Russia PPPoE" for "Max Idle Time" to the Internet port on Demand" or "Connect Manually" for Internet connection mode. Otherwise, you are a Cable user, please configure the Router following the above steps. - 126 - TL-WDR4300 N750 Wireless Dual Band Gigabit Router Appendix A: FAQ 1. Figure A-1 PPPoE Connection Type 4) If your ADSL lease...

TL-WDR4300 V1 User Guide 1910010838
Page 141
... then click on the Network Connections tab in Windows XP. First make sure your Ethernet Adapter is working, refer to the adapter's manual if needed. 1. Figure B-1 - 131 - TL-WDR4300 N750 Wireless Dual Band Gigabit Router Appendix B: Configuring the PCs In this section, we'll introduce how to install and configure the TCP...
... then click on the Network Connections tab in Windows XP. First make sure your Ethernet Adapter is working, refer to the adapter's manual if needed. 1. Figure B-1 - 131 - TL-WDR4300 N750 Wireless Dual Band Gigabit Router Appendix B: Configuring the PCs In this section, we'll introduce how to install and configure the TCP...
TL-WDR4300 Print Server Application Guide
Page 16
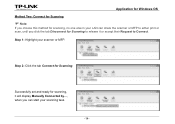
Step 2: Click the tab Connect for Scanning. Step 1: Highlight your scanning task. -14- Successfully set and ready for scanning, it or accept their Request to release it will display Manually Connected by..., when you can start your scanner or MFP. Application for Windows OS Method Two: Connect for Scanning ) Note: If you choose this method for scanning, no one else in your LAN can share the scanner or MFP to either print or scan, until you click the tab Disconnect for Scanning to Connect.
Step 2: Click the tab Connect for Scanning. Step 1: Highlight your scanning task. -14- Successfully set and ready for scanning, it or accept their Request to release it will display Manually Connected by..., when you can start your scanner or MFP. Application for Windows OS Method Two: Connect for Scanning ) Note: If you choose this method for scanning, no one else in your LAN can share the scanner or MFP to either print or scan, until you click the tab Disconnect for Scanning to Connect.

TL-WDR4300 Print Server Application Guide
Page 30
Application for Mac OS Method Two: Connect for Scanning ) Note: If you choose this method for scanning, no one else in your LAN can share the scanner or MFP to either print or scan, until you click the tab Disconnect for Scanning to release it will display Manually Connected by..., when you can start your scanner or MFP. Step 2: Click the tab Connect for scanning, it or accept their Request to Connect. Step 1: Highlight your scan task. -28- Successfully set and ready for Scanning.
Application for Mac OS Method Two: Connect for Scanning ) Note: If you choose this method for scanning, no one else in your LAN can share the scanner or MFP to either print or scan, until you click the tab Disconnect for Scanning to release it will display Manually Connected by..., when you can start your scanner or MFP. Step 2: Click the tab Connect for scanning, it or accept their Request to Connect. Step 1: Highlight your scan task. -28- Successfully set and ready for Scanning.
