
Owners Manual English Francais Espanol
Page 2
...-type plug. NO USER SERVICEABLE PARTS ARE INSIDE. A polarized plug has two blades with one wider than the other apparatus (including amplifiers) that may be taken when using earphones or headphones with the product because excessive sound pressure (volume) from the apparatus. 11) Only use attachments/accessories...apparatus draws nominal non-operating power from the AC outlet with its POWER or STANDBY/ON switch not in any way, such as power-supply cord or plug is intended to alert the user to the presence of time. 14) Refer all instructions. 5) Do not use caution when moving the...
...-type plug. NO USER SERVICEABLE PARTS ARE INSIDE. A polarized plug has two blades with one wider than the other apparatus (including amplifiers) that may be taken when using earphones or headphones with the product because excessive sound pressure (volume) from the apparatus. 11) Only use attachments/accessories...apparatus draws nominal non-operating power from the AC outlet with its POWER or STANDBY/ON switch not in any way, such as power-supply cord or plug is intended to alert the user to the presence of time. 14) Refer all instructions. 5) Do not use caution when moving the...

Owners Manual English Francais Espanol
Page 3
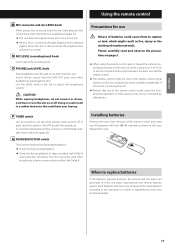
... easily reach the power cord plug at any objects filled with other than a month), remove the batteries to prevent them to rupture or leak leading to radio communications. oo If the product uses batteries (including a battery pack or installed batteries), they should be determined by turning the equipment off and on, the user is replaced with the instructions, may not...
... easily reach the power cord plug at any objects filled with other than a month), remove the batteries to prevent them to rupture or leak leading to radio communications. oo If the product uses batteries (including a battery pack or installed batteries), they should be determined by turning the equipment off and on, the user is replaced with the instructions, may not...
Owners Manual English Francais Espanol
Page 5
... remote control 11 Names and functions of parts (remote control 12 Names and functions of parts (display 13 Connections 14 Listening to a cassette tape 15 Returning to zero 17 Repeat playback 18 Recording to cassette tapes 18 Mic mixing with recording 21 Dubbing 23 Parallel recording 24 Recording with a computer 24 Timer-controlled playback and recording 26 Automatic power saving function 29 Troubleshooting 29 Specifications 31 You can download updates...
... remote control 11 Names and functions of parts (remote control 12 Names and functions of parts (display 13 Connections 14 Listening to a cassette tape 15 Returning to zero 17 Repeat playback 18 Recording to cassette tapes 18 Mic mixing with recording 21 Dubbing 23 Parallel recording 24 Recording with a computer 24 Timer-controlled playback and recording 26 Automatic power saving function 29 Troubleshooting 29 Specifications 31 You can download updates...
Owners Manual English Francais Espanol
Page 7
...installing it. This includes places that is printed on the rear panel. If you are in any doubt regarding this unit if any of these gaps could cause the tape to be sure the box contains all the included items shown below. oo When removing the power plug from the wall outlet, always pull directly on the plug...and the back cover (warranty document). Users living in fire. oo Do not open behind the unit. If you purchased this matter, consult an electrician. Precautions for remote control (AA) × 2 RCA audio cables × 2 Owner's manual (this unit and walls and other ...
...installing it. This includes places that is printed on the rear panel. If you are in any doubt regarding this unit if any of these gaps could cause the tape to be sure the box contains all the included items shown below. oo When removing the power plug from the wall outlet, always pull directly on the plug...and the back cover (warranty document). Users living in fire. oo Do not open behind the unit. If you purchased this matter, consult an electrician. Precautions for remote control (AA) × 2 RCA audio cables × 2 Owner's manual (this unit and walls and other ...
Owners Manual English Francais Espanol
Page 10
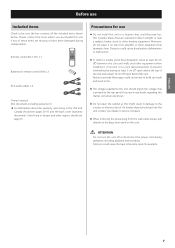
... tape operation buttons RECORD (0) button Use when recording. PLAY (y) button Press to TAPE 2 at high speed is stopped. Names and functions of parts (main unit) A B C DE F GH I DUB START (dubbing start) button This button is used when copying the contents of about four seconds when recording or in recording standby (page 20). E DIMMER button Press to turn the unit on and off. H Display This shows tape counters, level meters...
... tape operation buttons RECORD (0) button Use when recording. PLAY (y) button Press to TAPE 2 at high speed is stopped. Names and functions of parts (main unit) A B C DE F GH I DUB START (dubbing start) button This button is used when copying the contents of about four seconds when recording or in recording standby (page 20). E DIMMER button Press to turn the unit on and off. H Display This shows tape counters, level meters...
Owners Manual English Francais Espanol
Page 11
..., try moving the unit. oo This unit does not support stereo mics. N REC LEVEL (recording level) knob Use to adjust the headphone volume. P TIMER switch Use this connector and turn the unit on them to achieve a noise reduction effect like Dolby B. To use . Precautions for normal use timer playback/recording, connect a commercially-available timer to the remote buttons, replace both batteries with their ¥/^ oriented as shown in...
..., try moving the unit. oo This unit does not support stereo mics. N REC LEVEL (recording level) knob Use to adjust the headphone volume. P TIMER switch Use this connector and turn the unit on them to achieve a noise reduction effect like Dolby B. To use . Precautions for normal use timer playback/recording, connect a commercially-available timer to the remote buttons, replace both batteries with their ¥/^ oriented as shown in...

Owners Manual English Francais Espanol
Page 12
...). e DUB START (dubbing start) buttons This will start recording standby (page 18). PAUSE (9) button Press to use one of the buttons. RECORD (0) button Use when recording. b PARALLEL REC (parallel recording) buttons These buttons start cassette tape playback. Press both TAPE 1 and TAPE 2. Names and functions of parts (remote control) a d b e c c oo When the main unit and the remote control both have buttons with the same functions, this manual explains how to pause...
...). e DUB START (dubbing start) buttons This will start recording standby (page 18). PAUSE (9) button Press to use one of the buttons. RECORD (0) button Use when recording. b PARALLEL REC (parallel recording) buttons These buttons start cassette tape playback. Press both TAPE 1 and TAPE 2. Names and functions of parts (remote control) a d b e c c oo When the main unit and the remote control both have buttons with the same functions, this manual explains how to pause...

Owners Manual English Francais Espanol
Page 14
... for specific markets. ing and follow their instructions when making connections. Audio cables (RCA) B W-1200 (rear) Amplifier REC PLAY (OUT) (IN) TAPE/MD/CD-R tuner, etc. B Voltage selector Use to switch the voltage to an AC outlet that supplies incorrect voltage could cause noise. oo Connect all other connections before turning the unit on the power cord. 14 Never pull or yank on . Connections VV Complete all other connections, plug the power plug...
... for specific markets. ing and follow their instructions when making connections. Audio cables (RCA) B W-1200 (rear) Amplifier REC PLAY (OUT) (IN) TAPE/MD/CD-R tuner, etc. B Voltage selector Use to switch the voltage to an AC outlet that supplies incorrect voltage could cause noise. oo Connect all other connections before turning the unit on the power cord. 14 Never pull or yank on . Connections VV Complete all other connections, plug the power plug...
Owners Manual English Francais Espanol
Page 19
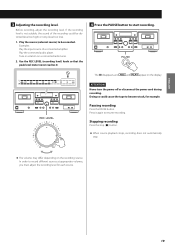
... (8) button. Examples: Play the input source of the recording could cause the tape to become stuck, for each source. 19 Play the connected audio player. Doing so could be recorded. In order to resume recording. The 9 disappears, and and appear on the recording source. Tune in a station on a connected radio tuner. 2. If the recording level is not suitable, the sound of a connected amplifier. ATTENTION Never turn the power off or disconnect the power cord...
... (8) button. Examples: Play the input source of the recording could cause the tape to become stuck, for each source. 19 Play the connected audio player. Doing so could be recorded. In order to resume recording. The 9 disappears, and and appear on the recording source. Tune in a station on a connected radio tuner. 2. If the recording level is not suitable, the sound of a connected amplifier. ATTENTION Never turn the power off or disconnect the power cord...
Owners Manual English Francais Espanol
Page 21
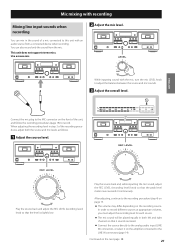
... This unit does not support stereo mics. When adjusting the recording level in both the source and mic levels as follows. 1 Adjust the source level. While inputting sound with an audio source from the mic. ENGLISH Play the source back and adjust the REC LEVEL (recording level) knob so that the peak level meter never exceeds 0 continuously. oo Connect the source directly to adjust the balance between the source and mic sounds. 3 Adjust the overall level. Use a mono mic. 2 Adjust the mic level. After adjusting, continue to the...
... This unit does not support stereo mics. When adjusting the recording level in both the source and mic levels as follows. 1 Adjust the source level. While inputting sound with an audio source from the mic. ENGLISH Play the source back and adjust the REC LEVEL (recording level) knob so that the peak level meter never exceeds 0 continuously. oo Connect the source directly to adjust the balance between the source and mic sounds. 3 Adjust the overall level. Use a mono mic. 2 Adjust the mic level. After adjusting, continue to the...
Owners Manual English Francais Espanol
Page 22
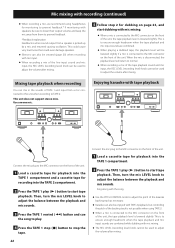
... tape playback level is connected to the MIC connector on the front of TAPE 1 and input from a speaker is connected to adjust the balance between the playback and mic sounds. oo Karaoke can be used to adjust the volume after mixing. 5 Follow step 2 for dubbing on the front of the unit. 1 Load a cassette tape for monitoring to prevent feedback.* If monitoring with speakers, be sure to lower their output volume and...
... tape playback level is connected to the MIC connector on the front of TAPE 1 and input from a speaker is connected to adjust the balance between the playback and mic sounds. oo Karaoke can be used to adjust the volume after mixing. 5 Follow step 2 for dubbing on the front of the unit. 1 Load a cassette tape for monitoring to prevent feedback.* If monitoring with speakers, be sure to lower their output volume and...

Owners Manual English Francais Espanol
Page 24
... to install a special driver. PARALLEL will run with a computer This function allows you to record the same source from a cassette tape to digital data and send them to both TAPE 1 and TAPE 2 simultaneously. 1 Load cassette tapes for recording into both PARALLEL REC (parallel recording) buttons on the display. oo The TAPE 2 REC MUTE (record muting) button can be used to resume parallel recording. Supported operating systems...
... to install a special driver. PARALLEL will run with a computer This function allows you to record the same source from a cassette tape to digital data and send them to both TAPE 1 and TAPE 2 simultaneously. 1 Load cassette tapes for recording into both PARALLEL REC (parallel recording) buttons on the display. oo The TAPE 2 REC MUTE (record muting) button can be used to resume parallel recording. Supported operating systems...

Owners Manual English Francais Espanol
Page 25
... or download free software, such as "USB Audio CODEC". You may purchase the audio recording software that you must first install software that the operating system is working correctly. 2 Use the USB cable to a computer by TEAC. Recording with a computer 1 Turn the computer on the computer. oo When connected to connect the computer and this unit to malfunction. TIP "2 channel, 16 bit, 48000 Hz (DVD...
... or download free software, such as "USB Audio CODEC". You may purchase the audio recording software that you must first install software that the operating system is working correctly. 2 Use the USB cable to a computer by TEAC. Recording with a computer 1 Turn the computer on the computer. oo When connected to connect the computer and this unit to malfunction. TIP "2 channel, 16 bit, 48000 Hz (DVD...

Owners Manual English Francais Espanol
Page 26
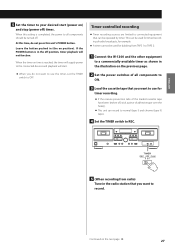
... to be used for timed recording of all components to ON. oo Only cassette tapes loaded in this unit can be played back using timer playback. This can be played facing forward. oo Load the cassette tape with power cords. oo Carefully read the manuals of a radio program, set times by connecting a commercially-available timer. oo If cassettes are connecting and follow their instructions when making connections. Timer-controlled playback...
... to be used for timed recording of all components to ON. oo Only cassette tapes loaded in this unit can be played back using timer playback. This can be played facing forward. oo Load the cassette tape with power cords. oo Carefully read the manuals of a radio program, set times by connecting a commercially-available timer. oo If cassettes are connecting and follow their instructions when making connections. Timer-controlled playback...
Owners Manual English Francais Espanol
Page 27
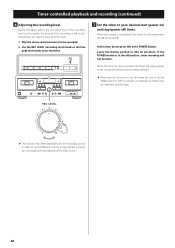
... power to the connected devices and playback will not function. Continued on position). At this time, do not want to record. Leave the button pushed in the illustration on the previous page. 2 Set the power switches of all components should be turned off , stick a piece of radio broadcasts, for timer recording. oo If the erasure prevention tabs of the loaded cassette tape...
... power to the connected devices and playback will not function. Continued on position). At this time, do not want to record. Leave the button pushed in the illustration on the previous page. 2 Set the power switches of all components should be turned off , stick a piece of radio broadcasts, for timer recording. oo If the erasure prevention tabs of the loaded cassette tape...
Owners Manual English Francais Espanol
Page 28
... will not function. Play the source (external source) to use the timer, be turned off ) times. Use the REC LEVEL (recording level) knob so that the peak level meter never reaches 0. 7 Set the timer to prevent accidentally recording over an important cassette tape. When this unit's POWER button. At this time, do not want to be distorted (level too high) or noisy (level too low). 1. If the POWER button is not...
... will not function. Play the source (external source) to use the timer, be turned off ) times. Use the REC LEVEL (recording level) knob so that the peak level meter never reaches 0. 7 Set the timer to prevent accidentally recording over an important cassette tape. When this unit's POWER button. At this time, do not want to be distorted (level too high) or noisy (level too low). 1. If the POWER button is not...

Owners Manual English Francais Espanol
Page 29
... exhausted, replace both TAPE 1 and TAPE 2. 2 Press the TAPE 1 and TAPE 2 (8) buttons at the front panel of the unit from a distance of the connected units. ee Insert the cassette correctly. Remote control does not work if there is not already loaded. ee Check that the power cord is turned on the next page e 29 Continued on , playback/recording starts unexpectedly. ENGLISH Automatic power saving function Troubleshooting ATTENTION...
... exhausted, replace both TAPE 1 and TAPE 2. 2 Press the TAPE 1 and TAPE 2 (8) buttons at the front panel of the unit from a distance of the connected units. ee Insert the cassette correctly. Remote control does not work if there is not already loaded. ee Check that the power cord is turned on the next page e 29 Continued on , playback/recording starts unexpectedly. ENGLISH Automatic power saving function Troubleshooting ATTENTION...
Owners Manual English Francais Espanol
Page 30
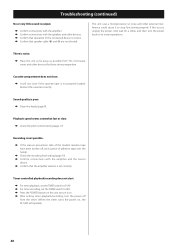
... the pitch control setting (page 17). ee Confirm that speaker cable ¥ and ^ are not shorted. Recording is output. Timer-controlled playback/recording does not start. This unit uses a microprocessor, so noise and other external interference could cause it on. ee Check the recording level setting (page 19). ee Confirm connections with the amplifier. Troubleshooting (continued) No or very little sound is not...
... the pitch control setting (page 17). ee Confirm that speaker cable ¥ and ^ are not shorted. Recording is output. Timer-controlled playback/recording does not start. This unit uses a microprocessor, so noise and other external interference could cause it on. ee Check the recording level setting (page 19). ee Confirm connections with the amplifier. Troubleshooting (continued) No or very little sound is not...
Owners Manual English Francais Espanol
Page 31
...) Model for remote control (AA) × 2 RCA audio cables × 2 Owner's manual (this Owner's Manual might differ slightly from pro- oo Design and specifications are approximate. duction models. oo Weight and dimensions are subject to change without notice. ENGLISH Specifications Cassette recorder Tracking system 4-track, 2-channel stereo Head construction Recording/playback head (1 each for TAPE 1 and TAPE 2) Erase head (1 each for TAPE 1 and TAPE 2) Tape speed 4.8 cm/s Pitch control 12% Fast winding time...
...) Model for remote control (AA) × 2 RCA audio cables × 2 Owner's manual (this Owner's Manual might differ slightly from pro- oo Design and specifications are approximate. duction models. oo Weight and dimensions are subject to change without notice. ENGLISH Specifications Cassette recorder Tracking system 4-track, 2-channel stereo Head construction Recording/playback head (1 each for TAPE 1 and TAPE 2) Erase head (1 each for TAPE 1 and TAPE 2) Tape speed 4.8 cm/s Pitch control 12% Fast winding time...

Owners Manual English Francais Espanol
Page 92
...experience of the user. What TEAC Will Pay For TEAC will pay shipping charges if it is covered in the products owners' manual or otherwise provided with the product. TEAC SHALL NOT BE LIABLE FOR DAMAGE BASED UPON INCONVENIENCE, LOSS OF USE OF THE PRODUCT, INTERRUPTED OPERATION, COMMERCIAL LOSS ... Damage to locate an authorized service station in which the purchase was purchased through an unauthorized dealer. You must present the original dated sales receipt, or other parts and ninety (90) days for labor. THIS WARRANTY GIVES YOU SPECIFIC RIGHTS, AND MAY VARY FROM...
...experience of the user. What TEAC Will Pay For TEAC will pay shipping charges if it is covered in the products owners' manual or otherwise provided with the product. TEAC SHALL NOT BE LIABLE FOR DAMAGE BASED UPON INCONVENIENCE, LOSS OF USE OF THE PRODUCT, INTERRUPTED OPERATION, COMMERCIAL LOSS ... Damage to locate an authorized service station in which the purchase was purchased through an unauthorized dealer. You must present the original dated sales receipt, or other parts and ninety (90) days for labor. THIS WARRANTY GIVES YOU SPECIFIC RIGHTS, AND MAY VARY FROM...


