Owners Manual
Page 6
... the finish. Before Using the Unit 6 Batteries 7 Connections 8 Unit Functions 10 Display 12 Getting Started 13 Setting the Clock 14 Basic Operation 15 Listening to iPod 16 Listening to an External Source 19 Listening to a source of your dealer or service company. < When removing the power plug from this matter, consult... the Unit Thank you are in any operations. < As the unit may become warm during operation, always leave sufficient space around the unit for choosing TEAC. Use a clean, dry cloth. < Keep this might result in a safe place for future reference. 6
... the finish. Before Using the Unit 6 Batteries 7 Connections 8 Unit Functions 10 Display 12 Getting Started 13 Setting the Clock 14 Basic Operation 15 Listening to iPod 16 Listening to an External Source 19 Listening to a source of your dealer or service company. < When removing the power plug from this matter, consult... the Unit Thank you are in any operations. < As the unit may become warm during operation, always leave sufficient space around the unit for choosing TEAC. Use a clean, dry cloth. < Keep this might result in a safe place for future reference. 6
Owners Manual
Page 10
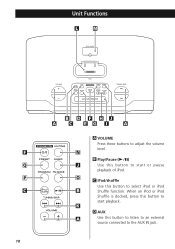
N B Play/Pause (y/J) J Use this button to start or pause playback of iPod. Unit Functions L M F Q P C 10 B D F HJ A C EG I A A VOLUME Press these buttons to select iPod or iPod B Shuffle function. O C iPod/shuffle Use this button to listen to an external source connected to start playback. When an iPod or iPod Shuffle is docked, press this button to the AUX IN jack. K D AUX A Use this button to adjust the volume level.
N B Play/Pause (y/J) J Use this button to start or pause playback of iPod. Unit Functions L M F Q P C 10 B D F HJ A C EG I A A VOLUME Press these buttons to select iPod or iPod B Shuffle function. O C iPod/shuffle Use this button to listen to an external source connected to start playback. When an iPod or iPod Shuffle is docked, press this button to the AUX IN jack. K D AUX A Use this button to adjust the volume level.
Owners Manual
Page 11
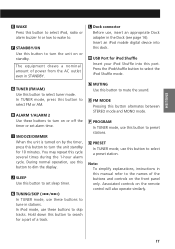
...on the front panel only. P PROGRAM In TUNER mode, use these buttons to set alarm time. Note: To simplify explanations, instructions in stations. Press the iPod/shuffle button to turn on or off the timer or set sleep timer. H ALARM 1/ALARM 2 Use these buttons to mute the sound. O FM MODE Pressing... Use this button to tune in this manual refer to preset stations. Associated controls on the remote control will also operate similarly. 11 Insert an iPod mobile digital device into this port. In TUNER mode, press this button to search for a part of power from the AC outlet even in...
...on the front panel only. P PROGRAM In TUNER mode, use these buttons to set alarm time. Note: To simplify explanations, instructions in stations. Press the iPod/shuffle button to turn on or off the timer or set sleep timer. H ALARM 1/ALARM 2 Use these buttons to mute the sound. O FM MODE Pressing... Use this button to tune in this manual refer to preset stations. Associated controls on the remote control will also operate similarly. 11 Insert an iPod mobile digital device into this port. In TUNER mode, press this button to search for a part of power from the AC outlet even in...
Owners Manual
Page 12
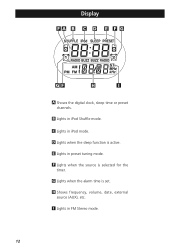
E Lights in iPod mode. H Shows frequency, volume, date, external source (AUX), etc. C Lights in preset tuning mode. I A Shows the digital clock, sleep time or preset channels. G Lights when the alarm time is active. Display FA B C D E F G GF H I Lights in iPod Shuffle mode. D Lights when the sleep function is set. B Lights in FM Stereo mode. 12 F Lights when the source is selected for the timer.
E Lights in iPod mode. H Shows frequency, volume, date, external source (AUX), etc. C Lights in preset tuning mode. I A Shows the digital clock, sleep time or preset channels. G Lights when the alarm time is active. Display FA B C D E F G GF H I Lights in iPod Shuffle mode. D Lights when the sleep function is set. B Lights in FM Stereo mode. 12 F Lights when the source is selected for the timer.
Owners Manual
Page 13
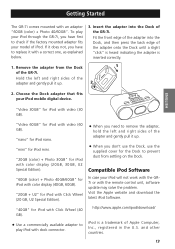
... color display (20GB, 30GB, U2 Special Edition). "60GB (color) + Photo 40GB/60GB" for iPod with color display (40GB, 60GB). Getting Started ENGLISH The GR-7i comes mounted with the remote control unit, software update may solve the problem. Remove the adapter from settling on the Dock. ... and other countries. 13 Visit the Apple website and download the latest iPod Software. Insert the adapter into the Dock, and then press the back edge of the GR-7i. "mini" for iPod nano. To play your iPod through the GR-7i, you have to replace it with Click Wheel (20 GB, U2 ...
... color display (20GB, 30GB, U2 Special Edition). "60GB (color) + Photo 40GB/60GB" for iPod with color display (40GB, 60GB). Getting Started ENGLISH The GR-7i comes mounted with the remote control unit, software update may solve the problem. Remove the adapter from settling on the Dock. ... and other countries. 13 Visit the Apple website and download the latest iPod Software. Insert the adapter into the Dock, and then press the back edge of the GR-7i. "mini" for iPod nano. To play your iPod through the GR-7i, you have to replace it with Click Wheel (20 GB, U2 ...
Owners Manual
Page 15
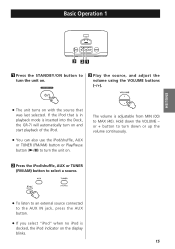
... (-/+). < The unit turns on with the source that is in playback mode is inserted into the Dock, the GR-7i will automatically turn on and start playback of the iPod. < You can also use the iPod/shuffle, AUX or TUNER (FM/AM) button or Play/Pause button (y/J) to turn the unit on the display... blinks. 15 Basic Operation 1 ENGLISH 3 21 1 Press the STANDBY/ON button to turn down the VOLUME - Hold down or up the volume continuously. 2 Press the iPod/shuffle, AUX or TUNER (FM/AM) button to select a source. < To listen to an external source connected to the AUX IN jack, press the AUX...
... (-/+). < The unit turns on with the source that is in playback mode is inserted into the Dock, the GR-7i will automatically turn on and start playback of the iPod. < You can also use the iPod/shuffle, AUX or TUNER (FM/AM) button or Play/Pause button (y/J) to turn the unit on the display... blinks. 15 Basic Operation 1 ENGLISH 3 21 1 Press the STANDBY/ON button to turn down the VOLUME - Hold down or up the volume continuously. 2 Press the iPod/shuffle, AUX or TUNER (FM/AM) button to select a source. < To listen to an external source connected to the AUX IN jack, press the AUX...
Owners Manual
Page 16
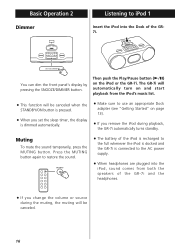
... press the MUTING button. Press the MUTING button again to restore the sound. < The battery of the iPod is recharged to the full whenever the iPod is docked and the GR-7i is dimmed automatically. < Make sure to the AC power supply. < When headphones are plugged into the Dock...source during playback, the GR-7i automatically turns standby. Then push the Play/Pause button (y/J) on page 13). < If you remove the iPod during the muting, the muting will be canceled. 16 Basic Operation 2 Dimmer Listening to iPod 1 Insert the iPod into the iPod, sound comes from the iPod's music list. < ...
... press the MUTING button. Press the MUTING button again to restore the sound. < The battery of the iPod is recharged to the full whenever the iPod is docked and the GR-7i is dimmed automatically. < Make sure to the AC power supply. < When headphones are plugged into the Dock...source during playback, the GR-7i automatically turns standby. Then push the Play/Pause button (y/J) on page 13). < If you remove the iPod during the muting, the muting will be canceled. 16 Basic Operation 2 Dimmer Listening to iPod 1 Insert the iPod into the iPod, sound comes from the iPod's music list. < ...
Owners Manual
Page 17
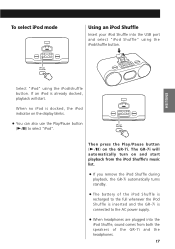
To select iPod mode Using an iPod Shuffle Insert your iPod Shuffle into the iPod Shuffle, sound comes from both the speakers of the GR-7i and the headphones. 17 ENGLISH Select "iPod" using the iPod/shuffle button. The GR-7i will start playback from the iPod Shuffle's music list. < If you remove the iPod Shuffle during playback, the GR-7i automatically turns standby. < The...
To select iPod mode Using an iPod Shuffle Insert your iPod Shuffle into the iPod Shuffle, sound comes from both the speakers of the GR-7i and the headphones. 17 ENGLISH Select "iPod" using the iPod/shuffle button. The GR-7i will start playback from the iPod Shuffle's music list. < If you remove the iPod Shuffle during playback, the GR-7i automatically turns standby. < The...
Owners Manual
Page 18
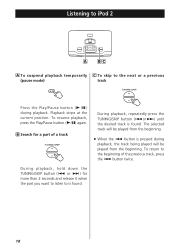
... TUNING/SKIP button (. button twice. To resume playback, press the Play/Pause button (G/J) again. The selected track will be played from the beginning. Listening to iPod 2 A BC A To suspend playback temporarily C To skip to the beginning of a track During playback, repeatedly press the TUNING/SKIP button (.or/) until the desired track...
... TUNING/SKIP button (. button twice. To resume playback, press the Play/Pause button (G/J) again. The selected track will be played from the beginning. Listening to iPod 2 A BC A To suspend playback temporarily C To skip to the beginning of a track During playback, repeatedly press the TUNING/SKIP button (.or/) until the desired track...
Owners Manual
Page 19
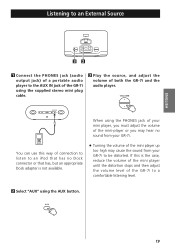
... volume of the mini-player or you may cause the sound from your GR-7i to be distorted. When using the AUX button. 19 If this way of connection to listen to an iPod that has no sound from your GR-7i. ENGLISH Listening to an External Source 32 1 Connect the PHONES jack (audio output... jack) of a portable audio player to the AUX IN jack of the GR-7i using the supplied stereo mini plug cable. 3 Play the...
... volume of the mini-player or you may cause the sound from your GR-7i to be distorted. When using the AUX button. 19 If this way of connection to listen to an iPod that has no sound from your GR-7i. ENGLISH Listening to an External Source 32 1 Connect the PHONES jack (audio output... jack) of a portable audio player to the AUX IN jack of the GR-7i using the supplied stereo mini plug cable. 3 Play the...
Owners Manual
Page 22
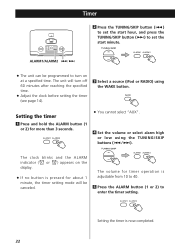
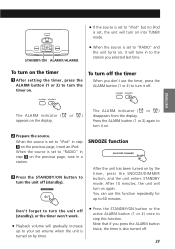
... ALARM button (1 or 2) to turn off 60 minutes after reaching the specified time. < Adjust the clock before setting the timer (see page 14). 3 Select a source (iPod or RADIO) using the TUNING/SKIP buttons (.//). The unit will turn on the display. < If no button is now completed. 22 The clock blinks and...
... ALARM button (1 or 2) to turn off 60 minutes after reaching the specified time. < Adjust the clock before setting the timer (see page 14). 3 Select a source (iPod or RADIO) using the TUNING/SKIP buttons (.//). The unit will turn on the display. < If no button is now completed. 22 The clock blinks and...
Owners Manual
Page 23
... on the display. ENGLISH The ALARM indicator ( or ) appears on again. When the source is set to "iPod" in step 3 on . STANDBY/ON ALARM1/ALARM2 < If the source is set to "iPod" but no iPod is set, the unit will turn on into TUNER mode. < When the source is set to "RADIO" and... the ALARM button (1 or 2) to turn off the timer When you don't use this function. To turn the timer on the previous page, insert an iPod.
... on the display. ENGLISH The ALARM indicator ( or ) appears on again. When the source is set to "iPod" in step 3 on . STANDBY/ON ALARM1/ALARM2 < If the source is set to "iPod" but no iPod is set, the unit will turn on into TUNER mode. < When the source is set to "RADIO" and... the ALARM button (1 or 2) to turn off the timer When you don't use this function. To turn the timer on the previous page, insert an iPod.
Owners Manual
Page 25
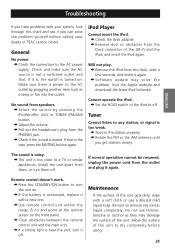
.... e Check the dock adapter. e Set the HOLD switch of the iPod to the AC outlet by pressing the iPod/shuffle, AUX or TUNER (FM/AM) button. Tuner Cannot listen to dry completely before calling your dealer or TEAC service center. The sound is too weak. If normal operation cannot be ...Pull out the headphone's plug from the outlet and plug it off . Will not play. eSoftware update may damage the surface of the GR-7i and the iPod, and insert the iPod again. e Tune in the station properly. Install the unit apart from the Dock connector of the unit. e Use remote control unit ...
.... e Check the dock adapter. e Set the HOLD switch of the iPod to the AC outlet by pressing the iPod/shuffle, AUX or TUNER (FM/AM) button. Tuner Cannot listen to dry completely before calling your dealer or TEAC service center. The sound is too weak. If normal operation cannot be ...Pull out the headphone's plug from the outlet and plug it off . Will not play. eSoftware update may damage the surface of the GR-7i and the iPod, and insert the iPod again. e Tune in the station properly. Install the unit apart from the Dock connector of the unit. e Use remote control unit ...