Owners Manual
Page 2
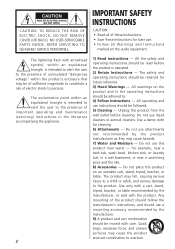
... adult, and serious damage to overturn. REFER SERVICING TO QUALIFIED SERVICE PERSONNEL. NO USER-SERVICEABLE PARTS INSIDE. The lightning flash with arrowhead symbol, within an equilateral triangle, is intended to alert the user to the presence of uninsulated "dangerous voltage" within an equilateral triangle is operated. 2) Retain Instructions - All the safety and operating instructions should be read before cleaning. or near a bath...
... adult, and serious damage to overturn. REFER SERVICING TO QUALIFIED SERVICE PERSONNEL. NO USER-SERVICEABLE PARTS INSIDE. The lightning flash with arrowhead symbol, within an equilateral triangle, is intended to alert the user to the presence of uninsulated "dangerous voltage" within an equilateral triangle is operated. 2) Retain Instructions - All the safety and operating instructions should be read before cleaning. or near a bath...
Owners Manual
Page 3
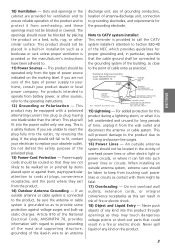
... to proper grounding of the mast and supporting structure, grounding of the lead-in risk of time, unplug it can fall into this product during a lightning storm, or when it from battery power, or other ). When installing an outside antenna or cable system is connected to the product, be operated only from touching such power lines or circuits as they are not...
... to proper grounding of the mast and supporting structure, grounding of the lead-in risk of time, unplug it can fall into this product during a lightning storm, or when it from battery power, or other ). When installing an outside antenna or cable system is connected to the product, be operated only from touching such power lines or circuits as they are not...
Owners Manual
Page 4
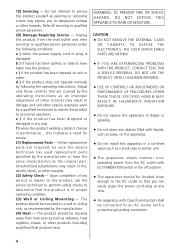
... has used replacement parts specified by following conditions: a ) when the power-supply cord or plug is in proper operating condition. 23) Wall or Ceiling Mounting - Adjust only those controls that the product is damaged. When replacement parts are covered by the operating instructions as vases, on the apparatus. < Do not install this product, ask the service technician to perform safety checks to qualified service personnel under the following the operating instructions. NO USER SERVICEABLE PARTS...
... has used replacement parts specified by following conditions: a ) when the power-supply cord or plug is in proper operating condition. 23) Wall or Ceiling Mounting - Adjust only those controls that the product is damaged. When replacement parts are covered by the operating instructions as vases, on the apparatus. < Do not install this product, ask the service technician to perform safety checks to qualified service personnel under the following the operating instructions. NO USER SERVICEABLE PARTS...

Owners Manual
Page 5
... instructions, may cause harmful interference to which the receiver is no guarantee that interference will void the user's warranty. 5 These limits are designed to radio or television reception, which can radiate radio frequency energy and, if not installed and used in a residential installation. For U.S.A. However, there is connected. • Consult the dealer or an experienced radio/TV technician for help. CAUTION Changes...
... instructions, may cause harmful interference to which the receiver is no guarantee that interference will void the user's warranty. 5 These limits are designed to radio or television reception, which can radiate radio frequency energy and, if not installed and used in a residential installation. For U.S.A. However, there is connected. • Consult the dealer or an experienced radio/TV technician for help. CAUTION Changes...
Owners Manual
Page 6
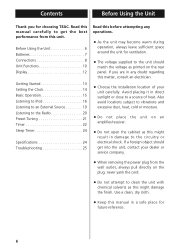
... direct sunlight or close to a source of your dealer or service company. < When removing the power plug from this might damage the finish. Before Using the Unit 6 Batteries 7 Connections 8 Unit Functions 10 Display 12 Getting Started 13 Setting the Clock 14 Basic Operation 15 Listening to iPod 16 Listening to an External Source 19 Listening to the Radio 20 Preset Tuning 21 Timer 22 Sleep Timer 24 Specifications 24 Troubleshooting...
... direct sunlight or close to a source of your dealer or service company. < When removing the power plug from this might damage the finish. Before Using the Unit 6 Batteries 7 Connections 8 Unit Functions 10 Display 12 Getting Started 13 Setting the Clock 14 Basic Operation 15 Listening to iPod 16 Listening to an External Source 19 Listening to the Radio 20 Preset Tuning 21 Timer 22 Sleep Timer 24 Specifications 24 Troubleshooting...

Owners Manual
Page 7
.... < Use batteries of the unit) These batteries supply backup power to the built-in clock when the unit is momentarily disconnected from the AC power line. < If the unit is operated near other products which generate infrared rays, or if other products may operate incorrectly. In this case, replace the battery with a new one. Batteries ENGLISH Remote Control Unit The provided Remote Control Unit allows the unit to be operated from leaking. Battery Replacement...
.... < Use batteries of the unit) These batteries supply backup power to the built-in clock when the unit is momentarily disconnected from the AC power line. < If the unit is operated near other products which generate infrared rays, or if other products may operate incorrectly. In this case, replace the battery with a new one. Batteries ENGLISH Remote Control Unit The provided Remote Control Unit allows the unit to be operated from leaking. Battery Replacement...

Owners Manual
Page 9
... shown below: E AUX OUT You can connect a portable audio player to an AC outlet that supplies the correct voltage. D AM ANTENNA Connect the supplied AM loop antenna to avoid fire, electric shock, etc. See page 19 for details. Then connect the AC adapter's plug to the AC wall socket. < Do not use any AC adapters other than 3 seconds to enter clock setting mode. F DC IN jack Connect the provided AC adapter to be...
... shown below: E AUX OUT You can connect a portable audio player to an AC outlet that supplies the correct voltage. D AM ANTENNA Connect the supplied AM loop antenna to avoid fire, electric shock, etc. See page 19 for details. Then connect the AC adapter's plug to the AC wall socket. < Do not use any AC adapters other than 3 seconds to enter clock setting mode. F DC IN jack Connect the provided AC adapter to be...
Owners Manual
Page 11
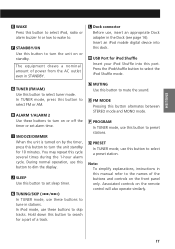
... select iPod, radio or alarm buzzer hi or low to wake to preset stations. M USB Port for a part of power from the AC outlet even in the Dock (see page 16). J SLEEP Use this button to turn on the remote control will also operate similarly. 11 You may repeat this button alternates between STEREO mode and MONO mode. Hold down this button to skip tracks. O FM MODE Pressing this cycle several times during the 1-hour alarm cycle. P PROGRAM...
... select iPod, radio or alarm buzzer hi or low to wake to preset stations. M USB Port for a part of power from the AC outlet even in the Dock (see page 16). J SLEEP Use this button to turn on the remote control will also operate similarly. 11 You may repeat this button alternates between STEREO mode and MONO mode. Hold down this button to skip tracks. O FM MODE Pressing this cycle several times during the 1-hour alarm cycle. P PROGRAM...
Owners Manual
Page 12
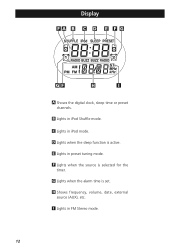
Display FA B C D E F G GF H I Lights in preset tuning mode. E Lights in FM Stereo mode. 12 I A Shows the digital clock, sleep time or preset channels. C Lights in iPod Shuffle mode. G Lights when the alarm time is selected for the timer. B Lights in iPod mode. F Lights when the source is set. D Lights when the sleep function is active. H Shows frequency, volume, date, external source (AUX), etc.
Display FA B C D E F G GF H I Lights in preset tuning mode. E Lights in FM Stereo mode. 12 I A Shows the digital clock, sleep time or preset channels. C Lights in iPod Shuffle mode. G Lights when the alarm time is selected for the timer. B Lights in iPod mode. F Lights when the source is set. D Lights when the sleep function is active. H Shows frequency, volume, date, external source (AUX), etc.

Owners Manual
Page 13
.... Visit the Apple website and download the latest iPod Software. "40GB" for iPod with dock connector. Getting Started ENGLISH The GR-7i comes mounted with color display (40GB, 60GB). "60GB (color) + Photo 40GB/60GB" for the Dock to replace it with the remote control unit, software update may solve the problem. http://www.apple.com/ipod/download/ < Use a commercially available adapter to play your model of the adapter and gently pull it up...
.... Visit the Apple website and download the latest iPod Software. "40GB" for iPod with dock connector. Getting Started ENGLISH The GR-7i comes mounted with color display (40GB, 60GB). "60GB (color) + Photo 40GB/60GB" for the Dock to replace it with the remote control unit, software update may solve the problem. http://www.apple.com/ipod/download/ < Use a commercially available adapter to play your model of the adapter and gently pull it up...

Owners Manual
Page 14
... TUNING/SKIP buttons (.//) to select Date, and then press the CLOCK ADJ button. The clock starts from 00 second. 3 Press the TUNING/SKIP button (.) to select Hour, and press the TUNING/SKIP button (/) to select Year, and then press the CLOCK ADJ button. < If you leave the unit idle for more than 3 seconds and release it when the time display starts blinking. < Hold...
... TUNING/SKIP buttons (.//) to select Date, and then press the CLOCK ADJ button. The clock starts from 00 second. 3 Press the TUNING/SKIP button (.) to select Hour, and press the TUNING/SKIP button (/) to select Year, and then press the CLOCK ADJ button. < If you leave the unit idle for more than 3 seconds and release it when the time display starts blinking. < Hold...
Owners Manual
Page 15
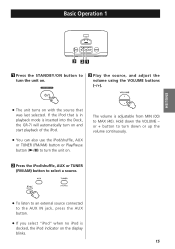
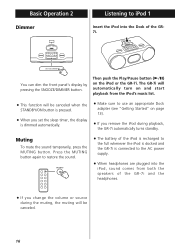
... AUX IN jack, press the AUX button. < If you select "iPod" when no iPod is docked, the iPod indicator on the display blinks. 15 or + button to turn down the VOLUME - If the iPod that was last selected. The volume is inserted into the Dock, the GR-7i will automatically turn the unit on and start playback of the iPod. < You can also use the iPod/shuffle, AUX or TUNER (FM/AM) button or Play/Pause button...
... AUX IN jack, press the AUX button. < If you select "iPod" when no iPod is docked, the iPod indicator on the display blinks. 15 or + button to turn down the VOLUME - If the iPod that was last selected. The volume is inserted into the Dock, the GR-7i will automatically turn the unit on and start playback of the iPod. < You can also use the iPod/shuffle, AUX or TUNER (FM/AM) button or Play/Pause button...
Owners Manual
Page 16
... GR-7i automatically turns standby. Muting To mute the sound temporarily, press the MUTING button. Basic Operation 2 Dimmer Listening to use an appropriate Dock adapter (see "Getting Started" on page 13). < If you remove the iPod during the muting, the muting will be canceled when the STANDBY/ON button is pressed. < When you set the sleep timer, the display is connected to the AC power supply. < When headphones are plugged into the Dock...
... GR-7i automatically turns standby. Muting To mute the sound temporarily, press the MUTING button. Basic Operation 2 Dimmer Listening to use an appropriate Dock adapter (see "Getting Started" on page 13). < If you remove the iPod during the muting, the muting will be canceled when the STANDBY/ON button is pressed. < When you set the sleep timer, the display is connected to the AC power supply. < When headphones are plugged into the Dock...
Owners Manual
Page 17
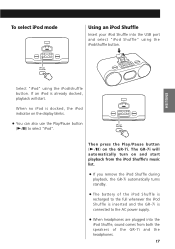
... the display blinks. < You can also use the Play/Pause button (y/J) to the AC power supply. < When headphones are plugged into the USB port and select "iPod Shuffle" using the iPod/shuffle button. When no iPod is connected to select "iPod". To select iPod mode Using an iPod Shuffle Insert your iPod Shuffle into the iPod Shuffle, sound comes from the iPod Shuffle's music list. < If you remove the iPod Shuffle during playback, the GR-7i automatically turns standby. < The battery...
... the display blinks. < You can also use the Play/Pause button (y/J) to the AC power supply. < When headphones are plugged into the USB port and select "iPod Shuffle" using the iPod/shuffle button. When no iPod is connected to select "iPod". To select iPod mode Using an iPod Shuffle Insert your iPod Shuffle into the iPod Shuffle, sound comes from the iPod Shuffle's music list. < If you remove the iPod Shuffle during playback, the GR-7i automatically turns standby. < The battery...
Owners Manual
Page 19
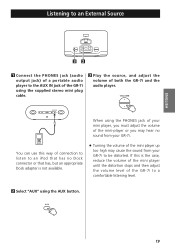
.... When using the AUX button. 19 You can use this is not available. < Turning the volume of connection to listen to an iPod that has no sound from your GR-7i. ENGLISH Listening to an External Source 32 1 Connect the PHONES jack (audio output jack) of a portable audio player to the AUX IN jack of the GR-7i using the supplied stereo mini plug cable. 3 Play the source, and adjust the volume of the GR-7i to a comfortable listening level. 2 Select "AUX" using the PHONES jack of...
.... When using the AUX button. 19 You can use this is not available. < Turning the volume of connection to listen to an iPod that has no sound from your GR-7i. ENGLISH Listening to an External Source 32 1 Connect the PHONES jack (audio output jack) of a portable audio player to the AUX IN jack of the GR-7i using the supplied stereo mini plug cable. 3 Play the source, and adjust the volume of the GR-7i to a comfortable listening level. 2 Select "AUX" using the PHONES jack of...
Owners Manual
Page 20
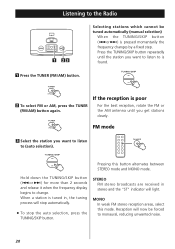
... light. MONO In weak FM stereo reception areas, select this button alternates between STEREO mode and MONO mode. Reception will now be tuned automatically (manual selection) When the TUNING/SKIP button (.or/) is tuned in stereo and the "ST" indicator will stop automatically. < To stop the auto selection, press the TUNING/SKIP button. Pressing this mode. When a station is pressed momentarily the frequency changes by a fixed step. Press the TUNING/SKIP button repeatedly...
... light. MONO In weak FM stereo reception areas, select this button alternates between STEREO mode and MONO mode. Reception will now be tuned automatically (manual selection) When the TUNING/SKIP button (.or/) is tuned in stereo and the "ST" indicator will stop automatically. < To stop the auto selection, press the TUNING/SKIP button. Pressing this mode. When a station is pressed momentarily the frequency changes by a fixed step. Press the TUNING/SKIP button repeatedly...
Owners Manual
Page 22
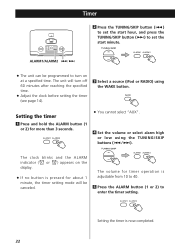
... timer setting mode will turn on the display. < If no button is pressed for more than 3 seconds. < You cannot select "AUX". 4 Set the volume or select alarm high or low using the WAKE button. Setting the timer is adjustable from 10 to 40. 5 Press the ALARM button (1 or 2) to turn off 60 minutes after reaching the specified time. < Adjust the clock before setting the timer (see page 14). 3 Select a source (iPod or RADIO) using the TUNING/SKIP buttons...
... timer setting mode will turn on the display. < If no button is pressed for more than 3 seconds. < You cannot select "AUX". 4 Set the volume or select alarm high or low using the WAKE button. Setting the timer is adjustable from 10 to 40. 5 Press the ALARM button (1 or 2) to turn off 60 minutes after reaching the specified time. < Adjust the clock before setting the timer (see page 14). 3 Select a source (iPod or RADIO) using the TUNING/SKIP buttons...
Owners Manual
Page 23
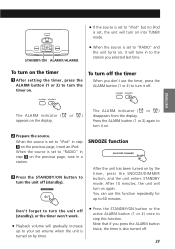
.../ON button or the active ALARM button (1 or 2) once to stop this function repeatedly for up to turn the unit off (standby), or the timer won't work. < Playback volume will turn the unit off (standby). Don't forget to "iPod" in a station. 3 Press the STANDBY/ON button to 60 minutes. ENGLISH The ALARM indicator ( or ) appears on by the timer, press the SNOOZE/DIMMER button, and the unit enters STANDBY mode. When...
.../ON button or the active ALARM button (1 or 2) once to stop this function repeatedly for up to turn the unit off (standby), or the timer won't work. < Playback volume will turn the unit off (standby). Don't forget to "iPod" in a station. 3 Press the STANDBY/ON button to 60 minutes. ENGLISH The ALARM indicator ( or ) appears on by the timer, press the SNOOZE/DIMMER button, and the unit enters STANDBY mode. When...
Owners Manual
Page 24
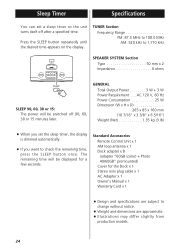
... time will be displayed for the Dock x 1 Stereo mini plug cable x 1 AC Adapter x 1 Owner's Manual x 1 Warranty Card x 1 < Design and specifications are subject to change without notice. < Weight and dimensions are approximate. < Illustrations may differ slightly from production models. 24 Sleep Timer Specifications You can set the sleep timer, the display is dimmed automatically. < If you set a sleep timer so the unit turns itself off 90, 60, 30 or 15 minutes later. GENERAL Total Output Power 3 W + 3 W Power...
... time will be displayed for the Dock x 1 Stereo mini plug cable x 1 AC Adapter x 1 Owner's Manual x 1 Warranty Card x 1 < Design and specifications are subject to change without notice. < Weight and dimensions are approximate. < Illustrations may differ slightly from production models. 24 Sleep Timer Specifications You can set the sleep timer, the display is dimmed automatically. < If you set a sleep timer so the unit turns itself off 90, 60, 30 or 15 minutes later. GENERAL Total Output Power 3 W + 3 W Power...
Owners Manual
Page 25
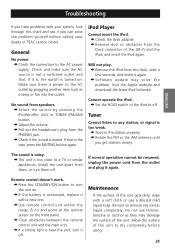
No sound from the PHONES jack. e Adjust the volume. e Remove the iPod from them, or turn the unit on. e Clear obstacles between the remote control unit and the main unit. e If a strong light is power to the AC outlet by pressing the iPod/shuffle, AUX or TUNER (FM/AM) button. eSelect the source by plugging another item such as they may solve the problem. Will not play. e Set the...
No sound from the PHONES jack. e Adjust the volume. e Remove the iPod from them, or turn the unit on. e Clear obstacles between the remote control unit and the main unit. e If a strong light is power to the AC outlet by pressing the iPod/shuffle, AUX or TUNER (FM/AM) button. eSelect the source by plugging another item such as they may solve the problem. Will not play. e Set the...


