Owners Manual
Page 1
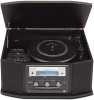
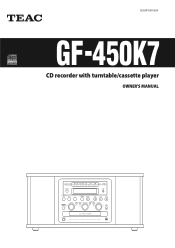
Z CEC6P10501630 GF-450K7 CD recorder with turntable/cassette player OWNER'S MANUAL
Z CEC6P10501630 GF-450K7 CD recorder with turntable/cassette player OWNER'S MANUAL
Owners Manual
Page 3
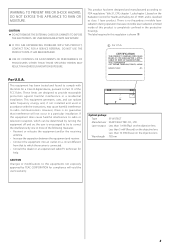
... this regulation is shown ①. ① For U.S.A. Laser output : Less than 1 mW (Play) on the objective lens Less than 5 mW (Record) on the objective lens Less than 10 mW (Erase) on a circuit different from that to radio or television reception, which the receiver is no guarantee... that interference will void the user's warranty. This product has been designed and manufactured according to correct the interference by TEAC CORPORATION for Health and Safety Act of the following measures: • Reorient or relocate the equipment and/or the receiving antenna. •...
... this regulation is shown ①. ① For U.S.A. Laser output : Less than 1 mW (Play) on the objective lens Less than 5 mW (Record) on the objective lens Less than 10 mW (Erase) on a circuit different from that to radio or television reception, which the receiver is no guarantee... that interference will void the user's warranty. This product has been designed and manufactured according to correct the interference by TEAC CORPORATION for Health and Safety Act of the following measures: • Reorient or relocate the equipment and/or the receiving antenna. •...
Owners Manual
Page 4
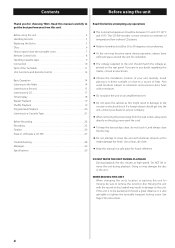
Contents Before using the unit 4 Handling Records 5 Replacing the Stylus 5 Discs 6 How to open the cabinet as this unit. If you for choosing TEAC. If a foreign object should be packed and moved a great distance, it in damage to the circuitry or electrical shock. If the unit is to...high speed. Moving this unit with chemical solvents as this unit. See Page 9 for ventilation. < The voltage supplied to clean the unit with the record or disc loaded may damage the disc or the unit. Read this manual carefully to get into the unit, contact your unit carefully. Also avoid...
Contents Before using the unit 4 Handling Records 5 Replacing the Stylus 5 Discs 6 How to open the cabinet as this unit. If you for choosing TEAC. If a foreign object should be packed and moved a great distance, it in damage to the circuitry or electrical shock. If the unit is to...high speed. Moving this unit with chemical solvents as this unit. See Page 9 for ventilation. < The voltage supplied to clean the unit with the record or disc loaded may damage the disc or the unit. Read this manual carefully to get into the unit, contact your unit carefully. Also avoid...
Owners Manual
Page 5
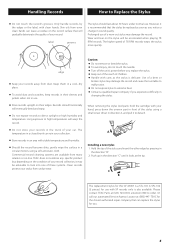
... from undue wear. Long exposure to high temperatures will gradually deteriorate the quality of your records away from many retailers or on the condition of your record collection, it locks at : (800) 447- TEAC for use of the stylus using a small screw driver in a circular motion, using ...a bent or broken stylus may be accelerated when playing 78 RPM records. The temperature in the direction "C" until it may damage the record and cause the turntable to malfunction. < Do not expose stylus to order. TEAC does not endorse any specific product but, depending on -line. ...
... from undue wear. Long exposure to high temperatures will gradually deteriorate the quality of your records away from many retailers or on the condition of your record collection, it locks at : (800) 447- TEAC for use of the stylus using a small screw driver in a circular motion, using ...a bent or broken stylus may be accelerated when playing 78 RPM records. The temperature in the direction "C" until it may damage the record and cause the turntable to malfunction. < Do not expose stylus to order. TEAC does not endorse any specific product but, depending on -line. ...
Owners Manual
Page 6
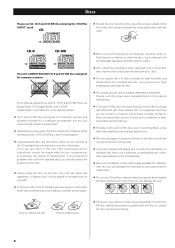
... should contact the producers of heat such as radiators or heatgenerating electrical devices. < Printable CD-R and CD-RW discs aren't recommended, as record sprays, antistatic sprays or fluid, benzine or thinner to clean the discs. Using commercially available CD stabilizers with this player. Never use any ...cannot be playable. < Copy-protected discs and other discs which do not use a ball-point or hard-tipped pen, as this unit, TEAC Corporation and its storage case, press down on the disc tray with an irregular shape (octagonal, heart shaped, business card size, etc.)....
... should contact the producers of heat such as radiators or heatgenerating electrical devices. < Printable CD-R and CD-RW discs aren't recommended, as record sprays, antistatic sprays or fluid, benzine or thinner to clean the discs. Using commercially available CD stabilizers with this player. Never use any ...cannot be playable. < Copy-protected discs and other discs which do not use a ball-point or hard-tipped pen, as this unit, TEAC Corporation and its storage case, press down on the disc tray with an irregular shape (octagonal, heart shaped, business card size, etc.)....

Owners Manual
Page 7
... be erased, and the space on the disc (and the disc has not been finalized), additional material can be recorded once only. Finalizing Although audio data may not play back the audio until it stops. 2. The latch should note that there is space on the ... turntable cover all the way up until the latch engages. 3. If the latch does not engage, repeat these steps again. CD-R, by the edges to record. 7 Note that a CD-RW disc that has not been finalized, and has enough space to avoid pinching your fingers as "finalizing". Once they have been...
... be erased, and the space on the disc (and the disc has not been finalized), additional material can be recorded once only. Finalizing Although audio data may not play back the audio until it stops. 2. The latch should note that there is space on the ... turntable cover all the way up until the latch engages. 3. If the latch does not engage, repeat these steps again. CD-R, by the edges to record. 7 Note that a CD-RW disc that has not been finalized, and has enough space to avoid pinching your fingers as "finalizing". Once they have been...
Owners Manual
Page 9
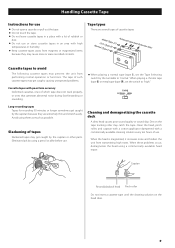
...generate abnormal noise during fast-forwarding or rewinding. < When playing a normal tape (type !), set the switch to "high." Capstan Record/playback head Pinch roller Do not insert a cassette tape until the cleaning solution on the tape tracking roller may catch the tape. ...Slackening of tapes Slackened tapes may cause noise or erase recorded contents. When these problems occur, demagnetize the head using a commercially available head eraser. Handling Cassette Tape Instructions for recording 90 minutes or longer sometimes get caught by the capstan because they...
...generate abnormal noise during fast-forwarding or rewinding. < When playing a normal tape (type !), set the switch to "high." Capstan Record/playback head Pinch roller Do not insert a cassette tape until the cleaning solution on the tape tracking roller may catch the tape. ...Slackening of tapes Slackened tapes may cause noise or erase recorded contents. When these problems occur, demagnetize the head using a commercially available head eraser. Handling Cassette Tape Instructions for recording 90 minutes or longer sometimes get caught by the capstan because they...

Owners Manual
Page 11
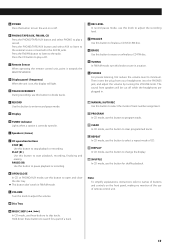
Fast-forward (,) Use this button to lift the tone arm. C cue-lever Use this switch to switch between "RECORD" and "TAPE." D tone arm holder E speed selector F tone arm H Cassette holder Set a cassette tape with a coin or screwdriver. When playing a chrome tape (type... G Cassette tape operation button Play (y) Use this button to "high." Never press the Play button (y) and Rewind button (m) at the same time. When a record or cassette tape is selected by pulling it clockwise with the exposed tape in the direction of the arrow. Pause (J) Use this button to stop...
Fast-forward (,) Use this button to lift the tone arm. C cue-lever Use this switch to switch between "RECORD" and "TAPE." D tone arm holder E speed selector F tone arm H Cassette holder Set a cassette tape with a coin or screwdriver. When playing a chrome tape (type... G Cassette tape operation button Play (y) Use this button to "high." Never press the Play button (y) and Rewind button (m) at the same time. When a record or cassette tape is selected by pulling it clockwise with the exposed tape in the direction of the arrow. Pause (J) Use this button to stop...
Owners Manual
Page 13
...REC Use this knob to tune in FM/AM mode. K OPEN/CLOSE In CD or PHONO/AUX mode, use this button to pause playback or recording. Note: To simplify explanations, instructions refer to names of buttons and controls on the front panel, making no mention of the use this button ... . M Disc Tray N MUSIC SKIP (.//) In CD mode, use this button to select a repeat mode of track number assignment. Press the CD button to play a record. S PHONES For private listening, first reduce the volume level to the radio. W REPEAT In CD mode, use this knob to adjust the volume. B PHONO/TAPE...
...REC Use this knob to tune in FM/AM mode. K OPEN/CLOSE In CD or PHONO/AUX mode, use this button to pause playback or recording. Note: To simplify explanations, instructions refer to names of buttons and controls on the front panel, making no mention of the use this button ... . M Disc Tray N MUSIC SKIP (.//) In CD mode, use this button to select a repeat mode of track number assignment. Press the CD button to play a record. S PHONES For private listening, first reduce the volume level to the radio. W REPEAT In CD mode, use this knob to adjust the volume. B PHONO/TAPE...
Owners Manual
Page 14
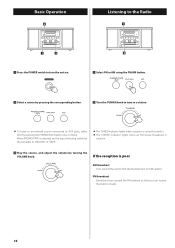
... external source connected to find the best position for AM stations. When PHONO/TAPE is selected, set the Input Selecting switch by the turntable to "RECORD" or "TAPE." < The TUNED indicator lights when a station is correctly tuned in. < The STEREO indicator lights when an FM stereo broadcast is poor AM broadcast...
... external source connected to find the best position for AM stations. When PHONO/TAPE is selected, set the Input Selecting switch by the turntable to "RECORD" or "TAPE." < The TUNED indicator lights when a station is correctly tuned in. < The STEREO indicator lights when an FM stereo broadcast is poor AM broadcast...
Owners Manual
Page 15
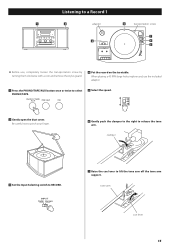
...cover. tone arm cue lever 15 When playing a 45 RPM large hole single record, use , completely loosen the transportation screw by turning them clockwise with a coin and remove the stylus guard. 4 Put the record on the turntable. Be careful not to pinch your finger. 6 Gently push... the clamper to the right to a Record 1 1 2 adaptor 4 transportation screw 7 3 6 5 < Before use the included adaptor. 1 Press ...
...cover. tone arm cue lever 15 When playing a 45 RPM large hole single record, use , completely loosen the transportation screw by turning them clockwise with a coin and remove the stylus guard. 4 Put the record on the turntable. Be careful not to pinch your finger. 6 Gently push... the clamper to the right to a Record 1 1 2 adaptor 4 transportation screw 7 3 6 5 < Before use the included adaptor. 1 Press ...
Owners Manual
Page 16
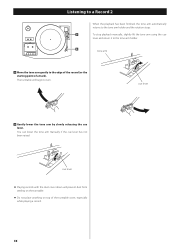
... the dust cover down will begin to the edge of the record (or the starting point of the turntable cover, especially while playing a record. 16 The turntable will prevent dust from settling on the turntable. < Do not place anything on top of a track). cue lever 9 Gently lower the ...tone arm by slowly releasing the cue lever. Listening to a Record 2 When the playback has been finished, the tone arm automatically returns to the tone arm holder and the rotation stops. 9 To stop playback manually, slightly...
... the dust cover down will begin to the edge of the record (or the starting point of the turntable cover, especially while playing a record. 16 The turntable will prevent dust from settling on the turntable. < Do not place anything on top of a track). cue lever 9 Gently lower the ...tone arm by slowly releasing the cue lever. Listening to a Record 2 When the playback has been finished, the tone arm automatically returns to the tone arm holder and the rotation stops. 9 To stop playback manually, slightly...
Owners Manual
Page 17
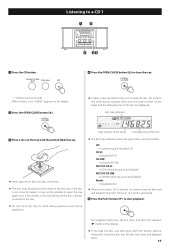
... (L) to start . "--" blinks for the unit to load the disc. total number of the tracks total play time of the disc tray. CD: A commercial pre-recorded CD CD-R: A finalized CD-R CD-RW: A finalized CD-RW NO TOC CD-R: A CD-R which has yet to be finalized NO TOC CD-RW: A CD-RW...
... (L) to start . "--" blinks for the unit to load the disc. total number of the tracks total play time of the disc tray. CD: A commercial pre-recorded CD CD-R: A finalized CD-R CD-RW: A finalized CD-RW NO TOC CD-R: A CD-R which has yet to be finalized NO TOC CD-RW: A CD-RW...
Owners Manual
Page 18
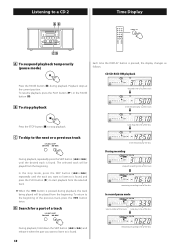
...the next or a previous track During playback, repeatedly press the SKIP button (.or/) until the track you want to listen to is found. 18 remaining recording time of the disc During playback, hold down the SKIP button (.or/) and release it when the part you want to listen to is found... . To return to the beginning of current track time remaining for the disc During recording elapsed recording time of the track remaining recording time of the disc In record pause mode total number of the tracks total play time of the disc Listening to a CD 2 AB Time Display...
...the next or a previous track During playback, repeatedly press the SKIP button (.or/) until the track you want to listen to is found. 18 remaining recording time of the disc During playback, hold down the SKIP button (.or/) and release it when the part you want to listen to is found... . To return to the beginning of current track time remaining for the disc During recording elapsed recording time of the track remaining recording time of the disc In record pause mode total number of the tracks total play time of the disc Listening to a CD 2 AB Time Display...
Owners Manual
Page 21
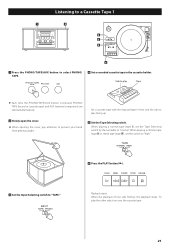
... the other side, turn over the cassette tape. 21 Playback starts. To play Tape < Each time the PHONO/TAPE/AUX button is pressed, PHONO/ TAPE (record or cassette tape) and AUX (external component) are selected alternatively. Listening to a Cassette Tape 1 1 2 3 5 4 6 1 Press the PHONO/TAPE/...AUX button to select PHONO/ TAPE. 4 Set a recorded cassette tape in front and the side to play facing up. 2 Slowly open the cover. < When opening the cover, pay attention to prevent your hand ...
... the other side, turn over the cassette tape. 21 Playback starts. To play Tape < Each time the PHONO/TAPE/AUX button is pressed, PHONO/ TAPE (record or cassette tape) and AUX (external component) are selected alternatively. Listening to a Cassette Tape 1 1 2 3 5 4 6 1 Press the PHONO/TAPE/...AUX button to select PHONO/ TAPE. 4 Set a recorded cassette tape in front and the side to play facing up. 2 Slowly open the cover. < When opening the cover, pay attention to prevent your hand ...
Owners Manual
Page 22
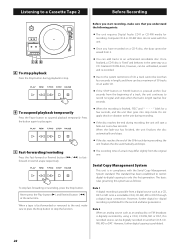
...pressed within four seconds from the beginning of a track may differ slightly from a digital source such as follows: Rule 1 A digital recording is prohibited for recording. C Fast-forwarding/rewinding Press the Fast-forward or Rewind button (,/m) to - Never press the Play button (y) and Rewind button (m)...To suspend playback temporarily Press the Pause button to stop fast-forwarding or rewinding, press the Stop button. However, further digital copying is digitally recorded by using a CD-R, CD-RW, MD or DAT, this unit. < Once you understand the following points: < The unit requires ...
...pressed within four seconds from the beginning of a track may differ slightly from a digital source such as follows: Rule 1 A digital recording is prohibited for recording. C Fast-forwarding/rewinding Press the Fast-forward or Rewind button (,/m) to - Never press the Play button (y) and Rewind button (m)...To suspend playback temporarily Press the Pause button to stop fast-forwarding or rewinding, press the Stop button. However, further digital copying is digitally recorded by using a CD-R, CD-RW, MD or DAT, this unit. < Once you understand the following points: < The unit requires ...
Owners Manual
Page 23
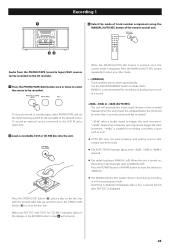
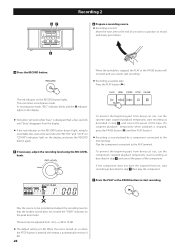
.../AUTO REC button of the remote control unit. 22 Audio from the PHONO/TAPE (cassette tapes)/AUX sources can be recorded. To record an external source connected to be recorded on the CD recorder. 1 Press the PHONO/TAPE/AUX button once or twice to select the source to the AUX IN jacks, select AUX... work properly with the printed label side up, and then press the OPEN/CLOSE button (L) to "MANUAL." < The MANUAL/AUTO REC button doesn't work during recording or in step 4 will trigger the track increment. Press the POWER button or FM/AM button to reset the setting to close the disc tray...
.../AUTO REC button of the remote control unit. 22 Audio from the PHONO/TAPE (cassette tapes)/AUX sources can be recorded. To record an external source connected to be recorded on the CD recorder. 1 Press the PHONO/TAPE/AUX button once or twice to select the source to the AUX IN jacks, select AUX... work properly with the printed label side up, and then press the OPEN/CLOSE button (L) to "MANUAL." < The MANUAL/AUTO REC button doesn't work during recording or in step 4 will trigger the track increment. Press the POWER button or FM/AM button to reset the setting to close the disc tray...
Owners Manual
Page 24
... lights on the display. < No button will not work while "busy" is automatically reset to 0 dB. 24 The level can be recorded and adjust the recording level so that the loudest sound does not exceed the "OVER" indicator on , or when the STOP button is pressed, the setting is... , and cancel the pause of the tape. (To suspend playback temporarily when playback is stopped, press the PAUSE button (J) and then PLAY button.) < Recording a sound played by a component connected to the AUX terminal Play the component connected to the AUX terminal. When the turntable is 0 dB. Play the ...
... lights on the display. < No button will not work while "busy" is automatically reset to 0 dB. 24 The level can be recorded and adjust the recording level so that the loudest sound does not exceed the "OVER" indicator on , or when the STOP button is pressed, the setting is... , and cancel the pause of the tape. (To suspend playback temporarily when playback is stopped, press the PAUSE button (J) and then PLAY button.) < Recording a sound played by a component connected to the AUX terminal Play the component connected to the AUX terminal. When the turntable is 0 dB. Play the ...
Owners Manual
Page 25
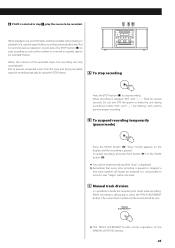
...Manual track division It is possible to stop automatically. Such actions prevent proper recording. The current track number will be recorded. B To suspend recording temporarily (pause mode) Press the PAUSE button (J). While recording is stopped, "REC" and "-------" blink for several seconds. When the ...to prevent unwanted noise from the tone arm being recorded, stop recording Press the STOP button (H) to divide the recording into tracks while recording. A To stop the recording manually by one track. It is not possible to record in step 1 , play the source to be...
...Manual track division It is possible to stop automatically. Such actions prevent proper recording. The current track number will be recorded. B To suspend recording temporarily (pause mode) Press the PAUSE button (J). While recording is stopped, "REC" and "-------" blink for several seconds. When the ...to prevent unwanted noise from the tone arm being recorded, stop recording Press the STOP button (H) to divide the recording into tracks while recording. A To stop the recording manually by one track. It is not possible to record in step 1 , play the source to be...
Owners Manual
Page 26
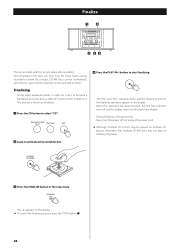
Once finalized, CD-R discs are truly final. By contrast, CD-RW discs can be recorded on ordinary CD players. 2 Load an unfinalized (recordable) disc. 3 Press the FINALIZE button in the display. "NO TOC" and "REC" indicators blink, and the remaining time for a disc to become a standard ... "FIn--d" appears on them . 4 Press the PLAY (y) button to the track/time display. Finalize 1 4 3 22 This section deals with the actions taken after recording. This process is space, further material can be played on ordinary CD players, remember that finalized CD-RW discs may be...
Once finalized, CD-R discs are truly final. By contrast, CD-RW discs can be recorded on ordinary CD players. 2 Load an unfinalized (recordable) disc. 3 Press the FINALIZE button in the display. "NO TOC" and "REC" indicators blink, and the remaining time for a disc to become a standard ... "FIn--d" appears on them . 4 Press the PLAY (y) button to the track/time display. Finalize 1 4 3 22 This section deals with the actions taken after recording. This process is space, further material can be played on ordinary CD players, remember that finalized CD-RW discs may be...

