
GF-550 Manual
Page 4
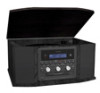
Contents Thank you for choosing TEAC. Before Using the Unit 5 Remote Control Unit 5 Handling Records 6 How to Replace the Stylus 6 Handling Cassette Tape 7 Discs 8 Turntable Cover 9 Connection 10 Parts of the ... Shuffle Playback 20 Time Display 20 Listening to the Radio 21 Preset Tuning 22 Listening to get the best performance from this unit. Read this manual carefully to a Cassette Tape 23 Before Recording 24 Recording 24 REC OFF Timer 28 Finalize 30 Erase or Unfinalize a CD-RW 31 Troubleshooting 32 Messages...
Contents Thank you for choosing TEAC. Before Using the Unit 5 Remote Control Unit 5 Handling Records 6 How to Replace the Stylus 6 Handling Cassette Tape 7 Discs 8 Turntable Cover 9 Connection 10 Parts of the ... Shuffle Playback 20 Time Display 20 Listening to the Radio 21 Preset Tuning 22 Listening to get the best performance from this unit. Read this manual carefully to a Cassette Tape 23 Before Recording 24 Recording 24 REC OFF Timer 28 Finalize 30 Erase or Unfinalize a CD-RW 31 Troubleshooting 32 Messages...

GF-550 Manual
Page 5
... type. Never use any obstacles between 5°C and 35°C (41°F and 95°F). Before Using the Unit Remote Control Unit ENGLISH Read this manual in a safe place for future reference. This is turned on, switching on an amplifier/receiver. < Do not open the cabinet as this case, turn off...
... type. Never use any obstacles between 5°C and 35°C (41°F and 95°F). Before Using the Unit Remote Control Unit ENGLISH Read this manual in a safe place for future reference. This is turned on, switching on an amplifier/receiver. < Do not open the cabinet as this case, turn off...

GF-550 Manual
Page 9
...) has been written at the start of a CD-R or CD-RW disc, read the precautions supplied with a soft, dry cloth. The process of writing this manual, we use the term "recordable" disc to describe a CD-R or CD-RW disc that there is available on the majority of contents is recorded with...
...) has been written at the start of a CD-R or CD-RW disc, read the precautions supplied with a soft, dry cloth. The process of writing this manual, we use the term "recordable" disc to describe a CD-R or CD-RW disc that there is available on the majority of contents is recorded with...

GF-550 Manual
Page 13
Hold down these buttons to search for shuffle playback. O MANUAL/AUTO REC, PRESET Use this button to change the display. 13 V DISPLAY In CD mode, use this button to turn the unit on or off, ...
Hold down these buttons to search for shuffle playback. O MANUAL/AUTO REC, PRESET Use this button to change the display. 13 V DISPLAY In CD mode, use this button to turn the unit on or off, ...

GF-550 Manual
Page 15
... 4 Select the speed. 8 Gently lower the tone arm by slowly releasing the cue lever. clamper < Do not place anything on the turntable. To stop playback manually, slightly lift the tone arm using the cue lever and return it to the tone arm holder. 6 Raise the cue lever to the tone arm...
... 4 Select the speed. 8 Gently lower the tone arm by slowly releasing the cue lever. clamper < Do not place anything on the turntable. To stop playback manually, slightly lift the tone arm using the cue lever and return it to the tone arm holder. 6 Raise the cue lever to the tone arm...
GF-550 Manual
Page 21
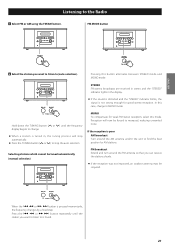
... to (auto selection). STEREO FM stereo broadcasts are received in stereo and the "STEREO" indicator lights in , the tuning process will now be tuned automatically (manual selection) MONO To compensate for AM stations. In this button alternates between STEREO mode and MONO mode. FM broadcast Extend and turn around the AM...
... to (auto selection). STEREO FM stereo broadcasts are received in stereo and the "STEREO" indicator lights in , the tuning process will now be tuned automatically (manual selection) MONO To compensate for AM stations. In this button alternates between STEREO mode and MONO mode. FM broadcast Extend and turn around the AM...

GF-550 Manual
Page 25
...CLOSE button is pressed, the setting is turned off ). The settings will trigger the track increment. "-20db" takes a louder signal to MANUAL (off). < The MANUAL/AUTO REC button does not work while "bUSY" is suitable for recording a noiseless source such as a record. When the unit is ...40db" means that contain low-level noises. < The AUTO TRACK indicator lights when -20dB, -30dB or -40dB is selected. < The default setting is MANUAL (off . -20db, -30db or -40db (AUTO REC) The unit will work during recording. PHONO < No button will automatically insert a track division in...
...CLOSE button is pressed, the setting is turned off ). The settings will trigger the track increment. "-20db" takes a louder signal to MANUAL (off). < The MANUAL/AUTO REC button does not work while "bUSY" is suitable for recording a noiseless source such as a record. When the unit is ...40db" means that contain low-level noises. < The AUTO TRACK indicator lights when -20dB, -30dB or -40dB is selected. < The default setting is MANUAL (off . -20db, -30db or -40db (AUTO REC) The unit will work during recording. PHONO < No button will automatically insert a track division in...

GF-550 Manual
Page 26
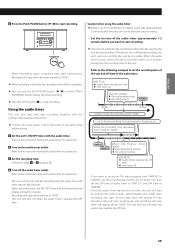
... is necessary to adjust the recording level for each source. When the playback of the source finishes, press the STOP button (H) to stop the recording manually by a component connected to the AUX terminal Play the component connected to the AUX terminal. < To prevent the beginning part from the tone arm or...
... is necessary to adjust the recording level for each source. When the playback of the source finishes, press the STOP button (H) to stop the recording manually by a component connected to the AUX terminal Play the component connected to the AUX terminal. < To prevent the beginning part from the tone arm or...

GF-550 Manual
Page 27
Press the PLAY/PAUSE button (y/J). Up to make a track of the MANUAL/AUTO REC setting. < You cannot divide the track manually to 99 tracks can be made on a disc depending on the display, and the recording is paused or stopped, a new track number will be ... button is pressed while recording, the recorded sound will always be incremented by one track. < The unit will not stop recording. ENGLISH A To stop recording C Manual track division Press the STOP button (H) to record in two "stages" within one . < The TRACK INCREMENT button works regardless of less than 10 seconds. B ...
Press the PLAY/PAUSE button (y/J). Up to make a track of the MANUAL/AUTO REC setting. < You cannot divide the track manually to 99 tracks can be made on a disc depending on the display, and the recording is paused or stopped, a new track number will be ... button is pressed while recording, the recorded sound will always be incremented by one track. < The unit will not stop recording. ENGLISH A To stop recording C Manual track division Press the STOP button (H) to record in two "stages" within one . < The TRACK INCREMENT button works regardless of less than 10 seconds. B ...
GF-550 Manual
Page 29
... < Audio timer reaches on time < Unit turns on and the recording will be cancelled. < You can start recording. Refer to the instruction manual of audio timer for finalizing, etc. Unit's finishes working: Including time for operations. Once the audio timer reaches the on time, the unit ...will start finalize when the disc reaches the end during recording. If the power turns off the audio timer outlet. Refer to the instruction manual of the audio timer before you want to start recording. < The unit will automatically start to decrease, and recording will stop recording....
... < Audio timer reaches on time < Unit turns on and the recording will be cancelled. < You can start recording. Refer to the instruction manual of audio timer for finalizing, etc. Unit's finishes working: Including time for operations. Once the audio timer reaches the on time, the unit ...will start finalize when the disc reaches the end during recording. If the power turns off the audio timer outlet. Refer to the instruction manual of the audio timer before you want to start recording. < The unit will automatically start to decrease, and recording will stop recording....
GF-550 Manual
Page 33
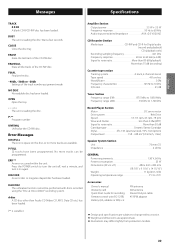
... 25 W Dimensions (W x H x D 480 x 230 x 380 mm (18 7/8" x 9 1/16" x 14 15/16") Weight 11 kg (24 1/4 lb) Operating temperature range 5°C to 35°C Accessories Owner's manual Warranty card Quick Start Guide for recording Remote control unit (RC-1258) Battery (AA, alkaline or MN) x 2 FM antenna AM antenna Stereo RCA pin cable...
... 25 W Dimensions (W x H x D 480 x 230 x 380 mm (18 7/8" x 9 1/16" x 14 15/16") Weight 11 kg (24 1/4 lb) Operating temperature range 5°C to 35°C Accessories Owner's manual Warranty card Quick Start Guide for recording Remote control unit (RC-1258) Battery (AA, alkaline or MN) x 2 FM antenna AM antenna Stereo RCA pin cable...


