

Owner's Manual
Page 4
... protected by Macrovision Corporation and other intellectual property rights owned by method claims of this manual, with your local regulations concerning chemical wastes. SUPPLIED ACCESSORIES Remote control Two AA batteries A/V cables RF Cable Owner's Manual Owner's Manual (NA220UD) (NA270UD) (approx. 3 feet (100 cm) long) (WPZ0102TM015) (WPZ0901TM002) (0VMN03747) SYMBOLS USED IN THIS MANUAL...
... protected by Macrovision Corporation and other intellectual property rights owned by method claims of this manual, with your local regulations concerning chemical wastes. SUPPLIED ACCESSORIES Remote control Two AA batteries A/V cables RF Cable Owner's Manual Owner's Manual (NA220UD) (NA270UD) (approx. 3 feet (100 cm) long) (WPZ0102TM015) (WPZ0901TM002) (0VMN03747) SYMBOLS USED IN THIS MANUAL...

Owner's Manual
Page 6
... turns the VCR on when you to a TV via Component Video In Jacks. ¡Bit rate indication ¡DRC (Dynamic range control) You can control the range of sound volume. ¡Black Level Setting VCR Mode Hardware specifications ¡Auto Head Cleaner ¡Trilingual on-screen menu ... UNIT which are used to send high-quality video to confirm the currently active functions (such as program playback), on the TV screen using the remote control. ¡Search Chapter search / Title search / Track search / Time search ¡Repeat Chapter / Title / Track / Group / All / A-B ¡Zoom ¡Marker...
... turns the VCR on when you to a TV via Component Video In Jacks. ¡Bit rate indication ¡DRC (Dynamic range control) You can control the range of sound volume. ¡Black Level Setting VCR Mode Hardware specifications ¡Auto Head Cleaner ¡Trilingual on-screen menu ... UNIT which are used to send high-quality video to confirm the currently active functions (such as program playback), on the TV screen using the remote control. ¡Search Chapter search / Title search / Track search / Time search ¡Repeat Chapter / Title / Track / Group / All / A-B ¡Zoom ¡Marker...

Owner's Manual
Page 8
... DVD/VCR. REC/OTR Button [page 19] Press once to view the picture rapidly in standby mode for a timer recording, but there is on the remote control. -8- G You can switch the output mode either by pressing OUTPUT on the front panel, or by pressing DVD or VCR on . You can only watch...] This light appears when the VCR output mode is selected. Cassette compartment 6. To make the green VCR OUTPUT light come on, press DVD on the remote control or OUTPUT on the front panel. 4. STOP Button Press to remove the tape from the audio out jack of a camcorder, another VCR, or an audio...
... DVD/VCR. REC/OTR Button [page 19] Press once to view the picture rapidly in standby mode for a timer recording, but there is on the remote control. -8- G You can switch the output mode either by pressing OUTPUT on the front panel, or by pressing DVD or VCR on . You can only watch...] This light appears when the VCR output mode is selected. Cassette compartment 6. To make the green VCR OUTPUT light come on, press DVD on the remote control or OUTPUT on the front panel. 4. STOP Button Press to remove the tape from the audio out jack of a camcorder, another VCR, or an audio...
Owner's Manual
Page 9
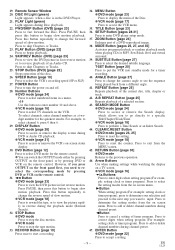
... program). Press to select the setting modes from the on and off. 28. To select channels, enter channel numbers as a twodigit number for the remote control. However, if you press OUTPUT on screen menu. G VCR mode Press to a specific Title/Chapter/Track/Time. MODE Button [pages 26, 27,... to enter digits when setting program (For example: setting clock or timer program). G VCR mode [page 17] Press to select TV channels on the remote control. G VCR mode [page 16] Press to access the VCR menu. 35. SETUP Button [pages 28-31] Press to exit from a different angle...
... program). Press to select the setting modes from the on and off. 28. To select channels, enter channel numbers as a twodigit number for the remote control. However, if you press OUTPUT on screen menu. G VCR mode Press to a specific Title/Chapter/Track/Time. MODE Button [pages 26, 27,... to enter digits when setting program (For example: setting clock or timer program). G VCR mode [page 17] Press to select TV channels on the remote control. G VCR mode [page 16] Press to access the VCR menu. 35. SETUP Button [pages 28-31] Press to exit from a different angle...

Owner's Manual
Page 10
... optional component video cables here and to resume normal recording. Press this button to operate the VCR and its features, press DVD on the remote control before pressing other audio equipment. 58. Press a second time to the component Video In jacks of a camcorder, another . 54. Buttons ...G DVD mode Press to select VCR mode for the remote control. Notes ¡To use the remote control to begin slow motion playback. This button does not affect DVD playback. 53. SKIP/CH. REAR VIEW 56 57 58 59...
... optional component video cables here and to resume normal recording. Press this button to operate the VCR and its features, press DVD on the remote control before pressing other audio equipment. 58. Press a second time to the component Video In jacks of a camcorder, another . 54. Buttons ...G DVD mode Press to select VCR mode for the remote control. Notes ¡To use the remote control to begin slow motion playback. This button does not affect DVD playback. 53. SKIP/CH. REAR VIEW 56 57 58 59...

Owner's Manual
Page 12
... that the VCR OUTPUT Light is lit.) DVD MODE Press DVD on the remote control. (Verify that the DVD OUTPUT Light is a combination of the remote control. OPEN/CLOSE DVD STOP SKIP/REV PLAY FWD/SKIP PLAY DISC IN OUTPUT DVD VCR TIMER/REC REC VCR REW F.FWD VIDEO POWER AUDIO CHANNEL ... does not switch the mode of a VCR and DVD player, you must first select which component you wish to select the correct mode on the remote control too.
... that the VCR OUTPUT Light is lit.) DVD MODE Press DVD on the remote control. (Verify that the DVD OUTPUT Light is a combination of the remote control. OPEN/CLOSE DVD STOP SKIP/REV PLAY FWD/SKIP PLAY DISC IN OUTPUT DVD VCR TIMER/REC REC VCR REW F.FWD VIDEO POWER AUDIO CHANNEL ... does not switch the mode of a VCR and DVD player, you must first select which component you wish to select the correct mode on the remote control too.

Owner's Manual
Page 16
... than 99, enter channel numbers as in "CONNECTING TO A TV WITHOUT A/V TERMINALS" on the VCR by pressing POWER. In this case, select channel 3 on the remote control. TO SELECT A DESIRED CHANNEL You can cancel it by pressing CLEAR/C.RESET. 1 You need to connect the antenna or cable to channel 4 by pressing K or...
... than 99, enter channel numbers as in "CONNECTING TO A TV WITHOUT A/V TERMINALS" on the VCR by pressing POWER. In this case, select channel 3 on the remote control. TO SELECT A DESIRED CHANNEL You can cancel it by pressing CLEAR/C.RESET. 1 You need to connect the antenna or cable to channel 4 by pressing K or...

Owner's Manual
Page 18
...Tracking function) when you start time search. ¡If you wish to go in the LP/SLP modes only). on the remote or CHANNEL (o/p) on the VCR. ¡When a tape has reached the end, the VCR will rewind the tape to...buttons such as PLAY, RECORD, D or E, that means no cassette tape is distorted or rolling vertically, adjust the vertical hold control on your TV, if so equipped. ¡You can reset the counter by pressing K or L. Counter Reset ¡You... during playback. PLAYBACK FUNCTION NORMAL PLAYBACK 2 Select "AUTO REPEAT" by pressing CLEAR/C.RESET on the remote control twice.
...Tracking function) when you start time search. ¡If you wish to go in the LP/SLP modes only). on the remote or CHANNEL (o/p) on the VCR. ¡When a tape has reached the end, the VCR will rewind the tape to...buttons such as PLAY, RECORD, D or E, that means no cassette tape is distorted or rolling vertically, adjust the vertical hold control on your TV, if so equipped. ¡You can reset the counter by pressing K or L. Counter Reset ¡You... during playback. PLAYBACK FUNCTION NORMAL PLAYBACK 2 Select "AUTO REPEAT" by pressing CLEAR/C.RESET on the remote control twice.
Owner's Manual
Page 19
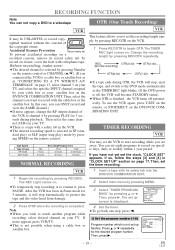
...comes on. ¡To temporarily stop , eject the tape, and switch to the DVD mode automatically as in "CLOCK SET UP" section on the remote control. The TIMER REC light comes on the DVD/VCR COMBINATION UNIT. Change the recording length by pressing RECORD. To use the VCR again, press T-SET... by pressing PLAY for 3 sec- If noise appears press VCR/TV. ¡This is not set up screen is selected by pressing Number on the remote control or CHANNEL (o/p). (If you to record with its record safety tab. REC OTR(0:30) (Normal recording) OTR(1:00)..... If so, follow the steps [3] and ...
...comes on. ¡To temporarily stop , eject the tape, and switch to the DVD mode automatically as in "CLOCK SET UP" section on the remote control. The TIMER REC light comes on the DVD/VCR COMBINATION UNIT. Change the recording length by pressing RECORD. To use the VCR again, press T-SET... by pressing PLAY for 3 sec- If noise appears press VCR/TV. ¡This is not set up screen is selected by pressing Number on the remote control or CHANNEL (o/p). (If you to record with its record safety tab. REC OTR(0:30) (Normal recording) OTR(1:00)..... If so, follow the steps [3] and ...

Owner's Manual
Page 20
... mode, then continue with the other features as described in this manual. TO STOP AN AUTOMATIC TIMER PROGRAM ALREADY STARTED Press STOP/EJECT on the remote control to a cable box or satellite box as in "DVD/VCR TO TV CONNECTION" on the DVD. To exit, press CLEAR/C.RESET. 3 Select "TIMER PROGRAMMING" by... can use the DVD only. Then, enter correct numbers by pressing o or p. ¡You may cancel the entire program by pressing the VCR on the remote control or the OUTPUT on the DVD/VCR COMBI- PROGRAM NUMBER 4 ONCE DAILY WEEKLY 3) Set the date First, press K or L for more than 30 seconds, ...
... mode, then continue with the other features as described in this manual. TO STOP AN AUTOMATIC TIMER PROGRAM ALREADY STARTED Press STOP/EJECT on the remote control to a cable box or satellite box as in "DVD/VCR TO TV CONNECTION" on the DVD. To exit, press CLEAR/C.RESET. 3 Select "TIMER PROGRAMMING" by... can use the DVD only. Then, enter correct numbers by pressing o or p. ¡You may cancel the entire program by pressing the VCR on the remote control or the OUTPUT on the DVD/VCR COMBI- PROGRAM NUMBER 4 ONCE DAILY WEEKLY 3) Set the date First, press K or L for more than 30 seconds, ...

Owner's Manual
Page 21
...recording VCR. ¡When you use the A/V input jacks on the back of the DVD/VCR, select "L1" position by pressing [0], [0], [1] on the remote control or the CHANNEL buttons (o/p). ¡When you use the A/V input jacks on the front of the DVD/VCR, select "L2" position by pressing [0], [0], ...[2] on the remote control or the CHANNEL buttons (o/p). 5 Press REC/OTR on the recording VCR to a videotape. The remote con- Standard audio cables are not recommended. ¡You can use the AUDIO/VIDEO input jacks on ...
...recording VCR. ¡When you use the A/V input jacks on the back of the DVD/VCR, select "L1" position by pressing [0], [0], [1] on the remote control or the CHANNEL buttons (o/p). ¡When you use the A/V input jacks on the front of the DVD/VCR, select "L2" position by pressing [0], [0], ...[2] on the remote control or the CHANNEL buttons (o/p). 5 Press REC/OTR on the recording VCR to a videotape. The remote con- Standard audio cables are not recommended. ¡You can use the AUDIO/VIDEO input jacks on ...
Owner's Manual
Page 22
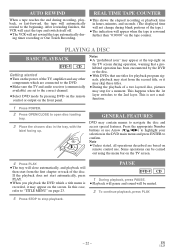
...Select DVD mode by the DVD or the disc. ¡With DVDs that a prohibited operation has been encountered by pressing DVD on the remote control or output on the screen. Note ¡Unless stated, all operations described are set to stop for playback program signals, playback may start... from the first chapter or track of the disc. In this case, refer to "TITLE MENU" on remote control use Arrow (L/K/s/B) to navigate the disc and access special features. After rewinding finishes, the VCR will eject the tape and switch itself off...
...Select DVD mode by the DVD or the disc. ¡With DVDs that a prohibited operation has been encountered by pressing DVD on the remote control or output on the screen. Note ¡Unless stated, all operations described are set to stop for playback program signals, playback may start... from the first chapter or track of the disc. In this case, refer to "TITLE MENU" on remote control use Arrow (L/K/s/B) to navigate the disc and access special features. After rewinding finishes, the VCR will eject the tape and switch itself off...

Owner's Manual
Page 28
... scenes from being played by pressing DISPLAY on the TV screen. ¡The elapsed and remaining playing time of your DVD discs. PARENTAL CONTROL DVD-V Parental Control limits the disc viewing that you have set. ¡Record the password in the event you are compatible with a password or playback will...to exit Notes ¡When doing this for the first time, enter any 4 digits. (except for 4737) That number will be displayed on the remote control. rent total track will be used as the password. (in case you to set the rating level of the cur- CHANGING THE ON-SCREEN DISPLAY...
... scenes from being played by pressing DISPLAY on the TV screen. ¡The elapsed and remaining playing time of your DVD discs. PARENTAL CONTROL DVD-V Parental Control limits the disc viewing that you have set. ¡Record the password in the event you are compatible with a password or playback will...to exit Notes ¡When doing this for the first time, enter any 4 digits. (except for 4737) That number will be displayed on the remote control. rent total track will be used as the password. (in case you to set the rating level of the cur- CHANGING THE ON-SCREEN DISPLAY...

Owner's Manual
Page 32
.... This is selected. "Prohibited icon" appears on the DVD/VCR COMBINATION UNIT. Playback picture is partially noisy • Adjust tracking control for details on the remote control to . • Check if the power plug is output. a tape but this is prohibited by pressing CHANNEL ( ) on .... when making a copy of a mal- Cannot remove the tape. • Check if the player is in the remote control. • Aim the remote control directly at the remote sensor. No DTS audio is connected to CH4. This is not a malfunction. changed • The DVD does not ...
.... This is selected. "Prohibited icon" appears on the DVD/VCR COMBINATION UNIT. Playback picture is partially noisy • Adjust tracking control for details on the remote control to . • Check if the power plug is output. a tape but this is prohibited by pressing CHANNEL ( ) on .... when making a copy of a mal- Cannot remove the tape. • Check if the player is in the remote control. • Aim the remote control directly at the remote sensor. No DTS audio is connected to CH4. This is not a malfunction. changed • The DVD does not ...

Owner's Manual
Page 44
... purchased and used in materials or workmanship as hotel, rental or office use . FUNAI CORP. THIS WARRANTY DOES NOT COVER PACKING MATERIALS, ANY ACCESSORIES (EXCEPT REMOTE CONTROL), ANY COSMETIC PARTS, COMPLETE ASSEMBLY PARTS, DEMO OR FLOOR MODELS. THIS WARRANTY IS MADE IN LIEU OF ALL OTHER WARRANTIES, EXPRESS OR IMPLIED, AND OF...
... purchased and used in materials or workmanship as hotel, rental or office use . FUNAI CORP. THIS WARRANTY DOES NOT COVER PACKING MATERIALS, ANY ACCESSORIES (EXCEPT REMOTE CONTROL), ANY COSMETIC PARTS, COMPLETE ASSEMBLY PARTS, DEMO OR FLOOR MODELS. THIS WARRANTY IS MADE IN LIEU OF ALL OTHER WARRANTIES, EXPRESS OR IMPLIED, AND OF...


