

Owner's Manual
Page 2
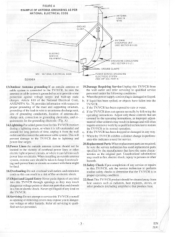
...-Power-supply cords should be placed in a built-in item 5. 6.Attachments-Do not use attachments not recommended by items placed upon or against them, paying particular attention to protect it from the appliance. - 2- THIS SYMBOL INDICATES THAT DAN- Any mounting of the cabinet. If the plug should use liquid cleaners or aerosol cleaners. Use only with a cart, stand, tripod, bracket...
...-Power-supply cords should be placed in a built-in item 5. 6.Attachments-Do not use attachments not recommended by items placed upon or against them, paying particular attention to protect it from the appliance. - 2- THIS SYMBOL INDICATES THAT DAN- Any mounting of the cabinet. If the plug should use liquid cleaners or aerosol cleaners. Use only with a cart, stand, tripod, bracket...
Owner's Manual
Page 3
...: a. When the power-supply cord or plug is connected to the TVNCR, be sure the service technician has used replacement parts specified by a qualified technician to restore the TVNCR to provide some protection against voltage surges and built-up static charges. If the TVNCR does not operate normally by the operating instructions, as this indicates a need for long periods of other controls may result...
...: a. When the power-supply cord or plug is connected to the TVNCR, be sure the service technician has used replacement parts specified by a qualified technician to restore the TVNCR to provide some protection against voltage surges and built-up static charges. If the TVNCR does not operate normally by the operating instructions, as this indicates a need for long periods of other controls may result...
Owner's Manual
Page 4
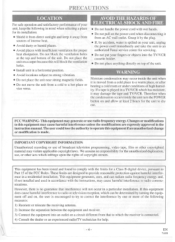
... HAZARDS OF ELECTRICAL SHOCK AND FIRE • Do not handle the power cord with the limits for help. - 4 - IMPORTANT COPYRIGHT INFORMATION Unauthorized recording or use of broadcast television programming, video tape, film or other acts which can radiate radio frequency energy and, if not installed and used in a particular installation. WARNING Moisture condensation may cause harmful interference unless the modifications are...
... HAZARDS OF ELECTRICAL SHOCK AND FIRE • Do not handle the power cord with the limits for help. - 4 - IMPORTANT COPYRIGHT INFORMATION Unauthorized recording or use of broadcast television programming, video tape, film or other acts which can radiate radio frequency energy and, if not installed and used in a particular installation. WARNING Moisture condensation may cause harmful interference unless the modifications are...
Owner's Manual
Page 5
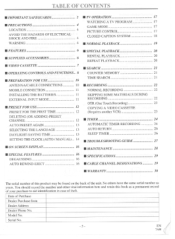
... 4 CLOSED CAPTION SYSTEM 18 WARNING 4 ■ NORMAL PLAYBACK 19 ■ FEATURES 6 ■ SPECIAL PLAYBACK 20 ■ SUPPLIED ACCESSORIES 6 RENTAL PLAYBACK 20 REPEAT PLAYBACK 20 ■ VIDEO CASSETTE 7 ■ SEARCH 21 ■ OPERATING CONTROLS AND FUNCTIONS.. 8 COUNTER MEMORY 21 ■ PREPARATION FOR USE TIME SEARCH 10 21 ANTENNA/CABLE CONNECTIONS 10 ■ RECORDING 22 MOBILE CONNECTION 11 NORMAL RECORDING 22 INSTALLING THE BA1 ihRIES EXTERNAL INPUT MODE...
... 4 CLOSED CAPTION SYSTEM 18 WARNING 4 ■ NORMAL PLAYBACK 19 ■ FEATURES 6 ■ SPECIAL PLAYBACK 20 ■ SUPPLIED ACCESSORIES 6 RENTAL PLAYBACK 20 REPEAT PLAYBACK 20 ■ VIDEO CASSETTE 7 ■ SEARCH 21 ■ OPERATING CONTROLS AND FUNCTIONS.. 8 COUNTER MEMORY 21 ■ PREPARATION FOR USE TIME SEARCH 10 21 ANTENNA/CABLE CONNECTIONS 10 ■ RECORDING 22 MOBILE CONNECTION 11 NORMAL RECORDING 22 INSTALLING THE BA1 ihRIES EXTERNAL INPUT MODE...

Owner's Manual
Page 6
... timer allows you to turn off the TVNCR without pressing the'PLAY button. • Time search- You may be searched. • Sleep timer-Allows you to repeat a tape indefinitely without using the supplied car-battery cord. The "-" indication will show a fairly clear picture. • Digital Auto Tracking (DTR)-Adjusts the tracking automatically for close viewing of a particular scene. You can be necessary to view scrambled cable channels.) • Auto Clock Setting...
... timer allows you to turn off the TVNCR without pressing the'PLAY button. • Time search- You may be searched. • Sleep timer-Allows you to repeat a tape indefinitely without using the supplied car-battery cord. The "-" indication will show a fairly clear picture. • Digital Auto Tracking (DTR)-Adjusts the tracking automatically for close viewing of a particular scene. You can be necessary to view scrambled cable channels.) • Auto Clock Setting...

Owner's Manual
Page 8
..., or to select setting modes from the handheld remote control unit. 12 5 POWER button- A button- • Press to view the picture rapidly in the Stand-by mode for exam- a AUDIO VIDEO (©b) O TECIPEC VOIVIA SECIIMICT nay RAE P.VVIO (- 11rr1 .09-P-ps. (MECO* 1 VO.A.AIE A V CIO/VIEL A CZ) IMMO MI- nals from on screen menu. 9 • Press to video output jack of a tape. Connect to enter digits when setting program (for Timer Recording. 24 4 Remote Sensor...
..., or to select setting modes from the handheld remote control unit. 12 5 POWER button- A button- • Press to view the picture rapidly in the Stand-by mode for exam- a AUDIO VIDEO (©b) O TECIPEC VOIVIA SECIIMICT nay RAE P.VVIO (- 11rr1 .09-P-ps. (MECO* 1 VO.A.AIE A V CIO/VIEL A CZ) IMMO MI- nals from on screen menu. 9 • Press to video output jack of a tape. Connect to enter digits when setting program (for Timer Recording. 24 4 Remote Sensor...

Owner's Manual
Page 9
...; When setting program (for personal listening. mode. (Forward Search) 17 DISPLAY button- - example: LANGUAGE or USER'S SET UP) COUNTER RESET button- Press to 10 REC button- monaural (3.5mm). 23 MUTE button- For example, pressing 12 CHANNEL A/V buttons- terminal- Press to activate Time for viewing or recording. The size of timer recoding (See page 25). Press to the Car Battery Cord. 28 AC 120V jack- Connect to set the Sleep Timer. (See +100 button- REAR VIEW - ( 27...
...; When setting program (for personal listening. mode. (Forward Search) 17 DISPLAY button- - example: LANGUAGE or USER'S SET UP) COUNTER RESET button- Press to 10 REC button- monaural (3.5mm). 23 MUTE button- For example, pressing 12 CHANNEL A/V buttons- terminal- Press to activate Time for viewing or recording. The size of timer recoding (See page 25). Press to the Car Battery Cord. 28 AC 120V jack- Connect to set the Sleep Timer. (See +100 button- REAR VIEW - ( 27...
Owner's Manual
Page 10
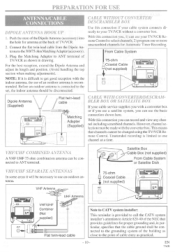
... best reception, extend the Dipole Antenna and adjust its length and position. (Avoid handling the top section when making adjustments). Plug the Matching Adapter to the300/75ohm Matching Adapter(accessory). 3. NOTE: If it will be changed using the TVNCR Remote Control. Push the stem of TV/VCR as practical. - 10 - EN 7A08 VHF Antenna UHF Antenna 75-ohm Coaxial Cable (not supplied) ANT. Connect the flat...
... best reception, extend the Dipole Antenna and adjust its length and position. (Avoid handling the top section when making adjustments). Plug the Matching Adapter to the300/75ohm Matching Adapter(accessory). 3. NOTE: If it will be changed using the TVNCR Remote Control. Push the stem of TV/VCR as practical. - 10 - EN 7A08 VHF Antenna UHF Antenna 75-ohm Coaxial Cable (not supplied) ANT. Connect the flat...
Owner's Manual
Page 12
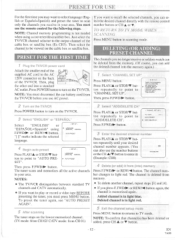
... must press MENU button. AUTO PRESET 4 Begin auto preset - NOTE: Channel memory programming is memorized again. PRESET FOR THE FIRST TIME 1 Plug the TVNCR power cord Attach the smaller end of the supplied AC cord to the AC 120V connector on the back AC 120V of the cable box or satellite box (Ex CH3). p mo"," . 2 Turn on the TVNCR Press POWER button to play or record a video tape BEFORE presetting...
... must press MENU button. AUTO PRESET 4 Begin auto preset - NOTE: Channel memory programming is memorized again. PRESET FOR THE FIRST TIME 1 Plug the TVNCR power cord Attach the smaller end of the supplied AC cord to the AC 120V connector on the back AC 120V of the cable box or satellite box (Ex CH3). p mo"," . 2 Turn on the TVNCR Press POWER button to play or record a video tape BEFORE presetting...
Owner's Manual
Page 13
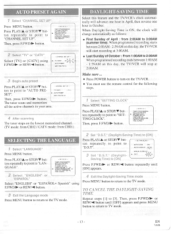
... "LANGUAGE". 2 Select "ENGLISH" or "ESPANOL" -MENU- TIMER PROGRAMMING PICTURE CONTROL SETTING CLOCK I ► IANGU: 76 44- AUTO PRESET AGAIN vrs**06......v.v.v...vos"cem.rawm. / Select "CHANNEL SET UP" Press MENU button. Then, press F.FWD/f/P- TV, CATv TV I or REW/11 button. CHANNEL SET UP USERS SET UP LANGUAGE IENGLISNI ION 'CAPTION) CTIAMPETSEARCH •-^ 2 Select "TV" or "CATV" Select [TV] or [CATV] using F.FWD/I0- Press PLAY/A or STOP/V but- - Press PLAY/A or STOP/V button repeatedly to...
... "LANGUAGE". 2 Select "ENGLISH" or "ESPANOL" -MENU- TIMER PROGRAMMING PICTURE CONTROL SETTING CLOCK I ► IANGU: 76 44- AUTO PRESET AGAIN vrs**06......v.v.v...vos"cem.rawm. / Select "CHANNEL SET UP" Press MENU button. Then, press F.FWD/f/P- TV, CATv TV I or REW/11 button. CHANNEL SET UP USERS SET UP LANGUAGE IENGLISNI ION 'CAPTION) CTIAMPETSEARCH •-^ 2 Select "TV" or "CATV" Select [TV] or [CATV] using F.FWD/I0- Press PLAY/A or STOP/V but- - Press PLAY/A or STOP/V button repeatedly to...

Owner's Manual
Page 14
... automatically. se-rpm:it:LOCK CHANNEL SET UP USERS SET UP LANGUAGE ENGLISH) CAPTION TIME SEA 2 Set "AUTO CLOCK" to be turned on the TVNCR set the clock manually and turn off the Auto Clock Setting feature. - 14- SETTING CLOCK - MANUAL CLOCK SET von If you must manually enter the correct local PBS station, or set . • Confirm that the antenna connections are correct. • The cable converter box must scan each channel for the following procedure...
... automatically. se-rpm:it:LOCK CHANNEL SET UP USERS SET UP LANGUAGE ENGLISH) CAPTION TIME SEA 2 Set "AUTO CLOCK" to be turned on the TVNCR set the clock manually and turn off the Auto Clock Setting feature. - 14- SETTING CLOCK - MANUAL CLOCK SET von If you must manually enter the correct local PBS station, or set . • Confirm that the antenna connections are correct. • The cable converter box must scan each channel for the following procedure...
Owner's Manual
Page 15
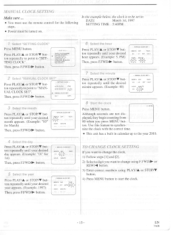
I Select "SETTING CLOCK" Press MENU button. Press PLAY/A or STOP/V button repeatedly to point to "MANUAL CLOCK SETH. button. button. - MANUAL CLOCK SET - 110NIN, t Cr, YEAR 03 DATE March 1st, 1997 SETTING TIME 5:40PM • Power must be set to be turned on. TIMER PROGRAMMING PICTURE CONTROL lo SETTING CLOCK LANGUEANGGELISH) CHANNEL SET UP USER'S SET UP • 2 Select "MANUAL CLOCK SET" Press PLAY/A or STOP/V button repeatedly to point to "SETTING CLOCK". PFFI 3 Select the month Press PLAY/A or STOP/V button repeatedly until your...
I Select "SETTING CLOCK" Press MENU button. Press PLAY/A or STOP/V button repeatedly to point to "MANUAL CLOCK SETH. button. button. - MANUAL CLOCK SET - 110NIN, t Cr, YEAR 03 DATE March 1st, 1997 SETTING TIME 5:40PM • Power must be set to be turned on. TIMER PROGRAMMING PICTURE CONTROL lo SETTING CLOCK LANGUEANGGELISH) CHANNEL SET UP USER'S SET UP • 2 Select "MANUAL CLOCK SET" Press PLAY/A or STOP/V button repeatedly to point to "SETTING CLOCK". PFFI 3 Select the month Press PLAY/A or STOP/V button repeatedly until your...
Owner's Manual
Page 17
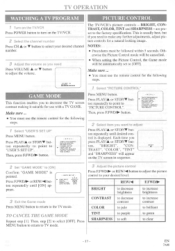
... use with a TV GAME. Make sure ... • You must use the remote control for the following steps. 1 Select "USER'S SET UP" Press MENU button. TIMER PROGRAMMING PICTURE CONTROL SETTING CLOCK OUNNEL SET UP IP USERS SET UP LANGUAGE (ENGLISH) CTP?:LPZIaugr -c-) Press MENU button. OMAE MODE RENTAL REPEAT PLAY AUTO RETURN 3 Adjust the picture control Press F.FWD/100 or REW/' button to adjust the picture control to your desired channel number. BRIGHT, CONTRAST, COLOR, TINT and SHARPNESS - Press PLAY/A or STOP/V button repeatedly to point to select...
... use with a TV GAME. Make sure ... • You must use the remote control for the following steps. 1 Select "USER'S SET UP" Press MENU button. TIMER PROGRAMMING PICTURE CONTROL SETTING CLOCK OUNNEL SET UP IP USERS SET UP LANGUAGE (ENGLISH) CTP?:LPZIaugr -c-) Press MENU button. OMAE MODE RENTAL REPEAT PLAY AUTO RETURN 3 Adjust the picture control Press F.FWD/100 or REW/' button to adjust the picture control to your desired channel number. BRIGHT, CONTRAST, COLOR, TINT and SHARPNESS - Press PLAY/A or STOP/V button repeatedly to point to select...

Owner's Manual
Page 18
... use the remote control for a second language. 1 Select "CAPTION'' Press MENU button. Common signal conditions which may view specially labeled (cc) TV programs, movies, news, prerecorded tapes, etc. Electric motor brush noise. TIMER PRCGRAMIAING PICTURE CONTROL SETTING CLOCK CHANNEL SET UP USER'S SET UP LANGUAGIMIGAL ► TIRE SEAR" NOTE: Not all . To clear screen, select [CAPTION1], [CAPTION2] or [OFF]. 3 Exit the caption setting mode Press MENU button to return to "CAPTION". -MENU- ONAYMIEI CLOSED CAPTION SYSTEM You may cause captions errors...
... use the remote control for a second language. 1 Select "CAPTION'' Press MENU button. Common signal conditions which may view specially labeled (cc) TV programs, movies, news, prerecorded tapes, etc. Electric motor brush noise. TIMER PRCGRAMIAING PICTURE CONTROL SETTING CLOCK CHANNEL SET UP USER'S SET UP LANGUAGIMIGAL ► TIRE SEAR" NOTE: Not all . To clear screen, select [CAPTION1], [CAPTION2] or [OFF]. 3 Exit the caption setting mode Press MENU button to return to "CAPTION". -MENU- ONAYMIEI CLOSED CAPTION SYSTEM You may cause captions errors...

Owner's Manual
Page 21
... playback Press RECORD or PLAY button. Select "TIME SEARCH" mode Press TIME SEARCH button OR Press MENU button. button. -MENU- MUER PROGRAMUINO PICTURE CONTROL SETTING CLOCK CHANNEL SET UP USER'S SET UP LANGUAGE [ENGLISH) ► •,17,?E:',Agi""°"" 2 Enter your desired position from present position to "TIME SEARCH". Then press COUNTER MEMORY continuously until your desired time appears. (Example: "2:50" for the following steps. • Power must be used to memorize a beginning...
... playback Press RECORD or PLAY button. Select "TIME SEARCH" mode Press TIME SEARCH button OR Press MENU button. button. -MENU- MUER PROGRAMUINO PICTURE CONTROL SETTING CLOCK CHANNEL SET UP USER'S SET UP LANGUAGE [ENGLISH) ► •,17,?E:',Agi""°"" 2 Enter your desired position from present position to "TIME SEARCH". Then press COUNTER MEMORY continuously until your desired time appears. (Example: "2:50" for the following steps. • Power must be used to memorize a beginning...

Owner's Manual
Page 23
... following diagram. 1 Select the channel to be done by the remote control. COPYING A VIDEO CASSETTE (Re uires another VCR) You can make copies of copyright laws. NOTE: For best results during dubbing, use the TVNCR's front panel controls whenever possible. OTR (One Touch Recording) This function enables you to set up to 8 hours. The recording length will be determined by the number of times...
... following diagram. 1 Select the channel to be done by the remote control. COPYING A VIDEO CASSETTE (Re uires another VCR) You can make copies of copyright laws. NOTE: For best results during dubbing, use the TVNCR's front panel controls whenever possible. OTR (One Touch Recording) This function enables you to set up to 8 hours. The recording length will be determined by the number of times...
Owner's Manual
Page 24
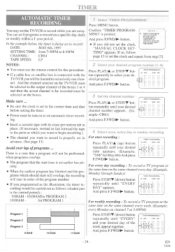
... period. cording would be turn on the boxes. If so, follow page 15 to set the clock and repeat from 7:30PM to select your desired channel number appears. (Example: CH61) And press F.FWD/11,- button. 3 Set the channel number Press PLAY/A or STOP/V button repeatedly until "EVERY" and your desired program number (1-8) Press PLAY/A or STOP/V but- - CR SATE START END -01,--1 1- - 24 EN 7A08 TIMER PROGRAMMING PICTURE CONTROL SETTING CLOCK...
... period. cording would be turn on the boxes. If so, follow page 15 to set the clock and repeat from 7:30PM to select your desired channel number appears. (Example: CH61) And press F.FWD/11,- button. 3 Set the channel number Press PLAY/A or STOP/V button repeatedly until "EVERY" and your desired program number (1-8) Press PLAY/A or STOP/V but- - CR SATE START END -01,--1 1- - 24 EN 7A08 TIMER PROGRAMMING PICTURE CONTROL SETTING CLOCK...
Owner's Manual
Page 26
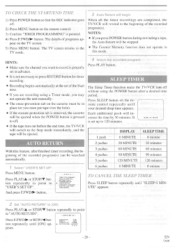
... DISPLAY 0 MINUTE SLEEP TIME 0 minute AtJ`I'0 RE URN 2 pushes 30 MINUTE 30 minutes With this mode. button. 2 Set "AUTO RETURN" ₹o [ON] Press PLAY/A or STOP/V button repeatedly to point to "USER'S SETUP". -MENU- USERS SET UP - pear on the remote control. 3) Confirm "TIMER PROGRAMMING" is set of the Start time. • If you are completed, the TV/VCR will begin When all the timer recordings are recording using the POWER button after finished timer recording...
... DISPLAY 0 MINUTE SLEEP TIME 0 minute AtJ`I'0 RE URN 2 pushes 30 MINUTE 30 minutes With this mode. button. 2 Set "AUTO RETURN" ₹o [ON] Press PLAY/A or STOP/V button repeatedly to point to "USER'S SETUP". -MENU- USERS SET UP - pear on the remote control. 3) Confirm "TIMER PROGRAMMING" is set of the Start time. • If you are completed, the TV/VCR will begin When all the timer recordings are recording using the POWER button after finished timer recording...
Owner's Manual
Page 27
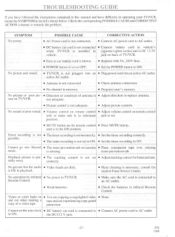
... timer recording to ON. is not connected. • Check antenna connection. • No channel in memory. • Program tuner's memory. the DC13.2 V jack. - 27 - ture on the remote control • Press MUTE button. No picture but the audio • Video heads are experiencing copy guard copy of TV/VCR. • Fuse in the ON position. SYMPTOM POSSIBLE CAUSE CORRECTIVE ACTION No power. • AC Power cord is not connected...
... timer recording to ON. is not connected. • Check antenna connection. • No channel in memory. • Program tuner's memory. the DC13.2 V jack. - 27 - ture on the remote control • Press MUTE button. No picture but the audio • Video heads are experiencing copy guard copy of TV/VCR. • Fuse in the ON position. SYMPTOM POSSIBLE CAUSE CORRECTIVE ACTION No power. • AC Power cord is not connected...

Owner's Manual
Page 29
... SPECIFICATIONS Video input level : Audio input level : Video S/N ratio : Audio S/N ratio : 0.5-2.0Vp_p -15dBs More than 46dB More than 43dB OTHER SPECIFICATIONS Power requirement : AC 120V/60Hz DC 13.2V Power consumption : AC/DC 65W Dimensions : H : 12-7/8" (328mm) W : 11-13/16" (300mm) D : 12-13/16" (326mm) Weight : 18.7 lbs (8.5 kg) • Designs and specifications are displayed as 1-125. W+1 36 37 W+15 . W-F23 58 59 W+9 45 W+24 60 CAN channel...
... SPECIFICATIONS Video input level : Audio input level : Video S/N ratio : Audio S/N ratio : 0.5-2.0Vp_p -15dBs More than 46dB More than 43dB OTHER SPECIFICATIONS Power requirement : AC 120V/60Hz DC 13.2V Power consumption : AC/DC 65W Dimensions : H : 12-7/8" (328mm) W : 11-13/16" (300mm) D : 12-13/16" (326mm) Weight : 18.7 lbs (8.5 kg) • Designs and specifications are displayed as 1-125. W+1 36 37 W+15 . W-F23 58 59 W+9 45 W+24 60 CAN channel...


