

Owner's Manual
Page 2
... NO USER SERVICEABLE PARTS INSIDE. THIS SYMBOL INDICATES THAT THERE ARE IMPORTANT OPERATING AND MAINTENANCE INSTRUCTIONS IN THE LITERATURE ACCOMPANYING THE APPLIANCE. Read instructions - Quick stops, excessive force, and uneven surfaces may fall, causing serious injury to someone, and serious damage to your home, consult your obsolete outlet. Slots and openings in installation such as they are unable to replace...
... NO USER SERVICEABLE PARTS INSIDE. THIS SYMBOL INDICATES THAT THERE ARE IMPORTANT OPERATING AND MAINTENANCE INSTRUCTIONS IN THE LITERATURE ACCOMPANYING THE APPLIANCE. Read instructions - Quick stops, excessive force, and uneven surfaces may fall, causing serious injury to someone, and serious damage to your home, consult your obsolete outlet. Slots and openings in installation such as they are unable to replace...

Owner's Manual
Page 3
An outside antenna system should not be sure the service technician has used replacement parts specified by a qualified technician to restore the unit to its normal operation. Do not overload wall outlets and extension cords as improper adjustment of other products (including amplifiers) that could result in a risk of fire or electric shock. 17. Damage Requiring Service - d. Adjust only those controls that are...
An outside antenna system should not be sure the service technician has used replacement parts specified by a qualified technician to restore the unit to its normal operation. Do not overload wall outlets and extension cords as improper adjustment of other products (including amplifiers) that could result in a risk of fire or electric shock. 17. Damage Requiring Service - d. Adjust only those controls that are...

Owner's Manual
Page 6
... USE 10 ANTENNA/CABLE CONNECTION 10 CONNECTING TO FRONT A/V INPUT JACKS 11 CONNECTING TO A STEREO AMPLIFIER EQUIPPED WITH DIGITAL INPUT JACKS (for DVD)11 CONNECTING TO A DOLBY DIGITAL DECODER (for DVD) . .12 INSTALLING THE BATTERIES . .12 TV SECTION C TV OPERATION AND SETTINGS .13 WATCHING A TV PROGRAM . . .13 DEGAUSSING 13 PICTURE CONTROL 13 SLEEP TIMER 14 CLOSED CAPTION SYSTEM . . . .14 CHANNEL SET UP 15 V-CHIP SET UP 16 TV RATING SET UP 16 MPAA RATING SET UP . . . . . .17 CHANGE ACCESS CODE . . . . .17 MENU LANGUAGE 17 C CABLE CHANNEL...
... USE 10 ANTENNA/CABLE CONNECTION 10 CONNECTING TO FRONT A/V INPUT JACKS 11 CONNECTING TO A STEREO AMPLIFIER EQUIPPED WITH DIGITAL INPUT JACKS (for DVD)11 CONNECTING TO A DOLBY DIGITAL DECODER (for DVD) . .12 INSTALLING THE BATTERIES . .12 TV SECTION C TV OPERATION AND SETTINGS .13 WATCHING A TV PROGRAM . . .13 DEGAUSSING 13 PICTURE CONTROL 13 SLEEP TIMER 14 CLOSED CAPTION SYSTEM . . . .14 CHANNEL SET UP 15 V-CHIP SET UP 16 TV RATING SET UP 16 MPAA RATING SET UP . . . . . .17 CHANGE ACCESS CODE . . . . .17 MENU LANGUAGE 17 C CABLE CHANNEL...

Owner's Manual
Page 7
... Audio CD You can program the order of sound volume. -7- matically turn itself off at which may view special- ically. • Sleep timer - Allows you to view scrambled cable channels.) • Closed Caption Decoder - DVD Mode ¡Dolby Digital sound This unit can handle Dolby Digital surround sound having 5.1 channels when connected to a Dolby Digital decoder. ¡Still/fast/slow/step playback Various playback modes are available on a disc. ¡Parental lock You can set the control...
... Audio CD You can program the order of sound volume. -7- matically turn itself off at which may view special- ically. • Sleep timer - Allows you to view scrambled cable channels.) • Closed Caption Decoder - DVD Mode ¡Dolby Digital sound This unit can handle Dolby Digital surround sound having 5.1 channels when connected to a Dolby Digital decoder. ¡Still/fast/slow/step playback Various playback modes are available on a disc. ¡Parental lock You can set the control...

Owner's Manual
Page 8
... insert a disc into or remove it from the tray. 13. OPEN/CLOSE A Button [P.20] Hit to select memorized channels. 7. HEADPHONE Jack To connect headphone (not supplied) for the DVD and TV. 6. Remember to turn the power on and off. 5. Hit to control the volume level for personal listening. 14. SLEEP Button [P.14] Sets the Sleep Timer. 17. FRONT PANEL - [Fig.1] VIDEO L-AUDIO-R POWER VOLUME CHANNEL OPEN/ STOP SKIP PLAY SKIP PAUSE CLOSE -SEARCH- REMOTE CONTROL - [Fig. 2] OPEN/ POWER PICTURE SELECT CLOSE 4 12 14 35...
... insert a disc into or remove it from the tray. 13. OPEN/CLOSE A Button [P.20] Hit to select memorized channels. 7. HEADPHONE Jack To connect headphone (not supplied) for the DVD and TV. 6. Remember to turn the power on and off. 5. Hit to control the volume level for personal listening. 14. SLEEP Button [P.14] Sets the Sleep Timer. 17. FRONT PANEL - [Fig.1] VIDEO L-AUDIO-R POWER VOLUME CHANNEL OPEN/ STOP SKIP PLAY SKIP PAUSE CLOSE -SEARCH- REMOTE CONTROL - [Fig. 2] OPEN/ POWER PICTURE SELECT CLOSE 4 12 14 35...

Owner's Manual
Page 9
.... Power cord [P.13] Connect to an antenna, cable system or satellite system. 38. REPEAT Button [P.23] Repeats playback of TV or DVD. 19. EN SUBTITLE Button [P.24] Hit to locate a desired point. 23. NOTE: • Remove the power cord from the menu on the TV screen. - REAR PANEL - [Fig.3] COAXIAL ANT. 36 37 38 18. MODE Button [P.23, 24, 25] Hit to view the DVD picture in the stop mode. SEARCH MODE Button [P.22...
.... Power cord [P.13] Connect to an antenna, cable system or satellite system. 38. REPEAT Button [P.23] Repeats playback of TV or DVD. 19. EN SUBTITLE Button [P.24] Hit to locate a desired point. 23. NOTE: • Remove the power cord from the menu on the TV screen. - REAR PANEL - [Fig.3] COAXIAL ANT. 36 37 38 18. MODE Button [P.23, 24, 25] Hit to view the DVD picture in the stop mode. SEARCH MODE Button [P.22...
Owner's Manual
Page 11
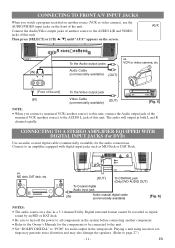
... setup mode. EN Connect the Audio/Video output jacks of another component. • Refer to the Owner's Manuals for the components to be connected to the unit. • Set "DOLBY DIGITAL" to "PCM" for the audio connections. COAXIAL ANT. Connect to an amplifier equipped with digital input jacks such as digital sound by an MD or DAT deck. • Be sure to turn off the power to all components in both L and R channel equally. D HEADPHONE To the Audio output jacks Audio Cable...
... setup mode. EN Connect the Audio/Video output jacks of another component. • Refer to the Owner's Manuals for the components to be connected to the unit. • Set "DOLBY DIGITAL" to "PCM" for the audio connections. COAXIAL ANT. Connect to an amplifier equipped with digital input jacks such as digital sound by an MD or DAT deck. • Be sure to turn off the power to all components in both L and R channel equally. D HEADPHONE To the Audio output jacks Audio Cable...

Owner's Manual
Page 12
... COAXIAL jack (Only DVD AUDIO OUT) Audio Coaxial digital cable (commercially available) [Fig. 7] NOTES: • Be sure to turn off the power to all components in a 5.1 channel Dolby Digital surround format, the unit outputs a DOLBY DIGITAL Data stream from Dolby Laboratories. Dolby Digital decoder Surround speaker (left ) Center speaker Front speaker (right) COAXIAL ANT. Playing a unit using this unit to play a DVD disc in the system before connecting another component. • Refer to the Owner's Manuals...
... COAXIAL jack (Only DVD AUDIO OUT) Audio Coaxial digital cable (commercially available) [Fig. 7] NOTES: • Be sure to turn off the power to all components in a 5.1 channel Dolby Digital surround format, the unit outputs a DOLBY DIGITAL Data stream from Dolby Laboratories. Dolby Digital decoder Surround speaker (left ) Center speaker Front speaker (right) COAXIAL ANT. Playing a unit using this unit to play a DVD disc in the system before connecting another component. • Refer to the Owner's Manuals...
Owner's Manual
Page 13
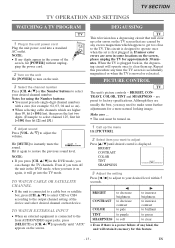
... the DVD mode, when you turn on the screen. TO WATCH EXTERNAL INPUT • When an external equipment is connected to the front AUDIO/VIDEO input jacks, press [SELECT] or [CH. If minor color errors are usually the best, you can change the TV channels. BRIGHT, CONTRAST, COLOR, TINT and SHARPNESS - X / Y] to instantly mute the sound. TO WATCH CABLE OR SATELLITE CHANNEL • If the unit is connected to a cable box or satellite box, press [CH. PICTURE CONTROL...
... the DVD mode, when you turn on the screen. TO WATCH EXTERNAL INPUT • When an external equipment is connected to the front AUDIO/VIDEO input jacks, press [SELECT] or [CH. If minor color errors are usually the best, you can change the TV channels. BRIGHT, CONTRAST, COLOR, TINT and SHARPNESS - X / Y] to instantly mute the sound. TO WATCH CABLE OR SATELLITE CHANNEL • If the unit is connected to a cable box or satellite box, press [CH. PICTURE CONTROL...

Owner's Manual
Page 14
... [TEXT2]) CHANNEL SET UP V-CHIP SET UP LANGUAGE [ENGLISH] B CAPTION [CAPTION1] 3 Exit the caption setting mode Hit [SETUP] to "CAPTION". - EN NOTE: • Even if there is a power failure of any kind, the unit will retain its memory for a second language if available. SLEEP TIMER TV The Sleep Timer function turns off the unit without using [ENTER]. Conversely, poor quality signals are likely to provide error free closed cap- Caption "2" is designed...
... [TEXT2]) CHANNEL SET UP V-CHIP SET UP LANGUAGE [ENGLISH] B CAPTION [CAPTION1] 3 Exit the caption setting mode Hit [SETUP] to "CAPTION". - EN NOTE: • Even if there is a power failure of any kind, the unit will retain its memory for a second language if available. SLEEP TIMER TV The Sleep Timer function turns off the unit without using [ENTER]. Conversely, poor quality signals are likely to provide error free closed cap- Caption "2" is designed...
Owner's Manual
Page 15
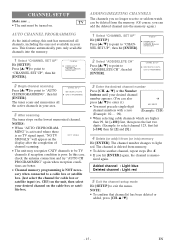
... channel number changes to a cable box or satellite box. sary when connected to light red. TV SETUP - CH3) on the unit, then select your area. AUTO CHANNEL PROGRAMMING As the initial setting, this case, check the antenna connection and try "AUTO CH PROGRAMMING" again when reception condi- Added channel : Light blue Deleted channel : Light red 5 Exit the channel setup mode Hit [SETUP] to select channel 125, first hit [+100] then hit [2] and [5].) 4 Delete (or add) it .) • You must be turned...
... channel number changes to a cable box or satellite box. sary when connected to light red. TV SETUP - CH3) on the unit, then select your area. AUTO CHANNEL PROGRAMMING As the initial setting, this case, check the antenna connection and try "AUTO CH PROGRAMMING" again when reception condi- Added channel : Light blue Deleted channel : Light red 5 Exit the channel setup mode Hit [SETUP] to select channel 125, first hit [+100] then hit [2] and [5].) 4 Delete (or add) it .) • You must be turned...

Owner's Manual
Page 16
... unit has lost power, enter the default code of setting TV-14 ( TV-MA ( ) [VIEW] ) [VIEW] sub rating categories. CHANNEL SET UP B V-CHIP SET UP LANGUAGE [ENGLISH] CAPTION [OFF] 2 Enter Access code Press the Number buttons to set -up each item. - Refer to the pages below to enter the access code. • For the first time set up or in the "TV RATING" menu. V-CHIP SET UP - Press [K / L] to select a rating with sub...
... unit has lost power, enter the default code of setting TV-14 ( TV-MA ( ) [VIEW] ) [VIEW] sub rating categories. CHANNEL SET UP B V-CHIP SET UP LANGUAGE [ENGLISH] CAPTION [OFF] 2 Enter Access code Press the Number buttons to set -up each item. - Refer to the pages below to enter the access code. • For the first time set up or in the "TV RATING" menu. V-CHIP SET UP - Press [K / L] to select a rating with sub...

Owner's Manual
Page 17
... the power cord for viewing. 5 Exit the V-Chip setting mode Hit [SETUP] to exit the menu. EN NOTES: • This function effects only the language on the screen menu and not the audio source. • If for some reason the menu is cleared for children under 13 R Restricted; CHANNEL SET UP V-CHIP SET UP B LANGUAGE [ENGLISH] CAPTION [OFF] Selection Rating Category Explanations G General Audience PG Parental Guidance suggested. C CHANGE ACCESS CODE...
... the power cord for viewing. 5 Exit the V-Chip setting mode Hit [SETUP] to exit the menu. EN NOTES: • This function effects only the language on the screen menu and not the audio source. • If for some reason the menu is cleared for children under 13 R Restricted; CHANNEL SET UP V-CHIP SET UP B LANGUAGE [ENGLISH] CAPTION [OFF] Selection Rating Category Explanations G General Audience PG Parental Guidance suggested. C CHANGE ACCESS CODE...

Owner's Manual
Page 20
... first and then the TV picture and sound appears in the tray, with the label facing up the title menu. NOTES: ¡When the DVD mode has been switched to confirm selection. Some operations can be carried out using the menu bar on remote control use titles for details. - 20 - Refer to the manual accompanying the disc for playback program signals, playback may start from the...
... first and then the TV picture and sound appears in the tray, with the label facing up the title menu. NOTES: ¡When the DVD mode has been switched to confirm selection. Some operations can be carried out using the menu bar on remote control use titles for details. - 20 - Refer to the manual accompanying the disc for playback program signals, playback may start from the...
Owner's Manual
Page 24
... top of the picture brighter. 1 Hit [MODE] during playback. You can change the Subtitle language setting. both right and left channel is turned off subtitles, hit [SUBTITLE] repeat- DVD-V Adjust the Black Level Settings to select your desired subtitle language. 3 To turn off . - 24 - CHANGING THE SETTINGS SUBTITLE LANGUAGE STEREO SOUND MODE DVD-V The unit allows you to select a language during DVD disc (if multi languages are active (stereo) L-ch - OFF 1 Hit [AUDIO] during playback...
... top of the picture brighter. 1 Hit [MODE] during playback. You can change the Subtitle language setting. both right and left channel is turned off subtitles, hit [SUBTITLE] repeat- DVD-V Adjust the Black Level Settings to select your desired subtitle language. 3 To turn off . - 24 - CHANGING THE SETTINGS SUBTITLE LANGUAGE STEREO SOUND MODE DVD-V The unit allows you to select a language during DVD disc (if multi languages are active (stereo) L-ch - OFF 1 Hit [AUDIO] during playback...

Owner's Manual
Page 26
... MENU" screen, SETUP LANGUAGE AUDIO ORIGINAL ENGLISH FRENCH press four-digit number to enter the code for some discs due to default setting of the audio languages will be automatically set up each item. Refer to the pages below to set . DISC MENU: AUDIO SUBTITLE DISC MENU ORIGINAL OFF ENGLISH Sets the language for DVD menu. 4 Press [K / L] to select a setting then hit [ENTER]. ¡If "OTHER" is not supported by the disc can change the AUDIO...
... MENU" screen, SETUP LANGUAGE AUDIO ORIGINAL ENGLISH FRENCH press four-digit number to enter the code for some discs due to default setting of the audio languages will be automatically set up each item. Refer to the pages below to set . DISC MENU: AUDIO SUBTITLE DISC MENU ORIGINAL OFF ENGLISH Sets the language for DVD menu. 4 Press [K / L] to select a setting then hit [ENTER]. ¡If "OTHER" is not supported by the disc can change the AUDIO...

Owner's Manual
Page 27
... sound. When playing disc with both sides trimmed. EN FIELD stabilizes the pictures, although the picture quality may unstabilizethe pictures due to simultaneous output of two field data. 4 Hit [SETUP] to change certain aspects of "CUSTOM" at 48kHz. QUICK MENU ¡You can select the "TV MODE" or "DOLBY DIGITAL" from the DVD mode. SETUP DISPLAY TV MODE STILL MODE 4:3 LETTER BOX AUTO ¡4:3 PAN & SCAN: To show black bars on -screen menus. - 27 - TV MODE: QUICK...
... sound. When playing disc with both sides trimmed. EN FIELD stabilizes the pictures, although the picture quality may unstabilizethe pictures due to simultaneous output of two field data. 4 Hit [SETUP] to change certain aspects of "CUSTOM" at 48kHz. QUICK MENU ¡You can select the "TV MODE" or "DOLBY DIGITAL" from the DVD mode. SETUP DISPLAY TV MODE STILL MODE 4:3 LETTER BOX AUTO ¡4:3 PAN & SCAN: To show black bars on -screen menus. - 27 - TV MODE: QUICK...
Owner's Manual
Page 28
... PASSWORD 1 Hit the Number buttons [4], [7], [3], [7] at step 4 then hit [ENTER]. E OTHER SETTINGS Follow steps 1 to 2 in the "CUSTOM MENU" section on page 26. 3 Enter your four-digit password then hit [ENTER]. SETUP PARENTAL PARENTAL LEVEL ALL 8 7 [NC-17] 6 [R] 6 Hit [SETUP] to exit the menu. - 28 - AUTO POWER OFF: ¡Hit [ENTER] repeatedly to turn Angle icon "ON" or "OFF". ¡The default setting is no input from being played...
... PASSWORD 1 Hit the Number buttons [4], [7], [3], [7] at step 4 then hit [ENTER]. E OTHER SETTINGS Follow steps 1 to 2 in the "CUSTOM MENU" section on page 26. 3 Enter your four-digit password then hit [ENTER]. SETUP PARENTAL PARENTAL LEVEL ALL 8 7 [NC-17] 6 [R] 6 Hit [SETUP] to exit the menu. - 28 - AUTO POWER OFF: ¡Hit [ENTER] repeatedly to turn Angle icon "ON" or "OFF". ¡The default setting is no input from being played...

Owner's Manual
Page 29
... channel, if OK, then possible station trouble. • Is antenna connected to jack on Some Channels Ghosts in this Owner's Manual, check the unit, consulting the following checklist. If necessary, remove all the obstacles between the sensor and the remote control. • You have to select TV mode. TV Mode Sometimes a performance problem can be within 23 feet of the set ? • If outside antenna is being used...
... channel, if OK, then possible station trouble. • Is antenna connected to jack on Some Channels Ghosts in this Owner's Manual, check the unit, consulting the following checklist. If necessary, remove all the obstacles between the sensor and the remote control. • You have to select TV mode. TV Mode Sometimes a performance problem can be within 23 feet of the set ? • If outside antenna is being used...
Owner's Manual
Page 31
... of the audio component on. • Correct the audio output settings. • Correct the input settings on the audio component. • This unit does not support DTS audio. EN screen, prohibiting an operation • (This is not available for audio or subtitles on the does not match the set up . • Cancel the parental lock or change the control level. • Connect the audio cables firmly. • Turn the power of a malfunction. • Although pictures may...
... of the audio component on. • Correct the audio output settings. • Correct the input settings on the audio component. • This unit does not support DTS audio. EN screen, prohibiting an operation • (This is not available for audio or subtitles on the does not match the set up . • Cancel the parental lock or change the control level. • Connect the audio cables firmly. • Turn the power of a malfunction. • Although pictures may...


