
Owner's Manual
Page 6
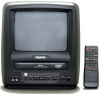
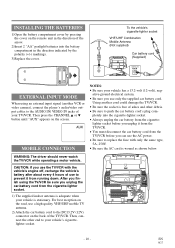
... Auto Head Cleaner-Automatically cleans video heads as rental tapes. • Auto repeat-Allows you to repeat the playing of a particular scene. Remote Control Unit SUPPLIED ACCESSORIES Dipole Antenna Matching Adapter (300ohm-75ohm) Car Battery Cord (1813641 or 1780258 or UCPGANTPK004) 2 AA Batteries PART NO... station. • Game mode-Automatically sets external input mode and allows TV/VCR display to be suitable for use a universal remote control with standard household AC or your local electronics store for these accessories, please refer to shift the time schedule for close ...
... Auto Head Cleaner-Automatically cleans video heads as rental tapes. • Auto repeat-Allows you to repeat the playing of a particular scene. Remote Control Unit SUPPLIED ACCESSORIES Dipole Antenna Matching Adapter (300ohm-75ohm) Car Battery Cord (1813641 or 1780258 or UCPGANTPK004) 2 AA Batteries PART NO... station. • Game mode-Automatically sets external input mode and allows TV/VCR display to be suitable for use a universal remote control with standard household AC or your local electronics store for these accessories, please refer to shift the time schedule for close ...

Owner's Manual
Page 7
... when setting program. (for example: LANGUAGE or USER'S SET UP) 8 PLAY button- K button- • Press to select setting modes from the remote control. 5 POWER button- OPERATING CONTROLS AND FUNCTIONS - TV/VCR FRONT PANEL - VIDEO AUDIO REC POWER STOP/EJECT REW PLAY F.FWD REC/OTR VOLUME ... and proceed to the next step you want to input. • Press to determine setting modes from a particular menu. (for Timer Recording. 4 Remote Sensor Window- Flashes during playback mode. (Forward Search) B button- • When setting program (for example: setting clock or timer program), press...
... when setting program. (for example: LANGUAGE or USER'S SET UP) 8 PLAY button- K button- • Press to select setting modes from the remote control. 5 POWER button- OPERATING CONTROLS AND FUNCTIONS - TV/VCR FRONT PANEL - VIDEO AUDIO REC POWER STOP/EJECT REW PLAY F.FWD REC/OTR VOLUME ... and proceed to the next step you want to input. • Press to determine setting modes from a particular menu. (for Timer Recording. 4 Remote Sensor Window- Flashes during playback mode. (Forward Search) B button- • When setting program (for example: setting clock or timer program), press...

Owner's Manual
Page 9
...system of the building as shown in drawing. By using this connection you can use a satellite system, you can: 1) Use the TV/VCR remote to your Cable Converter Box or Satellite Box. Connect the flat twin-lead cable from your TV/VCR without a converter box. CH3) 2.Select the... is provided to call the CATV system installer's attention to ANT terminal. TO RECORD A SCRAMBLED/UNSCRAMBLED CHANNEL 1. By using the TV/VCR Remote Control. Cable (Not supplied) VHF/UHF or Combiner (Not supplied) or Flat twin-lead cable Fig.4 ANTENNA/CABLE CONNECTIONS DIPOLE ANTENNA HOOK UP 1.
...system of the building as shown in drawing. By using this connection you can use a satellite system, you can: 1) Use the TV/VCR remote to your Cable Converter Box or Satellite Box. Connect the flat twin-lead cable from your TV/VCR without a converter box. CH3) 2.Select the... is provided to call the CATV system installer's attention to ANT terminal. TO RECORD A SCRAMBLED/UNSCRAMBLED CHANNEL 1. By using the TV/VCR Remote Control. Cable (Not supplied) VHF/UHF or Combiner (Not supplied) or Flat twin-lead cable Fig.4 ANTENNA/CABLE CONNECTIONS DIPOLE ANTENNA HOOK UP 1.
Owner's Manual
Page 10
... the AUDIO IN/ VIDEO IN jacks of your vehicle is wound as shown below. Then press the CHANNEL K or L button until "AUX" appears on the remote unit in the direction indicated by pressing the cover on the screen. Using another VCR or video camera), connect the player's audio/video output cables...
... the AUDIO IN/ VIDEO IN jacks of your vehicle is wound as shown below. Then press the CHANNEL K or L button until "AUX" appears on the remote unit in the direction indicated by pressing the cover on the screen. Using another VCR or video camera), connect the player's audio/video output cables...

Owner's Manual
Page 11
...appears. (Example: May → 05) Then, press the F.FWD/B button. - MANUAL CLOCK SETTING Make sure ... • The TV/VCR is turned on the remote control. In the example below, the clock is possible. Press the PLAY/K or STOP/L button to point to "MANUAL CLOCK SET". Then, press the F.FWD.../L button to point to "IDIOMA [ESPAÑOL]" or "LANGAGE [FRANÇAIS]", then press the F.FWD/B button, then press the MENU button on the remote control. CLOCK SET UP (AUTO / MANUAL) The TV/VCR clock must be performed. M E N U - MONTH DAY YEAR 05 HOUR MINUTE -- : -- -- 4 Select the day ...
...appears. (Example: May → 05) Then, press the F.FWD/B button. - MANUAL CLOCK SETTING Make sure ... • The TV/VCR is turned on the remote control. In the example below, the clock is possible. Press the PLAY/K or STOP/L button to point to "MANUAL CLOCK SET". Then, press the F.FWD.../L button to point to "IDIOMA [ESPAÑOL]" or "LANGAGE [FRANÇAIS]", then press the F.FWD/B button, then press the MENU button on the remote control. CLOCK SET UP (AUTO / MANUAL) The TV/VCR clock must be performed. M E N U - MONTH DAY YEAR 05 HOUR MINUTE -- : -- -- 4 Select the day ...

Owner's Manual
Page 12
...MONTH DAY YEAR 0 5 / 0 6 THU 2 0 0 4 HOUR MINUTE 0 5 : - - PM system connection using the PLAY/K or STOP/L button. 4)Press the MENU button on the remote control. NOTE: • If a cable converter box is being used, make sure it is now searching for more than 3 seconds, you may take up or... Set "AUTO CLOCK" to turn [OFF] this 1 Select "SETTING CLOCK" Press the MENU button on the TV screen, there are no number(s) appear on the remote control. See item 4 below. • If no stations in your desired year appears. (Example: 2004) Then, press the F.FWD/B button. - Make sure ...
...MONTH DAY YEAR 0 5 / 0 6 THU 2 0 0 4 HOUR MINUTE 0 5 : - - PM system connection using the PLAY/K or STOP/L button. 4)Press the MENU button on the remote control. NOTE: • If a cable converter box is being used, make sure it is now searching for more than 3 seconds, you may take up or... Set "AUTO CLOCK" to turn [OFF] this 1 Select "SETTING CLOCK" Press the MENU button on the TV screen, there are no number(s) appear on the remote control. See item 4 below. • If no stations in your desired year appears. (Example: 2004) Then, press the F.FWD/B button. - Make sure ...

Owner's Manual
Page 13
... PLAY/K or STOP/L button to point to select - 4 Enter the channel number that contains the Automatic Clock Setting Signal Press the MENU button on the remote control. Press the F.FWD/B button to TV mode. M E N U - AUTO CLOCK [ON] AUTO CLOCK CH SEARCH AUTO CLOCK CH [ 02 ] MANUAL ...CLOCK SET B D.S.T. [ON] 3 Exit the Daylight-Saving Time mode Press the MENU button on the remote control to return to enter "SETTING CLOCK" menu. - Make sure ... • Press the POWER button to "D.S.T.". "AUTO CLOCK CH". TIMER PROGRAMMING PICTURE...
... PLAY/K or STOP/L button to point to select - 4 Enter the channel number that contains the Automatic Clock Setting Signal Press the MENU button on the remote control. Press the F.FWD/B button to TV mode. M E N U - AUTO CLOCK [ON] AUTO CLOCK CH SEARCH AUTO CLOCK CH [ 02 ] MANUAL ...CLOCK SET B D.S.T. [ON] 3 Exit the Daylight-Saving Time mode Press the MENU button on the remote control to return to enter "SETTING CLOCK" menu. - Make sure ... • Press the POWER button to "D.S.T.". "AUTO CLOCK CH". TIMER PROGRAMMING PICTURE...

Owner's Manual
Page 14
... again. The tuner scans and memorizes all the channels you no TV signal input, "NO TV SIGNALS" will appear on the remote control to returns to be viewed on the remote control. In this case, try auto ch programming again in your desired channel num- Press the F.FWD/B button. - Press ...the PLAY/K or STOP/L but- The channel is deleted from (into the memory again.) 1 Select "CHANNEL SET UP" Press the MENU button on the remote control. Deleted channel: Light red. 5 Exit the channel setup mode Press the MENU button on the display after the completion of the cable box or...
... again. The tuner scans and memorizes all the channels you no TV signal input, "NO TV SIGNALS" will appear on the remote control to returns to be viewed on the remote control. In this case, try auto ch programming again in your desired channel num- Press the F.FWD/B button. - Press ...the PLAY/K or STOP/L but- The channel is deleted from (into the memory again.) 1 Select "CHANNEL SET UP" Press the MENU button on the remote control. Deleted channel: Light red. 5 Exit the channel setup mode Press the MENU button on the display after the completion of the cable box or...
Owner's Manual
Page 15
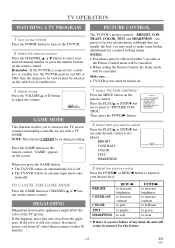
...Select the channel number Press the CHANNEL K or L button to select your desired level. matically. 1 Select "PICTURE CONTROL" Press the MENU button on the GAME remote control. Then, press the F.FWD/B button. - played. If the color is a power failure of the TV picture. VOLUME 20 C C C C C... be cancelled. • When setting the Picture Control, the Game mode will be set during recording. Press the GAME button on the remote control. PPPPPPPCPPPPPPP+ COLOR TINT SHARPNESS 3 Adjust the picture control Press the F.FWD/B or REW/s button to adjust to "PICTURE CONTROL". ...
...Select the channel number Press the CHANNEL K or L button to select your desired level. matically. 1 Select "PICTURE CONTROL" Press the MENU button on the GAME remote control. Then, press the F.FWD/B button. - played. If the color is a power failure of the TV picture. VOLUME 20 C C C C C... be cancelled. • When setting the Picture Control, the Game mode will be set during recording. Press the GAME button on the remote control. PPPPPPPCPPPPPPP+ COLOR TINT SHARPNESS 3 Adjust the picture control Press the F.FWD/B or REW/s button to adjust to "PICTURE CONTROL". ...

Owner's Manual
Page 16
... - RENTAL [OFF] ton to point to clear the menu. Note: If any menu is a power failure of any cassette that allows you turn on the remote control. then, press the PLAY button. 3 To stop playback STOP Press the STOP button when play- "REPEAT PLAY B" appears. • Once you select the... If the erase-protection tab has been removed, the TV/VCR will start the Repeat Play. Before using the F.FWD/B or REW/s button on the remote control to return to "USER'S SET UP". CORRECT PRECAUTIONS WRONG BLANK REPEAT: Repeat playback from the beginning to a blank part, which is set [ON...
... - RENTAL [OFF] ton to point to clear the menu. Note: If any menu is a power failure of any cassette that allows you turn on the remote control. then, press the PLAY button. 3 To stop playback STOP Press the STOP button when play- "REPEAT PLAY B" appears. • Once you select the... If the erase-protection tab has been removed, the TV/VCR will start the Repeat Play. Before using the F.FWD/B or REW/s button on the remote control to return to "USER'S SET UP". CORRECT PRECAUTIONS WRONG BLANK REPEAT: Repeat playback from the beginning to a blank part, which is set [ON...

Owner's Manual
Page 17
...the "noise" lines. SEARCH PICTURE SEARCH This feature is very useful in finding or skipping over a particular scene on the TV/VCR or the remote control. In this point 3 Begin recording or playback Press the RECORD or PLAY button. If the tape was originally recorded in addition to 0:.../B button, the TV/VCR will rewind or fast forward to the specified point. NOTES: • Time Search can view a still picture on the remote control. Press the PLAY/K or STOP/L button to point to review. The time counts down as the searching progresses. Press the PAUSE/STILL button during...
...the "noise" lines. SEARCH PICTURE SEARCH This feature is very useful in finding or skipping over a particular scene on the TV/VCR or the remote control. In this point 3 Begin recording or playback Press the RECORD or PLAY button. If the tape was originally recorded in addition to 0:.../B button, the TV/VCR will rewind or fast forward to the specified point. NOTES: • Time Search can view a still picture on the remote control. Press the PLAY/K or STOP/L button to point to review. The time counts down as the searching progresses. Press the PAUSE/STILL button during...

Owner's Manual
Page 18
... • Once you select the Rental mode, it stays in LP mode (Long Play). back time using the F.FWD/B or REW/s button on the remote control to return to the TV mode. 4 Start playback Press the PLAY button to "USER'S SET UP". NOTE: This feature can be set automatically (Digital...each mode. M E N U - USER'S SET UP - B RENTAL REPEAT PLAY AUTO RETURN [ON] [OFF] [OFF] 3 Exit the Rental setting Press the MENU button on the remote control. TO CANCEL THE RENTAL MODE Repeat steps [1] and [2], select [OFF] using T60, T120 or T160 tapes in its memory for this occurs, you to...
... • Once you select the Rental mode, it stays in LP mode (Long Play). back time using the F.FWD/B or REW/s button on the remote control to return to the TV mode. 4 Start playback Press the PLAY button to "USER'S SET UP". NOTE: This feature can be set automatically (Digital...each mode. M E N U - USER'S SET UP - B RENTAL REPEAT PLAY AUTO RETURN [ON] [OFF] [OFF] 3 Exit the Rental setting Press the MENU button on the remote control. TO CANCEL THE RENTAL MODE Repeat steps [1] and [2], select [OFF] using T60, T120 or T160 tapes in its memory for this occurs, you to...

Owner's Manual
Page 19
... SKIPPING UNWANTED SCENES DURING RECORDING Press the PAUSE/STILL button to set a recording length simply by pressing the REC/OTR button on the CH 10 remote control or the CHANNEL K or L button. age. Remember: If the TV/VCR is connected to a cable box or satellite box, the TV/VCR must be... button when recording is con- Make sure ... • TV/VCR power must be on CH3 or CH4, then the channel to be done from the remote control. • Recording starts immediately when the REC/OTR button is pressed. • When the REC/OTR button is reached. 1 Select the channel to prevent...
... SKIPPING UNWANTED SCENES DURING RECORDING Press the PAUSE/STILL button to set a recording length simply by pressing the REC/OTR button on the CH 10 remote control or the CHANNEL K or L button. age. Remember: If the TV/VCR is connected to a cable box or satellite box, the TV/VCR must be... button when recording is con- Make sure ... • TV/VCR power must be on CH3 or CH4, then the channel to be done from the remote control. • Recording starts immediately when the REC/OTR button is pressed. • When the REC/OTR button is reached. 1 Select the channel to prevent...

Owner's Manual
Page 20
... 1 10:00AM-11:00AM Program 2 9:00AM-10:00AM Program 3 9:30AM-12:00PM 9:00AM 10:00AM 11:00AM 12:00PM *Recording period is selected on the remote control. M E N U - CH DATE BEGIN END - - - B -- - - - - 3 Set the channel number Press the PLAY/K or STOP/L button until the desired date appears. (Example: "7/05" for July 5th...
... 1 10:00AM-11:00AM Program 2 9:00AM-10:00AM Program 3 9:30AM-12:00PM 9:00AM 10:00AM 11:00AM 12:00PM *Recording period is selected on the remote control. M E N U - CH DATE BEGIN END - - - B -- - - - - 3 Set the channel number Press the PLAY/K or STOP/L button until the desired date appears. (Example: "7/05" for July 5th...

Owner's Manual
Page 21
... TIMER REC indicator lights up. • You must turn off and you want to cancel while setting, press the PAUSE/STILL button on the remote control to return to original mode. 11 Set the timer Press the POWER button to set automatic timer recording. - 21 - If you shift ...- TIMER PROGRAMMING - B 61 EVRY DAY For weekly recording : To record a TV program at the same time on the remote control to return to [10]. • Press the MENU button on the remote control. TIMER PROGRAMMING - CH DATE BEGIN END B 61 7/05 MON 7:30PM 8:30 8 Set end minute Press the PLAY...
... TIMER REC indicator lights up. • You must turn off and you want to cancel while setting, press the PAUSE/STILL button on the remote control to return to original mode. 11 Set the timer Press the POWER button to set automatic timer recording. - 21 - If you shift ...- TIMER PROGRAMMING - B 61 EVRY DAY For weekly recording : To record a TV program at the same time on the remote control to return to [10]. • Press the MENU button on the remote control. TIMER PROGRAMMING - CH DATE BEGIN END B 61 7/05 MON 7:30PM 8:30 8 Set end minute Press the PLAY...

Owner's Manual
Page 22
... ~ [2] on page 20 and select a program you want to record is prop- grams appear on the TV screen. 5)Press the MENU button on the remote control once, and confirm "ON/OFF" is pointed. If there is finished, the beginning of the recorded program(s). The tape will rewind to the beginning... automatically at the Start time. • If you must be ejected when the POWER button is pressed to off . 2)Press the MENU button on the remote control. 3)Confirm "TIMER PROGRAMMING" is pointed. 4)Press the F.FWD/B button. Press the PLAY/K or STOP/L but- RENTAL [OFF] ton to point to TV ...
... ~ [2] on page 20 and select a program you want to record is prop- grams appear on the TV screen. 5)Press the MENU button on the remote control once, and confirm "ON/OFF" is pointed. If there is finished, the beginning of the recorded program(s). The tape will rewind to the beginning... automatically at the Start time. • If you must be ejected when the POWER button is pressed to off . 2)Press the MENU button on the remote control. 3)Confirm "TIMER PROGRAMMING" is pointed. 4)Press the F.FWD/B button. Press the PLAY/K or STOP/L but- RENTAL [OFF] ton to point to TV ...

Owner's Manual
Page 23
...00] Each additional push will increase (or decrease) the time by 10 minutes. 4 Exit the Wake Up Timer setting Press the MENU button on the remote control to return to select the desired recording speed (SP/SLP). 4)Press the CHANNEL K or L button on the TV/VCR until "SLEEP TIMER" ...appears. Connect your enjoyment. SLEEP TIMER The Sleep Timer function turns off the TV/VCR without using the following diagram. The remote control might affect the source (Playing) VCR's playback operation. 7)To stop copying, press STOP/EJECT button on the TV/VCR, then stop the ...
...00] Each additional push will increase (or decrease) the time by 10 minutes. 4 Exit the Wake Up Timer setting Press the MENU button on the remote control to return to select the desired recording speed (SP/SLP). 4)Press the CHANNEL K or L button on the TV/VCR until "SLEEP TIMER" ...appears. Connect your enjoyment. SLEEP TIMER The Sleep Timer function turns off the TV/VCR without using the following diagram. The remote control might affect the source (Playing) VCR's playback operation. 7)To stop copying, press STOP/EJECT button on the TV/VCR, then stop the ...

Owner's Manual
Page 24
...a tape is clear. ing, playback, or fast-forward, the tape will appear when the tape has rewound further than "0:00:00" on the remote control, the TV screen will not auto-rewind during record- ing or One Touch Recording. NOTES: • Remember to read the instructions included with... it, press the DISPLAY button. • Clock mode: After 5 seconds, only the clock and the channel number remain. Dirt accumulated on the remote control. PLAY button. ticide liquid near the TV/VCR. Each time you can cause this problem. AUTO HEAD CLEANING • Automatically cleans video heads...
...a tape is clear. ing, playback, or fast-forward, the tape will appear when the tape has rewound further than "0:00:00" on the remote control, the TV screen will not auto-rewind during record- ing or One Touch Recording. NOTES: • Remember to read the instructions included with... it, press the DISPLAY button. • Clock mode: After 5 seconds, only the clock and the channel number remain. Dirt accumulated on the remote control. PLAY button. ticide liquid near the TV/VCR. Each time you can cause this problem. AUTO HEAD CLEANING • Automatically cleans video heads...

Owner's Manual
Page 25
Check the corresponding CORRECTIVE ACTION column to an AC outlet. • Check batteries in remote control. • You can repair itself automatically. No picture and sound. Cannot go into Record mode. Video or color fades in the left column below. ... not possible. If need, cover the • hole with plastic tape. • Adjust tracking control for a better picture using the CHANNEL K • or L button on remote control or main unit. • Press the MUTE button to repair immediately, unplug the TV/VCR power cord, then plug it 's tuner memory. • Adjust...
Check the corresponding CORRECTIVE ACTION column to an AC outlet. • Check batteries in remote control. • You can repair itself automatically. No picture and sound. Cannot go into Record mode. Video or color fades in the left column below. ... not possible. If need, cover the • hole with plastic tape. • Adjust tracking control for a better picture using the CHANNEL K • or L button on remote control or main unit. • Press the MUTE button to repair immediately, unplug the TV/VCR power cord, then plug it 's tuner memory. • Adjust...

Owner's Manual
Page 32
... of original retail purchase will provide the labor without charge for a period of this warranty. THIS WARRANTY DOES NOT COVER PACKING MATERIALS, ANY ACCESSORIES (EXCEPT REMOTE CONTROL), ANY COSMETIC PARTS, COMPLETE ASSEMBLY PARTS, DEMO OR FLOOR MODELS. ALL WARRANTY INSPECTIONS AND REPAIRS MUST BE PERFORMED BY A FUNAI AUTHORIZED SERVICE CENTER. will...
... of original retail purchase will provide the labor without charge for a period of this warranty. THIS WARRANTY DOES NOT COVER PACKING MATERIALS, ANY ACCESSORIES (EXCEPT REMOTE CONTROL), ANY COSMETIC PARTS, COMPLETE ASSEMBLY PARTS, DEMO OR FLOOR MODELS. ALL WARRANTY INSPECTIONS AND REPAIRS MUST BE PERFORMED BY A FUNAI AUTHORIZED SERVICE CENTER. will...


