

Owner's Manual
Page 1
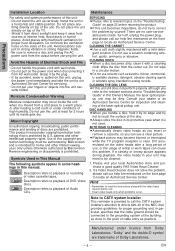
... Channels 8 Clock Setup 8 s Function Overview 9 Front Panel Indicator 9 VCR/DVD Switching 9 Remote Control 10 Installing the Batteries for the Remote Control 10 VCR Functions s Playback 11 s Other Operations 11 Index Search 11 Time Search 11 Auto Repeat 12 s Recording 12 OTR (One Touch Recording 12 Timer Recording 12 Hints for PARENTAL Setting) . . . 23 Information s Troubleshooting Guide 23 s Specifications 24 s Language List 24 s Limited Warranty 24 Español 25 Quick Use Guide 27 Basic TV Connection Cable TV Antenna signal...
... Channels 8 Clock Setup 8 s Function Overview 9 Front Panel Indicator 9 VCR/DVD Switching 9 Remote Control 10 Installing the Batteries for the Remote Control 10 VCR Functions s Playback 11 s Other Operations 11 Index Search 11 Time Search 11 Auto Repeat 12 s Recording 12 OTR (One Touch Recording 12 Timer Recording 12 Hints for PARENTAL Setting) . . . 23 Information s Troubleshooting Guide 23 s Specifications 24 s Language List 24 s Limited Warranty 24 Español 25 Quick Use Guide 27 Basic TV Connection Cable TV Antenna signal...

Owner's Manual
Page 2
...operating and maintenance (servicing) instructions in the manual. However, there is intended to alert the user to operate this unit and enter below the Serial No. If this information for used in accordance with the limits for help. Please dispose of electric shock to constitute a risk of any materials in a particular installation. Contact your local recycling regulations. NO USER SERVICEABLE PARTS... if an unauthorized change or modification is connected. 4) Consult the dealer or an experienced radio/TV technician for a Class B digital device, pursuant to Part 15 of in ...
...operating and maintenance (servicing) instructions in the manual. However, there is intended to alert the user to operate this unit and enter below the Serial No. If this information for used in accordance with the limits for help. Please dispose of electric shock to constitute a risk of any materials in a particular installation. Contact your local recycling regulations. NO USER SERVICEABLE PARTS... if an unauthorized change or modification is connected. 4) Consult the dealer or an experienced radio/TV technician for a Class B digital device, pursuant to Part 15 of in ...

Owner's Manual
Page 3
... cart, stand, tripod, bracket, or table. Servicing - This is operated. 2. Power supply cords should be moved with the video product. Article 810 of other products (including amplifiers) that produce heat. -3- Adjust only those controls that could result in proper operating condition. 22. When the video product exhibits a distinct change in wire to an antenna discharge unit, size of grounding conductors, location of antenna-discharge unit, connection to...
... cart, stand, tripod, bracket, or table. Servicing - This is operated. 2. Power supply cords should be moved with the video product. Article 810 of other products (including amplifiers) that produce heat. -3- Adjust only those controls that could result in proper operating condition. 22. When the video product exhibits a distinct change in wire to an antenna discharge unit, size of grounding conductors, location of antenna-discharge unit, connection to...
Owner's Manual
Page 4
... with a mild deter- Precautions Installation Location For safety and optimum performance of DVD-Video discs. Do not place the unit directly on the front page to remove a disc and unplug the AC power cord from Dolby Laboratories. Moisture Condensation Warning Moisture condensation may need to the point of intense heat. patents and other limited viewing uses only unless otherwise authorized...
... with a mild deter- Precautions Installation Location For safety and optimum performance of DVD-Video discs. Do not place the unit directly on the front page to remove a disc and unplug the AC power cord from Dolby Laboratories. Moisture Condensation Warning Moisture condensation may need to the point of intense heat. patents and other limited viewing uses only unless otherwise authorized...
Owner's Manual
Page 6
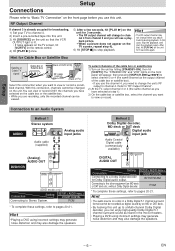
...be viewed. To select channels of the cable box or satellite box). • If you use this unit up to a Multi-channel Dolby Digital decoder, you need to change to channel 4 from channel 3 and you want to channel 4. 2) Insert a pre-recorded tape into this case, stop playback. Connection to an Audio System AUDIO Method 1 Stereo system L R Analog audio input jacks Audio cable (supplied) (Analog) AUDIO OUT DVD/VCR AUDIO OUT L VCR R DVD/VCR or DIGITAL AUDIO OUT DVD AUDIO OUT S-VIDEO OUT COMPONENT VIDEO OUT L R (DVD mode only) Connection Setting SETUP > AUDIO menu > DOLBY...
...be viewed. To select channels of the cable box or satellite box). • If you use this unit up to a Multi-channel Dolby Digital decoder, you need to change to channel 4 from channel 3 and you want to channel 4. 2) Insert a pre-recorded tape into this case, stop playback. Connection to an Audio System AUDIO Method 1 Stereo system L R Analog audio input jacks Audio cable (supplied) (Analog) AUDIO OUT DVD/VCR AUDIO OUT L VCR R DVD/VCR or DIGITAL AUDIO OUT DVD AUDIO OUT S-VIDEO OUT COMPONENT VIDEO OUT L R (DVD mode only) Connection Setting SETUP > AUDIO menu > DOLBY...

Owner's Manual
Page 7
... the input selector button (usually TV/VIDEO, INPUT or AUX) on your antenna or cable box here. AUDIO IN jack Connect audio cables coming from the audio out jack of a television or other audio equipment. (DVD only) DVD/VCR AUDIO OUT jacks Connect the supplied audio cable here through the TV's video in DVD mode. If the Audio/Video cables are connected to a VCR, pictures may be distorted due to the copy protection system. • The COAXIAL, DVD AUDIO OUT, S-VIDEO OUT and COMPONENT VIDEO OUT jacks are inputs for viewing the picture...
... the input selector button (usually TV/VIDEO, INPUT or AUX) on your antenna or cable box here. AUDIO IN jack Connect audio cables coming from the audio out jack of a television or other audio equipment. (DVD only) DVD/VCR AUDIO OUT jacks Connect the supplied audio cable here through the TV's video in DVD mode. If the Audio/Video cables are connected to a VCR, pictures may be distorted due to the copy protection system. • The COAXIAL, DVD AUDIO OUT, S-VIDEO OUT and COMPONENT VIDEO OUT jacks are inputs for viewing the picture...
Owner's Manual
Page 8
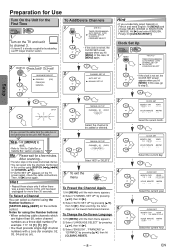
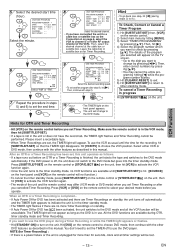
... channel. Hit [B] and select ENGLISH. TIMER PROGRAMMING AUTO REPEAT [OFF] CHANNEL SET UP B CLOCK SET LANGUAGE SELECT • If the clock is already occupied for using the Number buttons: • When selecting cable channels which To Change the On-Screen Language are higher than 30 seconds. Setup 2 3 MANUAL SET UP 3 CH 01 CHANNEL 30 (CATV) or ADD or AUTO SET UP Select the channel to channel 3. • If channel 3 is not set, the CLOCK SET screen or appears when you accidentally select...
... channel. Hit [B] and select ENGLISH. TIMER PROGRAMMING AUTO REPEAT [OFF] CHANNEL SET UP B CLOCK SET LANGUAGE SELECT • If the clock is already occupied for using the Number buttons: • When selecting cable channels which To Change the On-Screen Language are higher than 30 seconds. Setup 2 3 MANUAL SET UP 3 CH 01 CHANNEL 30 (CATV) or ADD or AUTO SET UP Select the channel to channel 3. • If channel 3 is not set, the CLOCK SET screen or appears when you accidentally select...
Owner's Manual
Page 10
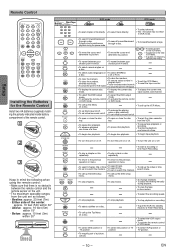
... select audio languages on the VCR Menu. • To advance to the previous operation in DVD mode. search time. MODE OPEN/CLOSE /EJECT • To set black level on/off . • To arrange the playing order or play a track or disc repeatedly. • To return to the previous operation in menu. • To return to the next VCR Menu. • To go back one frame at a time. RESET SUBTITLE T-SET ANGLE REPEAT A-B Installing...
... select audio languages on the VCR Menu. • To advance to the previous operation in DVD mode. search time. MODE OPEN/CLOSE /EJECT • To set black level on/off . • To arrange the playing order or play a track or disc repeatedly. • To return to the previous operation in menu. • To return to the next VCR Menu. • To go back one frame at a time. RESET SUBTITLE T-SET ANGLE REPEAT A-B Installing...

Owner's Manual
Page 11
... recording. • Hit [STOP C] to stop playback STOP 4 To eject OPEN/CLOSE /EJECT Other Operations OPEN/CLOSE STANDBY-ON SPEED AUDIO /EJECT 4 1 2 4 5 7 8 0 DISPLAY VCR 3 SKIP/CH. 6 VCR/TV 9 SLOW +10 DVD PAUSE 2 PLAY STOP 3 RECORD MENU ENTER 34 2 1 VIDEO yE STANDBY-ON REW D C A B F.FWD STOP/EJECT PLAY REC TIMER RECORD IR AUDIO YX CHANNEL A OPEN/ CLOSE VCR DVD DISC X Y H SOURCE PREV C STOP Hint • When a tape without record...
... recording. • Hit [STOP C] to stop playback STOP 4 To eject OPEN/CLOSE /EJECT Other Operations OPEN/CLOSE STANDBY-ON SPEED AUDIO /EJECT 4 1 2 4 5 7 8 0 DISPLAY VCR 3 SKIP/CH. 6 VCR/TV 9 SLOW +10 DVD PAUSE 2 PLAY STOP 3 RECORD MENU ENTER 34 2 1 VIDEO yE STANDBY-ON REW D C A B F.FWD STOP/EJECT PLAY REC TIMER RECORD IR AUDIO YX CHANNEL A OPEN/ CLOSE VCR DVD DISC X Y H SOURCE PREV C STOP Hint • When a tape without record...

Owner's Manual
Page 12
... "RF Output Channel" section. B TIMER PROGRAMMING AUTO REPEAT [OFF] CHANNEL SET UP CLOCK SET LANGUAGE SELECT TIMER PROGRAMMING 3 PROG 12345678 DATE START TIME END TIME AvCaHiAlaNbNlEeL program num- The "VCR" light on a recorded cassette, remove its record tab into the unit. 2 VCR VCR 1 MENU - TIMER PROGRAMMING B AUTO REPEAT [ON] CHANNEL SET UP CLOCK SET LANGUAGE SELECT Hint • To cancel Auto Repeat, follow steps 1)-2) above. REC OTR(0:30) (Normal recording) OTR(1:00)..... PROGRAM NUMBER 1 or DATE 1 0 / 0 3 MON START TIME END TIME Select an...
... "RF Output Channel" section. B TIMER PROGRAMMING AUTO REPEAT [OFF] CHANNEL SET UP CLOCK SET LANGUAGE SELECT TIMER PROGRAMMING 3 PROG 12345678 DATE START TIME END TIME AvCaHiAlaNbNlEeL program num- The "VCR" light on a recorded cassette, remove its record tab into the unit. 2 VCR VCR 1 MENU - TIMER PROGRAMMING B AUTO REPEAT [ON] CHANNEL SET UP CLOCK SET LANGUAGE SELECT Hint • To cancel Auto Repeat, follow steps 1)-2) above. REC OTR(0:30) (Normal recording) OTR(1:00)..... PROGRAM NUMBER 1 or DATE 1 0 / 0 3 MON START TIME END TIME Select an...
Owner's Manual
Page 13
... box on the TV screen. • Go to channel 3 or 4 (the RF output channel of the program you operate. The unit will appear. To use the DVD player during a Timer Recording or while the TIMER light appears or flashes. • Hit [STANDBY-ON] to turn on page 6, select the VCR to the digit you cancelled Timer Recording. The TIMER light will not function.) • To cancel the timer standby mode, press [SUBTITLE/T-SET] on the remote control...
... box on the TV screen. • Go to channel 3 or 4 (the RF output channel of the program you operate. The unit will appear. To use the DVD player during a Timer Recording or while the TIMER light appears or flashes. • Hit [STANDBY-ON] to turn on page 6, select the VCR to the digit you cancelled Timer Recording. The TIMER light will not function.) • To cancel the timer standby mode, press [SUBTITLE/T-SET] on the remote control...

Owner's Manual
Page 15
... stop for DVD function in "PLAYER MENU" setting (Refer to specific programs. • During the playback of a two-layered disc, pictures may stop playback STOP 1 OPEN/CLOSE STANDBY-ON SPEED AUDIO /EJECT 1 2 4 5 7 8 0 DISPLAY VCR 3 SKIP/CH. 6 VCR/TV 9 SLOW +10 DVD PAUSE 1 3 PLAY 4 RECORD STOP Hint VIDEO y E D C A REC B TIMER STANDBY-ON REW F.FWD STOP/EJECT PLAY RECORD IR AUDIO 1 12 YX CHANNEL A OPEN/ CLOSE VCR DVD DISC IN PLAY X Y H SOURCE PREV C STOP B PLAY G NEXT...
... stop for DVD function in "PLAYER MENU" setting (Refer to specific programs. • During the playback of a two-layered disc, pictures may stop playback STOP 1 OPEN/CLOSE STANDBY-ON SPEED AUDIO /EJECT 1 2 4 5 7 8 0 DISPLAY VCR 3 SKIP/CH. 6 VCR/TV 9 SLOW +10 DVD PAUSE 1 3 PLAY 4 RECORD STOP Hint VIDEO y E D C A REC B TIMER STANDBY-ON REW F.FWD STOP/EJECT PLAY RECORD IR AUDIO 1 12 YX CHANNEL A OPEN/ CLOSE VCR DVD DISC IN PLAY X Y H SOURCE PREV C STOP B PLAY G NEXT...

Owner's Manual
Page 17
... play a double-digit track, hit the track number. Refer to the manual accompanying the disc. • For CDs, Track Search is not available for the disc with the Number buttons. DVD Functions - 17 - Time Search DVD-V CD 1 PLAY DVD TOTAL 1:29:00 SEARCH MODE 21 2 3 4 5 6 7 8 9 0 Hit repeatedly until this marker display appears. 3 ENTER at the desired marker • Playback will restart from the specific...
... play a double-digit track, hit the track number. Refer to the manual accompanying the disc. • For CDs, Track Search is not available for the disc with the Number buttons. DVD Functions - 17 - Time Search DVD-V CD 1 PLAY DVD TOTAL 1:29:00 SEARCH MODE 21 2 3 4 5 6 7 8 9 0 Hit repeatedly until this marker display appears. 3 ENTER at the desired marker • Playback will restart from the specific...
Owner's Manual
Page 19
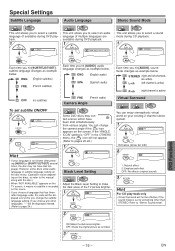
... 20-22.) 1 PLAY 1 / 8 ANGLE Black Level Setting DVD DVD-V Adjust the Black Level Setting to page 24.) Each time you hit [AUDIO], audio language changes as example below . STEREO (right and left channels are available) during DVD playback. 1 PLAY 1.ENG Dolby D 3/2.1ch 48k/3 SUBTITLE T-SET AUDIO Stereo Sound Mode DVD CD This unit allows you choose a language that language. EN ENG (English subtitles) FRE (French subtitles) OFF (no subtitle is set subtitle ON/OFF 1 PLAY 1.ENG/6 SUBTITLE T-SET 2 OFF Hint...
... 20-22.) 1 PLAY 1 / 8 ANGLE Black Level Setting DVD DVD-V Adjust the Black Level Setting to page 24.) Each time you hit [AUDIO], audio language changes as example below . STEREO (right and left channels are available) during DVD playback. 1 PLAY 1.ENG Dolby D 3/2.1ch 48k/3 SUBTITLE T-SET AUDIO Stereo Sound Mode DVD CD This unit allows you choose a language that language. EN ENG (English subtitles) FRE (French subtitles) OFF (no subtitle is set subtitle ON/OFF 1 PLAY 1.ENG/6 SUBTITLE T-SET 2 OFF Hint...

Owner's Manual
Page 20
... FRENCH DISC MENU ENGLISH FRENCH SPANISH PLAYER MENU ENGLISH FRANÇAIS ESPAÑOL - 20 - ENTER SETUP QUICK CUSTOM INITIALIZE Select the desired item. SETUP CUSTOM LANGUAGE DISPLAY AUDIO PARENTAL OTHERS DVD Functions LANGUAGE menu SETUP LANGUAGE AUDIO SUBTITLE DISC MENU PLAYER MENU ORIGINAL OFF ENGLISH ENGLISH DISPLAY menu SETUP DISPLAY TV ASPECT STILL MODE 4:3 LETTER BOX AUTO AUDIO menu SETUP AUDIO DRC DOWN SAMPLING DOLBY DIGITAL ON ON BITSTREAM PARENTAL menu SETUP PARENTAL PASSWORD Please enter a 4-digit password. DISC MENU: ∗1 (Default: ENGLISH) Sets the...
... FRENCH DISC MENU ENGLISH FRENCH SPANISH PLAYER MENU ENGLISH FRANÇAIS ESPAÑOL - 20 - ENTER SETUP QUICK CUSTOM INITIALIZE Select the desired item. SETUP CUSTOM LANGUAGE DISPLAY AUDIO PARENTAL OTHERS DVD Functions LANGUAGE menu SETUP LANGUAGE AUDIO SUBTITLE DISC MENU PLAYER MENU ORIGINAL OFF ENGLISH ENGLISH DISPLAY menu SETUP DISPLAY TV ASPECT STILL MODE 4:3 LETTER BOX AUTO AUDIO menu SETUP AUDIO DRC DOWN SAMPLING DOLBY DIGITAL ON ON BITSTREAM PARENTAL menu SETUP PARENTAL PASSWORD Please enter a 4-digit password. DISC MENU: ∗1 (Default: ENGLISH) Sets the...

Owner's Manual
Page 21
... BITSTREAM DOLBY DIGITAL: QUICK (Default: BITSTREAM) Set to "BITSTREAM" when the unit is connected to a Dolby Digital receiver. • BITSTREAM: Outputs a Dolby Digital Signals. • PCM: Convert the Dolby Digital into PCM (2 channel). It only affects during the playback of a disc recorded in 96kHz. or DISPLAY menu SETUP DISPLAY TV ASPECT STILL MODE 4:3 LETTER BOX AUTO 5 TV ASPECT: QUICK (Default: 4:3 LETTER BOX) See Hint to compress the range between soft and loud sounds. Follow...
... BITSTREAM DOLBY DIGITAL: QUICK (Default: BITSTREAM) Set to "BITSTREAM" when the unit is connected to a Dolby Digital receiver. • BITSTREAM: Outputs a Dolby Digital Signals. • PCM: Convert the Dolby Digital into PCM (2 channel). It only affects during the playback of a disc recorded in 96kHz. or DISPLAY menu SETUP DISPLAY TV ASPECT STILL MODE 4:3 LETTER BOX AUTO 5 TV ASPECT: QUICK (Default: 4:3 LETTER BOX) See Hint to compress the range between soft and loud sounds. Follow...

Owner's Manual
Page 22
... be set to the parental lock settings. To Change the Password for Parental Controls You can be played back. • Level 1: Only DVD softwares intended for adult and general use . PARENTAL LEVEL ALL PASSWORD CHANGE 7 8 9 0 SETUP PARENTAL PASSWORD Please enter a 4-digit password. or ENTER 7 To exit the menu SETUP 789 0 PARENTAL menu SETUP PARENTAL PASSWORD Please enter a 4-digit password. TIPS FOR LEVELS • 7 [NC-17]: No one under 13 • 3 [PG]: Parental Guidance suggested • 1 [G]: General Audience Hint • DVD-Video discs...
... be set to the parental lock settings. To Change the Password for Parental Controls You can be played back. • Level 1: Only DVD softwares intended for adult and general use . PARENTAL LEVEL ALL PASSWORD CHANGE 7 8 9 0 SETUP PARENTAL PASSWORD Please enter a 4-digit password. or ENTER 7 To exit the menu SETUP 789 0 PARENTAL menu SETUP PARENTAL PASSWORD Please enter a 4-digit password. TIPS FOR LEVELS • 7 [NC-17]: No one under 13 • 3 [PG]: Parental Guidance suggested • 1 [G]: General Audience Hint • DVD-Video discs...
Owner's Manual
Page 23
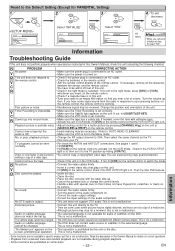
... Troubleshooting Guide If this unit does not perform properly when operated as instructed in the Menu mode. Turn the volume up . • Cancel the parental lock or change the control levels. • Handle a disc with adhesive tape. • Activate this unit or the disc. If needed, cover the hole with special care so that plays on this unit. • Tune your TV. Video or color fades...
... Troubleshooting Guide If this unit does not perform properly when operated as instructed in the Menu mode. Turn the volume up . • Cancel the parental lock or change the control levels. • Handle a disc with adhesive tape. • Activate this unit or the disc. If needed, cover the hole with special care so that plays on this unit. • Tune your TV. Video or color fades...

Owner's Manual
Page 27
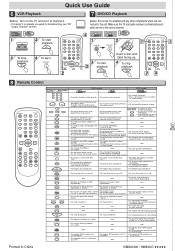
RESET SUBTITLE T-SET ANGLE REPEAT A-B VCR MODE Hit [VCR] on the remote control. (Verify that the VCR OUTPUT light is lit.) 4 Turn on the unit for the first time VCR VCR 1 Turn on the front page before you use this unit, hit [VCR/TV] on the remote control. 4)Hit [PLAY B] once. 5)After a few minutes. M E N U - Quick Use Guide 1 Connections Please refer to "Basic TV Connection" on the TV and set , the or CLOCK SET screen appears when you will change to channel 4 from...
RESET SUBTITLE T-SET ANGLE REPEAT A-B VCR MODE Hit [VCR] on the remote control. (Verify that the VCR OUTPUT light is lit.) 4 Turn on the unit for the first time VCR VCR 1 Turn on the front page before you use this unit, hit [VCR/TV] on the remote control. 4)Hit [PLAY B] once. 5)After a few minutes. M E N U - Quick Use Guide 1 Connections Please refer to "Basic TV Connection" on the TV and set , the or CLOCK SET screen appears when you will change to channel 4 from...
Owner's Manual
Page 28
... A-B repeat. • To remove status number in DVD mode. SKIP/CH. SLOW SPEED • To start playback PLAY 4 To stop playback. • To select subtitles on a disc. • To call up the VCR Menu. • To eject the video cassette from the VCR. search time. Make sure the TV and audio receiver (commercially available) are connected to this unit. RESET SUBTITLE T-SET ANGLE REPEAT A-B Button Disc/Tape (Alphabetical...
... A-B repeat. • To remove status number in DVD mode. SKIP/CH. SLOW SPEED • To start playback PLAY 4 To stop playback. • To select subtitles on a disc. • To call up the VCR Menu. • To eject the video cassette from the VCR. search time. Make sure the TV and audio receiver (commercially available) are connected to this unit. RESET SUBTITLE T-SET ANGLE REPEAT A-B Button Disc/Tape (Alphabetical...


