
Owner's Manual
Page 3
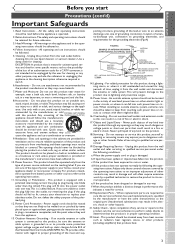
... mounting of overhead power lines or other controls may result in the operating instructions should be taken to keep from the type of power supply to an antenna discharge unit, size of grounding conductors, location of the lead-in a wet basement, or near a swimming pool, and the like. 8.Accessories - An outside antenna system, extreme care should be sure the service technician has used replacement parts...
... mounting of overhead power lines or other controls may result in the operating instructions should be taken to keep from the type of power supply to an antenna discharge unit, size of grounding conductors, location of the lead-in a wet basement, or near a swimming pool, and the like. 8.Accessories - An outside antenna system, extreme care should be sure the service technician has used replacement parts...

Owner's Manual
Page 4
... Service Center for home and other rights owners. To specify for inspection and cleaning of the laser optical pickup unit. Consult your local Audio/Video store and purchase a good quality VHS Video Head Cleaner. 2. If a streaky or snowy picture appears during playback, the video heads in its inside .Turn off, unplug the power plug, and please call our help line mentioned on the remote control...
... Service Center for home and other rights owners. To specify for inspection and cleaning of the laser optical pickup unit. Consult your local Audio/Video store and purchase a good quality VHS Video Head Cleaner. 2. If a streaky or snowy picture appears during playback, the video heads in its inside .Turn off, unplug the power plug, and please call our help line mentioned on the remote control...
Owner's Manual
Page 5
... 7 Installing batteries in the remote control 9 Using a remote control 9 VCR/DVD recorder switching 9 SETUP/DISC/CD menu 9 DISPLAY menu 11 Connections 13 Connection to a TV 13 Connection to a cable box or satellite box . . . .14 Connection to an Audio System 15 Getting started 16 Easy DVD recording 16 Channel setting 18 Getting channels automatically 18 Adding/deleting channels 19 Selecting the TV stereo or SAP 20 Clock setting 21 Auto Clock Setting 21 Manual Clock Setting 22 Setting the daylight saving time 24 Selecting the TV aspect ratio 25...
... 7 Installing batteries in the remote control 9 Using a remote control 9 VCR/DVD recorder switching 9 SETUP/DISC/CD menu 9 DISPLAY menu 11 Connections 13 Connection to a TV 13 Connection to a cable box or satellite box . . . .14 Connection to an Audio System 15 Getting started 16 Easy DVD recording 16 Channel setting 18 Getting channels automatically 18 Adding/deleting channels 19 Selecting the TV stereo or SAP 20 Clock setting 21 Auto Clock Setting 21 Manual Clock Setting 22 Setting the daylight saving time 24 Selecting the TV aspect ratio 25...
Owner's Manual
Page 6
... to the video cassette tape. Every time the REC/OTR button on the remote control or the RECORD button on the front panel pressed during recording, the recording time will be prepared from discs with surround sound system. Play DVD mode Theater surround sound in your convenience. Editing DVD mode Setting/Clearing chapter markers: You can edit titles on recordings as it is compatible with Dolby Digital, you...
... to the video cassette tape. Every time the REC/OTR button on the remote control or the RECORD button on the front panel pressed during recording, the recording time will be prepared from discs with surround sound system. Play DVD mode Theater surround sound in your convenience. Editing DVD mode Setting/Clearing chapter markers: You can edit titles on recordings as it is compatible with Dolby Digital, you...

Owner's Manual
Page 7
...DVD DIGITAL AUDIO AUDIO OUT OUT S-VIDEO COMPONENT VIDEO OUT Y DVD/VCR AUDIO IN AUDIO OUT ANTENNA IN L L 1. Press to connect the S-Video output of external equipment with a standard video cable. 9. S-VIDEO input jack (LINE2) (DVD only) Use to cancel the timer standby mode, and turn the unit on the rear panel. Press repeatedly to connect a TV monitor with component video inputs with standard audio cables. 12. DVD SELECT indicator This indicator appears when the DVD output mode is selected. 14. Remote control sensor (DVD/VCR) Receive signals from your TV monitor...
...DVD DIGITAL AUDIO AUDIO OUT OUT S-VIDEO COMPONENT VIDEO OUT Y DVD/VCR AUDIO IN AUDIO OUT ANTENNA IN L L 1. Press to connect the S-Video output of external equipment with a standard video cable. 9. S-VIDEO input jack (LINE2) (DVD only) Use to cancel the timer standby mode, and turn the unit on the rear panel. Press repeatedly to connect a TV monitor with component video inputs with standard audio cables. 12. DVD SELECT indicator This indicator appears when the DVD output mode is selected. 14. Remote control sensor (DVD/VCR) Receive signals from your TV monitor...

Owner's Manual
Page 14
... channel. Connection B (Back of this unit) DVD/VCR ANTENNA IN (Cable box or Cable Signal Satellite box) OUT E IN OUT RF Cable (supplied) RF Cable (Back of the cable box or satellite box 1) Turn on this unit.With this unit by pressing POWER button. To playback a DVD disc or a tape Before trying to change this unit by pressing POWER button.The "POWER" indicator on pages 44-45, 94. To select channels of TV) Select this connection when you need...
... channel. Connection B (Back of this unit) DVD/VCR ANTENNA IN (Cable box or Cable Signal Satellite box) OUT E IN OUT RF Cable (supplied) RF Cable (Back of the cable box or satellite box 1) Turn on this unit.With this unit by pressing POWER button. To playback a DVD disc or a tape Before trying to change this unit by pressing POWER button.The "POWER" indicator on pages 44-45, 94. To select channels of TV) Select this connection when you need...

Owner's Manual
Page 18
... 6 WXYZ VIDEO/TV 9 SLOW DVD PAUSE 3 7 PLAY STOP REC/OTR SETUP TIMER PROG. To cancel the auto presetting during presetting, some channels not yet preset may not be sure to select the input to cancel. Screen: 6 Select "Auto Preset" using { / B buttons, then press ENTER button. REC MONITOR ENTER MENU/LIST TOP MENU RETURN CLEAR/C-RESET ZOOM SKIP SEARCH MODE CM SKIP SKIP 4 5 6 To select a channel You can select a channel by using the Number buttons: • When selecting cable channels which the...
... 6 WXYZ VIDEO/TV 9 SLOW DVD PAUSE 3 7 PLAY STOP REC/OTR SETUP TIMER PROG. To cancel the auto presetting during presetting, some channels not yet preset may not be sure to select the input to cancel. Screen: 6 Select "Auto Preset" using { / B buttons, then press ENTER button. REC MONITOR ENTER MENU/LIST TOP MENU RETURN CLEAR/C-RESET ZOOM SKIP SEARCH MODE CM SKIP SKIP 4 5 6 To select a channel You can select a channel by using the Number buttons: • When selecting cable channels which the...
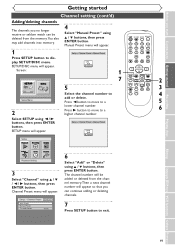
Owner's Manual
Page 19
... VIDEO/TV 9 SLOW DVD PAUSE 1 PLAY STOP REC/OTR SETUP TIMER PROG. 5 7 REC MONITOR ENTER MENU/LIST TOP MENU RETURN CLEAR/C-RESET ZOOM SKIP SKIP 2 3 Setup Menu Select the channel number to a higher channel number. 6 Select SETUP using K / L / { / B buttons, then press ENTER button. Press { button to move to a 5 lower channel number. 2 Press B button to move to SEARCH MODE CM SKIP 4 add or delete. Playing discs Editing Changing the SETUP menu VCR functions Others Français 19 Setup > Channel Preset VCR DVD Auto Preset Manual Preset TV Audio Select...
... VIDEO/TV 9 SLOW DVD PAUSE 1 PLAY STOP REC/OTR SETUP TIMER PROG. 5 7 REC MONITOR ENTER MENU/LIST TOP MENU RETURN CLEAR/C-RESET ZOOM SKIP SKIP 2 3 Setup Menu Select the channel number to a higher channel number. 6 Select SETUP using K / L / { / B buttons, then press ENTER button. Press { button to move to a 5 lower channel number. 2 Press B button to move to SEARCH MODE CM SKIP 4 add or delete. Playing discs Editing Changing the SETUP menu VCR functions Others Français 19 Setup > Channel Preset VCR DVD Auto Preset Manual Preset TV Audio Select...
Owner's Manual
Page 22
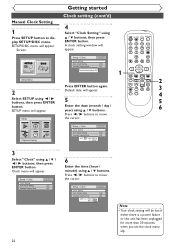
... button. Setup > Clock VCR DVD Clock Setting Auto Clock Setting Daylight Saving Time Auto ON POWER REC SPEED AUDIO OPEN/CLOSE .@/: 1 GHI 4 PQRS 7 DISPLAY ABC 2 JKL 5 TUV 8 SPACE 0 VCR DEF 3 MNO CH 6 WXYZ VIDEO/TV 9 SLOW DVD PAUSE 1 PLAY STOP REC/OTR SETUP TIMER PROG. SETUP menu will appear. Press { / B buttons to display SETUP/DISC menu. SETUP/DISC menu will appear. 5 Enter the date (month / day / year) using K / L buttons. Getting started Clock setting (cont'd) Manual Clock Setting 1 Press SETUP button to move the cursor. Default...
... button. Setup > Clock VCR DVD Clock Setting Auto Clock Setting Daylight Saving Time Auto ON POWER REC SPEED AUDIO OPEN/CLOSE .@/: 1 GHI 4 PQRS 7 DISPLAY ABC 2 JKL 5 TUV 8 SPACE 0 VCR DEF 3 MNO CH 6 WXYZ VIDEO/TV 9 SLOW DVD PAUSE 1 PLAY STOP REC/OTR SETUP TIMER PROG. SETUP menu will appear. Press { / B buttons to display SETUP/DISC menu. SETUP/DISC menu will appear. 5 Enter the date (month / day / year) using K / L buttons. Getting started Clock setting (cont'd) Manual Clock Setting 1 Press SETUP button to move the cursor. Default...

Owner's Manual
Page 23
... Clock Setting Daylight Saving Time VCR DVD Auto ON POWER REC SPEED AUDIO OPEN/CLOSE .@/: 1 GHI 4 PQRS 7 DISPLAY ABC 2 JKL 5 TUV 8 SPACE 0 VCR DEF 3 MNO CH 6 WXYZ VIDEO/TV 9 SLOW DVD PAUSE PLAY 8 STOP REC/OTR SETUP TIMER PROG. Setup > Clock Clock Setting Auto Clock Setting Daylight Saving Time VCR DVD OFF AAuuttoo OMfaf nual 5 Select "OFF" using K / L buttons, then press ENTER button. 6 Press SETUP button to (3) in "Manual Clock Setting". 4 Select "Auto Clock Setting" using K / L buttons, then press ENTER button. REC MONITOR ENTER MENU/LIST TOP MENU RETURN CLEAR/C-RESET...
... Clock Setting Daylight Saving Time VCR DVD Auto ON POWER REC SPEED AUDIO OPEN/CLOSE .@/: 1 GHI 4 PQRS 7 DISPLAY ABC 2 JKL 5 TUV 8 SPACE 0 VCR DEF 3 MNO CH 6 WXYZ VIDEO/TV 9 SLOW DVD PAUSE PLAY 8 STOP REC/OTR SETUP TIMER PROG. Setup > Clock Clock Setting Auto Clock Setting Daylight Saving Time VCR DVD OFF AAuuttoo OMfaf nual 5 Select "OFF" using K / L buttons, then press ENTER button. 6 Press SETUP button to (3) in "Manual Clock Setting". 4 Select "Auto Clock Setting" using K / L buttons, then press ENTER button. REC MONITOR ENTER MENU/LIST TOP MENU RETURN CLEAR/C-RESET...
Owner's Manual
Page 28
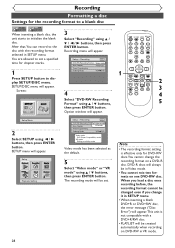
... DVD DVD-RW Recording Format Auto Chapter Timer Programming Dubbing Mode VVidRemo omdoede V1R0 mmionduetes VCR DVD Video mode DVD Player Compatibility mode. Setup > Recording DVD DVD-RW Recording Format Auto Chapter Timer Programming Dubbing Mode Video mode 10 minutes VCR DVD 4 Select "DVD-RW Recording Format" using K / L / { / B buttons, then press ENTER button. REC MONITOR ENTER MENU/LIST TOP MENU RETURN CLEAR/C-RESET ZOOM SKIP SEARCH MODE CM SKIP SKIP 2 3 4 5 Note • The recording format setting is effective only for DVD-RW discs.You cannot change it in SETUP menu...
... DVD DVD-RW Recording Format Auto Chapter Timer Programming Dubbing Mode VVidRemo omdoede V1R0 mmionduetes VCR DVD Video mode DVD Player Compatibility mode. Setup > Recording DVD DVD-RW Recording Format Auto Chapter Timer Programming Dubbing Mode Video mode 10 minutes VCR DVD 4 Select "DVD-RW Recording Format" using K / L / { / B buttons, then press ENTER button. REC MONITOR ENTER MENU/LIST TOP MENU RETURN CLEAR/C-RESET ZOOM SKIP SEARCH MODE CM SKIP SKIP 2 3 4 5 Note • The recording format setting is effective only for DVD-RW discs.You cannot change it in SETUP menu...

Owner's Manual
Page 35
... Connections Getting started Recording Playing discs 8 Select the channel number to start.Then the recording will start and waits to record using K / L buttons, then press CLEAR/C-RESET button. To stop the tape recording. STOP C button on the front display. When the timer recording is not effective. 12 POWER REC SPEED AUDIO OPEN/CLOSE .@/: 1 GHI 4 PQRS 7 DISPLAY ABC 2 JKL 5 TUV 8 SPACE 0 VCR DEF 3 MNO CH 6 WXYZ VIDEO/TV 9 SLOW DVD...
... Connections Getting started Recording Playing discs 8 Select the channel number to start.Then the recording will start and waits to record using K / L buttons, then press CLEAR/C-RESET button. To stop the tape recording. STOP C button on the front display. When the timer recording is not effective. 12 POWER REC SPEED AUDIO OPEN/CLOSE .@/: 1 GHI 4 PQRS 7 DISPLAY ABC 2 JKL 5 TUV 8 SPACE 0 VCR DEF 3 MNO CH 6 WXYZ VIDEO/TV 9 SLOW DVD...

Owner's Manual
Page 40
... button. REC MONITOR ENTER MENU/LIST TOP MENU RETURN CLEAR/C-RESET ZOOM SKIP SEARCH MODE CM SKIP SKIP 9 5 7-a POWER REW F.FWD STOP/EJECT PLAY RECORD 9-b 7-b OPEN/CLOSE CHANNEL DUBBING SELECT STOP PLAY R VCR SELECT DVD 8 9-a Note • When you wish to record to stop the recording. 40 POWER REC SPEED AUDIO OPEN/CLOSE .@/: 1 GHI 4 PQRS 7 DISPLAY ABC 2 JKL 5 TUV 8 SPACE 0 VCR DEF 3 MNO CH 6 WXYZ VIDEO/TV 9 SLOW DVD PAUSE 7 6 PLAY STOP REC/OTR SETUP TIMER...
... button. REC MONITOR ENTER MENU/LIST TOP MENU RETURN CLEAR/C-RESET ZOOM SKIP SEARCH MODE CM SKIP SKIP 9 5 7-a POWER REW F.FWD STOP/EJECT PLAY RECORD 9-b 7-b OPEN/CLOSE CHANNEL DUBBING SELECT STOP PLAY R VCR SELECT DVD 8 9-a Note • When you wish to record to stop the recording. 40 POWER REC SPEED AUDIO OPEN/CLOSE .@/: 1 GHI 4 PQRS 7 DISPLAY ABC 2 JKL 5 TUV 8 SPACE 0 VCR DEF 3 MNO CH 6 WXYZ VIDEO/TV 9 SLOW DVD PAUSE 7 6 PLAY STOP REC/OTR SETUP TIMER...

Owner's Manual
Page 85
... of OSD screen. Set the parental level of sound signal which you can set and the default settings. Before you start Connections Getting started Recording Changing the SETUP menu Tour of the SETUP menu The following table for useful operation. Refer to work the screen saver on even when the power is the contents which outputs from the digital audio output jack. Set the time to the following table is switched off. 85 Set the type of your DVD discs.
... of OSD screen. Set the parental level of sound signal which you can set and the default settings. Before you start Connections Getting started Recording Changing the SETUP menu Tour of the SETUP menu The following table for useful operation. Refer to work the screen saver on even when the power is the contents which outputs from the digital audio output jack. Set the time to the following table is switched off. 85 Set the type of your DVD discs.

Owner's Manual
Page 89
...press ENTER button. Setup > Display DVD OSD Background Transparency 35% OSD Background Color 1 OSD Language English Screen Saver 10 minutes Setup > Display DVD OSD Background Transparency 35% OSD Background Color OSD Language Screen Saver 11 E2nglish 130 minutes • Select a setting using K / L buttons, then press ENTER button. Your setting will be activated. Before you start Connections Getting started Recording Changing the SETUP menu Settings for OSD. OSD Background Color (Default : 1 Green) Set the OSD screen color. Setup > Display DVD OSD Background...
...press ENTER button. Setup > Display DVD OSD Background Transparency 35% OSD Background Color 1 OSD Language English Screen Saver 10 minutes Setup > Display DVD OSD Background Transparency 35% OSD Background Color OSD Language Screen Saver 11 E2nglish 130 minutes • Select a setting using K / L buttons, then press ENTER button. Your setting will be activated. Before you start Connections Getting started Recording Changing the SETUP menu Settings for OSD. OSD Background Color (Default : 1 Green) Set the OSD screen color. Setup > Display DVD OSD Background...

Owner's Manual
Page 90
... TIMER PROG. POWER REC SPEED AUDIO OPEN/CLOSE .@/: 1 GHI 4 PQRS 7 DISPLAY ABC 2 JKL 5 TUV 8 SPACE 0 VCR DEF 3 MNO CH 6 WXYZ VIDEO/TV 9 SLOW DVD PAUSE Setup Menu 2 Select "SETUP" using K / L / { / B buttons, then press ENTER button. SETUP menu will appear. Option window will only affect DVD discs during playback. REC MONITOR ENTER MENU/LIST TOP MENU RETURN CLEAR/C-RESET ZOOM SKIP SEARCH MODE CM SKIP SKIP 2 3 4 Setup Playback Setting 3 Select "Playback" using { / B buttons, then press ENTER button. Setup > Playback TV Aspect Parental Lock Disc Menu Language Audio...
... TIMER PROG. POWER REC SPEED AUDIO OPEN/CLOSE .@/: 1 GHI 4 PQRS 7 DISPLAY ABC 2 JKL 5 TUV 8 SPACE 0 VCR DEF 3 MNO CH 6 WXYZ VIDEO/TV 9 SLOW DVD PAUSE Setup Menu 2 Select "SETUP" using K / L / { / B buttons, then press ENTER button. SETUP menu will appear. Option window will only affect DVD discs during playback. REC MONITOR ENTER MENU/LIST TOP MENU RETURN CLEAR/C-RESET ZOOM SKIP SEARCH MODE CM SKIP SKIP 2 3 4 Setup Playback Setting 3 Select "Playback" using { / B buttons, then press ENTER button. Setup > Playback TV Aspect Parental Lock Disc Menu Language Audio...

Owner's Manual
Page 91
..., select "96kHz". 96kHz sound will be output. putting 48kHz digital sound. When your amplifier/decoder is NOT compatible with Audio DVD 4:3 Letter Box All English Original OFF ON ON OFF OFF • Select a setting using K / L buttons, then press ENTER button. Setup > Playback TV Aspect Parental Lock Disc Menu Language Audio Language Subtitle Language Digital Out Dynamic Range Control Fast Forward with Audio DVD 4:3 Letter Box All English Original OFF ON OFF Setup > Playback TV Aspect Parental Lock Disc Menu Language Audio Language Subtitle Language Digital Out...
..., select "96kHz". 96kHz sound will be output. putting 48kHz digital sound. When your amplifier/decoder is NOT compatible with Audio DVD 4:3 Letter Box All English Original OFF ON ON OFF OFF • Select a setting using K / L buttons, then press ENTER button. Setup > Playback TV Aspect Parental Lock Disc Menu Language Audio Language Subtitle Language Digital Out Dynamic Range Control Fast Forward with Audio DVD 4:3 Letter Box All English Original OFF ON OFF Setup > Playback TV Aspect Parental Lock Disc Menu Language Audio Language Subtitle Language Digital Out...
Owner's Manual
Page 97
... the DIGITAL AUDIO OUT (COAXIAL) jack, check the Audio Setup settings (pages 90-91). • The disc is noisy. • Switch the input to some programs could affect picture quality. Picture There is not compatible with DTS-CD. TV program reception does not fill the screen. No DTS sound is output • This unit is no sound. Symptom Power The power does not turn off the display. • Check the connection to...
... the DIGITAL AUDIO OUT (COAXIAL) jack, check the Audio Setup settings (pages 90-91). • The disc is noisy. • Switch the input to some programs could affect picture quality. Picture There is not compatible with DTS-CD. TV program reception does not fill the screen. No DTS sound is output • This unit is no sound. Symptom Power The power does not turn off the display. • Check the connection to...
Owner's Manual
Page 98
.../OTR button. If needed, cover the hole with another setting that was not finalized (page 41). • Resume play the disc if it again. • The program contains copy protection signals that lasted for the sound track cannot be changed from the AC outlet, and connect it was set the timer setting correctly. Recording/Timer recording/Editing The channel cannot be changed . Nothing was a power failure...
.../OTR button. If needed, cover the hole with another setting that was not finalized (page 41). • Resume play the disc if it again. • The program contains copy protection signals that lasted for the sound track cannot be changed from the AC outlet, and connect it was set the timer setting correctly. Recording/Timer recording/Editing The channel cannot be changed . Nothing was a power failure...
Owner's Manual
Page 100
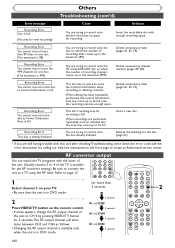
... to locate an Authorized service center. Delete unnecessary chapter markers (pages 69, 78). Recording Error You cannot record on ) CH3 3 seconds POWER REC SPEED AUDIO OPEN/CLOSE .@/: 1 GHI 4 PQRS 7 DISPLAY ABC 2 JKL 5 TUV 8 SPACE 0 VCR DEF 3 MNO CH 6 WXYZ VIDEO/TV 9 SLOW DVD PAUSE PLAY STOP REC/OTR SETUP TIMER PROG. REC MONITOR ENTER MENU/LIST TOP MENU RETURN CLEAR/C-RESET ZOOM SKIP SEARCH MODE CM SKIP SKIP...
... to locate an Authorized service center. Delete unnecessary chapter markers (pages 69, 78). Recording Error You cannot record on ) CH3 3 seconds POWER REC SPEED AUDIO OPEN/CLOSE .@/: 1 GHI 4 PQRS 7 DISPLAY ABC 2 JKL 5 TUV 8 SPACE 0 VCR DEF 3 MNO CH 6 WXYZ VIDEO/TV 9 SLOW DVD PAUSE PLAY STOP REC/OTR SETUP TIMER PROG. REC MONITOR ENTER MENU/LIST TOP MENU RETURN CLEAR/C-RESET ZOOM SKIP SEARCH MODE CM SKIP SKIP...


