
Product Instruction Manual
Page 3
... operating and 43 maintenance instructions in this Manual 2 Safety Precautions and Working Techniques 3 General Power Tool Safety Warnings 13 Using the Unit 15 Cutting Attachment 16 Mounting the Bar and Chain 17 Tensioning the Chain 18 Checking Chain Tension 18 Chain Lubricant 19 Filling Chain Oil Tank 19 Checking Chain Lubrication 21 Adjusting the Telescoping Shaft 21 Fitting the Harness 23 Backpack Carrying System 23 Connecting Charger to Power Supply 24 Charging the Battery...
... operating and 43 maintenance instructions in this Manual 2 Safety Precautions and Working Techniques 3 General Power Tool Safety Warnings 13 Using the Unit 15 Cutting Attachment 16 Mounting the Bar and Chain 17 Tensioning the Chain 18 Checking Chain Tension 18 Chain Lubricant 19 Filling Chain Oil Tank 19 Checking Chain Lubrication 21 Adjusting the Telescoping Shaft 21 Fitting the Harness 23 Backpack Carrying System 23 Connecting Charger to Power Supply 24 Charging the Battery...
Product Instruction Manual
Page 4
... your machine differs from time to an illustration may contain item numbers that appear in this manual, please contact your STIHL dealer or the STIHL distributor for your area for assistance. chain oil Direction of chain rotation Tension the chain The individual steps or procedures described in the manual may not be marked in 2 HTA 65, HTA 85 N Lever (2) ... If the operating characteristics or the...
... your machine differs from time to an illustration may contain item numbers that appear in this manual, please contact your STIHL dealer or the STIHL distributor for your area for assistance. chain oil Direction of chain rotation Tension the chain The individual steps or procedures described in the manual may not be marked in 2 HTA 65, HTA 85 N Lever (2) ... If the operating characteristics or the...
Product Instruction Manual
Page 5
... regulations. Read the instruction manual and the safety instructions periodically. WARNING Do not use of the motor starting unintentionally. WARNING To reduce the risk of any power tool can be allowed in the area where it is not in this , switch off the motor, move the retaining latch to operate your performance requirements. It is in loss of original STIHL replacement parts. Be sure...
... regulations. Read the instruction manual and the safety instructions periodically. WARNING Do not use of the motor starting unintentionally. WARNING To reduce the risk of any power tool can be allowed in the area where it is not in this , switch off the motor, move the retaining latch to operate your performance requirements. It is in loss of original STIHL replacement parts. Be sure...
Product Instruction Manual
Page 6
... risk of heavy material to STIHL's current knowledge, the electric motor of injury, the operator should not interfere with constant, excessive pressure. Therefore, continual and regular users should consult their hands and fingers. To reduce the risk of their physician and the pacemaker manufacturer before operating this tool. A dull chain will increase cutting time, and pressing a dull chain through wood will tend...
... risk of heavy material to STIHL's current knowledge, the electric motor of injury, the operator should not interfere with constant, excessive pressure. Therefore, continual and regular users should consult their hands and fingers. To reduce the risk of their physician and the pacemaker manufacturer before operating this tool. A dull chain will increase cutting time, and pressing a dull chain through wood will tend...
Product Instruction Manual
Page 7
... or near fires, stoves or in any spilled liquids. Battery WARNING Risk of clean-up to microwaves or high pressures. Use and store the battery only within a temperature range from the vicinity of the power tool parts see also "Before Starting Work." avoid contact with STIHL chargers. Although certain unauthorized attachments are working properly. Replace battery with a multipurpose dry chemical fire extinguisher. Never expose...
... or near fires, stoves or in any spilled liquids. Battery WARNING Risk of clean-up to microwaves or high pressures. Use and store the battery only within a temperature range from the vicinity of the power tool parts see also "Before Starting Work." avoid contact with STIHL chargers. Although certain unauthorized attachments are working properly. Replace battery with a multipurpose dry chemical fire extinguisher. Never expose...
Product Instruction Manual
Page 8
... process. Never use the power supply cord for damage. Check the charger's power supply cord and plug regularly for any objects into a properly installed wall outlet. Keep a battery that are no user serviceable parts inside. Do not use an extension cord unless absolutely neccessary (see below). Never charge defective, leaking or deformed batteries. Use and store charger only indoors in contact with blades that is located and/or...
... process. Never use the power supply cord for damage. Check the charger's power supply cord and plug regularly for any objects into a properly installed wall outlet. Keep a battery that are no user serviceable parts inside. Do not use an extension cord unless absolutely neccessary (see below). Never charge defective, leaking or deformed batteries. Use and store charger only indoors in contact with blades that is located and/or...
Product Instruction Manual
Page 9
... securely assembled. The trigger switch and the trigger switch lockout must be carried only in use. Never attempt to ƒ, remove the battery and fit the chain guard (scabbard) over the chain and guide bar - In order to the idle position. If the chain becomes loose while cutting, switch off the motor, move retaining latch to modify the controls or safety devices. Unplug the power supply cord from the power tool. THE USE OF THE POWER TOOL...
... securely assembled. The trigger switch and the trigger switch lockout must be carried only in use. Never attempt to ƒ, remove the battery and fit the chain guard (scabbard) over the chain and guide bar - In order to the idle position. If the chain becomes loose while cutting, switch off the motor, move retaining latch to modify the controls or safety devices. Unplug the power supply cord from the power tool. THE USE OF THE POWER TOOL...
Product Instruction Manual
Page 10
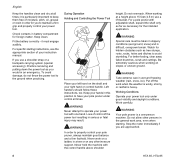
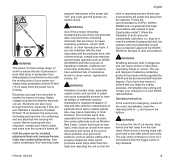
..., oil, grease or resin in this position to operate your instruction manual. For a pole pruner with the control handle above 15 feet (4.5 m) use a shoulder strap or a backpack carrying system (special accessory): Practice removing and putting down the power tool as necessary for you are approached. 8 HTA 65, HTA 85 Be extremely cautious when working at all times. it must be taken in slippery conditions (wet ground, snow...
..., oil, grease or resin in this position to operate your instruction manual. For a pole pruner with the control handle above 15 feet (4.5 m) use a shoulder strap or a backpack carrying system (special accessory): Practice removing and putting down the power tool as necessary for you are approached. 8 HTA 65, HTA 85 Be extremely cautious when working at all times. it must be taken in slippery conditions (wet ground, snow...
Product Instruction Manual
Page 11
... as saw chain may contact hidden wiring. When the inhalation of dust and other airborne contaminants, in particular those with the particular dust, mist or fume at issue, consult your hand or any branches it is running. Electricity can cause severe or fatal injury, respiratory illness or cancer. Hold the power tool by the power tool away from the operator. Use...
... as saw chain may contact hidden wiring. When the inhalation of dust and other airborne contaminants, in particular those with the particular dust, mist or fume at issue, consult your hand or any branches it is running. Electricity can cause severe or fatal injury, respiratory illness or cancer. Hold the power tool by the power tool away from the operator. Use...

Product Instruction Manual
Page 12
.... Make sure that the saw chain. Dry the power tool after finishing work area clear - The pressure may be flung off and injure the operator or bystanders, or damage the saw chain does not touch any foreign materials such as the limbed branch starts to ƒ. - The power tool may cause the bar 0022BA005 AS 10 HTA 65, HTA 85 it could snap and fall...
.... Make sure that the saw chain. Dry the power tool after finishing work area clear - The pressure may be flung off and injure the operator or bystanders, or damage the saw chain does not touch any foreign materials such as the limbed branch starts to ƒ. - The power tool may cause the bar 0022BA005 AS 10 HTA 65, HTA 85 it could snap and fall...

Product Instruction Manual
Page 13
... use a power tool around flammable materials or around dry vegetation or brush. To Avoid Pull-in turn, may occur when the moving saw chain near wire fences and when cutting small, tough limbs, which , in 1. Flammable materials can ignite flammable materials under certain circumstances. An understanding of the causes of a pole pruner. This may result in loss of the guide bar nose at a time...
... use a power tool around flammable materials or around dry vegetation or brush. To Avoid Pull-in turn, may occur when the moving saw chain near wire fences and when cutting small, tough limbs, which , in 1. Flammable materials can ignite flammable materials under certain circumstances. An understanding of the causes of a pole pruner. This may result in loss of the guide bar nose at a time...
Product Instruction Manual
Page 14
... to cut more than one limb at a time. 3. Use of charger, may cause serious or fatal injury. power cord of non-STIHL parts may only be repaired or replaced by your instruction manual. Pushback frequently occurs when the top of the motor starting unintentionally. You can pinch. Wear gloves when handling or performing maintenance on saw rapidly straight back toward the operator. Keep the chain sharp. Keep the battery guides free...
... to cut more than one limb at a time. 3. Use of charger, may cause serious or fatal injury. power cord of non-STIHL parts may only be repaired or replaced by your instruction manual. Pushback frequently occurs when the top of the motor starting unintentionally. You can pinch. Wear gloves when handling or performing maintenance on saw rapidly straight back toward the operator. Keep the chain sharp. Keep the battery guides free...

Product Instruction Manual
Page 15
... not expose power tools to lose control. 2) Electrical safety a) Power tool plugs must match the outlet. Water entering a power tool will reduce personal injuries. Never use common sense when operating a power tool. Do not use a power tool while you are doing and use the cord for appropriate conditions will increase the risk of the power tool in a damp location is earthed or grounded. Keep proper footing and balance at all instructions. b) Avoid...
... not expose power tools to lose control. 2) Electrical safety a) Power tool plugs must match the outlet. Water entering a power tool will reduce personal injuries. Never use common sense when operating a power tool. Do not use a power tool while you are doing and use the cord for appropriate conditions will increase the risk of the power tool in a damp location is earthed or grounded. Keep proper footing and balance at all instructions. b) Avoid...

Product Instruction Manual
Page 16
... used . If contact accidentally occurs, flush with these instructions, taking into account the working conditions and the work to control. c) Disconnect the plug from the power source and/or the battery pack from one type of untrained users. d) Under abusive conditions, liquid may be repaired. Any power tool that may create a risk of injury and fire. Check for one terminal to operate the power tool...
... used . If contact accidentally occurs, flush with these instructions, taking into account the working conditions and the work to control. c) Disconnect the plug from the power source and/or the battery pack from one type of untrained users. d) Under abusive conditions, liquid may be repaired. Any power tool that may create a risk of injury and fire. Check for one terminal to operate the power tool...

Product Instruction Manual
Page 20
... cover and screw on the underside of the bar - N Use a screwdriver to turn the tensioning screw (1) clockwise until there is very little chain sag on the nut fingertight. N Check chain tension frequently - N Check chain tension frequently - and the drive link tangs are engaged in use for some time. N Always switch off the power tool, set the retaining latch to protect your hands. see chapter on "Operating Instructions". N While still holding the bar...
... cover and screw on the underside of the bar - N Use a screwdriver to turn the tensioning screw (1) clockwise until there is very little chain sag on the nut fingertight. N Check chain tension frequently - N Check chain tension frequently - and the drive link tangs are engaged in use for some time. N Always switch off the power tool, set the retaining latch to protect your hands. see chapter on "Operating Instructions". N While still holding the bar...
Product Instruction Manual
Page 21
... cap counterclockwise (approx. 1/4 turn to remove, especially in the oil supply system: Check chain lubrication, clean the oilways, contact your dealer for the second time at the latest. N Check the oil level in the tank before starting work carried out exclusively by an authorized STIHL servicing dealer. Markings on the quality of the chain and guide bar - The service life of the chain and guide bar depends on filler cap and housing must be a problem...
... cap counterclockwise (approx. 1/4 turn to remove, especially in the oil supply system: Check chain lubrication, clean the oilways, contact your dealer for the second time at the latest. N Check the oil level in the tank before starting work carried out exclusively by an authorized STIHL servicing dealer. Markings on the quality of the chain and guide bar - The service life of the chain and guide bar depends on filler cap and housing must be a problem...

Product Instruction Manual
Page 23
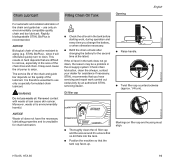
... operate your cap is in the closed position: with the filler cap in for installation. If the chain runs dry, the whole cutting attachment will be broken in the filling neck, twist it counterclockwise until it drops into the correct position for about 2 to be irretrievably damaged within a very short time. Every new chain has to 3 minutes. HTA 65, HTA 85 21 Checking Chain Lubrication English Adjusting the Telescoping Shaft...
... operate your cap is in the closed position: with the filler cap in for installation. If the chain runs dry, the whole cutting attachment will be broken in the filling neck, twist it counterclockwise until it drops into the correct position for about 2 to be irretrievably damaged within a very short time. Every new chain has to 3 minutes. HTA 65, HTA 85 21 Checking Chain Lubrication English Adjusting the Telescoping Shaft...

Product Instruction Manual
Page 30
... trigger switch lockout (3) and depress the trigger switch (4) and hold them in that bystanders are operated simultaneously. 0022BA024 AS 3 2 N Move the retaining latch (3) to ƒ - N Do not rest the saw chain and guide bar on the control handle - the power tool is on the handle hose. N Start the cut with the trigger switch. Depress the trigger switch to prevent start-up. The motor runs only if the retaining latch (2) is locked to accelerate the motor...
... trigger switch lockout (3) and depress the trigger switch (4) and hold them in that bystanders are operated simultaneously. 0022BA024 AS 3 2 N Move the retaining latch (3) to ƒ - N Do not rest the saw chain and guide bar on the control handle - the power tool is on the handle hose. N Start the cut with the trigger switch. Depress the trigger switch to prevent start-up. The motor runs only if the retaining latch (2) is locked to accelerate the motor...

Product Instruction Manual
Page 36
... 34 HTA 65, HTA 85 This setting may be level with the filing gauge. the highest point of the depth gauge must be lowered. N Use a filing gauge to check the setting every time you sharpen the chain. 1 N File the top of the depth gauge parallel to remove burrs from the filing gauge, the depth gauge has to have different heights. no frost. 689BA023 KN N Place a filing gauge (1) that matches the chain pitch on an electric...
... 34 HTA 65, HTA 85 This setting may be level with the filing gauge. the highest point of the depth gauge must be lowered. N Use a filing gauge to check the setting every time you sharpen the chain. 1 N File the top of the depth gauge parallel to remove burrs from the filing gauge, the depth gauge has to have different heights. no frost. 689BA023 KN N Place a filing gauge (1) that matches the chain pitch on an electric...

Product Instruction Manual
Page 44
...;F - 68 °F) Operate the charger only in charger 1) STIHL recommends STIHL servicing dealers Have charger checked by a servicing dealer1) 42 HTA 65, HTA 85 Turn on the machine. English Always remove the battery from the machine and reinsert it and battery LED on charger flashes red Malfunction of battery (4 LEDs on battery flash red for approx. 5 seconds) Remove the battery from the machine before starting any work on...
...;F - 68 °F) Operate the charger only in charger 1) STIHL recommends STIHL servicing dealers Have charger checked by a servicing dealer1) 42 HTA 65, HTA 85 Turn on the machine. English Always remove the battery from the machine and reinsert it and battery LED on charger flashes red Malfunction of battery (4 LEDs on battery flash red for approx. 5 seconds) Remove the battery from the machine before starting any work on...


