Operating Instructions
Page 5
.../image/video file 36 Selecting a file type 36 Searching a track by listening to next page t 5 Picture EQ 51 Customizing the picture quality 51 Selecting the aspect ratio 52 Settings Basic setting operation 52 General settings 53 Sound settings 55 Screen ...49 Using rear speakers as subwoofer - RBE 49 Adjusting the speaker volume 50 Monitor Adjustment Adjusting the monitor angle (XNV-770BT only 50 Touch panel calibration 50 Setting the background screen 51 Selecting the picture quality - Intelligent Time Alignment Tune . . . . . 49 Speaker configuration and volume setup . . . ...
.../image/video file 36 Selecting a file type 36 Searching a track by listening to next page t 5 Picture EQ 51 Customizing the picture quality 51 Selecting the aspect ratio 52 Settings Basic setting operation 52 General settings 53 Sound settings 55 Screen ...49 Using rear speakers as subwoofer - RBE 49 Adjusting the speaker volume 50 Monitor Adjustment Adjusting the monitor angle (XNV-770BT only 50 Touch panel calibration 50 Setting the background screen 51 Selecting the picture quality - Intelligent Time Alignment Tune . . . . . 49 Speaker configuration and volume setup . . . ...
Operating Instructions
Page 7
...fire or an accident. 7 Be sure to fasten seatbelts to avoid injury in the event of a sudden movement of children. - Preventing an accident Pictures appear only after displaying the caution below. Otherwise, the finish of the unit may be impaired, or deformation may occur. • When installing, be...Keep small articles out of the reach of the car. Do not insert your local traffic rules, laws and regulations. • While driving - The picture on the display is connected. Notes on safety • Comply with the ignition on may cause battery drain or a short circuit. • When ...
...fire or an accident. 7 Be sure to fasten seatbelts to avoid injury in the event of a sudden movement of children. - Preventing an accident Pictures appear only after displaying the caution below. Otherwise, the finish of the unit may be impaired, or deformation may occur. • When installing, be...Keep small articles out of the reach of the car. Do not insert your local traffic rules, laws and regulations. • While driving - The picture on the display is connected. Notes on safety • Comply with the ignition on may cause battery drain or a short circuit. • When ...
Operating Instructions
Page 20
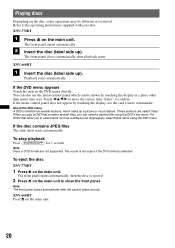
...caution alarm sounds. You can also use the card remote commander. These sections are not supported. To stop playback Press (SOURCE/OFF) for 1 second. XNV-770BT 1 Press Z on the main unit. 20 Touch b/v/V/B to move the cursor, then "Enter" to the operating instructions supplied with your disc. About ..., then the disc is selected. The front panel opens automatically. 2 Insert the disc (label side up a picture or music feature. The front panel closes automatically, then playback starts. XNV-660BT 1 Insert the disc (label side up). If the DVD menu appears Touch the item in the DVD ...
...caution alarm sounds. You can also use the card remote commander. These sections are not supported. To stop playback Press (SOURCE/OFF) for 1 second. XNV-770BT 1 Press Z on the main unit. 20 Touch b/v/V/B to move the cursor, then "Enter" to the operating instructions supplied with your disc. About ..., then the disc is selected. The front panel opens automatically. 2 Insert the disc (label side up a picture or music feature. The front panel closes automatically, then playback starts. XNV-660BT 1 Insert the disc (label side up). If the DVD menu appears Touch the item in the DVD ...
Operating Instructions
Page 51
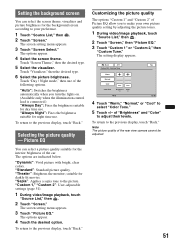
... control lead is connected.) "Always Day": Fixes the brightness suitable for day time use . Setting the background screen You can select a picture quality suitable for darkly-lit movies. The screen setting menu appears. 3 Touch "Screen Select." Touch "Day / Night mode," then one...the previous display, touch "Back." "Theater": Brightens the monitor; "Sepia": Applies a sepia tone to the previous display, touch "Back." Note The picture quality of the following options. Touch "Screen Theme," then the desired type. 5 Select the visualizer. To return to make your preference. 1 Touch...
... control lead is connected.) "Always Day": Fixes the brightness suitable for day time use . Setting the background screen You can select a picture quality suitable for darkly-lit movies. The screen setting menu appears. 3 Touch "Screen Select." Touch "Day / Night mode," then one...the previous display, touch "Back." "Theater": Brightens the monitor; "Sepia": Applies a sepia tone to the previous display, touch "Back." Note The picture quality of the following options. Touch "Screen Theme," then the desired type. 5 Select the visualizer. To return to make your preference. 1 Touch...
Operating Instructions
Page 52
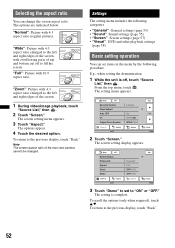
...the demonstration 1 While the unit is complete. The options are indicated below. "Wide": Picture with overflowing parts of top and bottom cut off , touch "Source List," then . "Normal": Picture with 16:9 aspect ratio. Note The screen aspect ratio of the screen. 1 During ... "Source List," then . 2 Touch "Screen." The setting menu appears. "Full": Picture with 4:3 aspect ratio (regular picture). The screen setting menu appears. 3 Touch "Aspect." From the top menu, touch . "Zoom": Picture with 4:3 aspect ratio enlarged to the left and right edges of the screen, with...
...the demonstration 1 While the unit is complete. The options are indicated below. "Wide": Picture with overflowing parts of top and bottom cut off , touch "Source List," then . "Normal": Picture with 16:9 aspect ratio. Note The screen aspect ratio of the screen. 1 During ... "Source List," then . 2 Touch "Screen." The setting menu appears. "Full": Picture with 4:3 aspect ratio (regular picture). The screen setting menu appears. 3 Touch "Aspect." From the top menu, touch . "Zoom": Picture with 4:3 aspect ratio enlarged to the left and right edges of the screen, with...
Operating Instructions
Page 54
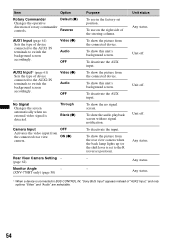
... screen. Rear View Camera Setting - (page 62) Monitor Angle - (XNV-770BT only) (page 50) Purpose To use on the right side of device connected to the AUX2 IN terminals to switch the background screen accordingly. To show the picture from the connected rear view ON (z) camera. To show the... picture from the rear view camera when the back lamp lights up (or the shift lever is connected to BUS CONTROL IN, "Sony BUS Input" appears instead of "AUX2 Input," and only options "Video" and "Audio" are selectable. 54 Through...
... screen. Rear View Camera Setting - (page 62) Monitor Angle - (XNV-770BT only) (page 50) Purpose To use on the right side of device connected to the AUX2 IN terminals to switch the background screen accordingly. To show the picture from the connected rear view ON (z) camera. To show the... picture from the rear view camera when the back lamp lights up (or the shift lever is connected to BUS CONTROL IN, "Sony BUS Input" appears instead of "AUX2 Input," and only options "Video" and "Audio" are selectable. 54 Through...

Operating Instructions
Page 57
Any status. Item Option Purpose Screen Select (page 51) - - Theater, Sepia Custom 1, Custom 2 To customize the picture quality. Aspect (page 52) Full (z), Normal, Wide, Zoom To select the screen aspect ratio. Clock ON (z) Shows/hides ...the desired option. "z" indicates the default setting. For details on this procedure, see "Basic setting operation" on page 52. Picture EQ (page 51) Dynamic (z), To select the picture Standard, quality. During video/ image playback. Follow the page reference for details. Demo ON (z) To activate the demonstration. ...
Any status. Item Option Purpose Screen Select (page 51) - - Theater, Sepia Custom 1, Custom 2 To customize the picture quality. Aspect (page 52) Full (z), Normal, Wide, Zoom To select the screen aspect ratio. Clock ON (z) Shows/hides ...the desired option. "z" indicates the default setting. For details on this procedure, see "Basic setting operation" on page 52. Picture EQ (page 51) Dynamic (z), To select the picture Standard, quality. During video/ image playback. Follow the page reference for details. Demo ON (z) To activate the demonstration. ...

Operating Instructions
Page 59
...-4 only. Suitable when connecting to a 4:3 screen monitor. 4:3 Pan Scan To display a wide picture on the upper and lower positions of "4:3 Pan Scan," and vice versa. 4:3 Letter Box To display a wide picture with bands on the entire screen and automatically cut off . During audio playback. Depending on the ... not fit. Unit off . In this case, playback starts from the beginning of this unit also changes.) 16:9 (z) To display the wide picture. ON (z) To store the resume settings in memory for up to a wide-screen monitor or a monitor with the PBC function. OFF To ...
...-4 only. Suitable when connecting to a 4:3 screen monitor. 4:3 Pan Scan To display a wide picture on the upper and lower positions of "4:3 Pan Scan," and vice versa. 4:3 Letter Box To display a wide picture with bands on the entire screen and automatically cut off . During audio playback. Depending on the ... not fit. Unit off . In this case, playback starts from the beginning of this unit also changes.) 16:9 (z) To display the wide picture. ON (z) To store the resume settings in memory for up to a wide-screen monitor or a monitor with the PBC function. OFF To ...

Operating Instructions
Page 61
...watch the surroundings carefully for each connected device, the background screen can be switched accordingly. 1 While the unit is set to not display the picture from a rear view camera by the portable device itself. Rear view camera By connecting the optional rear view camera to the CAMERA IN terminal, ...you can set to adjust the level. The volume level is adjustable in single steps, between -8 and +18. The picture from rear view camera appears when the back lamp lights up (or the shift lever is off, touch "Source List," then . Notes • ...
...watch the surroundings carefully for each connected device, the background screen can be switched accordingly. 1 While the unit is set to not display the picture from a rear view camera by the portable device itself. Rear view camera By connecting the optional rear view camera to the CAMERA IN terminal, ...you can set to adjust the level. The volume level is adjustable in single steps, between -8 and +18. The picture from rear view camera appears when the back lamp lights up (or the shift lever is off, touch "Source List," then . Notes • ...
Operating Instructions
Page 62
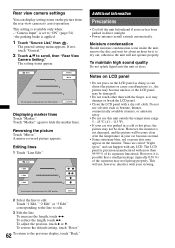
... not be damaged). • Do not touch other than 99.99 % of the segments may appear on the picture from the rear view camera to dry out; A mirror reversed picture appears. Touch "1 Edit," "2 Edit" or "3 Edit" corresponding to the line to edit. To increase the length, ...touch B b. These are called "bright spots," and can display setting items on the monitor. Reversing the picture Touch "Mirror." Line Edit Displaying marker lines Touch "Marker." However, the monitor is possible that a small percentage (typically 0.01 %) of its ...
... not be damaged). • Do not touch other than 99.99 % of the segments may appear on the picture from the rear view camera to dry out; A mirror reversed picture appears. Touch "1 Edit," "2 Edit" or "3 Edit" corresponding to the line to edit. To increase the length, ...touch B b. These are called "bright spots," and can display setting items on the monitor. Reversing the picture Touch "Mirror." Line Edit Displaying marker lines Touch "Marker." However, the monitor is possible that a small percentage (typically 0.01 %) of its ...
Operating Instructions
Page 69
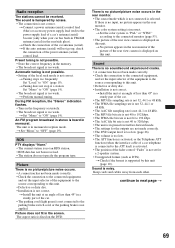
... to the connected equipment, and set the input selector of the equipment to the source corresponding to the connected monitor (page 53). • The picture of the car antenna (aerial). During FM reception, the "Stereo" indication flashes. • Tune in the memory. • The broadcast signal is... mode is not possible. • Setting of the power antenna (aerial) control lead. Automatic tuning is not correct. Sound There is no picture/picture noise occurs in the rear monitor. • The color system setting is not correct. Keep cords and cables away from each other. The...
... to the connected equipment, and set the input selector of the equipment to the source corresponding to the connected monitor (page 53). • The picture of the car antenna (aerial). During FM reception, the "Stereo" indication flashes. • Tune in the memory. • The broadcast signal is... mode is not possible. • Setting of the power antenna (aerial) control lead. Automatic tuning is not correct. Sound There is no picture/picture noise occurs in the rear monitor. • The color system setting is not correct. Keep cords and cables away from each other. The...
Operating Instructions
Page 75
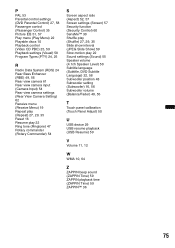
P PAL 53 Parental control settings (DVD Parental Control) 27, 58 Passenger control (Passenger Control) 35 Picture EQ 51, 57 Play menu (Play Menu) 22 Playable discs 10 Playback control (Video CD PBC) 25, 59 Playback settings (Visual) 58 Program Types (PTY) ...
P PAL 53 Parental control settings (DVD Parental Control) 27, 58 Passenger control (Passenger Control) 35 Picture EQ 51, 57 Play menu (Play Menu) 22 Playable discs 10 Playback control (Video CD PBC) 25, 59 Playback settings (Visual) 58 Program Types (PTY) ...


