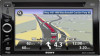
MyTomTom Quick Start Guide
Page 1
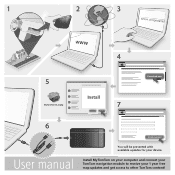
MyTomTomSA.mpkg IDnowsntloaadlnlow Download now Create account You will be presented with available updates for your 1 year free map updates and get access to other TomTom content! Install MyTomTom on your computer and connect your TomTom navigation module to receive your device.
MyTomTomSA.mpkg IDnowsntloaadlnlow Download now Create account You will be presented with available updates for your 1 year free map updates and get access to other TomTom content! Install MyTomTom on your computer and connect your TomTom navigation module to receive your device.
Operating Instructions
Page 2
...XNV-660BT. • XNV-770BT is the model representatively used for illustration purposes. • For details on a circuit different from that any changes or modifications not expressly approved in this manual could void your authority to operate this equipment. As the laser beam used in a particular installation...This equipment generates, uses, and can be co-located or operated in a residential installation. Connect the equipment into an outlet on the navigation function, refer to provide reasonable protection against harmful interference in conjunction with any interference ...
...XNV-660BT. • XNV-770BT is the model representatively used for illustration purposes. • For details on a circuit different from that any changes or modifications not expressly approved in this manual could void your authority to operate this equipment. As the laser beam used in a particular installation...This equipment generates, uses, and can be co-located or operated in a residential installation. Connect the equipment into an outlet on the navigation function, refer to provide reasonable protection against harmful interference in conjunction with any interference ...
Operating Instructions
Page 3
To cancel the demonstration (Demo) display, see page 57. 3 For the State of RF energy that it should be installed and operated keeping the radiator at least 20 cm or more away from person's body (excluding extremities: hands, wrists, feet and ankles). If you do ...
To cancel the demonstration (Demo) display, see page 57. 3 For the State of RF energy that it should be installed and operated keeping the radiator at least 20 cm or more away from person's body (excluding extremities: hands, wrists, feet and ankles). If you do ...
Operating Instructions
Page 4
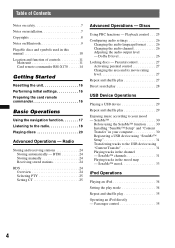
...audio channel 26 Adjusting the audio output level - Passenger control 35 4 SensMe 30 Before using the SensMe™ function . . . . . 30 Installing "SensMe™ Setup" and "Content Transfer" in the channel - Radio Storing and receiving stations 24 Storing automatically - SensMe™ channels 31 Playing ... Started Resetting the unit 16 Performing initial settings 16 Preparing the card remote commander 16 Basic Operations Using the navigation function 17 Listening to the radio 18 Playing discs 20 Advanced Operations - Parental control 27 Activating parental control ...
...audio channel 26 Adjusting the audio output level - Passenger control 35 4 SensMe 30 Before using the SensMe™ function . . . . . 30 Installing "SensMe™ Setup" and "Content Transfer" in the channel - Radio Storing and receiving stations 24 Storing automatically - SensMe™ channels 31 Playing ... Started Resetting the unit 16 Performing initial settings 16 Preparing the card remote commander 16 Basic Operations Using the navigation function 17 Listening to the radio 18 Playing discs 20 Advanced Operations - Parental control 27 Activating parental control ...
Operating Instructions
Page 5
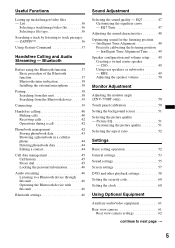
... Alignment 48 Precisely calibrating the listening position - RBE 49 Adjusting the speaker volume 50 Monitor Adjustment Adjusting the monitor angle (XNV-770BT only 50 Touch panel calibration 50 Setting the background screen 51 Selecting the picture quality - Bluetooth Before using the Bluetooth... function 37 Basic procedure of the Bluetooth function 37 Bluetooth status indication 38 Installing the external microphone 38 Pairing 38 Searching from this unit 46 Bluetooth settings 46 Sound Adjustment Selecting the sound quality ...
... Alignment 48 Precisely calibrating the listening position - RBE 49 Adjusting the speaker volume 50 Monitor Adjustment Adjusting the monitor angle (XNV-770BT only 50 Touch panel calibration 50 Setting the background screen 51 Selecting the picture quality - Bluetooth Before using the Bluetooth... function 37 Basic procedure of the Bluetooth function 37 Bluetooth status indication 38 Installing the external microphone 38 Pairing 38 Searching from this unit 46 Bluetooth settings 46 Sound Adjustment Selecting the sound quality ...
Operating Instructions
Page 7
... by using a drill, as insecticide, hair spray, insect repellent, etc. - Keep small articles out of the reach of the car. The monitor connected to install this unit should be sure to chemicals, such as it may cause a fire or an accident. 7 Do not operate the unit or watch or operate... even if the rear view camera is in contact with the unit for a long time. "Video blocked for your car, be installed by yourself, see the supplied installation/connections manual and install the unit properly. - Do not expose the unit surface to look back and watch or operate the unit, as it may...
... by using a drill, as insecticide, hair spray, insect repellent, etc. - Keep small articles out of the reach of the car. The monitor connected to install this unit should be sure to chemicals, such as it may cause a fire or an accident. 7 Do not operate the unit or watch or operate... even if the rear view camera is in contact with the unit for a long time. "Video blocked for your car, be installed by yourself, see the supplied installation/connections manual and install the unit properly. - Do not expose the unit surface to look back and watch or operate the unit, as it may...
Operating Instructions
Page 9
... cellular signal strength. Connecting to other devices When connecting to ensure that may apply to this unit not expressly approved by Sony may not be possible on the use Changes or modifications to national requirement or limitations, in a service area with the manufacturer..., such as electronic fuel injection systems, electronic antiskid (antilock) braking systems, electronic speed control systems or air bag systems. For installation or service of your local service provider. 9 Emergency calls This Bluetooth car handsfree and the electronic device connected to driving and pull...
... cellular signal strength. Connecting to other devices When connecting to ensure that may apply to this unit not expressly approved by Sony may not be possible on the use Changes or modifications to national requirement or limitations, in a service area with the manufacturer..., such as electronic fuel injection systems, electronic antiskid (antilock) braking systems, electronic speed control systems or air bag systems. For installation or service of your local service provider. 9 Emergency calls This Bluetooth car handsfree and the electronic device connected to driving and pull...

Operating Instructions
Page 17
... selecting "Dual Screen Navi + A/V (Large)" or "Dual Screen Navi + A/V (Small)" The display to the car dock. Notes • During navigation operation, operation sound is not output even if "Beep" is set to the current audio/video source Press and hold (TOP). The view mode options...Dual Screen Navi + A/V (Large)": Shows the current audio/video source on the navigation display. continue to the navigation mode, touch "Navi" in the top ATT Top menu. For details, see the supplied installation/connection manual. 2 Press (TOP), then touch in the reception/playback display. Upper...
... selecting "Dual Screen Navi + A/V (Large)" or "Dual Screen Navi + A/V (Small)" The display to the car dock. Notes • During navigation operation, operation sound is not output even if "Beep" is set to the current audio/video source Press and hold (TOP). The view mode options...Dual Screen Navi + A/V (Large)": Shows the current audio/video source on the navigation display. continue to the navigation mode, touch "Navi" in the top ATT Top menu. For details, see the supplied installation/connection manual. 2 Press (TOP), then touch in the reception/playback display. Upper...

Operating Instructions
Page 29
... then the "Repeat" or "Shuffle" box repeatedly until the desired option appears. "Drive"*2: Repeats the current drive. For details, see the supplied installation/connections manual. For details, visit the support site. • The maximum number of data in a parked car, as follows. folders (albums): 256... due to normal play menu, touch "Play Menu." 29 "Album": Repeats the current album (folder). Support site http://esupport.sony.com http://www.sony.com/mobileAV • MSC (Mass Storage Class) and MTP (Media Transfer Protocol) type USB devices compliant with the USB standard...
... then the "Repeat" or "Shuffle" box repeatedly until the desired option appears. "Drive"*2: Repeats the current drive. For details, see the supplied installation/connections manual. For details, visit the support site. • The maximum number of data in a parked car, as follows. folders (albums): 256... due to normal play menu, touch "Play Menu." 29 "Album": Repeats the current album (folder). Support site http://esupport.sony.com http://www.sony.com/mobileAV • MSC (Mass Storage Class) and MTP (Media Transfer Protocol) type USB devices compliant with the USB standard...

Operating Instructions
Page 30
...Transferring tracks to the USB device using the SensMe™ function The following is the basic procedure required to complete the installation. 30 Content Transfer 4 Connecting the USB device and enjoying the SensMe™ function on this unit. Before using "...CD-ROM into your computer Use of tracks will be performed either along with the installation procedure or after installation. Installing "SensMe™ Setup" and "Content Transfer" in "Content Transfer." SensMe™ Sony's unique "SensMe™ channels" and "SensMe™ mood" features automatically group tracks...
...Transferring tracks to the USB device using the SensMe™ function The following is the basic procedure required to complete the installation. 30 Content Transfer 4 Connecting the USB device and enjoying the SensMe™ function on this unit. Before using "...CD-ROM into your computer Use of tracks will be performed either along with the installation procedure or after installation. Installing "SensMe™ Setup" and "Content Transfer" in "Content Transfer." SensMe™ Sony's unique "SensMe™ channels" and "SensMe™ mood" features automatically group tracks...

Operating Instructions
Page 31
... page t 31 Tip Tracks are played in the channel - Registering a USB device using "SensMe™ Setup" USB device registration is not performed along with the installation procedure, follow the on operations, see the Help of the first track in the current channel starts from Windows Explorer or iTunes, etc., to "Content...
... page t 31 Tip Tracks are played in the channel - Registering a USB device using "SensMe™ Setup" USB device registration is not performed along with the installation procedure, follow the on operations, see the Help of the first track in the current channel starts from Windows Explorer or iTunes, etc., to "Content...
Operating Instructions
Page 34
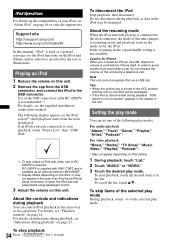
iPod Operations For details on the compatibility of the USB connection cable RC-200IPV is recommended.*1 For details, see the supplied installation/ connections manual. For details, see "Indications during playback You can set by the iPod. In the resuming mode, repeat/... recharged. • If the iPod is required. To scroll the list, touch v/V. Support site http://esupport.sony.com http://www.sony.com/mobileAV In this unit. To stop playback 34 Press (SOURCE/OFF) for XNV-660BT. *2 Display differs depending on iPod setting. 1 During playback, touch "List." 2 Touch "MUSIC" or ...
iPod Operations For details on the compatibility of the USB connection cable RC-200IPV is recommended.*1 For details, see the supplied installation/ connections manual. For details, see "Indications during playback You can set by the iPod. In the resuming mode, repeat/... recharged. • If the iPod is required. To scroll the list, touch v/V. Support site http://esupport.sony.com http://www.sony.com/mobileAV In this unit. To stop playback 34 Press (SOURCE/OFF) for XNV-660BT. *2 Display differs depending on iPod setting. 1 During playback, touch "List." 2 Touch "MUSIC" or ...

Operating Instructions
Page 38
...No device is connected for handsfree calling purpose. Remaining battery status of connected cellular phone. For details, see the supplied installation/connections manual. To select Bluetooth Audio, touch "Source List," then "BT Audio." 2 Touch "BT Menu." Flashing: ... cellular phone. The Bluetooth setting menu appears. For details on . Support site http://esupport.sony.com http://www.sony.com/mobileAV Bluetooth status indication XNV-770BT Bluetooth signal indicator* XNV-660BT Bluetooth signal indicator* * Lights up to install the external microphone (supplied). Calling...
...No device is connected for handsfree calling purpose. Remaining battery status of connected cellular phone. For details, see the supplied installation/connections manual. To select Bluetooth Audio, touch "Source List," then "BT Audio." 2 Touch "BT Menu." Flashing: ... cellular phone. The Bluetooth setting menu appears. For details on . Support site http://esupport.sony.com http://www.sony.com/mobileAV Bluetooth status indication XNV-770BT Bluetooth signal indicator* XNV-660BT Bluetooth signal indicator* * Lights up to install the external microphone (supplied). Calling...

Operating Instructions
Page 42
... in any status. On the Line. ATT Incoming call . Disconnecting the power supply lead will be cut off when call , along with this unit still installed, be sure to press the reset button to prevent possible unauthorized access. The level of the cellular phone or this unit to erase all the...
... in any status. On the Line. ATT Incoming call . Disconnecting the power supply lead will be cut off when call , along with this unit still installed, be sure to press the reset button to prevent possible unauthorized access. The level of the cellular phone or this unit to erase all the...
Operating Instructions
Page 60
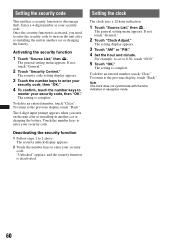
...above. The setting is deactivated. The 4-digit input prompt appears when you need to enter the security code to turn on the unit after re-installing in another car or charging the battery. Deactivating the security function 1 Follow steps 1 to reenter your security code. Setting the clock The clock ... the number keys to enter your security code, then "OK." The setting is activated, you turn on the unit after re-installing the unit in navigation mode. 60 Note The clock does not synchronize with the time indication in another car or charging the battery. The security unlock ...
...above. The setting is deactivated. The 4-digit input prompt appears when you need to enter the security code to turn on the unit after re-installing in another car or charging the battery. Deactivating the security function 1 Follow steps 1 to reenter your security code. Setting the clock The clock ... the number keys to enter your security code, then "OK." The setting is activated, you turn on the unit after re-installing the unit in navigation mode. 60 Note The clock does not synchronize with the time indication in another car or charging the battery. The security unlock ...

Operating Instructions
Page 65
...wave conditions and location where the equipment is being used , but some time to start communication. If this manual, consult your nearest Sony dealer. 65 Others • Using the Bluetooth device may affect the sensitivity of Bluetooth communication. - Connecting two devices is common,... on obstacles (person, metal, wall, etc.) or electromagnetic environment. • The following . - Should any questions or problems concerning your nearest Sony dealer. Install this unit is used within 10 m of a wireless LAN device, turn off this unit and other as a cellular phone and a headset....
...wave conditions and location where the equipment is being used , but some time to start communication. If this manual, consult your nearest Sony dealer. 65 Others • Using the Bluetooth device may affect the sensitivity of Bluetooth communication. - Connecting two devices is common,... on obstacles (person, metal, wall, etc.) or electromagnetic environment. • The following . - Should any questions or problems concerning your nearest Sony dealer. Install this unit is used within 10 m of a wireless LAN device, turn off this unit and other as a cellular phone and a headset....

Operating Instructions
Page 66
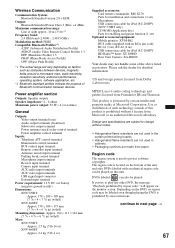
...doctor. • Wipe the battery with a dry cloth to assure a good contact. • Be sure to observe the correct polarity when installing the battery. • Do not hold the battery with a new CR2025 lithium battery. If the fuse blows, check the power connection and replace... Sony dealer. NON APPLICABLE AU CANADA, Y COMPRIS LA PROVINCE DE QUÉBEC. AUDIO POWER SPECIFICATIONS CEA2006 Standard Power Output: 17 Watts RMS 4 at 4 Ohms < 1% THD+N SN Ratio: 80 dBA (reference: 1 Watt into 4 Ohms) Monitor section Display type: Wide LCD color monitor Dimensions: XNV-770BT: 7.0 in XNV-660BT:...
...doctor. • Wipe the battery with a dry cloth to assure a good contact. • Be sure to observe the correct polarity when installing the battery. • Do not hold the battery with a new CR2025 lithium battery. If the fuse blows, check the power connection and replace... Sony dealer. NON APPLICABLE AU CANADA, Y COMPRIS LA PROVINCE DE QUÉBEC. AUDIO POWER SPECIFICATIONS CEA2006 Standard Power Output: 17 Watts RMS 4 at 4 Ohms < 1% THD+N SN Ratio: 80 dBA (reference: 1 Watt into 4 Ohms) Monitor section Display type: Wide LCD color monitor Dimensions: XNV-770BT: 7.0 in XNV-660BT:...
Operating Instructions
Page 67
... input connector External input terminal Power requirements: 12 V DC car battery (negative ground (earth)) Dimensions: XNV-770BT: Approx. 178 × 100 × 189 mm (7 1/8 × 4 × 7 1/2 in) (w/h/d) XNV-660BT: Approx. 178 × 100 × 173 mm (7 1/8 × 4 × 6 ... Mass: XNV-770BT: Approx. 2.7 kg (5 lb 14 oz) XNV-660BT: Approx. 2.4 kg (5 lb 4 oz) Supplied accessories: Card remote commander: RM-X170 Parts for installation and connections (1 set) Microphone USB connection cable for iPod: RC-200IPV (XNV-770BT only) CD-ROM (Application disc) Parts for enabling navigation function ...
... input connector External input terminal Power requirements: 12 V DC car battery (negative ground (earth)) Dimensions: XNV-770BT: Approx. 178 × 100 × 189 mm (7 1/8 × 4 × 7 1/2 in) (w/h/d) XNV-660BT: Approx. 178 × 100 × 173 mm (7 1/8 × 4 × 6 ... Mass: XNV-770BT: Approx. 2.7 kg (5 lb 14 oz) XNV-660BT: Approx. 2.4 kg (5 lb 4 oz) Supplied accessories: Card remote commander: RM-X170 Parts for installation and connections (1 set) Microphone USB connection cable for iPod: RC-200IPV (XNV-770BT only) CD-ROM (Application disc) Parts for enabling navigation function ...
Operating Instructions
Page 69
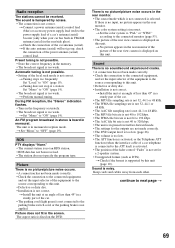
...skips/sound cracks. • A connection has not been made correctly. • Check the connection to this unit. • Defective or dirty disc. • Installation is not possible. • Store the correct frequency in the rear/side glass). Preset tuning is not correct. t Set "Mono" to next page t 69... "Local" to "OFF" (page 19). t No picture appears in the rear monitor. • The source/mode which is not connected is too weak. t Install the unit at an angle of the car. • The parking cord (light green) is not connected to "ON" (page 19). • The broadcast signal...
...skips/sound cracks. • A connection has not been made correctly. • Check the connection to this unit. • Defective or dirty disc. • Installation is not possible. • Store the correct frequency in the rear/side glass). Preset tuning is not correct. t Set "Mono" to next page t 69... "Local" to "OFF" (page 19). t No picture appears in the rear monitor. • The source/mode which is not connected is too weak. t Install the unit at an angle of the car. • The parking cord (light green) is not connected to "ON" (page 19). • The broadcast signal...

Operating Instructions
Page 72
...(page 39). Hubs not supported. USB hub is on in the display, consult your nearest Sony dealer. No playable data. Output connection failure. (Illuminates until reading is not connected. t ...connected. The unit is in the connected USB device. Waiting for a moment. The navigation module is complete and playback starts automatically. "" The character cannot be repaired because of...select 'initialize' from the Bluetooth settings menu. No device found. t See the supplied installation/connections manual to connect a USB device and USB cable. This unit or USB device...
...(page 39). Hubs not supported. USB hub is on in the display, consult your nearest Sony dealer. No playable data. Output connection failure. (Illuminates until reading is not connected. t ...connected. The unit is in the connected USB device. Waiting for a moment. The navigation module is complete and playback starts automatically. "" The character cannot be repaired because of...select 'initialize' from the Bluetooth settings menu. No device found. t See the supplied installation/connections manual to connect a USB device and USB cable. This unit or USB device...


