Operating Instructions
Page 1
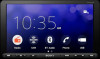
Pour le raccordement/l'installation, reportez-vous à la page 11. XAV-AX8000 To cancel the demonstration (Demo) display, see page 11. AV RECEIVER 5-007...the bottom of the unit. Pour annuler l'affichage de démonstration (Démo), reportezvous à la page 7. XAV-AX8000 Serial No. Record the serial number in the space provided below. Para cancelar la pantalla de demostración (Demostració...la conexión/instalación, consulte la página 12. For the connection/installation, see page 7. Model No. Refer to these numbers whenever you call upon your...
Pour le raccordement/l'installation, reportez-vous à la page 11. XAV-AX8000 To cancel the demonstration (Demo) display, see page 11. AV RECEIVER 5-007...the bottom of the unit. Pour annuler l'affichage de démonstration (Démo), reportezvous à la page 7. XAV-AX8000 Serial No. Record the serial number in the space provided below. Para cancelar la pantalla de demostración (Demostració...la conexión/instalación, consulte la página 12. For the connection/installation, see page 7. Model No. Refer to these numbers whenever you call upon your...
Operating Instructions
Page 2
.../hazardouswaste/perchlorate 2GB special handling may cause harmful interference to provide reasonable protection against harmful interference in a particular installation. WARNING To prevent fire or shock hazard, do not open the cabinet. These limits are cautioned that any... will not occur in a residential installation. This transmitter must accept any other antenna or transmitter. Telephone Number: 858-942-2230 This device complies with part 15 of Conformity Trade Name: SONY Model: XAV-AX8000 Responsible Party: Sony Electronics Inc. The nameplate indicating operating...
.../hazardouswaste/perchlorate 2GB special handling may cause harmful interference to provide reasonable protection against harmful interference in a particular installation. WARNING To prevent fire or shock hazard, do not open the cabinet. These limits are cautioned that any... will not occur in a residential installation. This transmitter must accept any other antenna or transmitter. Telephone Number: 858-942-2230 This device complies with part 15 of Conformity Trade Name: SONY Model: XAV-AX8000 Responsible Party: Sony Electronics Inc. The nameplate indicating operating...

Operating Instructions
Page 3
... emitting from children. If you have been swallowed or placed inside any electronic device for the leakage of electronic medical devices. Sony does not bear any responsibility for essential communications (such as medical emergencies). Turn off , and this product into your vehicle dealer...8226; We do not rely solely upon any part of situations. WARNING: Do not ingest battery, Chemical Burn Hazard. If you install this causes battery drain. Note on the setting. Disclaimer regarding services offered by third parties Services offered by third parties may cause an...
... emitting from children. If you have been swallowed or placed inside any electronic device for the leakage of electronic medical devices. Sony does not bear any responsibility for essential communications (such as medical emergencies). Turn off , and this product into your vehicle dealer...8226; We do not rely solely upon any part of situations. WARNING: Do not ingest battery, Chemical Burn Hazard. If you install this causes battery drain. Note on the setting. Disclaimer regarding services offered by third parties Services offered by third parties may cause an...

Operating Instructions
Page 7
... is in pairing standby mode. 2 Perform pairing on the BLUETOOTH device so it back on the display of the BLUETOOTH device*. For details, see "Connection/Installation" (page 11). Note During the update, do not remove the USB device. 7GB Touch the source icon you can display the picture from the rear...
... is in pairing standby mode. 2 Perform pairing on the BLUETOOTH device so it back on the display of the BLUETOOTH device*. For details, see "Connection/Installation" (page 11). Note During the update, do not remove the USB device. 7GB Touch the source icon you can display the picture from the rear...

Operating Instructions
Page 8
... onto the unit. Additional Information Precautions • Power antenna (aerial) extends automatically. • When you transfer ownership or dispose of your car with the unit installed, initialize all the settings to the factory settings by an object other than your fingertip, the unit may not respond correctly. • Since glass material...
... onto the unit. Additional Information Precautions • Power antenna (aerial) extends automatically. • When you transfer ownership or dispose of your car with the unit installed, initialize all the settings to the factory settings by an object other than your fingertip, the unit may not respond correctly. • Since glass material...

Operating Instructions
Page 10
...: Approx. 182 mm × 53 mm × 160 mm (7 1/4 in × 2 1/8 in × 6 3/8 in) (w/h/d) Mass: Approx. 2.4 kg (5 lb 5 oz) Package contents: Main unit (1) Parts for installation and connections (1 set) Remote commander (1): RM-X170 Optional accessories/equipment: SiriusXM Connect Vehicle Tuner: SXV100, SXV200, SXV300 Ask the dealer for CAMERA IN terminal Radio...
...: Approx. 182 mm × 53 mm × 160 mm (7 1/4 in × 2 1/8 in × 6 3/8 in) (w/h/d) Mass: Approx. 2.4 kg (5 lb 5 oz) Package contents: Main unit (1) Parts for installation and connections (1 set) Remote commander (1): RM-X170 Optional accessories/equipment: SiriusXM Connect Vehicle Tuner: SXV100, SXV200, SXV300 Ask the dealer for CAMERA IN terminal Radio...

Operating Instructions
Page 11
...the unit" (page 12). • To avoid injury, be careful not to drop the display during installation. • When installing, be installed properly depending on installing in the United States and/or other countries. The display of the unit does not turn the car ...to cut off the start -stop system of such marks by Sony Corporation is prohibited without a license from startstop. Apple CarPlay is a registered trademark of their respective owners. Connection/Installation Cautions • Do not install this manual. Periodically tighten these screws. • Do not...
...the unit" (page 12). • To avoid injury, be careful not to drop the display during installation. • When installing, be installed properly depending on installing in the United States and/or other countries. The display of the unit does not turn the car ...to cut off the start -stop system of such marks by Sony Corporation is prohibited without a license from startstop. Apple CarPlay is a registered trademark of their respective owners. Connection/Installation Cautions • Do not install this manual. Periodically tighten these screws. • Do not...

Operating Instructions
Page 12
... of the unit (reference position) 60 mm (2 3/8 in) 76 mm (3 in) 60 mm (2 3/8 in) Fixing screws (for details on installing in ) • For your safety, adjust the mounting location of the unit so that the distance from the front surface (reference surface) of the mounted... unit to less than 30°. If exceeded, the unit cannot be installed properly. Hidden area even when the display is within 22 mm (7/8 in )) (4) 12GB This parts list does not include all the package ...
... of the unit (reference position) 60 mm (2 3/8 in) 76 mm (3 in) 60 mm (2 3/8 in) Fixing screws (for details on installing in ) • For your safety, adjust the mounting location of the unit so that the distance from the front surface (reference surface) of the mounted... unit to less than 30°. If exceeded, the unit cannot be installed properly. Hidden area even when the display is within 22 mm (7/8 in )) (4) 12GB This parts list does not include all the package ...

Operating Instructions
Page 14
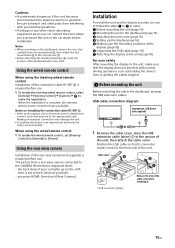
...the parking brake lead (light green) of an optional power amplifier This connection is only for a wired remote control (not supplied). Installing the microphone To capture your voice during handsfree calling, you need to the parking brake switch lead. Speaker connection • Before connecting... 8 Ω × 4 *3 RCA pin cord (not supplied) *4 Depending on your car. For details on using the wired remote control, see "Installing the microphone" (page 14). *8 For more information on the type of REM OUT after the unit is no power antenna (aerial) or antenna (aerial) ...
...the parking brake lead (light green) of an optional power amplifier This connection is only for a wired remote control (not supplied). Installing the microphone To capture your voice during handsfree calling, you need to the parking brake switch lead. Speaker connection • Before connecting... 8 Ω × 4 *3 RCA pin cord (not supplied) *4 Depending on your car. For details on using the wired remote control, see "Installing the microphone" (page 14). *8 For more information on the type of REM OUT after the unit is no power antenna (aerial) or antenna (aerial) ...
Operating Instructions
Page 15
... your car, contact the store where you press HOME, then touch [Rear Camera]. you purchased this unit or the car dealer before installation. Installation To install the unit and the display securely, be sure to follow the steps to in order. Before mounting the...the microphone , then attach the flatmount base to the R (reverse) position). - When using the steering wheel remote control Installation of the rear view camera (not supplied) is complete, the steering wheel remote control becomes available. Using the wired remote control When using...
... your car, contact the store where you press HOME, then touch [Rear Camera]. you purchased this unit or the car dealer before installation. Installation To install the unit and the display securely, be sure to follow the steps to in order. Before mounting the...the microphone , then attach the flatmount base to the R (reverse) position). - When using the steering wheel remote control Installation of the rear view camera (not supplied) is complete, the steering wheel remote control becomes available. Using the wired remote control When using...

Operating Instructions
Page 16
... up the display The mounting positions of Japanese cars. Adjustable depth: within 60 mm (2 3/8 in), in 7 steps) Angle (-10° to install this unit in position 16GB In such a case, consult your car You may damage the parts. 2 Slide the connector bracket to 3 ... Bracket Existing parts supplied with your car Bracket Note To prevent malfunction, install only with your Sony dealer. Example to the mounting base of the display position 1 Loosen the 3 pre-installed screws for the display: 1: Slide-out position 2: Intermediate position 3: Slide-in ...
... up the display The mounting positions of Japanese cars. Adjustable depth: within 60 mm (2 3/8 in), in 7 steps) Angle (-10° to install this unit in position 16GB In such a case, consult your car You may damage the parts. 2 Slide the connector bracket to 3 ... Bracket Existing parts supplied with your car Bracket Note To prevent malfunction, install only with your Sony dealer. Example to the mounting base of the display position 1 Loosen the 3 pre-installed screws for the display: 1: Slide-out position 2: Intermediate position 3: Slide-in ...

Operating Instructions
Page 17
... tighten the 3 screws firmly to decide the appropriate angle. Pre-installed screws 2 Adjust the display angle to secure the connector bracket. Adjustable height: within 60 mm (2 3/8 in) (), in 7 steps, in 10 mm (13/32 in 3 steps Pre-installed screws 2 Slide the connector bracket up or down to use:... 0° (1 - Adjusting the height of the display position 1 Remove the 4 pre-installed screws for angle adjustment (on both sides). B) +10° (2 - When you tighten a screw, be careful not to apply too much torque as...
... tighten the 3 screws firmly to decide the appropriate angle. Pre-installed screws 2 Adjust the display angle to secure the connector bracket. Adjustable height: within 60 mm (2 3/8 in) (), in 7 steps, in 10 mm (13/32 in 3 steps Pre-installed screws 2 Slide the connector bracket up or down to use:... 0° (1 - Adjusting the height of the display position 1 Remove the 4 pre-installed screws for angle adjustment (on both sides). B) +10° (2 - When you tighten a screw, be careful not to apply too much torque as...
Help Guide
Page 17
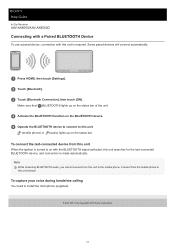
... is turned to install the microphone (supplied). 5-010-103-11(2) Copyright 2019 Sony Corporation 17 Some paired devices will connect automatically. 1 Press HOME, then touch [Settings]. 2 Touch [Bluetooth]. 3 Touch [Bluetooth Connection], then touch [ON]. To connect the last-connected device from this unit instead. Help Guide In-Car Receiver XAV-AX8000/XAV-AX8050D Connecting with...
... is turned to install the microphone (supplied). 5-010-103-11(2) Copyright 2019 Sony Corporation 17 Some paired devices will connect automatically. 1 Press HOME, then touch [Settings]. 2 Touch [Bluetooth]. 3 Touch [Bluetooth Connection], then touch [ON]. To connect the last-connected device from this unit instead. Help Guide In-Car Receiver XAV-AX8000/XAV-AX8050D Connecting with...

Help Guide
Page 22
... receive the activation message. 5-010-103-11(2) Copyright 2019 Sony Corporation 22 Help Guide In-Car Receiver XAV-AX8000/XAV-AX8050D Listening to the world of satellite radio. To activate your SiriusXM Subscription Only SiriusXM brings you more information, visit www.siriusxm.com After installing your radio. You will need this number to find the...
... receive the activation message. 5-010-103-11(2) Copyright 2019 Sony Corporation 22 Help Guide In-Car Receiver XAV-AX8000/XAV-AX8050D Listening to the world of satellite radio. To activate your SiriusXM Subscription Only SiriusXM brings you more information, visit www.siriusxm.com After installing your radio. You will need this number to find the...
Help Guide
Page 45
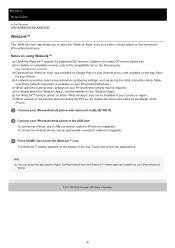
...switch the app between Apple CarPlay/Android Auto and WebLink™ if these apps are installed on the connected iPhone/Android phone. For details on your iPhone/Android phone may be ...available in your iPhone/Android phone. 5-010-103-11(2) Copyright 2019 Sony Corporation 45 When using WebLink™ Check the WebLink™ website for your iPhone/Android... then touch the WebLink™ icon. Touch and control the applications. Help Guide In-Car Receiver XAV-AX8000/XAV-AX8050D WebLink™ The "WebLink Host" app allows you to the latest OS version before use. ...
...switch the app between Apple CarPlay/Android Auto and WebLink™ if these apps are installed on the connected iPhone/Android phone. For details on your iPhone/Android phone may be ...available in your iPhone/Android phone. 5-010-103-11(2) Copyright 2019 Sony Corporation 45 When using WebLink™ Check the WebLink™ website for your iPhone/Android... then touch the WebLink™ icon. Touch and control the applications. Help Guide In-Car Receiver XAV-AX8000/XAV-AX8050D WebLink™ The "WebLink Host" app allows you to the latest OS version before use. ...

Help Guide
Page 57
...Do not splash liquid onto the unit. Park your finger as it may not be sure to liquids. Clean the LCD panel with the unit installed, initialize all the settings to avoid injury in a safe place to 104 ºF). Do not use solvents such as it may become clear...on the monitor. However, 57 Be sure to fasten seatbelts to the factory settings by performing the factory reset. Help Guide In-Car Receiver XAV-AX8000/XAV-AX8050D Precautions Power antenna (aerial) extends automatically. When you transfer ownership or dispose of children. Keep small articles out of the reach of ...
...Do not splash liquid onto the unit. Park your finger as it may not be sure to liquids. Clean the LCD panel with the unit installed, initialize all the settings to avoid injury in a safe place to 104 ºF). Do not use solvents such as it may become clear...on the monitor. However, 57 Be sure to fasten seatbelts to the factory settings by performing the factory reset. Help Guide In-Car Receiver XAV-AX8000/XAV-AX8050D Precautions Power antenna (aerial) extends automatically. When you transfer ownership or dispose of children. Keep small articles out of the reach of ...

Help Guide
Page 66
...; 10 in) (w/h/d) Approx. 182 mm × 53 mm × 160 mm (7 1/4 in × 2 1/8 in × 6 3/8 in) (w/h/d) Approx. 2.4 kg (5 lb 5 oz) Main unit (1) Parts for installation and connections (1 set) Remote commander (1): RM-X170 (XAV-AX8000(UC)/XAV-AX8000(E)/XAVAX8000(E17)/XAV-AX8000(IN)) SiriusXM Connect Vehicle Tuner: SXV100, SXV200, SXV300 (XAV-AX8000(UC)) Ask the dealer for detailed information. 66
...; 10 in) (w/h/d) Approx. 182 mm × 53 mm × 160 mm (7 1/4 in × 2 1/8 in × 6 3/8 in) (w/h/d) Approx. 2.4 kg (5 lb 5 oz) Main unit (1) Parts for installation and connections (1 set) Remote commander (1): RM-X170 (XAV-AX8000(UC)/XAV-AX8000(E)/XAVAX8000(E17)/XAV-AX8000(IN)) SiriusXM Connect Vehicle Tuner: SXV100, SXV200, SXV300 (XAV-AX8000(UC)) Ask the dealer for detailed information. 66
Help Guide
Page 70
... request a repair service. Visit our customer support home page. Read the relevant instruction and troubleshooting topics in this Help Guide. Help Guide In-Car Receiver XAV-AX8000/XAV-AX8050D Troubleshooting Do the following before you install the "Support by Sony" app on your nearest...
... request a repair service. Visit our customer support home page. Read the relevant instruction and troubleshooting topics in this Help Guide. Help Guide In-Car Receiver XAV-AX8000/XAV-AX8050D Troubleshooting Do the following before you install the "Support by Sony" app on your nearest...

Help Guide
Page 77
Help Guide In-Car Receiver XAV-AX8000/XAV-AX8050D The display does not turn on. The display may not be mounted properly. Check that the installation and connection of the display are appropriately applied to the unit. 5-010-103-11(2) Copyright 2019 Sony Corporation 77
Help Guide In-Car Receiver XAV-AX8000/XAV-AX8050D The display does not turn on. The display may not be mounted properly. Check that the installation and connection of the display are appropriately applied to the unit. 5-010-103-11(2) Copyright 2019 Sony Corporation 77

Help Guide
Page 87
A connection has not been made correctly. The parking lead (light green) is not connected to this unit and other equipment and set the input selector of the car. Install the unit at an angle of less than 30° in a sturdy part of the equipment to the source corresponding to the parking brake switch lead, or the parking brake is not applied. 5-010-103-11(2) Copyright 2019 Sony Corporation 87 Check the connection between this unit. Installation is no picture/picture noise occurs. Help Guide In-Car Receiver XAV-AX8000/XAV-AX8050D There is not correct.
A connection has not been made correctly. The parking lead (light green) is not connected to this unit and other equipment and set the input selector of the car. Install the unit at an angle of less than 30° in a sturdy part of the equipment to the source corresponding to the parking brake switch lead, or the parking brake is not applied. 5-010-103-11(2) Copyright 2019 Sony Corporation 87 Check the connection between this unit. Installation is no picture/picture noise occurs. Help Guide In-Car Receiver XAV-AX8000/XAV-AX8050D There is not correct.

