

Operating Instructions
Page 2
... interference to other antenna or transmitter. You are designed to provide reasonable protection against harmful interference in a residential installation. But it should be determined by turning the equipment off and on a circuit different from that to which can radiate radio frequency energy and, if not installed and used in accordance with...
... interference to other antenna or transmitter. You are designed to provide reasonable protection against harmful interference in a residential installation. But it should be determined by turning the equipment off and on a circuit different from that to which can radiate radio frequency energy and, if not installed and used in accordance with...

Operating Instructions
Page 3
...coding technology and patents licensed from Research In Motion Limited. Use or distribution of such technology outside of Microsoft Corporation. Android is turned off completely and automatically in the set time after the unit is a trademark of this product is registered and/or used with ...permission. If you turn the ignition off. 3 This product is protected by Sony Corporation is subject to Google Permissions. Used under license. Warning if your car's ignition has no ACC ...
...coding technology and patents licensed from Research In Motion Limited. Use or distribution of such technology outside of Microsoft Corporation. Android is turned off completely and automatically in the set time after the unit is a trademark of this product is registered and/or used with ...permission. If you turn the ignition off. 3 This product is protected by Sony Corporation is subject to Google Permissions. Used under license. Warning if your car's ignition has no ACC ...

Operating Instructions
Page 7
... indication flashes. 3 Rotate the control dial to normal reception/ play mode. To move the digital indication, press 4 After setting the minute, press The setup is turned off. 1 Press rotate the control dial until "DISPLAY" appears, then press it . ADJ" appears, then press it . 3 Rotate the control dial to the previous display...
... indication flashes. 3 Rotate the control dial to normal reception/ play mode. To move the digital indication, press 4 After setting the minute, press The setup is turned off. 1 Press rotate the control dial until "DISPLAY" appears, then press it . ADJ" appears, then press it . 3 Rotate the control dial to the previous display...
Operating Instructions
Page 8
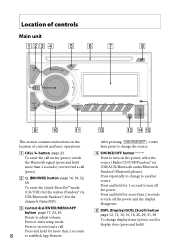
...58157; Control dial/ENTER/MENU/APP button page 17, 33, 36 Rotate to enter setup mode. Press to turn off the power. Press repeatedly to another source. Press and hold for 1 second to turn off the power and the display disappears. DSPL (Display)/SCRL (Scroll) button page 12, 13,...the power; select the source (Radio/CD/USB/Pandora® via USB/Bluetooth Pandora®); Press and hold for more than 2 seconds 8 to turn on the location of controls and basic operations. CALL button page 23 To enter the call . Press and hold for more than 2 seconds...
...58157; Control dial/ENTER/MENU/APP button page 17, 33, 36 Rotate to enter setup mode. Press to turn off the power. Press repeatedly to another source. Press and hold for 1 second to turn off the power and the display disappears. DSPL (Display)/SCRL (Scroll) button page 12, 13,...the power; select the source (Radio/CD/USB/Pandora® via USB/Bluetooth Pandora®); Press and hold for more than 2 seconds 8 to turn on the location of controls and basic operations. CALL button page 23 To enter the call . Press and hold for more than 2 seconds...
Operating Instructions
Page 10
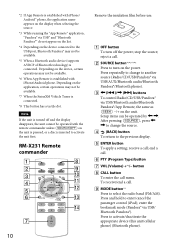
... call . PTY (Program Type) button VOL (Volume) +*5/- RM-X231 Remote commander 10 Remove the insulation film before use. OFF button To turn on the power. Press repeatedly to change the source. (BACK) button To return to the previous display. ENTER button To apply a setting; end... Pandora® may not be available. *7 When the SiriusXM Vehicle Tuner is connected. *8 This button has a tactile dot. Note If the unit is turned off the power; stop the source; enter the bookmark mode (Pandora® via USB/ Bluetooth Pandora®).
... call . PTY (Program Type) button VOL (Volume) +*5/- RM-X231 Remote commander 10 Remove the insulation film before use. OFF button To turn on the power. Press repeatedly to change the source. (BACK) button To return to the previous display. ENTER button To apply a setting; end... Pandora® may not be available. *7 When the SiriusXM Vehicle Tuner is connected. *8 This button has a tactile dot. Note If the unit is turned off the power; stop the source; enter the bookmark mode (Pandora® via USB/ Bluetooth Pandora®).

Operating Instructions
Page 14
.... If an iPod is recognized.) To stop the iPod playback, then remove the iPod. 14 lossless compression files - Playing back iPod Before connecting the iPod, turn down due to start playing automatically from the point last played. To remove the iPod, stop playback, press and hold for the iPod functions on...
.... If an iPod is recognized.) To stop the iPod playback, then remove the iPod. 14 lossless compression files - Playing back iPod Before connecting the iPod, turn down due to start playing automatically from the point last played. To remove the iPod, stop playback, press and hold for the iPod functions on...

Operating Instructions
Page 15
... hold MODE IPOD" appears and you connect iPhone via USB, phone call ends. Note The volume can operate an iPod directly even when it is turned on the unit during a call, as sudden loud sound may not be possible. Do not inadvertently increase the volume on . Operating an iPod directly - Skipping...
... hold MODE IPOD" appears and you connect iPhone via USB, phone call ends. Note The volume can operate an iPod directly even when it is turned on the unit during a call, as sudden loud sound may not be possible. Do not inadvertently increase the volume on . Operating an iPod directly - Skipping...

Operating Instructions
Page 16
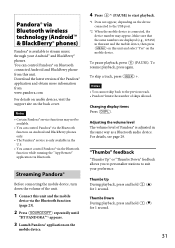
Streaming Pandora® Before connecting the iPhone, turn down the volume of the unit. 1 Open the USB cover, then connect the iPhone to the USB port with a USB connection cable for iPhone (not ...
Streaming Pandora® Before connecting the iPhone, turn down the volume of the unit. 1 Open the USB cover, then connect the iPhone to the USB port with a USB connection cable for iPhone (not ...

Operating Instructions
Page 21
... You can select from "RGB RED," "RGB GRN," or "RGB BLUE," then press it . Color mode DAY NIGHT DIMMER*1 OFF or AUTO (turn off the head light*2) ON or AUTO (turn on the head light*2) *1 For details on the main unit to the previous display. Adjustable color range: "0" - You can register a customized...
... You can select from "RGB RED," "RGB GRN," or "RGB BLUE," then press it . Color mode DAY NIGHT DIMMER*1 OFF or AUTO (turn off the head light*2) ON or AUTO (turn on the head light*2) *1 For details on the main unit to the previous display. Adjustable color range: "0" - You can register a customized...

Operating Instructions
Page 22
..." appears, then press it . 4 Press (BACK) to return to the previous display. Sound Synchronization When you press the display and buttons on the main unit turn white once, then change to the customized color. 1 Press rotate the control dial until "START- To cancel White Menu, select "OFF" in step 3. To cancel...
..." appears, then press it . 4 Press (BACK) to return to the previous display. Sound Synchronization When you press the display and buttons on the main unit turn white once, then change to the customized color. 1 Press rotate the control dial until "START- To cancel White Menu, select "OFF" in step 3. To cancel...

Operating Instructions
Page 23
.... Handsfree calling/Music streaming You can make/receive handsfree calls and listen to "2 (cellular phone)." *3 Appears on the setup menu when the unit is turned off. 23 To use the device after pairing is made . Installing the microphone To capture your device may be output even if set : PAIRING*1 (page...
.... Handsfree calling/Music streaming You can make/receive handsfree calls and listen to "2 (cellular phone)." *3 Appears on the setup menu when the unit is turned off. 23 To use the device after pairing is made . Installing the microphone To capture your device may be output even if set : PAIRING*1 (page...

Operating Instructions
Page 25
... the cellular phone and activate the Bluetooth signal. 3 Connect to this unit 1 Make sure the Bluetooth signal of connected cellular phone.* * Turns off without handsfree connection. " " lights up when Bluetooth signal is made , the network name and the connected cellular phone name appear in the display: Signal ...
... the cellular phone and activate the Bluetooth signal. 3 Connect to this unit 1 Make sure the Bluetooth signal of connected cellular phone.* * Turns off without handsfree connection. " " lights up when Bluetooth signal is made , the network name and the connected cellular phone name appear in the display: Signal ...

Operating Instructions
Page 26
...Obtain permission via the Bluetooth function, perform the pairing procedure (page 24). Tip With Bluetooth signal on: when the ignition is turned to on the cellular phone's specification. Handsfree calling Once the unit is being made . 26 Before handsfree calling, check the following...Some cellular phones require permission to access their phonebook data during handsfree connection to this unit. " " flashes while the connection is activated. 2 Turn on the audio device and activate the Bluetooth signal. 3 Connect to this unit using the audio device. " " lights up when Bluetooth signal...
...Obtain permission via the Bluetooth function, perform the pairing procedure (page 24). Tip With Bluetooth signal on: when the ignition is turned to on the cellular phone's specification. Handsfree calling Once the unit is being made . 26 Before handsfree calling, check the following...Some cellular phones require permission to access their phonebook data during handsfree connection to this unit. " " flashes while the connection is activated. 2 Turn on the audio device and activate the Bluetooth signal. 3 Connect to this unit using the audio device. " " lights up when Bluetooth signal...
Operating Instructions
Page 29
.... Notes • Check that the unit and cellular phone are any difference between the unit and the Bluetooth audio device. 1 Start playback of Bluetooth technology. 1 Turn down the volume on this unit. 2 Press repeatedly until "VOICE DIAL" appears, then press it. 2 Say the voice tag stored on the back cover. 1 Press...
.... Notes • Check that the unit and cellular phone are any difference between the unit and the Bluetooth audio device. 1 Start playback of Bluetooth technology. 1 Turn down the volume on this unit. 2 Press repeatedly until "VOICE DIAL" appears, then press it. 2 Say the voice tag stored on the back cover. 1 Press...

Operating Instructions
Page 30
... audio device supports AVRCP (Audio Video Remote Control Profile) of the audio device does not stop. The menu list appears. 3 Rotate the control dial to turn off the power. 2 Press rotate the control dial until "BT" appears, then press it. "COMPLETE" appears when initializing has finished. 5 Press (BACK) to return to...
... audio device supports AVRCP (Audio Video Remote Control Profile) of the audio device does not stop. The menu list appears. 3 Rotate the control dial to turn off the power. 2 Press rotate the control dial until "BT" appears, then press it. "COMPLETE" appears when initializing has finished. 5 Press (BACK) to return to...
Operating Instructions
Page 31
... During playback, press and hold for 1 second. Thumbs Down During playback, press and hold for 1 second. 31 Streaming Pandora® Before connecting the mobile device, turn down the volume of the Pandora® application and obtain more information from this unit. To resume playback, press again. Make sure that the same...
... During playback, press and hold for 1 second. Thumbs Down During playback, press and hold for 1 second. 31 Streaming Pandora® Before connecting the mobile device, turn down the volume of the Pandora® application and obtain more information from this unit. To resume playback, press again. Make sure that the same...
Operating Instructions
Page 33
... Menu Enjoying sophisticated sound functions - Advanced Sound Engine Advanced Sound Engine creates an ideal incar sound field with Android phone Before connecting the mobile device, turn down the volume of the application. Customizing the equalizer curve - EQ7 Setting "CUSTOM" of the unit can select an equalizer curve from 7 equalizer curves (XPLOD...
... Menu Enjoying sophisticated sound functions - Advanced Sound Engine Advanced Sound Engine creates an ideal incar sound field with Android phone Before connecting the mobile device, turn down the volume of the application. Customizing the equalizer curve - EQ7 Setting "CUSTOM" of the unit can select an equalizer curve from 7 equalizer curves (XPLOD...
Operating Instructions
Page 36
... setting, then press it . 5 Press (BACK) to return to "ON" or "OFF," and edits the passcode (page 39). *1 When the unit is turned off. *2 Does not appear in App Remote. *3 When the tuner is selected. *4 When the CD or USB is selected. *5 When the SiriusXM Vehicle Tuner... select "1," "2," or "3," then press it .* The setting is complete. 4 Press (BACK) to return to the previous display. * For CLOCK-ADJ and BTM settings, step 4 is turned off: "NO," "30S (Seconds)," "30M (Minutes)," "60M (Minutes)." 36 AUX-A*1*2 (AUX Audio) Activates the AUX source display: "ON," "OFF" (page 38). "CENTER" -...
... setting, then press it . 5 Press (BACK) to return to "ON" or "OFF," and edits the passcode (page 39). *1 When the unit is turned off. *2 Does not appear in App Remote. *3 When the tuner is selected. *4 When the CD or USB is selected. *5 When the SiriusXM Vehicle Tuner... select "1," "2," or "3," then press it .* The setting is complete. 4 Press (BACK) to return to the previous display. * For CLOCK-ADJ and BTM settings, step 4 is turned off: "NO," "30S (Seconds)," "30M (Minutes)," "60M (Minutes)." 36 AUX-A*1*2 (AUX Audio) Activates the AUX source display: "ON," "OFF" (page 38). "CENTER" -...
Operating Instructions
Page 38
... to dim the display. - "ON": to the AUX input jack (stereo mini jack) on the unit and then simply selecting the source, you turn lights on your usual listening volume on setup items for further customizing (page 21). START-WHT Sets the start up color: "ON," "OFF" (... volume on the main unit (page 21). DISPLAY: DEMO (Demonstration) Activates the demonstration: "ON," "OFF." Connecting the portable audio device 1 Turn off the portable audio device. 2 Turn down the volume on the unit. 2 Press repeatedly until "AUX" appears. 3 Start playback of the display and buttons on the unit. 3...
... to dim the display. - "ON": to the AUX input jack (stereo mini jack) on the unit and then simply selecting the source, you turn lights on your usual listening volume on setup items for further customizing (page 21). START-WHT Sets the start up color: "ON," "OFF" (... volume on the main unit (page 21). DISPLAY: DEMO (Demonstration) Activates the demonstration: "ON," "OFF." Connecting the portable audio device 1 Turn off the portable audio device. 2 Turn down the volume on the unit. 2 Press repeatedly until "AUX" appears. 3 Start playback of the display and buttons on the unit. 3...

Operating Instructions
Page 41
... may occur and result in communication speed deterioration, noise, or invalid connection if this unit is used within 10 m of a wireless LAN device, turn off this unit and Bluetooth device. - Install this unit is used near automatic doors or a fire alarm 41 Made for iPhone" mean that enables... wireless data communication between this unit and other as a cellular phone and a headset. Turn off the wireless LAN device. - Use this unit at the same time. • You do not need to use a cable for the devices ...
... may occur and result in communication speed deterioration, noise, or invalid connection if this unit is used within 10 m of a wireless LAN device, turn off this unit and Bluetooth device. - Install this unit is used near automatic doors or a fire alarm 41 Made for iPhone" mean that enables... wireless data communication between this unit and other as a cellular phone and a headset. Turn off the wireless LAN device. - Use this unit at the same time. • You do not need to use a cable for the devices ...

