Service Manual
Page 1
...dB), 30-13,000 Hz (±3 dB, -4dB recording), using Sony TYPE IV cassette SPECIFICATIONS Wow and flutter ±0.15% W. SERVICE MANUAL Ver 1.0 2001.04 TC-WE475 US Model Canadian Model AEP Model UK Model E Model Australian Model Dolby... noise reduction extension manufactured under license from Dolby Laboratories Licensing Corporation. Model Name Using Similar Mechanism DECK A Transport Mechanism Type DECK B TC-WE435 TCM-230ASR41A TCM-230ASR41B System Fast-winding time Approx.100 sec. (with Sony C-60 cassette...
...dB), 30-13,000 Hz (±3 dB, -4dB recording), using Sony TYPE IV cassette SPECIFICATIONS Wow and flutter ±0.15% W. SERVICE MANUAL Ver 1.0 2001.04 TC-WE475 US Model Canadian Model AEP Model UK Model E Model Australian Model Dolby... noise reduction extension manufactured under license from Dolby Laboratories Licensing Corporation. Model Name Using Similar Mechanism DECK A Transport Mechanism Type DECK B TC-WE435 TCM-230ASR41A TCM-230ASR41B System Fast-winding time Approx.100 sec. (with Sony C-60 cassette...
Service Manual
Page 3
...22 6-14. POWER Section 24 6-16. ELECTRICAL PARTS LIST 32 3 Mechanism Deck Assy (Deck A/B 6 3. Circuit Boards Location 12 6-2. MAIN (3/4) Section 17 6-6. Schematic Diagram - Schematic Diagram - Chassis Section 28 7-3. Cassette Lid Assy (Deck A/B 6 2-4. SERVICE MODE 7 4. ELECTRICAL ADJUSTMENTS 8 6. MAIN (2/4) ... AUS model • Abbreviation CND : Canadian model SP : Singapore model AUS : Australian model TC-WE475 TABLE OF CONTENTS 1. MECHANICAL ADJUSTMENTS 8 5. MAIN Section 14 6-3. Printed Wiring Board - EXPLODED VIEWS 7-1. Front Panel...
...22 6-14. POWER Section 24 6-16. ELECTRICAL PARTS LIST 32 3 Mechanism Deck Assy (Deck A/B 6 3. Circuit Boards Location 12 6-2. MAIN (3/4) Section 17 6-6. Schematic Diagram - Schematic Diagram - Chassis Section 28 7-3. Cassette Lid Assy (Deck A/B 6 2-4. SERVICE MODE 7 4. ELECTRICAL ADJUSTMENTS 8 6. MAIN (2/4) ... AUS model • Abbreviation CND : Canadian model SP : Singapore model AUS : Australian model TC-WE475 TABLE OF CONTENTS 1. MECHANICAL ADJUSTMENTS 8 5. MAIN Section 14 6-3. Printed Wiring Board - EXPLODED VIEWS 7-1. Front Panel...
Service Manual
Page 5
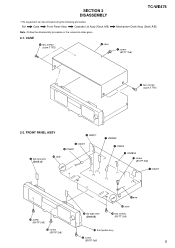
... panel assy qs screw (BVTP 3x8) 5 Set Case Front Panel Assy Cassette Lid Assy (Deck A/B) Note : Follow the disassembly procedure in the numerical order given. 2-1. SECTION 2 DISASSEMBLY • The equipment can be removed using the following procedure. CASE 3 two screws (case 3 TP2) 4 case TC-WE475 Mechanism Deck Assy (Deck A/B) 1 screw (BVTT 3x6) 2 two screws (case 3 TP2...
... panel assy qs screw (BVTP 3x8) 5 Set Case Front Panel Assy Cassette Lid Assy (Deck A/B) Note : Follow the disassembly procedure in the numerical order given. 2-1. SECTION 2 DISASSEMBLY • The equipment can be removed using the following procedure. CASE 3 two screws (case 3 TP2) 4 case TC-WE475 Mechanism Deck Assy (Deck A/B) 1 screw (BVTT 3x6) 2 two screws (case 3 TP2...
Service Manual
Page 6
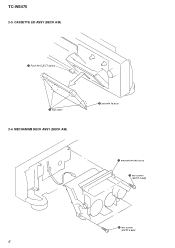
TC-WE475 2-3. MECHANISM DECK ASSY (DECK A/B) 3 cassette lid assy 3 mechanism deck assy 1 two screws (BVTP 2.6x8) 2 two screws (BVTP 2.6x8) 6 CASSETTE LID ASSY (DECK A/B) 1 Push the EJECT button. 2 four claws 2-4.
TC-WE475 2-3. MECHANISM DECK ASSY (DECK A/B) 3 cassette lid assy 3 mechanism deck assy 1 two screws (BVTP 2.6x8) 2 two screws (BVTP 2.6x8) 6 CASSETTE LID ASSY (DECK A/B) 1 Push the EJECT button. 2 four claws 2-4.

Service Manual
Page 29
... 3-019-453-01 3-019-456-01 3-019-452-01 4-951-620-01 4-959-229-11 LEVER (LOCK R) SCREW, STEP LEVER (LOCK L) SCREW (2.6X8), +BVTP DETENT, CASSETTE 29 No. 101 101 102 102 103 103 104 105 106 Part No. Description Remark X-4953-501-1 LID(A) ASSY...) 4-232-407-11 BUTTON (EJECT)(SILVER) (AEP) 3-022-410-01 DAMPER 3-019-450-01 PLATE (L), FULCRUM X-4953-543-1 HOLDER (R) ASSY, CASSETTE (US,CND,AEP,UK,SP,AUS) Ref. 7-3. CASSETTE HOLDER SECTION TC-WE475 #4 #3 104 114 105 114 TCM-230ASR41A 114 106 115 111 108 112 107 113 #3 105 103 112 #3 114 114 TCM-230ASR41B...
... 3-019-453-01 3-019-456-01 3-019-452-01 4-951-620-01 4-959-229-11 LEVER (LOCK R) SCREW, STEP LEVER (LOCK L) SCREW (2.6X8), +BVTP DETENT, CASSETTE 29 No. 101 101 102 102 103 103 104 105 106 Part No. Description Remark X-4953-501-1 LID(A) ASSY...) 4-232-407-11 BUTTON (EJECT)(SILVER) (AEP) 3-022-410-01 DAMPER 3-019-450-01 PLATE (L), FULCRUM X-4953-543-1 HOLDER (R) ASSY, CASSETTE (US,CND,AEP,UK,SP,AUS) Ref. 7-3. CASSETTE HOLDER SECTION TC-WE475 #4 #3 104 114 105 114 TCM-230ASR41A 114 106 115 111 108 112 107 113 #3 105 103 112 #3 114 114 TCM-230ASR41B...
Operating Instructions
Page 1
4-232-596-12 (1) Stereo Cassette Deck Operating Instructions TC-WE675 TC-WE475 © 2001 Sony Corporation
4-232-596-12 (1) Stereo Cassette Deck Operating Instructions TC-WE675 TC-WE475 © 2001 Sony Corporation
Operating Instructions
Page 7
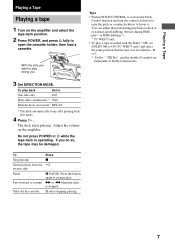
... RMS play 2) or RMS dubbing 2)). 2) TC-WE675 only • To play back Set to resume play facing you do so, the tape may be damaged. The deck starts playing. Do not press POWER or A while the tape deck is stopped Take out the cassette A after playing back five times. 4 Press... a Tape Playing a Tape Playing a tape 1 Turn on the amplifier and select the tape deck position. 2 Press POWER, and press A fully to play . With the side you want to open the cassette holder, then load a cassette. Adjust the volume on the amplifier. To Press Stop playing x Start playback from the h ...
... RMS play 2) or RMS dubbing 2)). 2) TC-WE675 only • To play back Set to resume play facing you do so, the tape may be damaged. The deck starts playing. Do not press POWER or A while the tape deck is stopped Take out the cassette A after playing back five times. 4 Press... a Tape Playing a Tape Playing a tape 1 Turn on the amplifier and select the tape deck position. 2 Press POWER, and press A fully to play . With the side you want to open the cassette holder, then load a cassette. Adjust the volume on the amplifier. To Press Stop playing x Start playback from the h ...

Operating Instructions
Page 8
... You can even locate a specific point anywhere on deck A in the display. 0 3 H FRONT RMS BACK 1 2 3 4 5 6 7 8 9 10 11 12 13 14 Track number Side of the current track (Multi-AMS) m (or M) once during playback. The beginning of the cassette 8 the blank space between tracks is a passage of... the left and right channels are reset to s, the deck stops when the current side reaches the end during playback. RMS Play (TC-WE675 only) By creating a program, you want ...
... You can even locate a specific point anywhere on deck A in the display. 0 3 H FRONT RMS BACK 1 2 3 4 5 6 7 8 9 10 11 12 13 14 Track number Side of the current track (Multi-AMS) m (or M) once during playback. The beginning of the cassette 8 the blank space between tracks is a passage of... the left and right channels are reset to s, the deck stops when the current side reaches the end during playback. RMS Play (TC-WE675 only) By creating a program, you want ...
Operating Instructions
Page 10
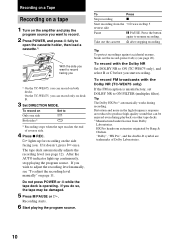
...you want to record. 2 Press POWER, and press A fully to open the cassette holder, then load a cassette. 1) With the side you want to resume recording. After the AUTO indicator lights up for recording on deck B. 3 Set DIRECTION MODE. Tip The Dolby HX Pro 3) automatically works during...source. To record on page 11. Take out the cassette A after stopping recording Tip To protect recordings against accidental erasure, break out the record-protect tab(s) (see page 12). On the TC-WE475, you can record on other tape decks. 3) Manufactured under license from the h twice in ...
...you want to record. 2 Press POWER, and press A fully to open the cassette holder, then load a cassette. 1) With the side you want to resume recording. After the AUTO indicator lights up for recording on deck B. 3 Set DIRECTION MODE. Tip The Dolby HX Pro 3) automatically works during...source. To record on page 11. Take out the cassette A after stopping recording Tip To protect recordings against accidental erasure, break out the record-protect tab(s) (see page 12). On the TC-WE475, you can record on other tape decks. 3) Manufactured under license from the h twice in ...
Operating Instructions
Page 11
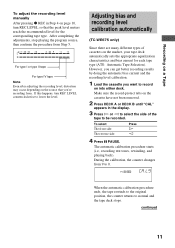
..., and playing back). CAL B REC CA. If this happens, turn REC LEVEL so that you want to record on the cassette have not been removed. 2 Press DECK A or DECK B until "CAL" appears in Step 4 on page 10, turn REC LEVEL counterclockwise to lower the level. During the calibration,...source, then continue the procedure from Step 5. Adjusting bias and recording level calibration automatically (TC-WE675 only) Since there are many different types of the tape to normal and the tape deck stops. However, you can get better recording results by doing the automatic bias current and...
..., and playing back). CAL B REC CA. If this happens, turn REC LEVEL so that you want to record on the cassette have not been removed. 2 Press DECK A or DECK B until "CAL" appears in Step 4 on page 10, turn REC LEVEL counterclockwise to lower the level. During the calibration,...source, then continue the procedure from Step 5. Adjusting bias and recording level calibration automatically (TC-WE675 only) Since there are many different types of the tape to normal and the tape deck stops. However, you can get better recording results by doing the automatic bias current and...
Operating Instructions
Page 12
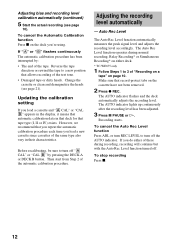
... clean and demagnetize the heads (see page 10). Updating the calibration setting If you load a new cassette since cassettes of the same type also vary in that deck for that automatic calibration data in their characteristics. Then start from Step 2 of the test tone. • Damaged ...do either of these during normal recording, Relay Recording* or Simultaneous Recording* on either deck. * TC-WE675 only 1 Follow Steps 1 to turn off "A CAL" or "CAL B" by : • The end of "Recording on a tape" on the cassette have not been removed. 2 Press z REC. Before recalibrating, be sure to ...
... clean and demagnetize the heads (see page 10). Updating the calibration setting If you load a new cassette since cassettes of the same type also vary in that deck for that automatic calibration data in their characteristics. Then start from Step 2 of the test tone. • Damaged ...do either of these during normal recording, Relay Recording* or Simultaneous Recording* on either deck. * TC-WE675 only 1 Follow Steps 1 to turn off "A CAL" or "CAL B" by : • The end of "Recording on a tape" on the cassette have not been removed. 2 Press z REC. Before recalibrating, be sure to ...

Operating Instructions
Page 14
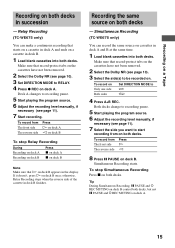
... normal or high speed. 1 Load a recorded cassette into deck A and a blank cassette into deck B. To select Press HIGH/NORMAL Normal speed Once High speed Twice "HIGH" or "NORM" appears in deck B have to start dubbing. The deck changes to dubbing standby. 4 Select the side from which to adjust the .... RELAY. Recording on the reverse side on deck B starts simultaneously with the same recording level and Dolby NR as the original in deck A. Dubbing a tape You can copy a tape in deck A to be recorded on. Make sure the record-protect tabs on the cassette in the display.
... normal or high speed. 1 Load a recorded cassette into deck A and a blank cassette into deck B. To select Press HIGH/NORMAL Normal speed Once High speed Twice "HIGH" or "NORM" appears in deck B have to start dubbing. The deck changes to dubbing standby. 4 Select the side from which to adjust the .... RELAY. Recording on the reverse side on deck B starts simultaneously with the same recording level and Dolby NR as the original in deck A. Dubbing a tape You can copy a tape in deck A to be recorded on. Make sure the record-protect tabs on the cassette in the display.
Operating Instructions
Page 15
... Simultaneous Recording, X PAUSE and W REC MUTING on deck B control both decks. Relay Recording (TC-WE675 only) You can record the same source on cassettes in deck A and B at the same time. 1 Load blank cassettes into both decks. Simultaneous Recording starts. Make sure that starts on a cassette in deck A and ends on a cassette in succession - To record from The front side...
... Simultaneous Recording, X PAUSE and W REC MUTING on deck B control both decks. Relay Recording (TC-WE675 only) You can record the same source on cassettes in deck A and B at the same time. 1 Load blank cassettes into both decks. Simultaneous Recording starts. Make sure that starts on a cassette in deck A and ends on a cassette in succession - To record from The front side...
Operating Instructions
Page 16
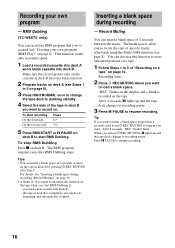
... dubbing standby. 4 Select the side of the tape in deck B is automatically inserted on the tape. You can record an RMS program that you to locate the start RMS Dubbing if: - RMS Dubbing (TC-WE675 only) You can also use this function to erase unwanted portions on a tape. 1 Follow... to resume recording. Tip If you want to insert a blank space longer than 4 seconds, hold down W REC MUTING as long as you load a new cassette into deck B. Tips • You can insert a blank space of 4 seconds between the tracks. After 4 seconds, "REC" flashes faster. When you start of 4...
... dubbing standby. 4 Select the side of the tape in deck B is automatically inserted on the tape. You can record an RMS program that you to locate the start RMS Dubbing if: - RMS Dubbing (TC-WE675 only) You can also use this function to erase unwanted portions on a tape. 1 Follow... to resume recording. Tip If you want to insert a blank space longer than 4 seconds, hold down W REC MUTING as long as you load a new cassette into deck B. Tips • You can insert a blank space of 4 seconds between the tracks. After 4 seconds, "REC" flashes faster. When you start of 4...
Operating Instructions
Page 17
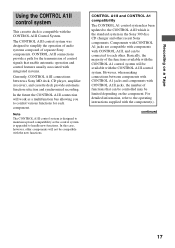
... A1 control system will not be limited depending on a Tape Using the CONTROL A1II control system This cassette deck is the standard system in the Sony 300 disc CD changer and other . CONTROL A1II and CONTROL A1 compatibility The CONTROL A1 control system ... that can be available with the new functions. Recording on the component. However, when making connections between a Sony MD deck, CD player, amplifier (receiver), and cassette deck provide automatic function selection and synchronized recording. Components with CONTROL A1 jacks are compatible with components with CONTROL A1II...
... A1 control system will not be limited depending on a Tape Using the CONTROL A1II control system This cassette deck is the standard system in the Sony 300 disc CD changer and other . CONTROL A1II and CONTROL A1 compatibility The CONTROL A1 control system ... that can be available with the new functions. Recording on the component. However, when making connections between a Sony MD deck, CD player, amplifier (receiver), and cassette deck provide automatic function selection and synchronized recording. Components with CONTROL A1 jacks are compatible with components with CONTROL A1II...
Operating Instructions
Page 18
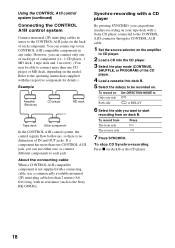
...player. 2 Load a CD into the CD player. 3 Select the play mode (CONTINUE, SHUFFLE, or PROGRAM) of the CD player. 4 Load a cassette into deck B. 5 Select the side(s) to be able to connect more than one CONTROL A1II jack, you can connect only one , or connect different components to ...each type of each jack. You can perform synchro-recording on your tape deck with a Sony CD player connected to the CONTROL A1II connector through a CONTROL A1II cable. 1 Set the source selector on deck B. About the connecting cable When a CONTROL A1II compatible component is no resistance (...
...player. 2 Load a CD into the CD player. 3 Select the play mode (CONTINUE, SHUFFLE, or PROGRAM) of the CD player. 4 Load a cassette into deck B. 5 Select the side(s) to be able to connect more than one CONTROL A1II jack, you can connect only one , or connect different components to ...each type of each jack. You can perform synchro-recording on your tape deck with a Sony CD player connected to the CONTROL A1II connector through a CONTROL A1II cable. 1 Set the source selector on deck B. About the connecting cable When a CONTROL A1II compatible component is no resistance (...
Operating Instructions
Page 19
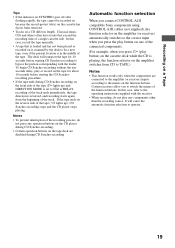
...new tape, even if the present location is in length. To begin CD Synchro-recording without the tenseconds delay, play button) on the cassette deck while the CD is reversed, and recording starts again from CD to the names on the function buttons. In this case, refer to... the CD Synchrorecording procedure. • If the tape ends during CD Synchro-recording Automatic function selection When you connect CONTROL A1II compatible Sony components using CONTROL A1II cables (not supplied), the function selector on the amplifier (or receiver) automatically switches to the correct input when...
...new tape, even if the present location is in length. To begin CD Synchro-recording without the tenseconds delay, play button) on the cassette deck while the CD is reversed, and recording starts again from CD to the names on the function buttons. In this case, refer to... the CD Synchrorecording procedure. • If the tape ends during CD Synchro-recording Automatic function selection When you connect CONTROL A1II compatible Sony components using CONTROL A1II cables (not supplied), the function selector on the amplifier (or receiver) automatically switches to the correct input when...
Operating Instructions
Page 20
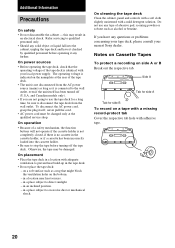
... tab hole with adequate ventilation to stop the tape before operating it any questions or problems concerning your tape deck, please consult your local power supply. Notes on Cassette Tapes To protect a recording on a soft surface such as it checked by qualified personnel before turning off ...or B Break out the respective tab. in a location with adhesive tape. 20 On cleaning the tape deck Clean the cabinet, panel and controls with a soft cloth slightly moistened with your nearest Sony dealer. in an inclined position. - Refer servicing to the wall outlet, even if the unit itself...
... tab hole with adequate ventilation to stop the tape before operating it any questions or problems concerning your tape deck, please consult your local power supply. Notes on Cassette Tapes To protect a recording on a soft surface such as it checked by qualified personnel before turning off ...or B Break out the respective tab. in a location with adhesive tape. 20 On cleaning the tape deck Clean the cabinet, panel and controls with a soft cloth slightly moistened with your nearest Sony dealer. in an inclined position. - Refer servicing to the wall outlet, even if the unit itself...

Operating Instructions
Page 21
...1 Press A to open the cassette holder. 2 With the tape deck turned off, wipe the heads, the pinch rollers and the capstans with a cotton swab slightly moistened with a commercially available demagnetizer for tape decks. A Clean the heads and tape path of the tape deck after every 10 hours of operation...that you notice a hissing sound or loss of high frequencies, demagnetize the heads with alcohol or a commercially available cleaning fluid for tape decks. Please refer to 30 hours of the demagnetizer. Demagnetizing the heads After 20 to the instructions of use, or when you clean the ...
...1 Press A to open the cassette holder. 2 With the tape deck turned off, wipe the heads, the pinch rollers and the capstans with a cotton swab slightly moistened with a commercially available demagnetizer for tape decks. A Clean the heads and tape path of the tape deck after every 10 hours of operation...that you notice a hissing sound or loss of high frequencies, demagnetize the heads with alcohol or a commercially available cleaning fluid for tape decks. Please refer to 30 hours of the demagnetizer. Demagnetizing the heads After 20 to the instructions of use, or when you clean the ...
Operating Instructions
Page 22
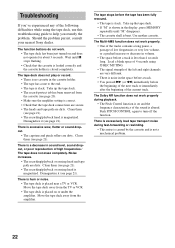
...; Make sure the amplifier setting is correct. • Check that the cassette is loaded correctly and the cassette holder is bent. Should the problem persist, consult your nearest Sony dealer. There is hum or noise. • The tape deck is less than 4 seconds long. Take up the tape slack. •...; The record-protect tab has been removed from the cassette (see page 21). • The recording/playback ...
...; Make sure the amplifier setting is correct. • Check that the cassette is loaded correctly and the cassette holder is bent. Should the problem persist, consult your nearest Sony dealer. There is hum or noise. • The tape deck is less than 4 seconds long. Take up the tape slack. •...; The record-protect tab has been removed from the cassette (see page 21). • The recording/playback ...


