Service Manual
Page 1
... STEREO CASSETTE DECK 9-873-893-11 2001D0900-1 © 2001. 4 Sony Corporation Home Audio Company Shinagawa Tec Service Manual Production Group Model Name Using Similar Mechanism DECK A Transport Mechanism Type DECK B TC-WE435 TCM-230ASR41A TCM-230ASR41B System Fast-winding time Approx.100 sec. (with Sony C-60 cassette) Signal-... "HX PRO" are trademarks of 32 ohms - Peak (IEC) 0.1% W. SERVICE MANUAL Ver 1.0 2001.04 TC-WE475 US Model Canadian Model AEP Model UK Model E Model Australian Model Dolby noise reduction extension manufactured under license from Dolby Laboratories Licensing ...
... STEREO CASSETTE DECK 9-873-893-11 2001D0900-1 © 2001. 4 Sony Corporation Home Audio Company Shinagawa Tec Service Manual Production Group Model Name Using Similar Mechanism DECK A Transport Mechanism Type DECK B TC-WE435 TCM-230ASR41A TCM-230ASR41B System Fast-winding time Approx.100 sec. (with Sony C-60 cassette) Signal-... "HX PRO" are trademarks of 32 ohms - Peak (IEC) 0.1% W. SERVICE MANUAL Ver 1.0 2001.04 TC-WE475 US Model Canadian Model AEP Model UK Model E Model Australian Model Dolby noise reduction extension manufactured under license from Dolby Laboratories Licensing ...
Service Manual
Page 3
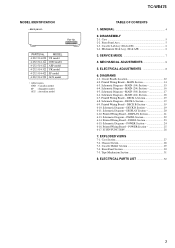
...MECHANICAL ADJUSTMENTS 8 5. Schematic Diagram - MAIN (4/4) Section 18 6-7. DECK A Section 19 6-9. POWER Section 24 6-16. EXPLODED VIEWS 7-1. GENERAL 4 2. Cassette Lid Assy (Deck A/B 6 2-4. Circuit Boards Location 12 6-2. MAIN (1/4) Section 15 6-4. DECK B Section 19 6-10. Printed Wiring Board - DISASSEMBLY 2-1. ...UK model SP model AUS model • Abbreviation CND : Canadian model SP : Singapore model AUS : Australian model TC-WE475 TABLE OF CONTENTS 1. Case 5 2-2. SERVICE MODE 7 4. DIAGRAMS 6-1. PANEL Section 23 6-15. Printed Wiring ...
...MECHANICAL ADJUSTMENTS 8 5. Schematic Diagram - MAIN (4/4) Section 18 6-7. DECK A Section 19 6-9. POWER Section 24 6-16. EXPLODED VIEWS 7-1. GENERAL 4 2. Cassette Lid Assy (Deck A/B 6 2-4. Circuit Boards Location 12 6-2. MAIN (1/4) Section 15 6-4. DECK B Section 19 6-10. Printed Wiring Board - DISASSEMBLY 2-1. ...UK model SP model AUS model • Abbreviation CND : Canadian model SP : Singapore model AUS : Australian model TC-WE475 TABLE OF CONTENTS 1. Case 5 2-2. SERVICE MODE 7 4. DIAGRAMS 6-1. PANEL Section 23 6-15. Printed Wiring ...
Service Manual
Page 5
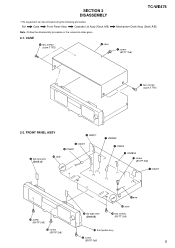
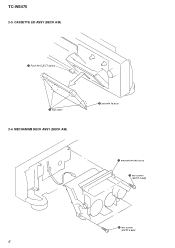
Set Case Front Panel Assy Cassette Lid Assy (Deck A/B) Note : Follow the disassembly procedure in the numerical order given. 2-1. CASE 3 two screws (case 3 TP2) 4 case TC-WE475 Mechanism Deck Assy (Deck A/B) 1 screw (BVTT 3x6) 2 two screws (case 3 TP2) 2-2. FRONT PANEL ASSY 2 CN807 5 flat type wire (Deck A) 8 CN301 9 CN002 qj claw 1 CN5802 3 CN803 4 CNA806 0 screw (BVTP 3x8) 7 CN401 qawire...
Set Case Front Panel Assy Cassette Lid Assy (Deck A/B) Note : Follow the disassembly procedure in the numerical order given. 2-1. CASE 3 two screws (case 3 TP2) 4 case TC-WE475 Mechanism Deck Assy (Deck A/B) 1 screw (BVTT 3x6) 2 two screws (case 3 TP2) 2-2. FRONT PANEL ASSY 2 CN807 5 flat type wire (Deck A) 8 CN301 9 CN002 qj claw 1 CN5802 3 CN803 4 CNA806 0 screw (BVTP 3x8) 7 CN401 qawire...
Service Manual
Page 6
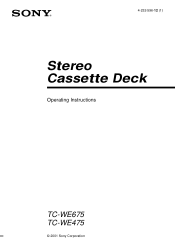
MECHANISM DECK ASSY (DECK A/B) 3 cassette lid assy 3 mechanism deck assy 1 two screws (BVTP 2.6x8) 2 two screws (BVTP 2.6x8) 6 CASSETTE LID ASSY (DECK A/B) 1 Push the EJECT button. 2 four claws 2-4. TC-WE475 2-3.
MECHANISM DECK ASSY (DECK A/B) 3 cassette lid assy 3 mechanism deck assy 1 two screws (BVTP 2.6x8) 2 two screws (BVTP 2.6x8) 6 CASSETTE LID ASSY (DECK A/B) 1 Push the EJECT button. 2 four claws 2-4. TC-WE475 2-3.
Operating Instructions
Page 1
4-232-596-12 (1) Stereo Cassette Deck Operating Instructions TC-WE675 TC-WE475 © 2001 Sony Corporation
4-232-596-12 (1) Stereo Cassette Deck Operating Instructions TC-WE675 TC-WE475 © 2001 Sony Corporation
Operating Instructions
Page 7
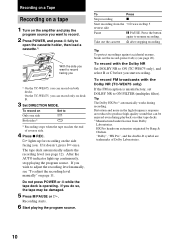
... during RMS play 2) or RMS dubbing 2)). 2) TC-WE675 only • To play back Set to One side only g Both sides continuously 1) s Both decks in succession 1) RELAY 1) The deck automatically stops after stopping playing 7 Do not press POWER or A while the tape deck is stopped Take out the cassette A after playing back five times. 4 Press H. To...
... during RMS play 2) or RMS dubbing 2)). 2) TC-WE675 only • To play back Set to One side only g Both sides continuously 1) s Both decks in succession 1) RELAY 1) The deck automatically stops after stopping playing 7 Do not press POWER or A while the tape deck is stopped Take out the cassette A after playing back five times. 4 Press H. To...

Operating Instructions
Page 8
... locate The beginning of low frequencies or very low volume within a range of 30 tracks (Multi-AMS: Automatic Music Sensor) or the beginning of the cassette 8 The beginning of the current track (Multi-AMS) m (or M) once during Multi-AMS operation. • The tape counters are very different. •...on the reverse side (when h lights up), press the button(s) in the display. A particular point on deck A in any order that you create a program of the tape. 1 Press RMS/START. RMS Play (TC-WE675 only) By creating a program, you want , then press RESET to reset the tape counter and ...
... locate The beginning of low frequencies or very low volume within a range of 30 tracks (Multi-AMS: Automatic Music Sensor) or the beginning of the cassette 8 The beginning of the current track (Multi-AMS) m (or M) once during Multi-AMS operation. • The tape counters are very different. •...on the reverse side (when h lights up), press the button(s) in the display. A particular point on deck A in any order that you create a program of the tape. 1 Press RMS/START. RMS Play (TC-WE675 only) By creating a program, you want , then press RESET to reset the tape counter and ...
Operating Instructions
Page 10
... Recording stops when the tape reaches the end of Dolby Laboratories. 10 Tip The Dolby HX Pro 3) automatically works during playback on other tape decks. 3) Manufactured under license from the h twice in the high-frequency response are trademarks of reverse side. 4 Press z REC. To record on...up for recording on the side facing you can be damaged. 5 Press X PAUSE or H. On the TC-WE475, you start recording. If it doesn't, press H once. Take out the cassette A after stopping recording Tip To protect recordings against accidental erasure, break out the record-protect tab(s) (see...
... Recording stops when the tape reaches the end of Dolby Laboratories. 10 Tip The Dolby HX Pro 3) automatically works during playback on other tape decks. 3) Manufactured under license from the h twice in the high-frequency response are trademarks of reverse side. 4 Press z REC. To record on...up for recording on the side facing you can be damaged. 5 Press X PAUSE or H. On the TC-WE475, you start recording. If it doesn't, press H once. Take out the cassette A after stopping recording Tip To protect recordings against accidental erasure, break out the record-protect tab(s) (see...
Operating Instructions
Page 11
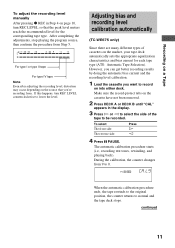
...continue the procedure from . Make sure the record-protect tabs on the cassette have not been removed. 2 Press DECK A or DECK B until "CAL" appears in Step 4 on the market, your tape deck automatically sets the appropriate equalization characteristics and bias current for the corresponding tape... type. CAL B REC CA. Adjusting bias and recording level calibration automatically (TC-WE675 only) Since there are many different types of the tape to select the side of cassettes ...
...continue the procedure from . Make sure the record-protect tabs on the cassette have not been removed. 2 Press DECK A or DECK B until "CAL" appears in Step 4 on the market, your tape deck automatically sets the appropriate equalization characteristics and bias current for the corresponding tape... type. CAL B REC CA. Adjusting bias and recording level calibration automatically (TC-WE675 only) Since there are many different types of the tape to select the side of cassettes ...
Operating Instructions
Page 12
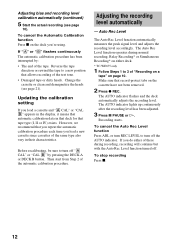
... "B" flashes continuously The automatic calibration procedure has been interrupted by pressing the DECK A or DECK B button. Change the cassette or clean and demagnetize the heads (see page 10). Updating the calibration setting If you do either deck. * TC-WE675 only 1 Follow Steps 1 to turn off "A CAL" or "...CAL B" by : • The end of the automatic calibration procedure. Recording starts. If you load a cassette and "A CAL" or "CAL B" appears in...
... "B" flashes continuously The automatic calibration procedure has been interrupted by pressing the DECK A or DECK B button. Change the cassette or clean and demagnetize the heads (see page 10). Updating the calibration setting If you do either deck. * TC-WE675 only 1 Follow Steps 1 to turn off "A CAL" or "...CAL B" by : • The end of the automatic calibration procedure. Recording starts. If you load a cassette and "A CAL" or "CAL B" appears in...

Operating Instructions
Page 14
...s. If, however, you want to skip. Make sure the record-protect tabs on . You don't have to be recorded on the cassette in deck B have not been removed. 2 Select the side(s) to adjust the recording level or select the Dolby NR during high-speed dubbing.... "HIGH" or "NORM" appears in deck B at the portion you want to resume recording on deck A, then stop dubbing During Normal-speed dubbing High-speed dubbing Press x on deck B x on deck A at normal or high speed. 1 Load a recorded cassette into deck A and a blank cassette into deck B. Dubbing only specific portions You can...
...s. If, however, you want to skip. Make sure the record-protect tabs on . You don't have to be recorded on the cassette in deck B have not been removed. 2 Select the side(s) to adjust the recording level or select the Dolby NR during high-speed dubbing.... "HIGH" or "NORM" appears in deck B at the portion you want to resume recording on deck A, then stop dubbing During Normal-speed dubbing High-speed dubbing Press x on deck B x on deck A at normal or high speed. 1 Load a recorded cassette into deck A and a blank cassette into deck B. Dubbing only specific portions You can...
Operating Instructions
Page 15
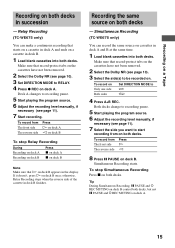
... deck B appears in deck B. 1 Load blank cassettes into both decks. To record from The front side The reverse side Press H on deck A h on deck B To stop Simultaneous Recording Press x on both decks, but not X PAUSE and W REC MUTING on deck A. 15 Recording on a Tape Recording on both decks - Relay Recording (TC-WE675 only) You can record the same source on deck A. Deck...
... deck B appears in deck B. 1 Load blank cassettes into both decks. To record from The front side The reverse side Press H on deck A h on deck B To stop Simultaneous Recording Press x on both decks, but not X PAUSE and W REC MUTING on deck A. 15 Recording on a Tape Recording on both decks - Relay Recording (TC-WE675 only) You can record the same source on deck A. Deck...
Operating Instructions
Page 16
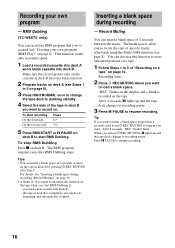
...its beginning and automatically stopped. Press X PAUSE to resume recording. This function works only at normal speed. 1 Load a recorded cassette into deck A and a blank cassette into deck B. - The RMS program remains even after Step 4. Tips • You can insert a blank space of 4 seconds or more...TC-WE675 only) You can also use this function to erase unwanted portions on a tape. 1 Follow Steps 1 to 5 of the tape in deck B have not been removed. 2 Program tracks on deck A (see "Creating your own program - Make sure the record-protect tabs on the cassette in deck...
...its beginning and automatically stopped. Press X PAUSE to resume recording. This function works only at normal speed. 1 Load a recorded cassette into deck A and a blank cassette into deck B. - The RMS program remains even after Step 4. Tips • You can insert a blank space of 4 seconds or more...TC-WE675 only) You can also use this function to erase unwanted portions on a tape. 1 Follow Steps 1 to 5 of the tape in deck B have not been removed. 2 Program tracks on deck A (see "Creating your own program - Make sure the record-protect tabs on the cassette in deck...
Operating Instructions
Page 17
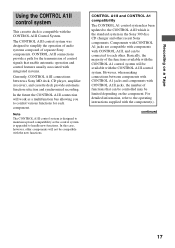
... a multifunction bus allowing you to the CONTROL A1II which is the standard system in the Sony 300 disc CD changer and other . Recording on the component. However, when making connections between a Sony MD deck, CD player, amplifier (receiver), and cassette deck provide automatic function selection and synchronized recording. Components with CONTROL A1 jacks are compatible...
... a multifunction bus allowing you to the CONTROL A1II which is the standard system in the Sony 300 disc CD changer and other . Recording on the component. However, when making connections between a Sony MD deck, CD player, amplifier (receiver), and cassette deck provide automatic function selection and synchronized recording. Components with CONTROL A1 jacks are compatible...
Operating Instructions
Page 18
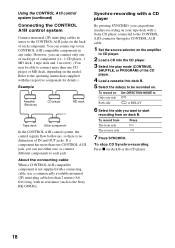
...long, with a Sony CD player connected to the CONTROL A1II connector through a CONTROL A1II cable. 1 Set the source selector on the amplifier to CD player. 2 Load a CD into the CD player. 3 Select the play mode (CONTINUE, SHUFFLE, or PROGRAM) of the CD player. 4 Load a cassette into deck B. 5 Select the... side(s) to be recorded on. To record from on deck B or the CD player. 18 However, you can connect up to the operating instructions supplied with the respective ...
...long, with a Sony CD player connected to the CONTROL A1II connector through a CONTROL A1II cable. 1 Set the source selector on the amplifier to CD player. 2 Load a CD into the CD player. 3 Select the play mode (CONTINUE, SHUFFLE, or PROGRAM) of the CD player. 4 Load a cassette into deck B. 5 Select the... side(s) to be recorded on. To record from on deck B or the CD player. 18 However, you can connect up to the operating instructions supplied with the respective ...
Operating Instructions
Page 19
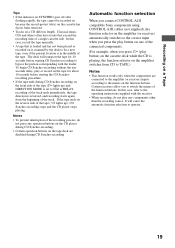
... during CD Synchro-recording on the function buttons. Notes • To prevent interruption of the recording process, do not play button) on the cassette deck while the CD is reversed, and recording starts again from CD to the names on the front side of the tape (H lights up ),... starting the CD Synchrorecording procedure. • If the tape ends during CD Synchro-recording Automatic function selection When you connect CONTROL A1II compatible Sony components using CONTROL A1II cables (not supplied), the function selector on a CD differ in the middle of the track. To begin CD ...
... during CD Synchro-recording on the function buttons. Notes • To prevent interruption of the recording process, do not play button) on the cassette deck while the CD is reversed, and recording starts again from CD to the names on the front side of the tape (H lights up ),... starting the CD Synchrorecording procedure. • If the tape ends during CD Synchro-recording Automatic function selection When you connect CONTROL A1II compatible Sony components using CONTROL A1II cables (not supplied), the function selector on a CD differ in the middle of the track. To begin CD ...
Operating Instructions
Page 20
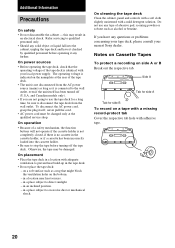
...Before operating the tape deck, check that might block the ventilation holes on a tape with a missing record-protect tab Cover the respective tab hole with your nearest Sony dealer. and Canadian models only). • If you have it any solid object or liquid fall into the cassette holder. • Be...to the wall outlet, even if the unit itself ; Otherwise, the tape may result in the cassette holder, or if a cassette has been incorrectly loaded into the cabinet, unplug the tape deck and have any type of abrasive pad, scouring powder or solvent such as a rug that the operating...
...Before operating the tape deck, check that might block the ventilation holes on a tape with a missing record-protect tab Cover the respective tab hole with your nearest Sony dealer. and Canadian models only). • If you have it any solid object or liquid fall into the cassette holder. • Be...to the wall outlet, even if the unit itself ; Otherwise, the tape may result in the cassette holder, or if a cassette has been incorrectly loaded into the cabinet, unplug the tape deck and have any type of abrasive pad, scouring powder or solvent such as a rug that the operating...

Operating Instructions
Page 21
... you notice a hissing sound or loss of high frequencies, demagnetize the heads with alcohol or a commercially available cleaning fluid for tape decks. Demagnetizing the heads After 20 to 30 hours of the demagnetizer. Please refer to the instructions of use, or when you clean ... Cleaning the heads and tape path Head assembly Pinch rollers Capstans Erasing head Recording/playback head 1 Press A to open the cassette holder. 2 With the tape deck turned off, wipe the heads, the pinch rollers and the capstans with a cotton swab slightly moistened with a commercially available ...
... you notice a hissing sound or loss of high frequencies, demagnetize the heads with alcohol or a commercially available cleaning fluid for tape decks. Demagnetizing the heads After 20 to 30 hours of the demagnetizer. Please refer to the instructions of use, or when you clean ... Cleaning the heads and tape path Head assembly Pinch rollers Capstans Erasing head Recording/playback head 1 Press A to open the cassette holder. 2 With the tape deck turned off, wipe the heads, the pinch rollers and the capstans with a cotton swab slightly moistened with a commercially available ...
Operating Instructions
Page 22
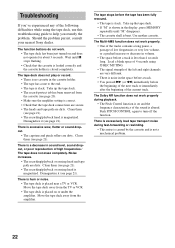
... the tape slack. • The record-protect tab has been removed from the cassette (see page 21). Should the problem persist, consult your nearest Sony dealer. There is altered. Use another cassette. Load a blank space of 4 seconds using the tape deck, use this troubleshooting guide to turn off the function. There is excessively loud...
... the tape slack. • The record-protect tab has been removed from the cassette (see page 21). Should the problem persist, consult your nearest Sony dealer. There is altered. Use another cassette. Load a blank space of 4 seconds using the tape deck, use this troubleshooting guide to turn off the function. There is excessively loud...


