
Operating Instructions
Page 6
... might occur when using this product. ❑ The guarantee and user support for this drive. • is a trademark of Sony Corporation. • Pentium is a registered trademark of Intel Corporation. • Microsoft and Windows are registered trademarks of Microsoft Corporation. • Other system and product names used herein are registered trademarks or trademarks...
... might occur when using this product. ❑ The guarantee and user support for this drive. • is a trademark of Sony Corporation. • Pentium is a registered trademark of Intel Corporation. • Microsoft and Windows are registered trademarks of Microsoft Corporation. • Other system and product names used herein are registered trademarks or trademarks...

Operating Instructions
Page 9
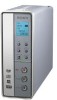
... you set the disc inside the two lower pins. Pins Pins B Eject button Opens and closes the disc tray. The LCD backlight turns on . C Display window The blue LCD backlight goes out automaticaly when: • 5 minutes have passed without any key is accessing the disc, such as reading, playing or writing...
... you set the disc inside the two lower pins. Pins Pins B Eject button Opens and closes the disc tray. The LCD backlight turns on . C Display window The blue LCD backlight goes out automaticaly when: • 5 minutes have passed without any key is accessing the disc, such as reading, playing or writing...

Operating Instructions
Page 10
Display Window The display window works only when the drive is used as a video camera or VCR. B USB connector Connect a USB cable when connecting the drive to the drive. * For ...
Display Window The display window works only when the drive is used as a video camera or VCR. B USB connector Connect a USB cable when connecting the drive to the drive. * For ...

Operating Instructions
Page 11
... available PCI adaptor cards that meets the following requirements in order to use the USB 2.0 EHCI driver software supplied with Windows 2000 SP4 and Windows XP SP1. For details, contact your software documentation. For details, refer to your USB 2.0 adaptor dealer or consult...or higher ❑ 1 GB (with NeroVision Express: 10 GB) free hard disk space ❑ Operating system: Windows 2000 Professional (referred to as Windows 2000), Windows XP Home Edition or Windows XP Professional (referred to as weight imbalance and eccentricity. • System should be used with a system that ...
... available PCI adaptor cards that meets the following requirements in order to use the USB 2.0 EHCI driver software supplied with Windows 2000 SP4 and Windows XP SP1. For details, contact your software documentation. For details, refer to your USB 2.0 adaptor dealer or consult...or higher ❑ 1 GB (with NeroVision Express: 10 GB) free hard disk space ❑ Operating system: Windows 2000 Professional (referred to as Windows 2000), Windows XP Home Edition or Windows XP Professional (referred to as weight imbalance and eccentricity. • System should be used with a system that ...

Operating Instructions
Page 15
.../PAUSE/STOP buttons on the drive. i.LINK (DV) cable connection You can record pictures on Recordable/Rewritable DVDs while playing them back on the display window. Continued 15
.../PAUSE/STOP buttons on the drive. i.LINK (DV) cable connection You can record pictures on Recordable/Rewritable DVDs while playing them back on the display window. Continued 15

Operating Instructions
Page 16
... Press REC to "DV" automatically. The digital video camera stops playback automatically. 16 Once you play back the video on the display window. Hint The drive switches the input automatically when detecting the video signal (Auto Source Selection function page 30). Make sure "DV" is...Hint Recording stops automatically when playback of the digital video camera ends. 6 Press STOP to [Ready]. Wait until [Format] on the display window changes to stop recording. [STOP] appears on the connected video camera (video signal is formatted automatically. A new blank disc is output), for...
... Press REC to "DV" automatically. The digital video camera stops playback automatically. 16 Once you play back the video on the display window. Hint The drive switches the input automatically when detecting the video signal (Auto Source Selection function page 30). Make sure "DV" is...Hint Recording stops automatically when playback of the digital video camera ends. 6 Press STOP to [Ready]. Wait until [Format] on the display window changes to stop recording. [STOP] appears on the connected video camera (video signal is formatted automatically. A new blank disc is output), for...

Operating Instructions
Page 17
... remaining Press TIME. Stand-alone Operation - Note When using DVD+R, DVD-R, or DVD-RW disc and ejecting the disc, the following buttons on the display window.
... remaining Press TIME. Stand-alone Operation - Note When using DVD+R, DVD-R, or DVD-RW disc and ejecting the disc, the following buttons on the display window.

Operating Instructions
Page 19
...drive switches the input to [Ready]. Once you play back the video on the connected video device (video signal is displayed on the display window before recording, or display "VIDEO"* by pressing INPUT SELECT manually. * "S-VIDEO" when S-Video cable used 3 Press the eject button, ..."VIDEO"* is formatted automatically. Wait until [Format] on the drive. Using the Drive as a DVD Recorder 2 Turn on the display window changes to "VIDEO"* automatically. Busy indicator Hint The drive switches the input automatically when detecting the video signal (Auto Source Selection function page ...
...drive switches the input to [Ready]. Once you play back the video on the connected video device (video signal is displayed on the display window before recording, or display "VIDEO"* by pressing INPUT SELECT manually. * "S-VIDEO" when S-Video cable used 3 Press the eject button, ..."VIDEO"* is formatted automatically. Wait until [Format] on the drive. Using the Drive as a DVD Recorder 2 Turn on the display window changes to "VIDEO"* automatically. Busy indicator Hint The drive switches the input automatically when detecting the video signal (Auto Source Selection function page ...

Operating Instructions
Page 20
4 Press REC on the display window indicates that the drive is interrupted, the drive pauses. To play these discs on DVD devices, ...disc, the following message appears. Wait for recording. REC 5 Start playback on the video device. [Recording] appears on the display window and the REC button lights up during recording. [SIG] on the drive. If the drive detects no video signals after recording (...for a moment until [Ready] appears. 7 Press the eject button to stop recording. [STOP] appears on the display window. When the video signal is receiving signals from the video device.
4 Press REC on the display window indicates that the drive is interrupted, the drive pauses. To play these discs on DVD devices, ...disc, the following message appears. Wait for recording. REC 5 Start playback on the video device. [Recording] appears on the display window and the REC button lights up during recording. [SIG] on the drive. If the drive detects no video signals after recording (...for a moment until [Ready] appears. 7 Press the eject button to stop recording. [STOP] appears on the display window. When the video signal is receiving signals from the video device.

Operating Instructions
Page 21
To resume recording, press REC or PAUSE again. Each time you stop playback on the display window. To check the time passed or remaining Press TIME. Stand-alone Operation - To resume recording, restart playback. Recording pauses also when you press TIME, the time passed within the current title or the time remaining within the disc appears in turn. 21 Using the Drive as a DVD Recorder To pause recording Press PAUSE. [Pause] appears on the video device.
To resume recording, press REC or PAUSE again. Each time you stop playback on the display window. To check the time passed or remaining Press TIME. Stand-alone Operation - To resume recording, restart playback. Recording pauses also when you press TIME, the time passed within the current title or the time remaining within the disc appears in turn. 21 Using the Drive as a DVD Recorder To pause recording Press PAUSE. [Pause] appears on the video device.

Operating Instructions
Page 22
Wait until [Format] on page 15 or "Synchronized recording - Eject button Recording side 22 A new blank disc is formatted automatically. Busy indicator 3 Press the eject button, and insert a disc. Manual recording You can start/pause/stop recording manually by operating the drive and the connected device respectively. 1 Connect a video device. The busy indicator lights up in green. See "Synchronized recording - i.LINK (DV) cable connection" on the display window changes to [Ready]. AV cable connection" on page 18. 2 Turn on the drive.
Wait until [Format] on page 15 or "Synchronized recording - Eject button Recording side 22 A new blank disc is formatted automatically. Busy indicator 3 Press the eject button, and insert a disc. Manual recording You can start/pause/stop recording manually by operating the drive and the connected device respectively. 1 Connect a video device. The busy indicator lights up in green. See "Synchronized recording - i.LINK (DV) cable connection" on the display window changes to [Ready]. AV cable connection" on page 18. 2 Turn on the drive.

Operating Instructions
Page 23
... playback mode" on page 26. 5 On the video device, search the start playback on the connected device. [Recording] appears on the display window and the REC button lights up during recording. [SIG] on page 25. SYNC INPUT SELECT To select a recording mode, see "Selecting a ...SELECT. If you have connected an S video cable, display [S-VIDEO]. To select a chapter interval, see "Selecting a recording mode" on the display window indicates that the drive is receiving signals from the connected device. If you have connected an i.LINK cable, display [DV]. Stand-alone Operation - Display...
... playback mode" on page 26. 5 On the video device, search the start playback on the connected device. [Recording] appears on the display window and the REC button lights up during recording. [SIG] on page 25. SYNC INPUT SELECT To select a recording mode, see "Selecting a ...SELECT. If you have connected an S video cable, display [S-VIDEO]. To select a chapter interval, see "Selecting a recording mode" on the display window indicates that the drive is receiving signals from the connected device. If you have connected an i.LINK cable, display [DV]. Stand-alone Operation - Display...

Operating Instructions
Page 24
... after recording ( page 27). Wait for a moment until [Ready] appears. 8 Press the eject button to stop recording. [STOP] appears on the display window, and stop playback on the display window. 7 Press STOP to eject the disc. Note When using DVD+R, DVD-R, or DVD-RW disc and ejecting the disc, the following message...
... after recording ( page 27). Wait for a moment until [Ready] appears. 8 Press the eject button to stop recording. [STOP] appears on the display window, and stop playback on the display window. 7 Press STOP to eject the disc. Note When using DVD+R, DVD-R, or DVD-RW disc and ejecting the disc, the following message...
Operating Instructions
Page 27
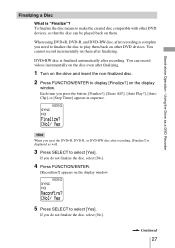
...finalized automatically after finalizing. 1 Turn on the drive and insert the non-finalized disc. 2 Press FUNCTION/ENTER to display [Finalize?] on the display window. 5 Press SELECT to play them back on other DVD devices, so that the disc can record videos incrementally on the disc even after recording.... If you do not finalize the disc, select [No]. 4 Press FUNCTION/ENTER. [Reconfirm?] appears on the display window. DVD+RW disc is complete you need to finalize the disc to select [Yes]. Hint When you press the button, [Finalize?], [Erase All?], [...
...finalized automatically after finalizing. 1 Turn on the drive and insert the non-finalized disc. 2 Press FUNCTION/ENTER to display [Finalize?] on the display window. 5 Press SELECT to play them back on other DVD devices, so that the disc can record videos incrementally on the disc even after recording.... If you do not finalize the disc, select [No]. 4 Press FUNCTION/ENTER. [Reconfirm?] appears on the display window. DVD+RW disc is complete you need to finalize the disc to select [Yes]. Hint When you press the button, [Finalize?], [Erase All?], [...
Operating Instructions
Page 28
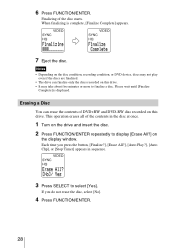
... take about five minutes or more to display [Erase All?] on this drive. Erasing a Disc You can finalize only the discs recorded on the display window. Finalizing of DVD+RW and DVD-RW disc recorded on the drive and insert the disc. 2 Press FUNCTION/ENTER repeatedly to finalize a disc. Please wait...
... take about five minutes or more to display [Erase All?] on this drive. Erasing a Disc You can finalize only the discs recorded on the display window. Finalizing of DVD+RW and DVD-RW disc recorded on the drive and insert the disc. 2 Press FUNCTION/ENTER repeatedly to finalize a disc. Please wait...
Operating Instructions
Page 29
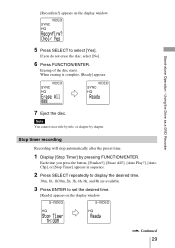
.../ENTER. Note You cannot erase title by title, or chapter by pressing FUNCTION/ENTER. Using the Drive as a DVD Recorder [Reconfirm?] appears on the display window. 5 Press SELECT to set the desired time. [Ready] appears on the display...
.../ENTER. Note You cannot erase title by title, or chapter by pressing FUNCTION/ENTER. Using the Drive as a DVD Recorder [Reconfirm?] appears on the display window. 5 Press SELECT to set the desired time. [Ready] appears on the display...

Operating Instructions
Page 31
..., you install the supplied driver and software in stand-alone operation. When you need to install the supplied driver and software. The buttons and display window of the drive do not function. When connecting the drive to your computer for using the supplied USB cable to use the drive as a DVD...
..., you install the supplied driver and software in stand-alone operation. When you need to install the supplied driver and software. The buttons and display window of the drive do not function. When connecting the drive to your computer for using the supplied USB cable to use the drive as a DVD...

Operating Instructions
Page 33
Installing the USB driver On Windows XP 1 Insert the supplied software disc into a drive on the computer. Continued 33 When connecting the USB cable to a USB connector on the computer. Note Please connect the drive directly to the computer, the following screen is displayed. . On Windows 2000, see below. On Windows XP, see page 35. Using the Drive as an External DVD 4 Connect the other end of the USB cable to your computer. Computer 5 Install the drive on the computer.
Installing the USB driver On Windows XP 1 Insert the supplied software disc into a drive on the computer. Continued 33 When connecting the USB cable to a USB connector on the computer. Note Please connect the drive directly to the computer, the following screen is displayed. . On Windows 2000, see below. On Windows XP, see page 35. Using the Drive as an External DVD 4 Connect the other end of the USB cable to your computer. Computer 5 Install the drive on the computer.

Operating Instructions
Page 34
... [Browse] (3), browse for the drive you are installing for the best driver in these locations.] (1), [Include this hardware: Sony VRD-VC20 [Video Capture] has not passed Windows Logo testing to verify its compatibility with Windows XP." The following screen will appear. 3 Check [Search for this location in the supplied software disc following screen...
... [Browse] (3), browse for the drive you are installing for the best driver in these locations.] (1), [Include this hardware: Sony VRD-VC20 [Video Capture] has not passed Windows Logo testing to verify its compatibility with Windows XP." The following screen will appear. 3 Check [Search for this location in the supplied software disc following screen...
Operating Instructions
Page 35
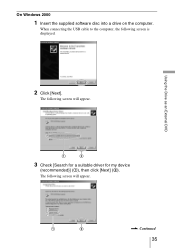
Using the Drive as an External DVD On Windows 2000 1 Insert the supplied software disc into a drive on the computer. Continued 35 The following screen will appear. 3 Check [Search for a suitable driver for my device (recommended)] (1), then click [Next] (2). When connecting the USB cable to the computer, the following screen will appear. . The following screen is displayed. 2 Click [Next].
Using the Drive as an External DVD On Windows 2000 1 Insert the supplied software disc into a drive on the computer. Continued 35 The following screen will appear. 3 Check [Search for a suitable driver for my device (recommended)] (1), then click [Next] (2). When connecting the USB cable to the computer, the following screen will appear. . The following screen is displayed. 2 Click [Next].


