
Operating Instructions
Page 5
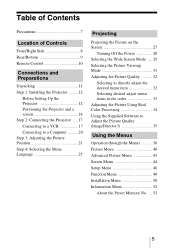
...Side 8 Rear/Bottom 9 Remote Control 10 Connections and Preparations Unpacking 11 Step 1: Installing the Projector .........12 Before Setting Up the Projector 12 Positioning the Projector and a screen 14 Step 2: Connecting the Projector .....17 Connecting to a VCR 17 Connecting to a Computer ..........20 Step 3: Adjusting the Picture...adjust the desired menu item 32 Selecting desired adjust menu items in the order 33 Adjusting the Picture Using Real Color Processing 34 Using the Supplied Software to Adjust the Picture Quality (ImageDirector3 35 Using the Menus Operation through the ...
...Side 8 Rear/Bottom 9 Remote Control 10 Connections and Preparations Unpacking 11 Step 1: Installing the Projector .........12 Before Setting Up the Projector 12 Positioning the Projector and a screen 14 Step 2: Connecting the Projector .....17 Connecting to a VCR 17 Connecting to a Computer ..........20 Step 3: Adjusting the Picture...adjust the desired menu item 32 Selecting desired adjust menu items in the order 33 Adjusting the Picture Using Real Color Processing 34 Using the Supplied Software to Adjust the Picture Quality (ImageDirector3 35 Using the Menus Operation through the ...

Operating Instructions
Page 13
... 13 Blocking the ventilation holes. Tilting front/rear and left/right 15° or more Avoid using the projector. Failing to set "Cooling Setting" in uneven color uniformity and reducing the reliability of the effects of the lamp. Connections and Preparations Improper use Do not do... any of the following while using the projector tilted at high altitudes could have adverse effects, such as reducing the ...
... 13 Blocking the ventilation holes. Tilting front/rear and left/right 15° or more Avoid using the projector. Failing to set "Cooling Setting" in uneven color uniformity and reducing the reliability of the effects of the lamp. Connections and Preparations Improper use Do not do... any of the following while using the projector tilted at high altitudes could have adverse effects, such as reducing the ...
Operating Instructions
Page 27
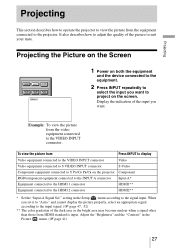
..."Auto," and cannot display the picture properly, select an appropriate signal according to the input signal. (1 page 47, 52) ** The color gradation of the dark area or the bright area may become unclear when a signal other than those from Press INPUT to display Video equipment ... the Picture on the Screen 1 Power on the screen. setting in the Picture menu. (1 page 41) 27 Display the indication of the picture to suit your taste. Adjust the "Brightness" and the "Contrast" in the Setup menu according to the projector. Projecting Projecting This section describes how to operate the...
..."Auto," and cannot display the picture properly, select an appropriate signal according to the input signal. (1 page 47, 52) ** The color gradation of the dark area or the bright area may become unclear when a signal other than those from Press INPUT to display Video equipment ... the Picture on the Screen 1 Power on the screen. setting in the Picture menu. (1 page 41) 27 Display the indication of the picture to suit your taste. Adjust the "Brightness" and the "Contrast" in the Setup menu according to the projector. Projecting Projecting This section describes how to operate the...

Operating Instructions
Page 32
...or ADVANCED IRIS. ADVANCED IRIS button Adjusts the desired iris when projecting a picture. COLOR SPACE button Adjusts the range of color reproduction on the screen. GAMMA CORRECTION button Each time you press the button, the setting of the button is changed in the order of "Gamma1", "Gamma2", and "Off...". Selecting to change the range of color reproduction on the screen. BLACK LEVEL button Each time you press the button, the setting of the button is changed in the order of "Auto1", "Auto2", "Manual" and "Off". 32...
...or ADVANCED IRIS. ADVANCED IRIS button Adjusts the desired iris when projecting a picture. COLOR SPACE button Adjusts the range of color reproduction on the screen. GAMMA CORRECTION button Each time you press the button, the setting of the button is changed in the order of "Gamma1", "Gamma2", and "Off...". Selecting to change the range of color reproduction on the screen. BLACK LEVEL button Each time you press the button, the setting of the button is changed in the order of "Auto1", "Auto2", "Manual" and "Off". 32...

Operating Instructions
Page 34
...source when you are adjusting the picture using Real Color Processing. 2, 3, 4, 5 1 Press RCP on the remote control. 2 Press M/m to select "User1," "User2" or "User3," then press ,. You can thus obtain a picture more suitable to select "Color Select," then press Repeat steps 1 and 2 described... below to specify the target color. 1 Reference palette 1 Press M/m to your taste. Tip Freeze the scene of the projected picture you want to...
...source when you are adjusting the picture using Real Color Processing. 2, 3, 4, 5 1 Press RCP on the remote control. 2 Press M/m to select "User1," "User2" or "User3," then press ,. You can thus obtain a picture more suitable to select "Color Select," then press Repeat steps 1 and 2 described... below to specify the target color. 1 Reference palette 1 Press M/m to your taste. Tip Freeze the scene of the projected picture you want to...

Operating Instructions
Page 39
To decrease the value, press m/ Using the Menus 4 Make the setting or adjustment of an item. When changing the adjustment level To increase the value, press M/,.
To decrease the value, press m/ Using the Menus 4 Make the setting or adjustment of an item. When changing the adjustment level To increase the value, press M/,.

Operating Instructions
Page 40
..., you want in a dark environment. To store the settings 1 Select User1, User2, or User3. 2 Adjust the items you can adjust the quality of input signal. Picture Menu The Picture menu is used for enhanced picture contrast and sharpness to reproduce color tones. User1, User2, User3: You can view the...with the adjusted picture quality by pressing the PICTURE MODE button on the type of the picture to suit your taste and then store the settings. Standard: Select this for watching movies, etc. Picture Mode You can also adjust the picture quality in "Dynamic", "Standard" or "Cinema", ...
..., you want in a dark environment. To store the settings 1 Select User1, User2, or User3. 2 Adjust the items you can adjust the quality of input signal. Picture Menu The Picture menu is used for enhanced picture contrast and sharpness to reproduce color tones. User1, User2, User3: You can view the...with the adjusted picture quality by pressing the PICTURE MODE button on the type of the picture to suit your taste and then store the settings. Standard: Select this for watching movies, etc. Picture Mode You can also adjust the picture quality in "Dynamic", "Standard" or "Cinema", ...
Operating Instructions
Page 41
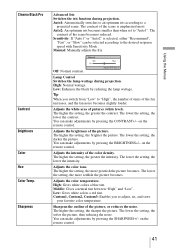
...make adjustments by reducing the lamp wattage. The contrast of the color density. Manual: Manually adjusts the Iris. Using the Menus Contrast Brightness Color Hue Color Temp. High: Normal wattage. The higher the setting, the greater the contrast. Adjusts the intensity of the scene becomes... reduced. High: Gives white colors a blue tint. The lower the setting, the darker the picture. The lower the setting, the lower the intensity. Adjusts the color temperature. Custom1, Custom2, Custom3: Enables you switch from "Low" to...
...make adjustments by reducing the lamp wattage. The contrast of the color density. Manual: Manually adjusts the Iris. Using the Menus Contrast Brightness Color Hue Color Temp. High: Normal wattage. The higher the setting, the greater the contrast. Adjusts the intensity of the scene becomes... reduced. High: Gives white colors a blue tint. The lower the setting, the darker the picture. The lower the setting, the lower the intensity. Adjusts the color temperature. Custom1, Custom2, Custom3: Enables you switch from "Low" to...

Operating Instructions
Page 42
...Middle" or "High" according to the input signal source. Gamma2: Makes a scene brighter. DDE (Dynamic Detail Enhancer) According to the black color. High: Gives higher emphasis to the film source you to a progressive format. Gamma3: Makes a scene darker. Film: Normally, select this... feature. Progressive: Converts an interlace format video signal to adjust, set, and store a favorite tone in an interlace format without converting. Off: Cancels this option. Usually, select "Off". Gamma Correction Adjusts...
...Middle" or "High" according to the input signal source. Gamma2: Makes a scene brighter. DDE (Dynamic Detail Enhancer) According to the black color. High: Gives higher emphasis to the film source you to a progressive format. Gamma3: Makes a scene darker. Film: Normally, select this... feature. Progressive: Converts an interlace format video signal to adjust, set, and store a favorite tone in an interlace format without converting. Off: Cancels this option. Usually, select "Off". Gamma Correction Adjusts...

Operating Instructions
Page 43
... "Normal". 43 User1, User2, User3: You can adjust the color and hue of each selected portion of color reproduction, compared to Hi-Vision color. RCP (Real Color Processing) Color Space You can adjust the picture using Real Color Processing and store the settings. Wide: Reproduces more . Using the Menus Advanced Picture Menu The Advanced Picture is used...
... "Normal". 43 User1, User2, User3: You can adjust the color and hue of each selected portion of color reproduction, compared to Hi-Vision color. RCP (Real Color Processing) Color Space You can adjust the picture using Real Color Processing and store the settings. Wide: Reproduces more . Using the Menus Advanced Picture Menu The Advanced Picture is used...

Operating Instructions
Page 47
.... Video GBR: Inputs the signal from the equipment connected to the input signal. Selects the color system of signal input from a TV game or HDTV broadcast. Note Normally, set this item set to "Auto," select the item according to the INPUT A connector. Note When the input ... you to "Auto." If the picture is not displayed correctly with the INPUT button. Auto: Selects the input signal type automatically. Color System Lamp Setting Selects the type of the input signal. Using the Menus Input-A Signal Sel. Component: Inputs the component signal from the equipment by...
.... Video GBR: Inputs the signal from the equipment connected to the input signal. Selects the color system of signal input from a TV game or HDTV broadcast. Note Normally, set this item set to "Auto," select the item according to the INPUT A connector. Note When the input ... you to "Auto." If the picture is not displayed correctly with the INPUT button. Auto: Selects the input signal type automatically. Color System Lamp Setting Selects the type of the input signal. Using the Menus Input-A Signal Sel. Component: Inputs the component signal from the equipment by...

Operating Instructions
Page 49
You can select "Black" or "Blue". Test Pattern Background Displays the test pattern. Tip While the test pattern is displayed, it is only displayed in green to allow you to "Off." Using the Menus 49 A test pattern does not appear when this item is input. When set to adjust the focus easily. Selects the background color of the screen when no signal is set to "On," a test pattern appears on the screen to be used when adjusting the lens with "Lens Focus," "Lens Zoom," and "Lens Shift," or correcting the screen proportions with "V Keystone."
You can select "Black" or "Blue". Test Pattern Background Displays the test pattern. Tip While the test pattern is displayed, it is only displayed in green to allow you to "Off." Using the Menus 49 A test pattern does not appear when this item is input. When set to adjust the focus easily. Selects the background color of the screen when no signal is set to "On," a test pattern appears on the screen to be used when adjusting the lens with "Lens Focus," "Lens Zoom," and "Lens Shift," or correcting the screen proportions with "V Keystone."

Operating Instructions
Page 51
... the screen after making the adjustments above , the number of the screen. When set the "V Keystone" to "0". Select "B/G" (Blue and Green) or "R/G/B" (White, all colors) when the "Adjust Color" is "B" (Blue). Also, colors may become uneven or the resolution may decrease. Select "R" (Red) or "B"... sure that you to adjust the displayable region within the four directions of display pixel may change. Blanking This feature allows you set to "On", the "Adjust Color" and the "Pattern Color" can be adjusted with the < / ,, M / m buttons in each screen edge "left / right / top / ...
... the screen after making the adjustments above , the number of the screen. When set the "V Keystone" to "0". Select "B/G" (Blue and Green) or "R/G/B" (White, all colors) when the "Adjust Color" is "B" (Blue). Also, colors may become uneven or the resolution may decrease. Select "R" (Red) or "B"... sure that you to adjust the displayable region within the four directions of display pixel may change. Blanking This feature allows you set to "On", the "Adjust Color" and the "Pattern Color" can be adjusted with the < / ,, M / m buttons in each screen edge "left / right / top / ...
Operating Instructions
Page 54
... and correct the problem using the INPUT button. (1 page 27) c Set the computer signal to the input signal. (1 page 47) The picture from the INPUT A connector is colored strange. on . Leave the projector for about one minute, turn the power on the Setup menu according to...page 24) c Condensation has accumulated on . 54 c After about two hours with qualified Sony personnel. on . c Select "Computer," "Component" or "Video GBR" for "Input-A Signal Sel." c Adjust the picture of the Picture c Set "Color System" in the Picture menu. (1 page 41) The picture is not turned on ...
... and correct the problem using the INPUT button. (1 page 27) c Set the computer signal to the input signal. (1 page 47) The picture from the INPUT A connector is colored strange. on . Leave the projector for about one minute, turn the power on the Setup menu according to...page 24) c Condensation has accumulated on . 54 c After about two hours with qualified Sony personnel. on . c Select "Computer," "Component" or "Video GBR" for "Input-A Signal Sel." c Adjust the picture of the Picture c Set "Color System" in the Picture menu. (1 page 41) The picture is not turned on ...
Operating Instructions
Page 55
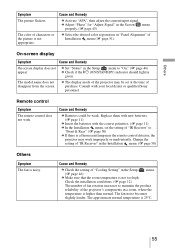
... batteries with your local dealer or qualified Sony personnel. Cause and Remedy c Check the setting of characters or the picture is noisy. The approximate normal temperature is a fluorescent lamp near the remote control detector, the projector may be weak. Others Symptom The picture flickers. The color of "Cooling Setting" in the Installation menu. (1 page 50...
... batteries with your local dealer or qualified Sony personnel. Cause and Remedy c Check the setting of characters or the picture is noisy. The approximate normal temperature is a fluorescent lamp near the remote control detector, the projector may be weak. Others Symptom The picture flickers. The color of "Cooling Setting" in the Installation menu. (1 page 50...
Operating Instructions
Page 58
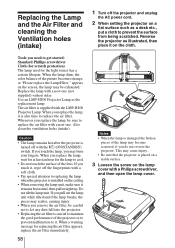
Replacing the Lamp and the Air Filter and cleaning the Ventilation holes (intake) 1 Turn off the projector and unplug the AC power cord. 2 When setting the projector on the screen, the lamp may be exhausted. Tools you may become scattered, if you touch it remains horizontal, then pull straight up. Whenever ...unit while tilted and if the lamp breaks, the pieces may cause injury. • Be sure that the projector is damaged the broken pieces of the lens. When the lamp dims, the color balance of the projector or to prevent malfunction to it is also time to replacing the lamp when the...
Replacing the Lamp and the Air Filter and cleaning the Ventilation holes (intake) 1 Turn off the projector and unplug the AC power cord. 2 When setting the projector on the screen, the lamp may be exhausted. Tools you may become scattered, if you touch it remains horizontal, then pull straight up. Whenever ...unit while tilted and if the lamp breaks, the pieces may cause injury. • Be sure that the projector is damaged the broken pieces of the lens. When the lamp dims, the color balance of the projector or to prevent malfunction to it is also time to replacing the lamp when the...

Operating Instructions
Page 67
... signal Component signal Video GBR signal PC signal Advanced Iris z z z z Lamp Control z Contrast z z z z z z z Brightness z z z z Color z z z - (except for B & W) Hue z z z - (NTSC3.58/ NTSC4.43 only, except for B & W) Color Temp. z z z RCP z z z z Color Space z z z z z : Adjustable/can be set 67 Others Input Signals and Adjustable/Setting Items Some of the items in the menu. The items that cannot be adjusted...
... signal Component signal Video GBR signal PC signal Advanced Iris z z z z Lamp Control z Contrast z z z z z z z Brightness z z z z Color z z z - (except for B & W) Hue z z z - (NTSC3.58/ NTSC4.43 only, except for B & W) Color Temp. z z z RCP z z z z Color Space z z z z z : Adjustable/can be set 67 Others Input Signals and Adjustable/Setting Items Some of the items in the menu. The items that cannot be adjusted...


