Operating Instructions
Page 7
... (red, blue, or green) that face the screen with opaque draperies. • It is desirable to install the projector in handy if you ever have to the wall outlet, even if the unit itself has been turned off the power with the I / 1 key on the Remote Commander or on the lens, use a damp cloth, detergent solution, or thinner. • Clean the filter at the factory...
... (red, blue, or green) that face the screen with opaque draperies. • It is desirable to install the projector in handy if you ever have to the wall outlet, even if the unit itself has been turned off the power with the I / 1 key on the Remote Commander or on the lens, use a damp cloth, detergent solution, or thinner. • Clean the filter at the factory...
Operating Instructions
Page 8
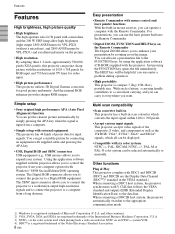
... manually. When connecting a DDC2B host system, the projector automatically switches to a Digital RGB equipment. Features Features High brightness, high picture quality • High brightness The high aperture ratio LCD panel with a microlens and the 200 W UHP lamp allow high brightness (light output 1800 ANSI lumen for VPL-PX21 (without a microlens), and 2800 ANSI lumen for VPL-PX31) and excellent uniformity on the picture. • High resolution By adopting three 1.3-inch, approximately 790,000pixels XGA panels, this projector can project sharp picture...
... manually. When connecting a DDC2B host system, the projector automatically switches to a Digital RGB equipment. Features Features High brightness, high picture quality • High brightness The high aperture ratio LCD panel with a microlens and the 200 W UHP lamp allow high brightness (light output 1800 ANSI lumen for VPL-PX21 (without a microlens), and 2800 ANSI lumen for VPL-PX31) and excellent uniformity on the picture. • High resolution By adopting three 1.3-inch, approximately 790,000pixels XGA panels, this projector can project sharp picture...
Operating Instructions
Page 11
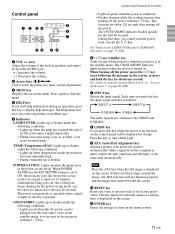
keys Adjust the volume of the built-in speakers and output level of the AUDIO jack. + : Increases the volume. - : Decreases the volume. 2 Arrow keys (M/m/ MENU HELP ENTER RESET INPUT APA LIGHT 7 qa 0 9 8 1 VOL +/- Control panel 1 2 34 LAMP/ COVER TEMP/ POWER ON/ FAN SAVING STANDBY 5 6 VOL + VOL -
keys Adjust the volume of the built-in speakers and output level of the AUDIO jack. + : Increases the volume. - : Decreases the volume. 2 Arrow keys (M/m/ MENU HELP ENTER RESET INPUT APA LIGHT 7 qa 0 9 8 1 VOL +/- Control panel 1 2 34 LAMP/ COVER TEMP/ POWER ON/ FAN SAVING STANDBY 5 6 VOL + VOL -
Operating Instructions
Page 13
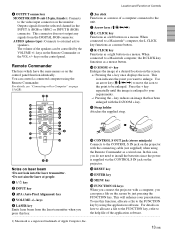
... qg qf qd COMMAND / OFF ON HELP APA INPUT MUTING AUDIO PIC FUNCTION 1 2 MENU + VOLUME - AUDIO (phono type): Connects to the video input connector on the monitor. Remote Commander The keys which have the same names as a mouse of a computer connected to the unit. 7 Arrow keys (M/m/ Outputs signals from the DIGITAL RGB connector. You can be controlled by the VOLUME +/- keys on the control panel. This connector...
... qg qf qd COMMAND / OFF ON HELP APA INPUT MUTING AUDIO PIC FUNCTION 1 2 MENU + VOLUME - AUDIO (phono type): Connects to the video input connector on the monitor. Remote Commander The keys which have the same names as a mouse of a computer connected to the unit. 7 Arrow keys (M/m/ Outputs signals from the DIGITAL RGB connector. You can be controlled by the VOLUME +/- keys on the control panel. This connector...
Operating Instructions
Page 14
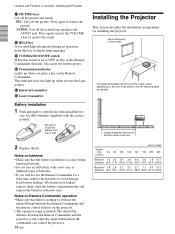
... to open the lid, then install the two size AA (R6) batteries (supplied) with the correct polarity. This saves the battery power. This indicator does not light up when you use the Remote Commander for installing the projector. Use the following table as a guide. AUDIO: Cuts off the picture and sound. Notes on the size of batteries. • If you need help information during an operation, press this switch is set to display help messages. Location...
... to open the lid, then install the two size AA (R6) batteries (supplied) with the correct polarity. This saves the battery power. This indicator does not light up when you use the Remote Commander for installing the projector. Use the following table as a guide. AUDIO: Cuts off the picture and sound. Notes on the size of batteries. • If you need help information during an operation, press this switch is set to display help messages. Location...
Operating Instructions
Page 15
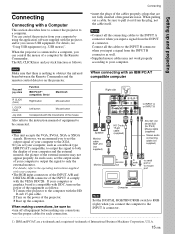
... to output the signal to the operating instructions supplied port with your computer to the XGA. • If you connect the computer to obstruct the infrared beam between the Remote Commander and the remoter control detector on the power of the cables properly; However, we recommend you to set the output mode of your computer. • The RGB input connectors of the INPUT A/B and DIGITAL RGB connector of...
... to output the signal to the operating instructions supplied port with your computer to the XGA. • If you connect the computer to obstruct the infrared beam between the Remote Commander and the remoter control detector on the power of the cables properly; However, we recommend you to set the output mode of your computer. • The RGB input connectors of the INPUT A/B and DIGITAL RGB connector of...
Operating Instructions
Page 17
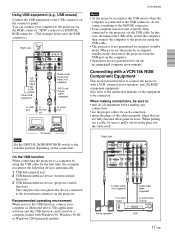
... CONTROL S VIDEO IN IN PLUG IN POWER S VIDEO VIDEO INPUT B L R (MONO) AUDIO MONITOR INPUT A USB AUDIO DIGITAL RGB RGB 5BNC RGB RGB AUDIO MOUSE AUDIO MOUSE DIGITAL RGB R/R-Y/PR G/Y B/B-Y/PB SYNC/HD VD S-Video cable (not supplied) to S video output Audio/video cable (supplied) to audio/video outputs Active speakers VCR 17 (GB) When pulling out a cable, be sure to: • turn off all the recommended computer environments. On the USB function When connecting the projector to a computer by using the USB cable...
... CONTROL S VIDEO IN IN PLUG IN POWER S VIDEO VIDEO INPUT B L R (MONO) AUDIO MONITOR INPUT A USB AUDIO DIGITAL RGB RGB 5BNC RGB RGB AUDIO MOUSE AUDIO MOUSE DIGITAL RGB R/R-Y/PR G/Y B/B-Y/PB SYNC/HD VD S-Video cable (not supplied) to S video output Audio/video cable (supplied) to audio/video outputs Active speakers VCR 17 (GB) When pulling out a cable, be sure to: • turn off all the recommended computer environments. On the USB function When connecting the projector to a computer by using the USB cable...
Operating Instructions
Page 18
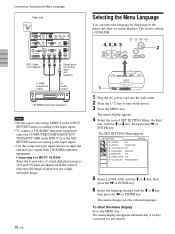
... clear the menu display Press the MENU key. The menu changes into the wall outlet. 2 Press the I / 1 key to the input signal. • Use the composite sync signal when you input the external sync signal from 15k RGB/component equipment. LAMP/ TEMP/ POWER ON/ COVER FAN SAVING STANDBY 4, 5, 6 3 2 VOL + MENU HELP INPUT VOL - Connecting / Selecting the Menu Language Right side DIGITAL RGB RGB 5BNC REMOTE RS-232C OUTPUT CONTROL S VIDEO IN IN PLUG IN POWER S VIDEO VIDEO INPUT B L R (MONO) AUDIO MONITOR INPUT A USB AUDIO DIGITAL RGB RGB...
... clear the menu display Press the MENU key. The menu changes into the wall outlet. 2 Press the I / 1 key to the input signal. • Use the composite sync signal when you input the external sync signal from 15k RGB/component equipment. LAMP/ TEMP/ POWER ON/ COVER FAN SAVING STANDBY 4, 5, 6 3 2 VOL + MENU HELP INPUT VOL - Connecting / Selecting the Menu Language Right side DIGITAL RGB RGB 5BNC REMOTE RS-232C OUTPUT CONTROL S VIDEO IN IN PLUG IN POWER S VIDEO VIDEO INPUT B L R (MONO) AUDIO MONITOR INPUT A USB AUDIO DIGITAL RGB RGB...
Operating Instructions
Page 19
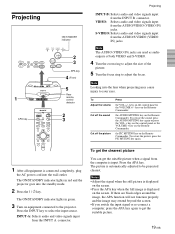
... projected clearest. The picture is displayed on the screen. • Press the APA key when the full image is automatically adjusted to your eyes. To restore the picture, press the PIC MUTING key again. Projecting VOL + VOL - 1 ON/STANDBY indicator LAMP/ TEMP/ POWER ON/ COVER FAN SAVING STANDBY MENU HELP ENTER RESET INPUT APA LIGHT 2 3 APA key 4 (Front) 5 Rear remote control detector APA key COMMAND / OFF ON HELP APA INPUT MUTING AUDIO PIC FUNCTION 1 2 MENU + VOLUME - INPUT-A: Selects audio and video signals input...
... projected clearest. The picture is displayed on the screen. • Press the APA key when the full image is automatically adjusted to your eyes. To restore the picture, press the PIC MUTING key again. Projecting VOL + VOL - 1 ON/STANDBY indicator LAMP/ TEMP/ POWER ON/ COVER FAN SAVING STANDBY MENU HELP ENTER RESET INPUT APA LIGHT 2 3 APA key 4 (Front) 5 Rear remote control detector APA key COMMAND / OFF ON HELP APA INPUT MUTING AUDIO PIC FUNCTION 1 2 MENU + VOLUME - INPUT-A: Selects audio and video signals input...
Operating Instructions
Page 20
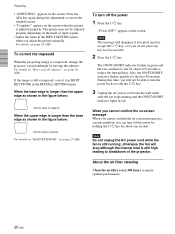
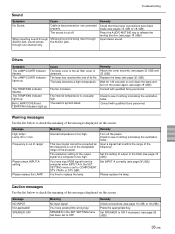
... outlet after the fan stops running ; Note The message will disappear if you press any key except the I / 1 key, or if you can turn off the power 1 Press the I / 1 key. Also, the ON/STANDBY indicator flashes quickly for five seconds. 2 Press the I / 1 key. About the air filter cleaning Clean the air filter every 300 hours to restore the original screen. • "Complete!" The picture may not...
... outlet after the fan stops running ; Note The message will disappear if you press any key except the I / 1 key, or if you can turn off the power 1 Press the I / 1 key. Also, the ON/STANDBY indicator flashes quickly for five seconds. 2 Press the I / 1 key. About the air filter cleaning Clean the air filter every 300 hours to restore the original screen. • "Complete!" The picture may not...
Operating Instructions
Page 22
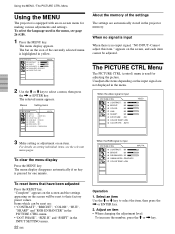
... the INPUT SETTING menu. 22 (GB) When the RGB signal is used in yellow. When no input signal, "NO INPUT-Cannot adjust this item." The PICTURE CTRL Menu The PICTURE CTRL (control) menu is input PICTURE CTRL CONTRAST: 80 BRIGHT: 50 RGB ENHANCER: 30 GAMMA MODE: GRAPHICS COLOR TEMP: LOW INPUT-A Operation 1. To reset items that have been adjusted Press the RESET key. The menu display appears. Menus Setting items SET SETTING INPUT-A STATUS: ON INPUT-A: COMPUTER AUTO INPUT SEL: OFF LANGUAGE: ENGLISH SPEAKER: ON POWER...
... the INPUT SETTING menu. 22 (GB) When the RGB signal is used in yellow. When no input signal, "NO INPUT-Cannot adjust this item." The PICTURE CTRL Menu The PICTURE CTRL (control) menu is input PICTURE CTRL CONTRAST: 80 BRIGHT: 50 RGB ENHANCER: 30 GAMMA MODE: GRAPHICS COLOR TEMP: LOW INPUT-A Operation 1. To reset items that have been adjusted Press the RESET key. The menu display appears. Menus Setting items SET SETTING INPUT-A STATUS: ON INPUT-A: COMPUTER AUTO INPUT SEL: OFF LANGUAGE: ENGLISH SPEAKER: ON POWER...
Operating Instructions
Page 25
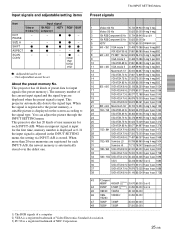
... a computer 2) VESA is a registered trademark of Video Electronics Standard Association. 3) PC-98 is displayed as 0. SCAN - When an unpreset signal is input for the first time, memory number is a registered trademark of preset data for each INPUT-A/B. This projector has 44 kinds of NEC Corporation. 25 (GB) SHIFT ASPECT - fH fV Sync SIZE (kHz) (Hz) H 1 Video 60 Hz 15.734 59.940...
... a computer 2) VESA is a registered trademark of Video Electronics Standard Association. 3) PC-98 is displayed as 0. SCAN - When an unpreset signal is input for the first time, memory number is a registered trademark of preset data for each INPUT-A/B. This projector has 44 kinds of NEC Corporation. 25 (GB) SHIFT ASPECT - fH fV Sync SIZE (kHz) (Hz) H 1 Video 60 Hz 15.734 59.940...
Operating Instructions
Page 26
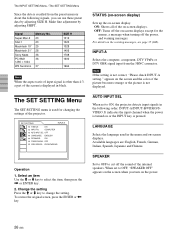
... screen and the color of the on the warning messages, see page 35 (GB). STATUS (on-screen display) Sets up the on the power. 26 (GB) The SET SETTING Menu The SET SETTING menu is displayed in the following signals, you turn on -screen display. Select an item Use the M or m key to change the setting. When set to OFF, "SPEAKER OFF" appears on the screen when you can use these preset data by adjusting SHIFT. SET SETTING INPUT-A STATUS: ON INPUT-A: COMPUTER AUTO INPUT...
... screen and the color of the on the warning messages, see page 35 (GB). STATUS (on-screen display) Sets up the on the power. 26 (GB) The SET SETTING Menu The SET SETTING menu is displayed in the following signals, you turn on -screen display. Select an item Use the M or m key to change the setting. When set to OFF, "SPEAKER OFF" appears on the screen when you can use these preset data by adjusting SHIFT. SET SETTING INPUT-A STATUS: ON INPUT-A: COMPUTER AUTO INPUT...
Operating Instructions
Page 27
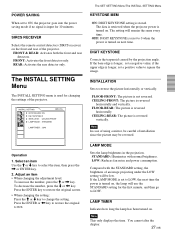
... displays the time. You cannot alter the display. 27 (GB) REAR: Activates the rear detector only. OFF: DIGIT KEYSTONE is reset to LOW. CEILING-REAR: The picture is turned on . SIRCS RECEIVER Selects the remote control detectors (SIRCS receiver) on . INSTALL SETTING INPUT-A KEYSTONE MEM: ON DIGIT KEYSTONE: 0 INSTALLATION: CEILING-FRONT LAMP MODE: STANDARD LAMP TIMER: 234h The SET SETTING Menu/The INSTALL SETTING Menu KEYSTONE MEM ON: DIGIT KEYSTONE setting is reversed horizontally. Adjust an item • When changing the adjustment level: To increase the number...
... displays the time. You cannot alter the display. 27 (GB) REAR: Activates the rear detector only. OFF: DIGIT KEYSTONE is reset to LOW. CEILING-REAR: The picture is turned on . SIRCS RECEIVER Selects the remote control detectors (SIRCS receiver) on . INSTALL SETTING INPUT-A KEYSTONE MEM: ON DIGIT KEYSTONE: 0 INSTALLATION: CEILING-FRONT LAMP MODE: STANDARD LAMP TIMER: 234h The SET SETTING Menu/The INSTALL SETTING Menu KEYSTONE MEM ON: DIGIT KEYSTONE setting is reversed horizontally. Adjust an item • When changing the adjustment level: To increase the number...
Operating Instructions
Page 32
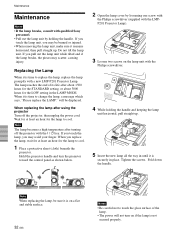
... Projector Lamp. Note When replacing the lamp, be displayed. If you may scald your finger. will not turn the projector toward the control panel as shown below. 2 Open the lamp cover by holding the handle and keeping the lamp unit horizontal, pull straight up . Tighten the screws. Wait for at least an hour for the lamp to cool. 1 Place a protective sheet (cloth) beneath the projector. Note The lamp becomes a high temperature...
... Projector Lamp. Note When replacing the lamp, be displayed. If you may scald your finger. will not turn the projector toward the control panel as shown below. 2 Open the lamp cover by holding the handle and keeping the lamp unit horizontal, pull straight up . Tighten the screws. Wait for at least an hour for the lamp to cool. 1 Place a protective sheet (cloth) beneath the projector. Note The lamp becomes a high temperature...
Operating Instructions
Page 33
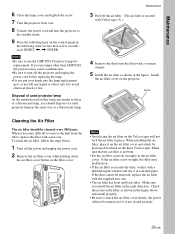
Maintenance 6 Close the lamp cover and tighten the screw. 7 Turn the projector back over. 8 Connect the power cord and turn the projector to the standby mode. 9 Press the following keys on the control panel in the following order for less than in five seconds each: RESET,
Maintenance 6 Close the lamp cover and tighten the screw. 7 Turn the projector back over. 8 Connect the power cord and turn the projector to the standby mode. 9 Press the following keys on the control panel in the following order for less than in five seconds each: RESET,

Operating Instructions
Page 34
... the input source correctly using the INPUT key (see page 32 (GB)). The picture is detached. Image Symptom No picture. The computer signal is not output correctly. • Other: The indicator lights up/flashes. If the problem persists, contact your Sony dealer. Colors are not correct. • Sound: Sound is set to both the LCD of help messages. Cause Remedy Cable is detached. Close the lamp cover securely (see page 19 (GB)). Input selection...
... the input source correctly using the INPUT key (see page 32 (GB)). The picture is detached. Image Symptom No picture. The computer signal is not output correctly. • Other: The indicator lights up/flashes. If the problem persists, contact your Sony dealer. Colors are not correct. • Sound: Sound is set to both the LCD of help messages. Cause Remedy Cable is detached. Close the lamp cover securely (see page 19 (GB)). Input selection...
Operating Instructions
Page 35
... only. Input stereo sound. The LAMP/COVER indicator lights up. Cause The lamp cover or the air filter cover is broken. The lamp has reached the end of the projector. The fan is detached. Remedy Attach the cover securely (see if nothing is time to check the meaning of range! Message High temp.! Frequency is too high. Please check INPUT-A setting. Meaning Remedy Internal temperature is out of the messages displayed on the screen. This input signal cannot be projected as...
... only. Input stereo sound. The LAMP/COVER indicator lights up. Cause The lamp cover or the air filter cover is broken. The lamp has reached the end of the projector. The fan is detached. Remedy Attach the cover securely (see if nothing is time to check the meaning of range! Message High temp.! Frequency is too high. Please check INPUT-A setting. Meaning Remedy Internal temperature is out of the messages displayed on the screen. This input signal cannot be projected as...
Operating Instructions
Page 38
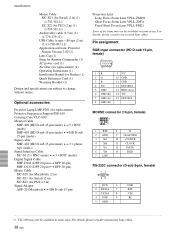
B type (2 m) (1) (1-790-081-11) Application software, Projector Station Version 2.00 (1) Lens Cap (1) Strap for Remote Commander (1) AC power cord (1) Air filter (for replacement) (1) Operating Instructions (1) Installation Manual for PS/2) (2 m) (1) (1-783-501-11) Audio/video cable (1.5 m) (1) (1-776-279-11) USB Cable A type - For details, please consult your nearest Sony office. 38 (GB) Pin assignment RGB input connector (HD D-sub 15-pin, female) 1R 2G 3B 4 N.C. 5 GND 6 GND (R) 7 GND (G) 8 GND (B) 9 N.C. 10 GND 11 GND...
B type (2 m) (1) (1-790-081-11) Application software, Projector Station Version 2.00 (1) Lens Cap (1) Strap for Remote Commander (1) AC power cord (1) Air filter (for replacement) (1) Operating Instructions (1) Installation Manual for PS/2) (2 m) (1) (1-783-501-11) Audio/video cable (1.5 m) (1) (1-776-279-11) USB Cable A type - For details, please consult your nearest Sony office. 38 (GB) Pin assignment RGB input connector (HD D-sub 15-pin, female) 1R 2G 3B 4 N.C. 5 GND 6 GND (R) 7 GND (G) 8 GND (B) 9 N.C. 10 GND 11 GND...
Operating Instructions
Page 42
...) KEYSTONE MEM 27 (GB) L LAMP MODE 27 (GB) Lamp replacement 32 (GB) LAMP TIMER 27 (GB) LANGUAGE 26 (GB) Location and function of controls connector panel 12 (GB) control panel 11 (GB) front/left side 9 (GB) rear/right side/bottom 9 (GB) Remote Commander 13 (GB) M, N Menu clearing the menu display 22 (GB) INPUT SETTING menu 24 (GB) INSTALL SETTING menu 27 (GB) PICTURE CTRL menu 22 (GB) SET SETTING menu 26 (GB) using the menu 22 (GB) Messages cautions 35 (GB) warnings...
...) KEYSTONE MEM 27 (GB) L LAMP MODE 27 (GB) Lamp replacement 32 (GB) LAMP TIMER 27 (GB) LANGUAGE 26 (GB) Location and function of controls connector panel 12 (GB) control panel 11 (GB) front/left side 9 (GB) rear/right side/bottom 9 (GB) Remote Commander 13 (GB) M, N Menu clearing the menu display 22 (GB) INPUT SETTING menu 24 (GB) INSTALL SETTING menu 27 (GB) PICTURE CTRL menu 22 (GB) SET SETTING menu 26 (GB) using the menu 22 (GB) Messages cautions 35 (GB) warnings...


