
Startup Guide
Page 2
... 4 Selecting the Menu Language ........Page 16 Step 5 Projecting Page 17 Error Handling Warning Indicators Page 19 Maintenance Replacing the Lamp Page 20 Cleaning the Air Filter Page 23 2 GB About the Quick Reference Manual This Quick Reference Manual explains the installation and basic operations for projecting pictures. It also describes important... details on the operations, refer to pay attention when handling and using this unit. Refer to "Warning Indicators," "Replacing the Lamp," and "Cleaning the Air Filter" as necessary.
... 4 Selecting the Menu Language ........Page 16 Step 5 Projecting Page 17 Error Handling Warning Indicators Page 19 Maintenance Replacing the Lamp Page 20 Cleaning the Air Filter Page 23 2 GB About the Quick Reference Manual This Quick Reference Manual explains the installation and basic operations for projecting pictures. It also describes important... details on the operations, refer to pay attention when handling and using this unit. Refer to "Warning Indicators," "Replacing the Lamp," and "Cleaning the Air Filter" as necessary.
Startup Guide
Page 19
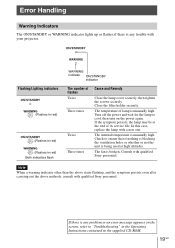
... lights up or flashes if there is any problem or an error message appears on the power again. The fan is unusually high. Close the filter holder securely. Consult with a new one. The temperature of flashes Twice Three times Twice Three times Cause and Remedy Close the lamp cover securely, then... in red) (Flashes in red) (Flashes in the supplied CD-ROM. 19 GB In this case, replace the lamp with qualified Sony personnel. If there is any trouble with qualified Sony personnel. Turn off the power and wait for the lamp to cool, then turn on the screen, refer to ensure that...
... lights up or flashes if there is any problem or an error message appears on the power again. The fan is unusually high. Close the filter holder securely. Consult with a new one. The temperature of flashes Twice Three times Twice Three times Cause and Remedy Close the lamp cover securely, then... in red) (Flashes in red) (Flashes in the supplied CD-ROM. 19 GB In this case, replace the lamp with qualified Sony personnel. If there is any trouble with qualified Sony personnel. Turn off the power and wait for the lamp to cool, then turn on the screen, refer to ensure that...
Startup Guide
Page 20
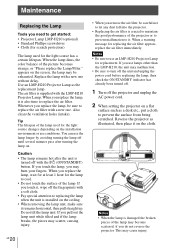
... pull straight up. When the lamp dims, the color balance of the lamp may cause injury. This may become scattered, if you remove the air filter, be exhausted. When you need to get started: • Projector Lamp LMP-H210 (optional) • Standard Phillips screwdriver • Cloth (for scratch ... The lamp used for the light source has a certain lifespan. You can use an LMP-H210 Projector Lamp for replacing the air filter appears, replace the air filter immediately. Notes • Be sure to use the lamp longer by avoiding turning the lamp off with the LMP-H210 Projector Lamp...
... pull straight up. When the lamp dims, the color balance of the lamp may cause injury. This may become scattered, if you remove the air filter, be exhausted. When you need to get started: • Projector Lamp LMP-H210 (optional) • Standard Phillips screwdriver • Cloth (for scratch ... The lamp used for the light source has a certain lifespan. You can use an LMP-H210 Projector Lamp for replacing the air filter appears, replace the air filter immediately. Notes • Be sure to use the lamp longer by avoiding turning the lamp off with the LMP-H210 Projector Lamp...
Startup Guide
Page 22
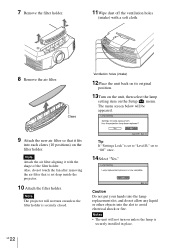
... Do not put your hands into the lamp replacement slot, and do not touch the fan after removing the air filter that it with a soft cloth. 8 Remove the air filter. Claws Ventilation holes (intake) 12Place the unit back on its original position. 13Turn on the unit, then select the... is set to "Level B," set deep inside the projector. 10 Attach the filter holder. 7 Remove the filter holder. 11Wipe dust off the ventilation holes (intake) with the shape of the filter holder. Note Attach the air filter aligning it fits into the slot to "Off" once. 14Select "Yes." Tip If "Settings...
... Do not put your hands into the lamp replacement slot, and do not touch the fan after removing the air filter that it with a soft cloth. 8 Remove the air filter. Claws Ventilation holes (intake) 12Place the unit back on its original position. 13Turn on the unit, then select the... is set to "Level B," set deep inside the projector. 10 Attach the filter holder. 7 Remove the filter holder. 11Wipe dust off the ventilation holes (intake) with the shape of the filter holder. Note Attach the air filter aligning it fits into the slot to "Off" once. 14Select "Yes." Tip If "Settings...

Startup Guide
Page 23
... cleaned every 1,500 hours. For details on how to attach and remove the air filter, see www.sony.com/ mercury Cleaning the Air Filter When "Please clean the filter." • The unit will not turn on unless the lamp cover are securely closed. • To clear a message displayed on the screen..., press any dust fall into the projector. • Cleaning the air filter is used. 1,500 ...
... cleaned every 1,500 hours. For details on how to attach and remove the air filter, see www.sony.com/ mercury Cleaning the Air Filter When "Please clean the filter." • The unit will not turn on unless the lamp cover are securely closed. • To clear a message displayed on the screen..., press any dust fall into the projector. • Cleaning the air filter is used. 1,500 ...

Operating Instructions
Page 2
... Updating the Software 45 About the x.v.Color 45 About the simulated 3D feature ....... 45 Replacing the Lamp and the Air Filter and Cleaning the Ventilation Holes (intake 46 Cleaning the Air Filter 49 Fitting the Lens Cap 50 Cleaning 50 Specifications 51 Preset Signals 52 Input Signals and Adjustable/ Setting Items 54...
... Updating the Software 45 About the x.v.Color 45 About the simulated 3D feature ....... 45 Replacing the Lamp and the Air Filter and Cleaning the Ventilation Holes (intake 46 Cleaning the Air Filter 49 Fitting the Lens Cap 50 Cleaning 50 Specifications 51 Preset Signals 52 Input Signals and Adjustable/ Setting Items 54...

Operating Instructions
Page 5
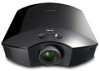
o HDMI 1/HDMI 2 connector (page 12) p REMOTE connector Connects to control the unit. for remote control. Rear/Bottom q IR IN connector Inputs signals to a computer, etc. r TRIGGER connector (page 33) a Ventilation holes (intake) (page 48) b Lamp cover (page 47) c Front feet (adjustable) (page 11) d Filter holder (page 48) e Projector suspension support attaching hole (page 63) 5
o HDMI 1/HDMI 2 connector (page 12) p REMOTE connector Connects to control the unit. for remote control. Rear/Bottom q IR IN connector Inputs signals to a computer, etc. r TRIGGER connector (page 33) a Ventilation holes (intake) (page 48) b Lamp cover (page 47) c Front feet (adjustable) (page 11) d Filter holder (page 48) e Projector suspension support attaching hole (page 63) 5

Operating Instructions
Page 23
... adjusting "Brightness," set "Dynamic Control" according to check the effect of the room and the picture itself. Increases image sharpness and makes image dynamic. Noise Filtering: When you increase the setting value, the texture and detail of the iris (aperture) and lower brightness than "Full," making the picture quality suitable for...
... adjusting "Brightness," set "Dynamic Control" according to check the effect of the room and the picture itself. Increases image sharpness and makes image dynamic. Noise Filtering: When you increase the setting value, the texture and detail of the iris (aperture) and lower brightness than "Full," making the picture quality suitable for...
Operating Instructions
Page 40
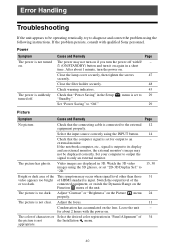
... the unit. The picture is connected to the external 12 equipment properly. Error Handling Troubleshooting If the unit appears to be displayed correctly. Close the filter holder securely. 48 Check warning indicators. 43 Check that the connecting cable is too dark. Bright or dark area of the This symptom may occur...
... the unit. The picture is connected to the external 12 equipment properly. Error Handling Troubleshooting If the unit appears to be displayed correctly. Close the filter holder securely. 48 Check warning indicators. 43 Check that the connecting cable is too dark. Bright or dark area of the This symptom may occur...

Operating Instructions
Page 43
...if nothing is blocking the ventilation holes or whether or not the unit is unusually high. In this case, replace the lamp with qualified Sony personnel. The internal temperature is broken. The temperature of lamp is being used at the end of flashes Twice Three times Twice Three ...Flashes in red) (Flashes in red) (Flashes in red) Both indicators flash WARNING indicator ON/STANDBY indicator The number of its service life. Close the filter holder securely (page 48). If the symptom persists, the lamp may be at high altitudes. Consult with a new one (page 46). Check to cool...
...if nothing is blocking the ventilation holes or whether or not the unit is unusually high. In this case, replace the lamp with qualified Sony personnel. The internal temperature is broken. The temperature of lamp is being used at the end of flashes Twice Three times Twice Three ...Flashes in red) (Flashes in red) (Flashes in red) Both indicators flash WARNING indicator ON/STANDBY indicator The number of its service life. Close the filter holder securely (page 48). If the symptom persists, the lamp may be at high altitudes. Consult with a new one (page 46). Check to cool...

Operating Instructions
Page 44
...Check to "On" in 1 minute. Caution messages Symptom x Not applicable! Frequency is blocking the ventilation 4, 5 holes. Clean the air filter. 49 Note To clear this message, press any button either on the remote control or the control panel of the unit once. Yes If...or "Level B." 31 44 Input a signal that nothing is being used at high altitude, set . Replace the lamp. 46 Filter. Also, replace the air filter too. Restart cleaning the ventilation holes (intake). Note To clear this message, press any button either on the remote control or...
...Check to "On" in 1 minute. Caution messages Symptom x Not applicable! Frequency is blocking the ventilation 4, 5 holes. Clean the air filter. 49 Note To clear this message, press any button either on the remote control or the control panel of the unit once. Yes If...or "Level B." 31 44 Input a signal that nothing is being used at high altitude, set . Replace the lamp. 46 Filter. Also, replace the air filter too. Restart cleaning the ventilation holes (intake). Note To clear this message, press any button either on the remote control or...
Operating Instructions
Page 46
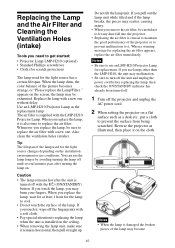
...source has a certain lifespan. appears on the screen, the lamp may be sure to replace the air filter with a new one without delay. Do not tilt the lamp unit. Notes • Be sure to... use an LMP-H210 Projector Lamp for replacing the air filter appears, replace the air filter immediately. Replace the lamp with a new one . Caution • The lamp remains hot ...after turning the lamp on. Replacing the Lamp and the Air Filter and Cleaning the Ventilation Holes (intake) Tools you use lamps other than the LMP-H210, the unit ...
...source has a certain lifespan. appears on the screen, the lamp may be sure to replace the air filter with a new one without delay. Do not tilt the lamp unit. Notes • Be sure to... use an LMP-H210 Projector Lamp for replacing the air filter appears, replace the air filter immediately. Replace the lamp with a new one . Caution • The lamp remains hot ...after turning the lamp on. Replacing the Lamp and the Air Filter and Cleaning the Ventilation Holes (intake) Tools you use lamps other than the LMP-H210, the unit ...

Operating Instructions
Page 48
... Caution Do not put your hands into the lamp replacement slot, and do not touch the fan after removing the air filter that it with a soft cloth. 8 Remove the air filter. Claws Ventilation holes (intake) 12Place the unit back on its original position. 13Turn on the unit, then select the lamp ...setting item on unless the lamp is securely closed. Notes • The unit will not turn on the filter holder. Note The projector will be appeared. 9 Attach the new air filter so that is set to "Off" once (page 31). 14Select "Yes." Note Attach the air...
... Caution Do not put your hands into the lamp replacement slot, and do not touch the fan after removing the air filter that it with a soft cloth. 8 Remove the air filter. Claws Ventilation holes (intake) 12Place the unit back on its original position. 13Turn on the unit, then select the lamp ...setting item on unless the lamp is securely closed. Notes • The unit will not turn on the filter holder. Note The projector will be appeared. 9 Attach the new air filter so that is set to "Off" once (page 31). 14Select "Yes." Note Attach the air...

Operating Instructions
Page 49
... or the control panel of the unit once. This value varies depending on how to attach and remove the air filter, see www.sony.com/ mercury Cleaning the Air Filter When "Please clean the filter." For details on the environment or how the projector is used. 1,500 hours are securely closed. • To clear...
... or the control panel of the unit once. This value varies depending on how to attach and remove the air filter, see www.sony.com/ mercury Cleaning the Air Filter When "Please clean the filter." For details on the environment or how the projector is used. 1,500 hours are securely closed. • To clear...


