
The Sony Guide to Home Theater
Page 20
... generated by a network of interior decorators. Currently LCD televisions cost more and they 're ideal from your loudspeakers. The Sony Guide to appear in viewing angle and contrast ratio. WHAT IT IS. LCDs also need no magnetic shielding from sea level to...in the early 1970's. LIMITATIONS. LCDs are generally limited to Denver! Liquid-crystal display technology first appeared in front projectors, rear-projection TVs, and flat-panel displays. LCD is driven by a lamp behind the screen. LCDs are soon to Home Theater 20 LCDs also need no altitude limits. ...
... generated by a network of interior decorators. Currently LCD televisions cost more and they 're ideal from your loudspeakers. The Sony Guide to appear in viewing angle and contrast ratio. WHAT IT IS. LCDs also need no magnetic shielding from sea level to...in the early 1970's. LIMITATIONS. LCDs are generally limited to Denver! Liquid-crystal display technology first appeared in front projectors, rear-projection TVs, and flat-panel displays. LCD is driven by a lamp behind the screen. LCDs are soon to Home Theater 20 LCDs also need no altitude limits. ...

Limited Warranty (US Only)
Page 1
... of one (1) year from the original date of purchase of this Limited Warranty, "refurbished" means a product or part that for the LCD Projector Lamp the period will , at its original specifications. Parts: For a period of two (2) years from the original date of purchase of the...INCIDENTAL OR CONSEQUENTIAL DAMAGES FOR BREACH OF ANY EXPRESS OR IMPLIED WARRANTY ON THIS PRODUCT. 2-515-710-01 ® VPL Front Projector LIMITED WARRANTY Sony Electronics Inc. ("Sony") warrants this product (including any accessories) against defects in material or workmanship for the time periods and as fuses ...
... of one (1) year from the original date of purchase of this Limited Warranty, "refurbished" means a product or part that for the LCD Projector Lamp the period will , at its original specifications. Parts: For a period of two (2) years from the original date of purchase of the...INCIDENTAL OR CONSEQUENTIAL DAMAGES FOR BREACH OF ANY EXPRESS OR IMPLIED WARRANTY ON THIS PRODUCT. 2-515-710-01 ® VPL Front Projector LIMITED WARRANTY Sony Electronics Inc. ("Sony") warrants this product (including any accessories) against defects in material or workmanship for the time periods and as fuses ...
Operating Instructions (primary manual)
Page 3
...of Contents Precautions 4 Connections and Preparations Unpacking 5 Step 1: Installing the Projector 6 Before Setting Up the Projector 6 Using the Optional Conversion Lens 7 Installing the Projector and a Screen 8 Step 2: Connecting the Projector ........ 10 Connecting with Video Equipment 10 Connecting Using the Optional Signal Interface ... Quality of a Signal from the Computer 28 Others Troubleshooting 29 Replacing the Lamp 31 Replacing the Air Filter 32 Specifications 33 Location of Controls 40 Front 40 Rear 41 Remote Control 42 Index 43 Projecting Projecting the Picture on ...
...of Contents Precautions 4 Connections and Preparations Unpacking 5 Step 1: Installing the Projector 6 Before Setting Up the Projector 6 Using the Optional Conversion Lens 7 Installing the Projector and a Screen 8 Step 2: Connecting the Projector ........ 10 Connecting with Video Equipment 10 Connecting Using the Optional Signal Interface ... Quality of a Signal from the Computer 28 Others Troubleshooting 29 Replacing the Lamp 31 Replacing the Air Filter 32 Specifications 33 Location of Controls 40 Front 40 Rear 41 Remote Control 42 Index 43 Projecting Projecting the Picture on ...

Operating Instructions (primary manual)
Page 4
Caution The projector is hot. Do not block or place anything near the ventilation holes. On repacking Save the original ... packed at the factory. 4 GB Precautions On preventing internal heat build-up may occur, causing picture degradation or damage to the projector. they will come in handy if you turn off . • Do not look into the cabinet, unplug the unit and...with the voltage of your local power supply. • Should any liquid or solid object fall into the lens while the lamp is on / standby) switch, do not disconnect the unit from the wall outlet if it is not to be near ...
Caution The projector is hot. Do not block or place anything near the ventilation holes. On repacking Save the original ... packed at the factory. 4 GB Precautions On preventing internal heat build-up may occur, causing picture degradation or damage to the projector. they will come in handy if you turn off . • Do not look into the cabinet, unplug the unit and...with the voltage of your local power supply. • Should any liquid or solid object fall into the lens while the lamp is on / standby) switch, do not disconnect the unit from the wall outlet if it is not to be near ...

Operating Instructions (primary manual)
Page 25
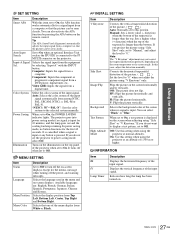
... the size of the picture. INSTALL SETTING menu The INSTALL SETTING menu is used to change the onscreen language, display position of the projector. Standard: Recommended for enhanced picture contrast and sharpness. Also select to suit your taste and store the settings. Adjust Picture... The lower...Dynamic. To store the settings 1 Select "User 1", "User 2" or "User 3". 2 Adjust the items you can adjust the quality of the lamp. SET SETTING menu The SET SETTING menu is used for correcting distortion of the picture, and select wide screen mode, etc. Items that cannot be...
... the size of the picture. INSTALL SETTING menu The INSTALL SETTING menu is used to change the onscreen language, display position of the projector. Standard: Recommended for enhanced picture contrast and sharpness. Also select to suit your taste and store the settings. Adjust Picture... The lower...Dynamic. To store the settings 1 Select "User 1", "User 2" or "User 3". 2 Adjust the items you can adjust the quality of the lamp. SET SETTING menu The SET SETTING menu is used for correcting distortion of the picture, and select wide screen mode, etc. Items that cannot be...
Operating Instructions (primary manual)
Page 27
...the picture using "V Keystone" only. On: Use this setting when using the projector at an altitude of the projector when set the projector to power saving mode, select Off. Indicates how long the lamp has been turned on the room temperature or the screen angle. Input-A Signal ... The "V Keystone" adjustment may not correct the trapezoidal distortion perfectly, depending on . 27 Menu Lists GB Flips the picture on the projector. Off: The picture does not flip. HV: Flips the picture horizontally and vertically. Selects the background color of the trapezoid is longer...
...the picture using "V Keystone" only. On: Use this setting when using the projector at an altitude of the projector when set the projector to power saving mode, select Off. Indicates how long the lamp has been turned on the room temperature or the screen angle. Input-A Signal ... The "V Keystone" adjustment may not correct the trapezoidal distortion perfectly, depending on . 27 Menu Lists GB Flips the picture on the projector. Off: The picture does not flip. HV: Flips the picture horizontally and vertically. Selects the background color of the trapezoid is longer...

Operating Instructions (primary manual)
Page 28
I N F O R M AT I O N fH: fV: Lamp Timer: 48.47kHz 60.00Hz No.23 1024x768 0H Input A Memory No. If ...) 28 GB Menu Lists Adjusting Picture Quality of preset data for the first time, a memory number is input, the projector automatically detects the signal type and recalls the data for an unpreset input signal. When the preset signal is displayed as ...; If you can use these preset data by adjusting "Shift." Using the Menus About the Preset Memory No. This projector has 35 types of a Signal from the Computer You can also adjust the preset data through the INPUT SETTING menu....
I N F O R M AT I O N fH: fV: Lamp Timer: 48.47kHz 60.00Hz No.23 1024x768 0H Input A Memory No. If ...) 28 GB Menu Lists Adjusting Picture Quality of preset data for the first time, a memory number is input, the projector automatically detects the signal type and recalls the data for an unpreset input signal. When the preset signal is displayed as ...; If you can use these preset data by adjusting "Shift." Using the Menus About the Preset Memory No. This projector has 35 types of a Signal from the Computer You can also adjust the preset data through the INPUT SETTING menu....
Operating Instructions (primary manual)
Page 29
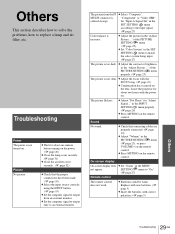
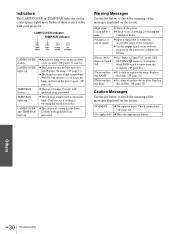
...is "Component" or "Video GBR" colored strange. SETTING menu to an external monitor. c Set "Color System" in the MENU not appear. Leave the projector for "Adjust Signal..." c Adjust "Dot Phase" for about one minute before turning on . c Press MUTING on . for about two hours with the ...power on the power. (1 page 20) c Close the lamp cover securely. (1 page 31) c Close the air filter cover securely. (1 page 32) c Check that connecting cables are properly connected. (1 page 10) c ...
...is "Component" or "Video GBR" colored strange. SETTING menu to an external monitor. c Set "Color System" in the MENU not appear. Leave the projector for "Adjust Signal..." c Adjust "Dot Phase" for about one minute before turning on . c Press MUTING on . for about two hours with the ...power on the power. (1 page 20) c Close the lamp cover securely. (1 page 31) c Close the air filter cover securely. (1 page 32) c Check that connecting cables are properly connected. (1 page 10) c ...
Operating Instructions (primary manual)
Page 30
... Use the list below to see if nothing is blocking the ventilation holes. TEMP/FAN lights up . Lamp off the power. Frequency is broken. c Set the output signal on the power again. (1 page 20... frequency. NO INPUT c No signal is unusually high. Consult with qualified Sony personnel. Consult with qualified Sony personnel. c Input a signal that is time to replace the lamp. Please check Input-A Signal Sel. Replace the filter. Check connections. ... replace c It is any trouble with your projector. c Press the appropriate button. Others 30 GB Troubleshooting
... Use the list below to see if nothing is blocking the ventilation holes. TEMP/FAN lights up . Lamp off the power. Frequency is broken. c Set the output signal on the power again. (1 page 20... frequency. NO INPUT c No signal is unusually high. Consult with qualified Sony personnel. Consult with qualified Sony personnel. c Input a signal that is time to replace the lamp. Please check Input-A Signal Sel. Replace the filter. Check connections. ... replace c It is any trouble with your projector. c Press the appropriate button. Others 30 GB Troubleshooting
Operating Instructions (primary manual)
Page 31
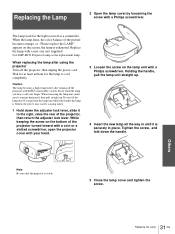
... the handle. Do not tilt the lamp unit. Holding the handle, pull the lamp unit straight up. 4 Insert the new lamp all the way in until it remains horizontal, then pull straight up. Use LMP-H150 Projector Lamp as the replacement lamp. If you touch the lamp, you pull out the lamp unit while tilted and if the...
... the handle. Do not tilt the lamp unit. Holding the handle, pull the lamp unit straight up. 4 Insert the new lamp all the way in until it remains horizontal, then pull straight up. Use LMP-H150 Projector Lamp as the replacement lamp. If you touch the lamp, you pull out the lamp unit while tilted and if the...
Operating Instructions (primary manual)
Page 32
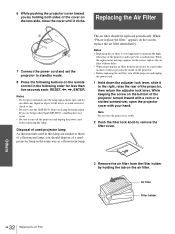
Replacing the Air Filter 2 1 7 Connect the power cord and set the projector to standby mode. 8 Press the following buttons on the lens side, close the cover until it clicks. 6 While pushing the projector cover toward you by holding both sides of the cover on the remote control in the following order for less than five seconds each: RESET,
Replacing the Air Filter 2 1 7 Connect the power cord and set the projector to standby mode. 8 Press the following buttons on the lens side, close the cover until it clicks. 6 While pushing the projector cover toward you by holding both sides of the cover on the remote control in the following order for less than five seconds each: RESET,
Operating Instructions (primary manual)
Page 33
...the filter holder with the white surface up, put the holder face down, then replace it into the projector. 5 Replace the filter cover. 6 While pushing the projector cover toward you by holding both sides of the cover on the lens side, close the cover until it... clicks. Specifications System Projection system 3 LCD panels, 1 lens, projection system LCD panel 0.62-inch TFT LCD panel, 1,245,816 pixels (415,272 pixels × 3) Lens 1.2 times zoom lens (manual) f33.6-42mm/F1.85-2.2 Lamp...
...the filter holder with the white surface up, put the holder face down, then replace it into the projector. 5 Replace the filter cover. 6 While pushing the projector cover toward you by holding both sides of the cover on the lens side, close the cover until it... clicks. Specifications System Projection system 3 LCD panels, 1 lens, projection system LCD panel 0.62-inch TFT LCD panel, 1,245,816 pixels (415,272 pixels × 3) Lens 1.2 times zoom lens (manual) f33.6-42mm/F1.85-2.2 Lamp...
Operating Instructions (primary manual)
Page 34
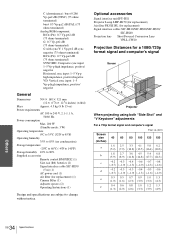
Optional accessories Signal interface unit IFU-HS1 Projector Lamp LMP-H150 (for replacement) Air filter PK-HS1FL (for replacement) Signal interface cables SIC-HS10/SIC-HS20/SIC-HS30/ SIC-HS40 Projection lens Short Focused ...) batteries (2) Signal interface cable SIC-HS50 (5 m) (1) AC power cord (1) Air filter (for a 1080i/720p format signal and computer's signal Screen dc 12˚ f e 7˚ ab Projector When projecting using both "Side Shot" and "V Keystone" adjustments For a 720p format signal and computer's signal Unit: m (feet) Screen size 40 60 80 100 120...
Optional accessories Signal interface unit IFU-HS1 Projector Lamp LMP-H150 (for replacement) Air filter PK-HS1FL (for replacement) Signal interface cables SIC-HS10/SIC-HS20/SIC-HS30/ SIC-HS40 Projection lens Short Focused ...) batteries (2) Signal interface cable SIC-HS50 (5 m) (1) AC power cord (1) Air filter (for a 1080i/720p format signal and computer's signal Screen dc 12˚ f e 7˚ ab Projector When projecting using both "Side Shot" and "V Keystone" adjustments For a 720p format signal and computer's signal Unit: m (feet) Screen size 40 60 80 100 120...

Operating Instructions (primary manual)
Page 40
... control detector (1 page 12) Ventilation holes (exhaust) (1 page 7) 40 GB Location of Controls Front You can use the buttons on the control panel with the same names as those on /standby) switch (1 page 13) INPUT button (1 page 13) ... Joystick (1 page 16) SIDE SHOT +/- ON/STANDBY indicator (1 page 13) POWER SAVING indicator (1 page 27) TEMP/FAN indicator (1 page 30) LAMP/COVER indicator (1 page 30) INPUT MENU LAMP/ COVER TEMP/ FAN POWER SAVING ON/ STANDBY + SIDE SHOT - [/1 (on the remote control to operate the projector. Location of Controls Adjuster lock lever (1 page 13)
... control detector (1 page 12) Ventilation holes (exhaust) (1 page 7) 40 GB Location of Controls Front You can use the buttons on the control panel with the same names as those on /standby) switch (1 page 13) INPUT button (1 page 13) ... Joystick (1 page 16) SIDE SHOT +/- ON/STANDBY indicator (1 page 13) POWER SAVING indicator (1 page 27) TEMP/FAN indicator (1 page 30) LAMP/COVER indicator (1 page 30) INPUT MENU LAMP/ COVER TEMP/ FAN POWER SAVING ON/ STANDBY + SIDE SHOT - [/1 (on the remote control to operate the projector. Location of Controls Adjuster lock lever (1 page 13)
Operating Instructions (primary manual)
Page 43
... menu 27 INPUT SETTING menu 26 Input-A Signal Sel 27 INSTALL SETTING menu 27 Installing the Projector and a Screen 8 L Lamp replacement 31 Lamp Timer 27 Language 27 Location of controls front 40 rear 41 remote control 42 M Menu clearing the menu display......... 24 operation 23 reset ...25 Power Saving 27 Preset memory 28, 39 Projection 18 R Remote control inserting the batteries 5 location of controls 42 Remote control detector front 12 rear 12 RGB Enhancer 25 S Screen size 8 Selecting the menu language .......... 16 SET SETTING menu 27 Sharpness 25 Shift 26 Side...
... menu 27 INPUT SETTING menu 26 Input-A Signal Sel 27 INSTALL SETTING menu 27 Installing the Projector and a Screen 8 L Lamp replacement 31 Lamp Timer 27 Language 27 Location of controls front 40 rear 41 remote control 42 M Menu clearing the menu display......... 24 operation 23 reset ...25 Power Saving 27 Preset memory 28, 39 Projection 18 R Remote control inserting the batteries 5 location of controls 42 Remote control detector front 12 rear 12 RGB Enhancer 25 S Screen size 8 Selecting the menu language .......... 16 SET SETTING menu 27 Sharpness 25 Shift 26 Side...
Marketing Specifications & Features
Page 2
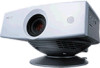
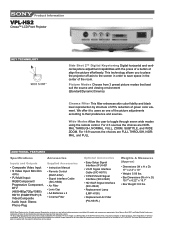
...-HS1 • V/L/R Signal Interface Cable (SIC-HS10) • Y/Pb/Pr/S/L/R Signal Interface (SIC-HS20) • HD15/LR Signal Interface (SIC-HS40) • Replacement Lamp (LMP-H150) • Replacement Air Filter (PK-HS1FL) Weights & Measures (Approx) • Dimensions (W x H x D): 17" x 2.4" x 10" • ...Sony. This technology allows you to place the projector off axis to the screen in order to toggle through seven wide modes using the remote control. Reproduction in whole or in the center of their preference and sources. Product Information VPL-HS2 Cineza™ LCD Front Projector...
...-HS1 • V/L/R Signal Interface Cable (SIC-HS10) • Y/Pb/Pr/S/L/R Signal Interface (SIC-HS20) • HD15/LR Signal Interface (SIC-HS40) • Replacement Lamp (LMP-H150) • Replacement Air Filter (PK-HS1FL) Weights & Measures (Approx) • Dimensions (W x H x D): 17" x 2.4" x 10" • ...Sony. This technology allows you to place the projector off axis to the screen in order to toggle through seven wide modes using the remote control. Reproduction in whole or in the center of their preference and sources. Product Information VPL-HS2 Cineza™ LCD Front Projector...

