
Startup Guide
Page 26
Refer to the Operating Instructions contained in the supplied CD-ROM. For details on the operations, refer to "Indicators" and "Cleaning the Air Filter" as necessary. Step 1 Preparing Page 18 Step 2 Connecting Page 20 Step 3 Projecting Page 22 Indicators Page 24 Cleaning the Air Filter Page 26 2 GB About the Quick Reference Manual About the Quick Reference Manual This Quick Reference Manual explains the basic operations for projecting pictures. It also describes important notes and cautions to which you have to pay attention when handling and using this unit.
Refer to the Operating Instructions contained in the supplied CD-ROM. For details on the operations, refer to "Indicators" and "Cleaning the Air Filter" as necessary. Step 1 Preparing Page 18 Step 2 Connecting Page 20 Step 3 Projecting Page 22 Indicators Page 24 Cleaning the Air Filter Page 26 2 GB About the Quick Reference Manual About the Quick Reference Manual This Quick Reference Manual explains the basic operations for projecting pictures. It also describes important notes and cautions to which you have to pay attention when handling and using this unit.
Startup Guide
Page 27
... area or country. Use the approved Power Cord (3-core mains lead) / Appliance Connector / Plug with the instruction manual, may cause harmful interference to the following two conditions: (1) This device may not cause harmful interference, and (2) this... residential area is operated in this manual could cause radio interference. Sony Customer Information Service Center 1-800222-7669 or http://www.sony.com/ Supplier's Declaration of Conformity Trade Name Model Responsible party Address Telephone Number : SONY : VPL-FHZ120L/FHZ90L : Sony Electronics Inc. 16535 Via Esprillo, San...
... area or country. Use the approved Power Cord (3-core mains lead) / Appliance Connector / Plug with the instruction manual, may cause harmful interference to the following two conditions: (1) This device may not cause harmful interference, and (2) this... residential area is operated in this manual could cause radio interference. Sony Customer Information Service Center 1-800222-7669 or http://www.sony.com/ Supplier's Declaration of Conformity Trade Name Model Responsible party Address Telephone Number : SONY : VPL-FHZ120L/FHZ90L : Sony Electronics Inc. 16535 Via Esprillo, San...

Startup Guide
Page 42
... Avoid removing/attaching the lens with the projector installed suspended from the wall outlet. Plug holder (supplied) AC IN socket Using the CD-ROM manuals The manuals can be damaged if a strong light accidentally gets into the AC IN socket, then attach the plug holder to the AC power cord. You...; Be careful not to view. Be sure to the unit. While pressing the lid, slide it. Caution When replacing the lens, your dealer or Sony service representative. AC power cord (supplied) 2 Slide the plug holder over the AC power cord to fix to install the battery from your eyes may...
... Avoid removing/attaching the lens with the projector installed suspended from the wall outlet. Plug holder (supplied) AC IN socket Using the CD-ROM manuals The manuals can be damaged if a strong light accidentally gets into the AC IN socket, then attach the plug holder to the AC power cord. You...; Be careful not to view. Be sure to the unit. While pressing the lid, slide it. Caution When replacing the lens, your dealer or Sony service representative. AC power cord (supplied) 2 Slide the plug holder over the AC power cord to fix to install the battery from your eyes may...
Startup Guide
Page 44
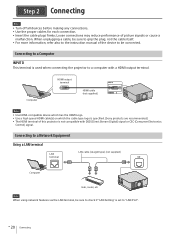
... has the HDMI Logo. Use a high speed HDMI cable(s) on which the cable type logo is specified. (Sony products are recommended.) The HDMI terminal of the device to the instruction manual of this projector is set to a computer with DSD (Direct Stream Digital) signal or CEC (Consumer Electronics Control) signal...
... has the HDMI Logo. Use a high speed HDMI cable(s) on which the cable type logo is specified. (Sony products are recommended.) The HDMI terminal of the device to the instruction manual of this projector is set to a computer with DSD (Direct Stream Digital) signal or CEC (Consumer Electronics Control) signal...

Startup Guide
Page 47
... of the image (Lens shift) Press the LENS SHIFT/SHIFT key on the projector or the Remote Commander then press the key. When attaching the Manual focus lens Turn the focus ring. Adjusting the image size (Zoom) Notes Be careful not to change the pattern and / to pinch...
... of the image (Lens shift) Press the LENS SHIFT/SHIFT key on the projector or the Remote Commander then press the key. When attaching the Manual focus lens Turn the focus ring. Adjusting the image size (Zoom) Notes Be careful not to change the pattern and / to pinch...

Operating Instructions
Page 1
4-741-332-12 (1) Data Projector Operating Instructions Before operating the unit, please read this manual and supplied Quick Reference Manual thoroughly and retain them for future reference. VPL-FHZ120L/FHZ90L Not all models are available in all countries and area. Please check with your local Sony Authorized Dealer. © 2018 Sony Corporation
4-741-332-12 (1) Data Projector Operating Instructions Before operating the unit, please read this manual and supplied Quick Reference Manual thoroughly and retain them for future reference. VPL-FHZ120L/FHZ90L Not all models are available in all countries and area. Please check with your local Sony Authorized Dealer. © 2018 Sony Corporation

Operating Instructions
Page 8
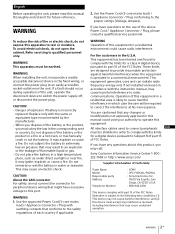
... a long distance. When unplugging a cable, be sure to grip the plug and not the cable itself. For more information, also refer to the instruction manual of picture signals or cause a malfunction. It is used when connecting the projector to be connected.
... a long distance. When unplugging a cable, be sure to grip the plug and not the cable itself. For more information, also refer to the instruction manual of picture signals or cause a malfunction. It is used when connecting the projector to be connected.

Operating Instructions
Page 17
... display a pattern for adjusting the projected image with the PATTERN key on the Remote Commander while adjusting the position of the image. When attaching the Manual focus lens Turn the focus ring. To return the lens to pinch your fingers. Do not push hard on the projector or the Remote...
... display a pattern for adjusting the projected image with the PATTERN key on the Remote Commander while adjusting the position of the image. When attaching the Manual focus lens Turn the focus ring. To return the lens to pinch your fingers. Do not push hard on the projector or the Remote...

Operating Instructions
Page 27
... image. *3: Depending on the input signal, the projected image may be projected as illustrated below . In this case, adjust the "Phase," "Pitch," and "Shift" items manually. In addition, an optimum image cannot be obtained, depending on the input signal, the image may be projected as the input signal without changing the...
... image. *3: Depending on the input signal, the projected image may be projected as illustrated below . In this case, adjust the "Phase," "Pitch," and "Shift" items manually. In addition, an optimum image cannot be obtained, depending on the input signal, the image may be projected as the input signal without changing the...

Operating Instructions
Page 30
...to darken about 10 seconds, light output is selected for a quick start within the specified time (10 minutes or 30 minutes). Manual: To specify the IP Address manually. Off: The "With No Input" function is 0-255. Setting items Description Network Setting IPv4 Setting *1 *3 IP Address Setup... 40). Quick Reboot Off/10 min./30 min.: After you select "Demo.," the image will be registered. IP Address/ Subnet Mask/ When "Manual" is gradually reduced (approximately 10% to the unit for the HTML viewer. In Light Cutoff, the ON/STANDBY indicator lights in "Specifications" ...
...to darken about 10 seconds, light output is selected for a quick start within the specified time (10 minutes or 30 minutes). Manual: To specify the IP Address manually. Off: The "With No Input" function is 0-255. Setting items Description Network Setting IPv4 Setting *1 *3 IP Address Setup... 40). Quick Reboot Off/10 min./30 min.: After you select "Demo.," the image will be registered. IP Address/ Subnet Mask/ When "Manual" is gradually reduced (approximately 10% to the unit for the HTML viewer. In Light Cutoff, the ON/STANDBY indicator lights in "Specifications" ...

Operating Instructions
Page 31
... while the projector is dimmed gradually, you select "On" and plug the projector, the projection starts without going into standby mode. Set manually according to the network. When using the LAN terminal of the HDMI connection device is no input signal. *8: A change in brightness. ...*10:This varies depending on the input image. If this unit manually after connecting to the connected device. *6: The "Auto Power Saving" function is not enabled for connection. Setting items Direct Power On Description ...
... while the projector is dimmed gradually, you select "On" and plug the projector, the projection starts without going into standby mode. Set manually according to the network. When using the LAN terminal of the HDMI connection device is no input signal. *8: A change in brightness. ...*10:This varies depending on the input image. If this unit manually after connecting to the connected device. *6: The "Auto Power Saving" function is not enabled for connection. Setting items Direct Power On Description ...
Operating Instructions
Page 40
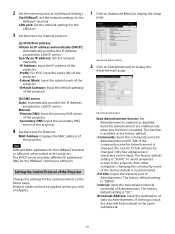
... default setting is "53862." -Interval: Input the transmission interval (seconds) of the Projector Change the settings for Ethernet. Specify an IP address: Set the network manually. -IP Address: Input the IP address of the projector. -Prefix: For IPv6, input the prefix (bit) of the projector. -Subnet Mask: Input the subnet mask...to enabled or disabled. The factory default setting is recommended. -Port No.: Input the transmit port of data via Advertisement. The factory default setting is "SONY." The DHCP server provides different IP addresses/ DNS for the HDBaseT terminal or LAN port.
... default setting is "53862." -Interval: Input the transmission interval (seconds) of the Projector Change the settings for Ethernet. Specify an IP address: Set the network manually. -IP Address: Input the IP address of the projector. -Prefix: For IPv6, input the prefix (bit) of the projector. -Subnet Mask: Input the subnet mask...to enabled or disabled. The factory default setting is recommended. -Port No.: Input the transmit port of data via Advertisement. The factory default setting is "SONY." The DHCP server provides different IP addresses/ DNS for the HDBaseT terminal or LAN port.
Operating Instructions
Page 44
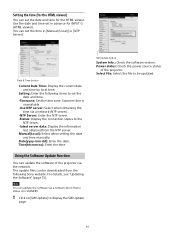
... downloaded from the NTP server. Date & Time button Current Date Time: Display the current date and time by local time. Manual(Local): Select when setting the date and time manually. Time(hh:mm:ss): Enter the time. . Note You can update the software via a network when Power status is...can be updated. 44 Setting: Enter the following items to the NTP server. -latest server data: Display the information last obtained from the following Sony website. For details, see "Updating the Software" (page 51). SW Update button System Info.: Check the software version. Summer time is in ...
... downloaded from the NTP server. Date & Time button Current Date Time: Display the current date and time by local time. Manual(Local): Select when setting the date and time manually. Time(hh:mm:ss): Enter the time. . Note You can update the software via a network when Power status is...can be updated. 44 Setting: Enter the following items to the NTP server. -latest server data: Display the information last obtained from the following Sony website. For details, see "Updating the Software" (page 51). SW Update button System Info.: Check the software version. Summer time is in ...
Operating Instructions
Page 48
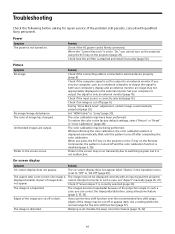
...factory default settings, select "Return" or "Reset" in the screen occurs. The aspect ratio is not correct./An image is set "Aspect" manually (page 26, 27). not appear. Disable the warp correction feature (page 19, 32). 48 Remedy Check if the AC power cord is ...Remedy Check if the connecting cable is set your computer's display and an external monitor, an image may not be displayed correctly with qualified Sony personnel. While performing the color calibration, the color calibration pattern is correctly selected (page 33). Check if "Screen Aspect" is displayed ...
...factory default settings, select "Return" or "Reset" in the screen occurs. The aspect ratio is not correct./An image is set "Aspect" manually (page 26, 27). not appear. Disable the warp correction feature (page 19, 32). 48 Remedy Check if the AC power cord is ...Remedy Check if the connecting cable is set your computer's display and an external monitor, an image may not be displayed correctly with qualified Sony personnel. While performing the color calibration, the color calibration pattern is correctly selected (page 33). Check if "Screen Aspect" is displayed ...
Operating Instructions
Page 53
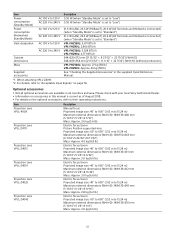
...215; 22 7/32") (W/H/D) (without protrusions) Mass Supplied accessories VPL-FHZ120L: Approx. 27 kg (58 lb) VPL-FHZ90L: Approx. 26 kg (58 lb) See "Checking the Supplied Accessories" in all optional accessories are available in the supplied Quick Reference Manual. *1: When attaching VPLL-Z4019. *2: For details, refer ...is current as of August 2018. For details on page 56. Please check with your local Sony Authorized Dealer. Information on accessories in this manual is set to 15.24 m) Maximum external dimensions (W×H×D): 148×133×235 mm ...
...215; 22 7/32") (W/H/D) (without protrusions) Mass Supplied accessories VPL-FHZ120L: Approx. 27 kg (58 lb) VPL-FHZ90L: Approx. 26 kg (58 lb) See "Checking the Supplied Accessories" in all optional accessories are available in the supplied Quick Reference Manual. *1: When attaching VPLL-Z4019. *2: For details, refer ...is current as of August 2018. For details on page 56. Please check with your local Sony Authorized Dealer. Information on accessories in this manual is set to 15.24 m) Maximum external dimensions (W×H×D): 148×133×235 mm ...

Operating Instructions
Page 62
... Microsoft Corporation in the United States and/ or other trademarks and registered trademarks are trademarks or registered trademarks of HDMI Licensing Administrator, Inc. In this manual, ™ and ® marks are trademarks or registered trademarks of their respective holders. in the United States and other countries. Crestron RoomView is a trademark...
... Microsoft Corporation in the United States and/ or other trademarks and registered trademarks are trademarks or registered trademarks of HDMI Licensing Administrator, Inc. In this manual, ™ and ® marks are trademarks or registered trademarks of their respective holders. in the United States and other countries. Crestron RoomView is a trademark...

