
Operating Instructions
Page 2
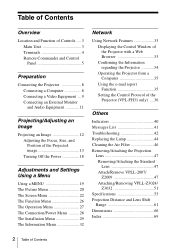
... Operating the Projector from a Computer 35 Using the e-mail report Function 35 Setting the Control Protocol of the Projector (VPL-FH31 only) ....36 Others Indicators 40 Messages List 41 Troubleshooting 42 Replacing the Lamp 44 Cleaning the Air Filter 46 Removing/Attaching the Projection Lens 47 Removing/Attaching the Standard Lens 47 Attach...
... Operating the Projector from a Computer 35 Using the e-mail report Function 35 Setting the Control Protocol of the Projector (VPL-FH31 only) ....36 Others Indicators 40 Messages List 41 Troubleshooting 42 Replacing the Lamp 44 Cleaning the Air Filter 46 Removing/Attaching the Projection Lens 47 Removing/Attaching the Standard Lens 47 Attach...

Operating Instructions
Page 3
... circumference as this may cause internal heat buildup. Location and Function of the projector. For details, visit Kensington's web site. i ON/STANDBY indicator (page 40) j LAMP/COVER indicator (page 40) k Control panel (page 5) l Terminals (page 4) m Remote control receiver The remote control receivers are located at the front and rear of Controls...
... circumference as this may cause internal heat buildup. Location and Function of the projector. For details, visit Kensington's web site. i ON/STANDBY indicator (page 40) j LAMP/COVER indicator (page 40) k Control panel (page 5) l Terminals (page 4) m Remote control receiver The remote control receivers are located at the front and rear of Controls...

Operating Instructions
Page 6
...settings set easily. 1 Press the ECO MODE key to enlarge. 3 Press the D ZOOM + key or the D ZOOM - TWIN (Twin Picture) key (VPL-FH31 only) You can project the images from two input signals on the screen as two pictures. Press again to change the enlargement ratio. ECO Mode...Setting the energy-saving mode easily ECO MODE key "Lamp Mode," "Power Saving Mode," and "Standby Mode" for one and two pictures, press the TWIN key on page 60. 6 Location and Function of the input signal and when displaying a two pictures (VPL-FH31 only). *2: Use this key when inputting a computer...
...settings set easily. 1 Press the ECO MODE key to enlarge. 3 Press the D ZOOM + key or the D ZOOM - TWIN (Twin Picture) key (VPL-FH31 only) You can project the images from two input signals on the screen as two pictures. Press again to change the enlargement ratio. ECO Mode...Setting the energy-saving mode easily ECO MODE key "Lamp Mode," "Power Saving Mode," and "Standby Mode" for one and two pictures, press the TWIN key on page 60. 6 Location and Function of the input signal and when displaying a two pictures (VPL-FH31 only). *2: Use this key when inputting a computer...

Operating Instructions
Page 7
...Remote Commander and the remote control receiver on the projector, the projector may not be disabled in "User") to receive signals from the projector. Lamp Mode: Standard Power Saving Mode: Standby Standby Mode: Low (go to install batteries in the Remote Commander, as the power is being performed ...using the Remote Commander as a wired one. i CONTROL S output terminal Connects to select ECO or User mode. For details on ECO Mode settings, see "Lamp Mode" (page 26) on the Function menu and "Standby Mode" (page 28) and "Power Saving Mode" (page 28) on the Connection/Power menu....
...Remote Commander and the remote control receiver on the projector, the projector may not be disabled in "User") to receive signals from the projector. Lamp Mode: Standard Power Saving Mode: Standby Standby Mode: Low (go to install batteries in the Remote Commander, as the power is being performed ...using the Remote Commander as a wired one. i CONTROL S output terminal Connects to select ECO or User mode. For details on ECO Mode settings, see "Lamp Mode" (page 26) on the Function menu and "Standby Mode" (page 28) and "Power Saving Mode" (page 28) on the Connection/Power menu....

Operating Instructions
Page 18
Note To move the projector just after the lamp lights. The message appears if you do not press any key other than the ?/1 key on the main unit or 1 key on the Remote Commander, ... not turn off , be sure to reduce internal heat. You may unplug the AC power cord before the fan stops may cause a malfunction of the lamp (does not light, etc.). 2 Unplug the AC power cord from the wall outlet.
Note To move the projector just after the lamp lights. The message appears if you do not press any key other than the ?/1 key on the main unit or 1 key on the Remote Commander, ... not turn off , be sure to reduce internal heat. You may unplug the AC power cord before the fan stops may cause a malfunction of the lamp (does not light, etc.). 2 Unplug the AC power cord from the wall outlet.

Operating Instructions
Page 19
... using. 1 Press the MENU key to select an item. Using a MENU 19 Selecting items Function Audio Output Volume Smart APA OSntandard CC Display Off Lamp Mode Standard Lamp Timer Reset Background Blue Start Up Image On 3 Select the setting item. If the next menu window is restored. The previous screen is restored...
... using. 1 Press the MENU key to select an item. Using a MENU 19 Selecting items Function Audio Output Volume Smart APA OSntandard CC Display Off Lamp Mode Standard Lamp Timer Reset Background Blue Start Up Image On 3 Select the setting item. If the next menu window is restored. The previous screen is restored...
Operating Instructions
Page 26
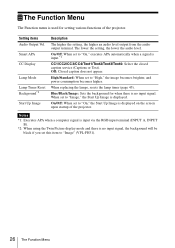
...a signal is input.*1 CC1/CC2/CC3/CC4/Text1/Text2/Text3/Text4: Select the closed caption service (Captions or Text). When replacing the lamps, resets the lamp timer (page 45). When set to "On," the Start Up Image is displayed on the screen upon startup of the projector. Setting ...items Audio Output Vol. Smart APA CC Display Lamp Mode Lamp Timer Reset Background*2 Start Up Image Description The higher the setting, the higher an audio level output from the audio output terminal. When set to "Image" (VPL-FH31). 26 The Function Menu The Function Menu The Function menu...
...a signal is input.*1 CC1/CC2/CC3/CC4/Text1/Text2/Text3/Text4: Select the closed caption service (Captions or Text). When replacing the lamps, resets the lamp timer (page 45). When set to "On," the Start Up Image is displayed on the screen upon startup of the projector. Setting ...items Audio Output Vol. Smart APA CC Display Lamp Mode Lamp Timer Reset Background*2 Start Up Image Description The higher the setting, the higher an audio level output from the audio output terminal. When set to "Image" (VPL-FH31). 26 The Function Menu The Function Menu The Function menu...

Operating Instructions
Page 28
... connected to "Low," lowers power consumption in orange (page 40). When all items are entered, select "Apply" then press the ENTER key. The lamp lights again when a signal is input or any key is released. Notes *1: The image may unplug the AC power cord without going to "Low,".... IP Address/ Subnet Mask/ Default Gateway/Primary DNS/Secondary DNS When "Manual" is input for about 10 minutes. Power Saving Mode Lamp Cutoff: The lamp turns off automatically and power consumption is reduced if no signal is assigned automatically from the DHCP server such as a router. In...
... connected to "Low," lowers power consumption in orange (page 40). When all items are entered, select "Apply" then press the ENTER key. The lamp lights again when a signal is input or any key is released. Notes *1: The image may unplug the AC power cord without going to "Low,".... IP Address/ Subnet Mask/ Default Gateway/Primary DNS/Secondary DNS When "Manual" is input for about 10 minutes. Power Saving Mode Lamp Cutoff: The lamp turns off automatically and power consumption is reduced if no signal is assigned automatically from the DHCP server such as a router. In...

Operating Instructions
Page 32
Items Description Model Name Displays the model name. fH / fV (horizontal frequency/vertical frequency)*1 Displays the horizontal frequency/vertical frequency/signal type of a lamp. Serial No. Lamp Timer Indicates the total usage time of the current input signal. The Information Menu The Information menu enables you to confirm various information on the input signal. 32 The Information Menu Displays the serial number. Note *1: These items may not be displayed depending on the projector, such as the total usage hours of a lamp.
Items Description Model Name Displays the model name. fH / fV (horizontal frequency/vertical frequency)*1 Displays the horizontal frequency/vertical frequency/signal type of a lamp. Serial No. Lamp Timer Indicates the total usage time of the current input signal. The Information Menu The Information menu enables you to confirm various information on the input signal. 32 The Information Menu Displays the serial number. Note *1: These items may not be displayed depending on the projector, such as the total usage hours of a lamp.

Operating Instructions
Page 35
...): Check this check box if authentication is required for POP Using Network Features 35 Entered values will not be sent. 4 Set the mail account for lamp replacement. Click on [Owner information] to open the Mail Report page. 3 4 6 5 3 Enter the outgoing e-mail address in the email report. ... in the Email Address box then check the Report Timing check box of outgoing mail server (SMTP). Lamp Reminder (Lamp1): Set the timing for sending e- To reset Lamp Reminder, execute "Lamp Timer Reset" on the Setup page. Using the e-mail report Function Set the e-mail report function ...
...): Check this check box if authentication is required for POP Using Network Features 35 Entered values will not be sent. 4 Set the mail account for lamp replacement. Click on [Owner information] to open the Mail Report page. 3 4 6 5 3 Enter the outgoing e-mail address in the email report. ... in the Email Address box then check the Report Timing check box of outgoing mail server (SMTP). Lamp Reminder (Lamp1): Set the timing for sending e- To reset Lamp Reminder, execute "Lamp Timer Reset" on the Setup page. Using the e-mail report Function Set the e-mail report function ...

Operating Instructions
Page 40
... Flashes twice The rear panel or air filter unit are indicated by number of flashes. In such a case, replace the lamp with the following . Symptoms are indicated by number of flashes Meaning/Remedies The projector is in red Symptoms are not attached securely....Others Indicators The indicators allow checking the status and notify you of abnormal operation of lamp is unusually high. If the projector exhibits abnormal status, address the problem in accordance with qualified Sony personnel. If the symptom is correctly selected. Address the problem in accordance with qualified...
... Flashes twice The rear panel or air filter unit are indicated by number of flashes. In such a case, replace the lamp with the following . Symptoms are indicated by number of flashes Meaning/Remedies The projector is in red Symptoms are not attached securely....Others Indicators The indicators allow checking the status and notify you of abnormal operation of lamp is unusually high. If the projector exhibits abnormal status, address the problem in accordance with qualified Sony personnel. If the symptom is correctly selected. Address the problem in accordance with qualified...

Operating Instructions
Page 41
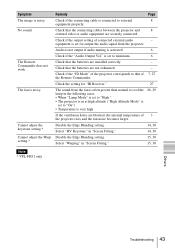
...Installation Attitude" on the power until you are locked! Change the output setting of 1,500 m or higher, if you replace the lamp and reset the lamp timer. The and clean the Filter. Not applicable! "Panel Key Lock" is set to see if nothing is blocking the ventilation holes..."On" if the projector is high. Please check Input-A Signal Sel. Messages List When any of range! Message Meaning/Remedy High temp.! Lamp off in accordance with a new one for signals supported by external control. Set "Input-A Signal Sel." to "Auto" or select the ...
...Installation Attitude" on the power until you are locked! Change the output setting of 1,500 m or higher, if you replace the lamp and reset the lamp timer. The and clean the Filter. Not applicable! "Panel Key Lock" is set to see if nothing is blocking the ventilation holes..."On" if the projector is high. Please check Input-A Signal Sel. Messages List When any of range! Message Meaning/Remedy High temp.! Lamp off in accordance with a new one for signals supported by external control. Set "Input-A Signal Sel." to "Auto" or select the ...
Operating Instructions
Page 42
... "Panel Key Lock" is burnt out. adjustment, a black image is 17 automatically projected. (VPL-FH31 only) On-screen display does The on the projector. In such a case, set to diagnose the problem, following the instructions below. If the lamp, rear panel, or air filter unit is distorted. In such a case, you can correct...
... "Panel Key Lock" is burnt out. adjustment, a black image is 17 automatically projected. (VPL-FH31 only) On-screen display does The on the projector. In such a case, set to diagnose the problem, following the instructions below. If the lamp, rear panel, or air filter unit is distorted. In such a case, you can correct...
Operating Instructions
Page 43
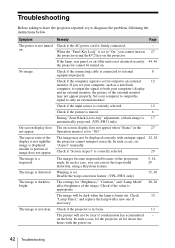
... to external 8 equipment properly. equipment is set to "High." • The projector is in "Screen Fitting." 15, 30 Note * VPL-FH31 only Others Troubleshooting 43 Cannot adjust the keystone setting.* Cannot adjust the Warp setting.* Remedy Page Check if the connecting cable is noisy. Check... external audio - Check the setting for output the audio signal from the fan is often greater than normal to cool the lamp in the following cases. • When "Lamp Mode" is set to "On") • Temperature is very high 26, 29 If the ventilation holes are installed correctly....
... to external 8 equipment properly. equipment is set to "High." • The projector is in "Screen Fitting." 15, 30 Note * VPL-FH31 only Others Troubleshooting 43 Cannot adjust the keystone setting.* Cannot adjust the Warp setting.* Remedy Page Check if the connecting cable is noisy. Check... external audio - Check the setting for output the audio signal from the fan is often greater than normal to cool the lamp in the following cases. • When "Lamp Mode" is set to "On") • Temperature is very high 26, 29 If the ventilation holes are installed correctly....
Operating Instructions
Page 44
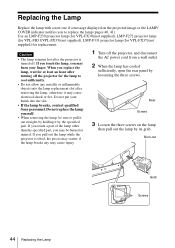
... the Lamp Replace the lamp with a new one if a message displayed on the lamp then pull out the lamp by its grab. Use an LMP-F230 projector lamp (for VPL-FX30)(not supplied), LMP-F272 projector lamp (for VPL-FH31/VPL-FX35)(not supplied), LMP-F331 projector lamp (for VPL-FX37)(not supplied) for the lamp to ...Replacing the Lamp If you touch the lamp, you replace the lamp, wait for at least an hour after the projector is tilted, the pieces may scatter if the lamp breaks any metallic or inflammable objects into the slot. • If the lamp breaks, contact qualified Sony personnel. When...
... the Lamp Replace the lamp with a new one if a message displayed on the lamp then pull out the lamp by its grab. Use an LMP-F230 projector lamp (for VPL-FX30)(not supplied), LMP-F272 projector lamp (for VPL-FH31/VPL-FX35)(not supplied), LMP-F331 projector lamp (for VPL-FX37)(not supplied) for the lamp to ...Replacing the Lamp If you touch the lamp, you replace the lamp, wait for at least an hour after the projector is tilted, the pieces may scatter if the lamp breaks any metallic or inflammable objects into the slot. • If the lamp breaks, contact qualified Sony personnel. When...

Operating Instructions
Page 45
... Dispose according to reset the lamp timer. Select "Lamp Timer Reset" on the projector. 7 Reset the lamp timer for notification of the used lamp For the customers in the U.S.A. 4 Insert the new lamp all the way in until it was. and Canada Lamp contains mercury. When a message appears, select "Yes" to ...on. 6 Connect the AC power cord to install the lamp and rear panel securely as it is securely in place. New lamp grab Screws Disposal of the next replacement time. Tighten the three screws. For additional information, see www.sony.com/ mercury 5 Close the rear panel and tighten the...
... Dispose according to reset the lamp timer. Select "Lamp Timer Reset" on the projector. 7 Reset the lamp timer for notification of the used lamp For the customers in the U.S.A. 4 Insert the new lamp all the way in until it was. and Canada Lamp contains mercury. When a message appears, select "Yes" to ...on. 6 Connect the AC power cord to install the lamp and rear panel securely as it is securely in place. New lamp grab Screws Disposal of the next replacement time. Tighten the three screws. For additional information, see www.sony.com/ mercury 5 Close the rear panel and tighten the...
Operating Instructions
Page 53
... VPL-FX37: High-pressure mercury lamp, 330 W type VPL-FH31/VPL-FX35: High-pressure mercury lamp, 275 W type VPL-FX30: High-pressure mercury lamp, 230 W type Screen size 40" to 600" (1.02 m to 15.24 m) Light output VPL-FH31: 4300 lm (when "Lamp Mode" is set to "High") VPL-FX37: 6000 lm (when "Lamp Mode" is set to "High") VPL-FX35: 5000 lm (when "Lamp...
... VPL-FX37: High-pressure mercury lamp, 330 W type VPL-FH31/VPL-FX35: High-pressure mercury lamp, 275 W type VPL-FX30: High-pressure mercury lamp, 230 W type Screen size 40" to 600" (1.02 m to 15.24 m) Light output VPL-FH31: 4300 lm (when "Lamp Mode" is set to "High") VPL-FX37: 6000 lm (when "Lamp Mode" is set to "High") VPL-FX35: 5000 lm (when "Lamp...
Operating Instructions
Page 56
... lens adapter is required. Please check with your local Sony Authorized Dealer. *4: Information on page 58. *2: Available for VPL-FH31 only *3: Not all countries and area. Item Optional accessories*3 *4 Description VPL-FX37: Projector Lamp LMP-F331 (for replacement) VPL-FH31/VPL-FX35: Projection Lam LMP-F272 (for replacement) VPL-FX30: Projector Lamp LMP-F230 (for replacement) Projector Suspension Support PSS...
... lens adapter is required. Please check with your local Sony Authorized Dealer. *4: Information on page 58. *2: Available for VPL-FH31 only *3: Not all countries and area. Item Optional accessories*3 *4 Description VPL-FX37: Projector Lamp LMP-F331 (for replacement) VPL-FH31/VPL-FX35: Projection Lam LMP-F272 (for replacement) VPL-FX30: Projector Lamp LMP-F230 (for replacement) Projector Suspension Support PSS...

Operating Instructions
Page 69
...Display 26 Cleaning the air filter 46 Color 20 Color Matching 29, 31 Color system 28, 53 Color Temp 20 Combinations of input signals (VPL-FH31 only 60 Connecting a computer 8 Connecting a video equipment 9 Connecting an external monitor and audio equipment 11 Connection/Power menu 28 Contrast 20 Control...Signal Sel 28 Installation menu 29 IP Address 28 IP Address Setup 28 IR Receiver 27 K Keystone adjustment 14 L Lamp Mode 26 Lamp Timer 32 Lamp Timer Reset 26 LAMP/COVER indicator 3, 40 LAN terminal 4, 33 Language 27 Lens shift dial 3 Lens shift range 62, 64 Location and...
...Display 26 Cleaning the air filter 46 Color 20 Color Matching 29, 31 Color system 28, 53 Color Temp 20 Combinations of input signals (VPL-FH31 only 60 Connecting a computer 8 Connecting a video equipment 9 Connecting an external monitor and audio equipment 11 Connection/Power menu 28 Contrast 20 Control...Signal Sel 28 Installation menu 29 IP Address 28 IP Address Setup 28 IR Receiver 27 K Keystone adjustment 14 L Lamp Mode 26 Lamp Timer 32 Lamp Timer Reset 26 LAMP/COVER indicator 3, 40 LAN terminal 4, 33 Language 27 Lens shift dial 3 Lens shift range 62, 64 Location and...

Operating Instructions
Page 70
... and lens shift range 61 Projection distance formula 62, 63 R Rear panel 3 Remote commander 5 Remote control receiver 3 Removing/attaching the projection lens 47 Replacing the lamp 44 Reset 20 RS-232C terminal 4 S Screen Aspect 30 Screen menu 22 Secondary DNS 28 Security Lock 27 Selecting an input signal 5 Serial No 32...
... and lens shift range 61 Projection distance formula 62, 63 R Rear panel 3 Remote commander 5 Remote control receiver 3 Removing/attaching the projection lens 47 Replacing the lamp 44 Reset 20 RS-232C terminal 4 S Screen Aspect 30 Screen menu 22 Secondary DNS 28 Security Lock 27 Selecting an input signal 5 Serial No 32...


